
A Quick look at Solar Calcium Filters
Calcium Solar Filters are NOT all created equal. Anyone considering purchasing one would be well served to do a little research before laying down any cash. Undoubtedly, the first prerequisite in the decision making process is in determining what attributes you might expect from a Calcium filter and what your end use will be. Knowing the end use of the filter and what attributes align with your goals will go a long way toward selecting the filter that is right for you and will best meet your individual needs.
In this article I will discuss the 3 brands of Calcium Filters that I own, since I have experience with them and I’m familiar with the pros and cons of each. Each brand has it’s own unique attributes and detriments. The 3 brands are the BAADER Calcium K Line Filter, the DAYSTAR FILTERS Calcium H Line Filter and the LUNT SOLAR SYSTEMS Calcium K Line Filter.
There are some important features that each of these filters share. For example, lying in the deep violet portion of the spectrum, Calcium Filters are much more susceptible to bad seeing than H-Alpha filters.
As you can see in Illustration #1 an H-Alpha Filter on a 40mm telescope is capable of reaching ~ 4 arc second resolution.
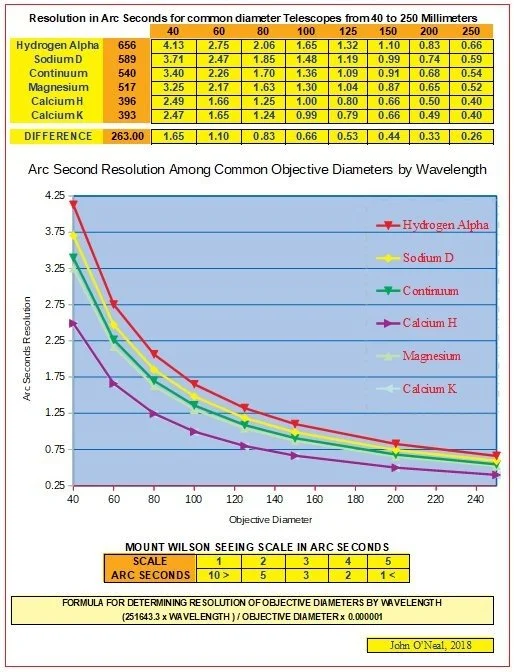
Illustration #1
The Mount Wilson Seeing chart tells us that we can resolve 4 arc seconds with a 2.5 on the
seeing scale. So, if our seeing is 3, we are very happy. Our view looks GREAT!!!
Placing a Calcium Filter on the same 40mm telescope increases our resolution from 4.13 to ~ 2.5 arc seconds. To resolve 2.5 arc seconds requires about a 3.5 on the Mount Wilson Seeing Scale. Since our seeing is only a 3, switching from H-Alpha to Calcium suddenly makes our image go from good to bad.
And as aperture increases we very quickly surpass the ability of our seeing conditions to resolve the theoretical resolution of our scopes. That’s the curse of all Calcium Filters. But it’s not a show stopper...
Having said that, we can extrapolate some truths about Calcium Filters…
• First, we can decide to only use Calcium filters on the very best SEEING days.
• Second, if we just MUST use our Calcium Filters on less than optimal days, we can stop down our aperture or use a smaller aperture telescope to mitigate and/or match the effects of seeing.
Both methods will improve our conditions and are viable approaches to optimizing our scopes to perform their very best in relation to seeing conditions. And, again, this sensitivity to seeing runs across the board among all Calcium filters. I mention it because I was really confused when I bought my first Calcium filter, and I couldn’t understand why I was experiencing excellent seeing in the H-Alpha band, yet seeing always seemed to immediately worsen when I switched to the Calcium Filter. Understanding the problem is always the first step in eliminating it.
Below, in Illustration #2, I’ve created a table to compare important features of each filter and it’s respective attributes and/or detriments.
First, lets compare the features of the LUNT and DAYSTAR Filters. Price-wise, they are about the same, and smart shoppers can wait for promotions and discounts to reduce prices even further. While both filters can be utilized photographically, the DAYSTAR Calcium H QUARK stands out because it can be used visually, as well. At ~ 397Å, it is closer to the 400Å area, where visual acuity begins to drop off.
I am 65 years old and as a result I only see an extremely faint, purple smudge in the center of the eyepiece when using the LUNT Ca-K Module at 393Å. I need to hook up a camera just to focus. In the QUARK, at 397Å, I can see a distinct disk with some surface detail. So, if you enjoy doing outreach and viewing through your Calcium Filter, the DAYSTAR QUARK has a distinct advantage.
If you ONLY want a filter to use photographically, the LUNT Module has the clear upperhand. The < 2.4Å Bandwidth gives an unparalleled photographic view with very high contrast and dynamic range.
Another advantage of the DAYSTAR is that it can be used on refractors up to 6” aperture (150mm) with only a 1.25” UV/IR filter as an ERF. The maximum recommended aperture on the LUNT Module is 4”. (100mm)
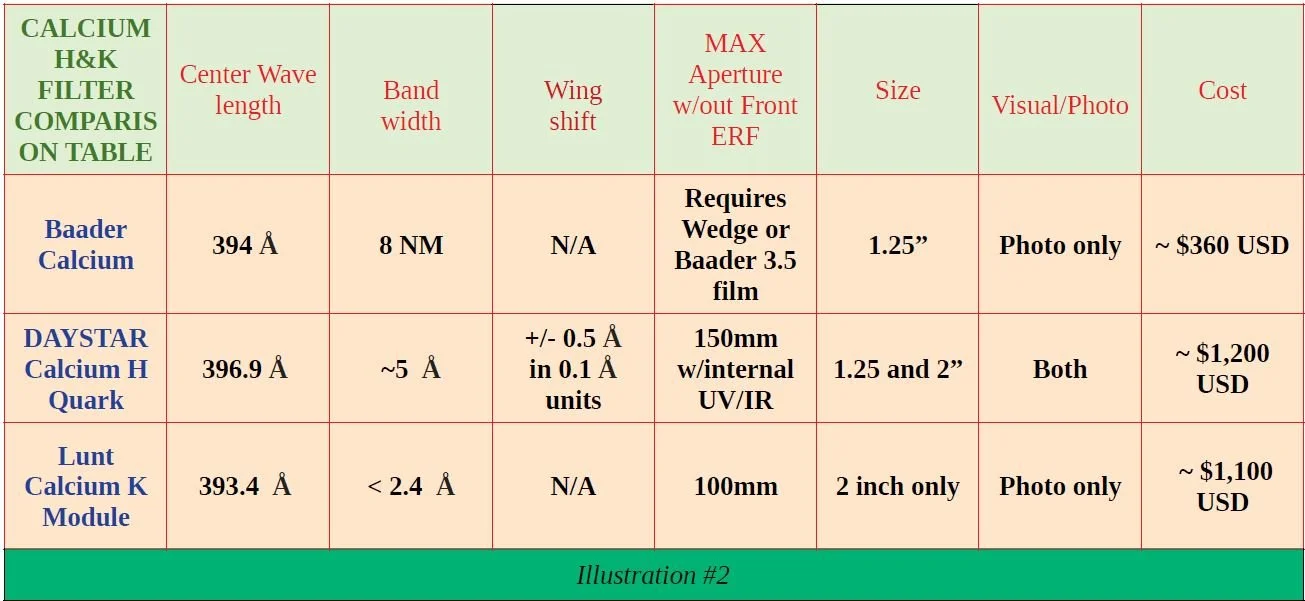
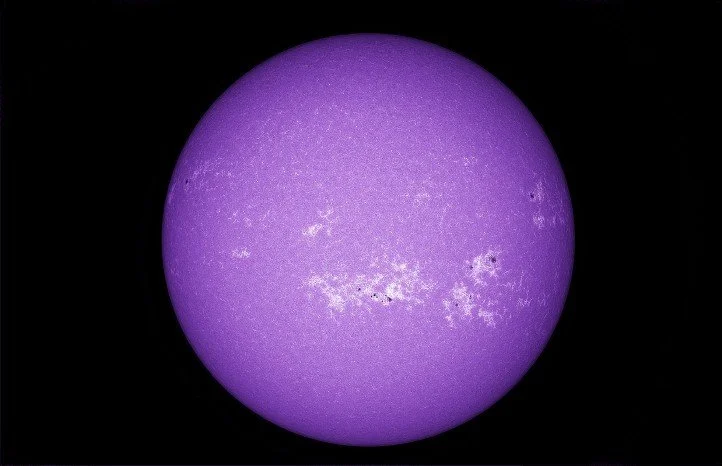
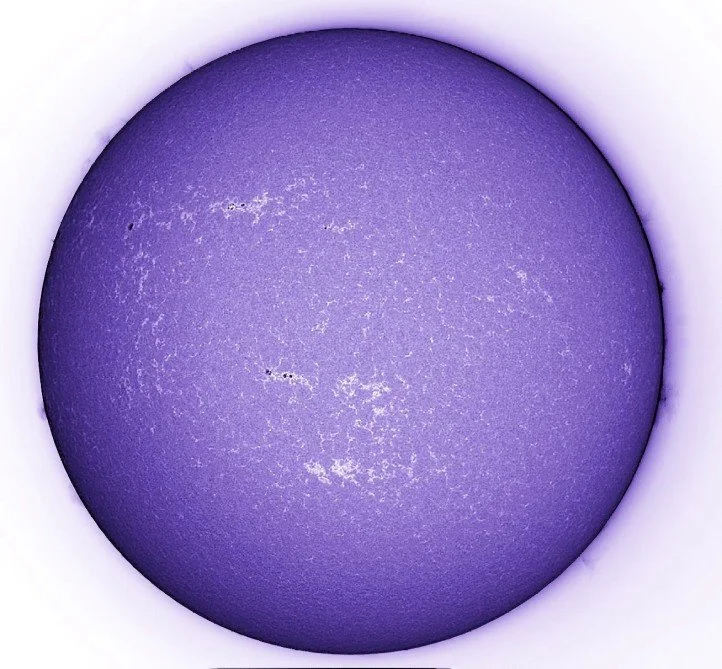
Another advantage of the DAYSTAR QUARK is that it is tune-able. It’s got a tuning range of 1Å, in 10 steps, each 0.1Å wide and plus or minus 5 steps on either side of the center frequency. It’s the only Calcium Filter that’s tune-able. With a 5Å wide bandwidth contrast is good and faint details are easily discernible. Images appear sharp and contrasty with plenty of depth and range. Prominences can be seen with this filter but are usually faint & tenuous. You can get best results by shooting a prominence layer, then a disk layer and combining them in Photoshop. The QUARK comes with a 1.25” & 2” snout included in the package and a 1.25” eyepiece holder. A 2” eyepiece holder is optional at an additional price.
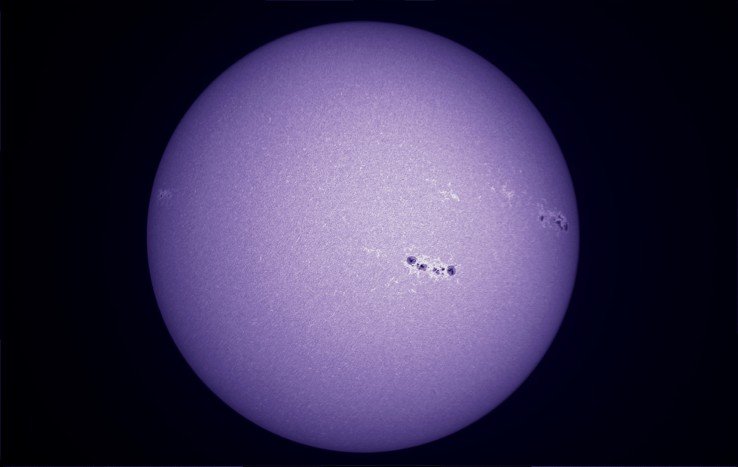
Baader Filter
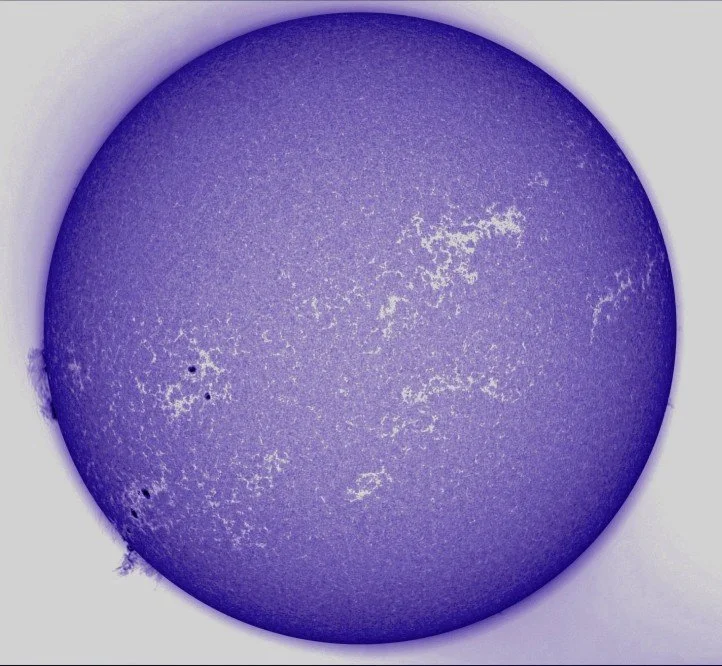
Lunt Calcium K Module
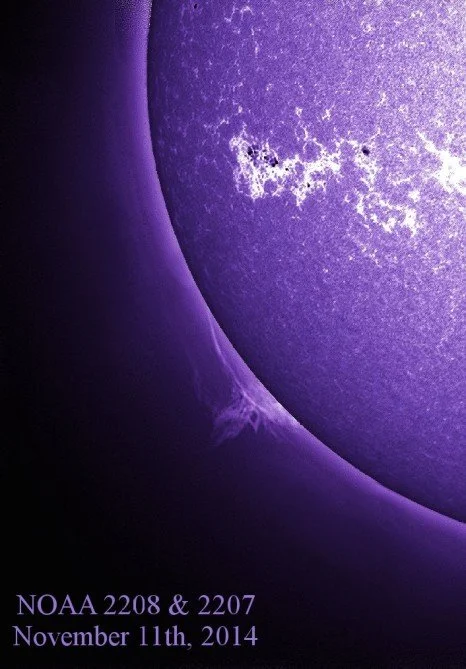
DAYSTAR Calcium H QUARK
The strength of the LUNT MODULE is it’s very narrow bandwidth. At less than 2.4Å Bandwidth, contrast is good and faint details are easily discernible. Images appear tack sharp and contrasty with plenty of depth and dynamic range. As a result of the narrow bandwidth, the LUNT MODULE shows Solar Prominences easily, although usually not as bright or clear as in H-Alpha.
LUNT Calcium K image w/Prominences
LUNT Ca K image w/Prom
DAYSTAR Calcium H image w/Prominences
The only real disadvantage with the Lunt is that it would not slip into the eyepiece holder of my Orion EON ED80. Seems there is a detente built into the eyepiece holder at about 2 inches, designed to prevent objects from falling into the scope. Since the Lunt needs to be fully inserted into the eyepiece it is not usable on the ED80. It did work great on my LUNT Engineering 102mm Refractor, though. So, before purchasing a Lunt Ca-K Filter you might want to contact your telescope manufacturer or Lunt to make certain the Module will insert fully into your your focusing tube.
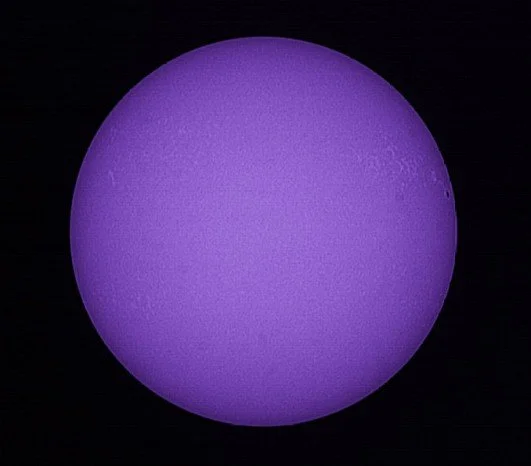
Next, let’s take a look at the Baader Calcium Filter. It’s about 33% less expensive than the other Calcium Filters. So, if price point over performance is your determining factor, then this might be the unit for you. The reason for the great price is the extremely wide bandwidth of the Baader Filter.
With an 8 Nanometer wide bandwidth, contrast is weak and many faint details are lost. Images appear washed out and flat and lack depth and range. Images in the Baader are bright and as a result the purple Sun can be seen visually but Baader recommends using the filter ONLY photographically. I’ve looked through mine momentarily. All I can see is a purple disk with soft edges that I can’t resolve, and a surface with ZERO detail.

So, after looking at the 3 Calcium Filters, I’ve come to the conclusion that if you have a limited budget and don’t do outreach with your filter, and don’t expect a lot of contrast and detail in your images, the Baader Filter might be the right choice for you… I imaged with mine quite happily until I could afford to upgrade.
If you want the ability to use your filter on any refractor up to 6” aperture and you want to do outreach and observe visually as well as photographically, then the DAYSTAR Calcium H QUARK Filter is undoubtedly the right choice for you.
It’s easy to use. Just screw a UV/IR Filter into the snout and insert the QUARK into the Eyepiece Holder, plug it in to an AC or DC Power supply and add eyepieces or cameras of your choosing and you are off to the races. See the image, left.
If so desired, you can also add a diagonal, a focal reducer, a barlow or other standard 1.25” or 2” accessories to the Ca-H QUARK.
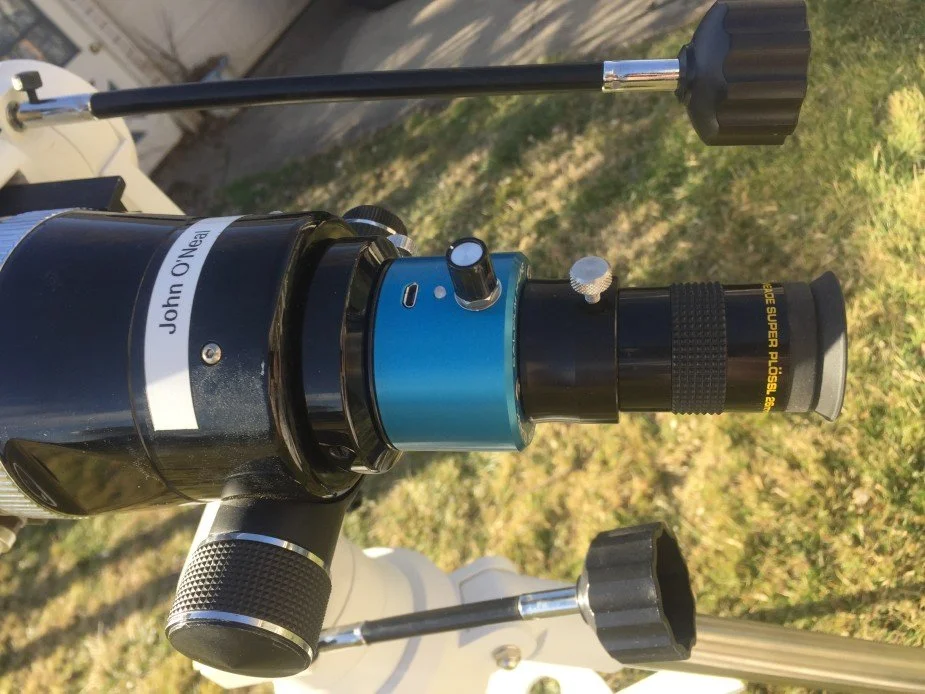
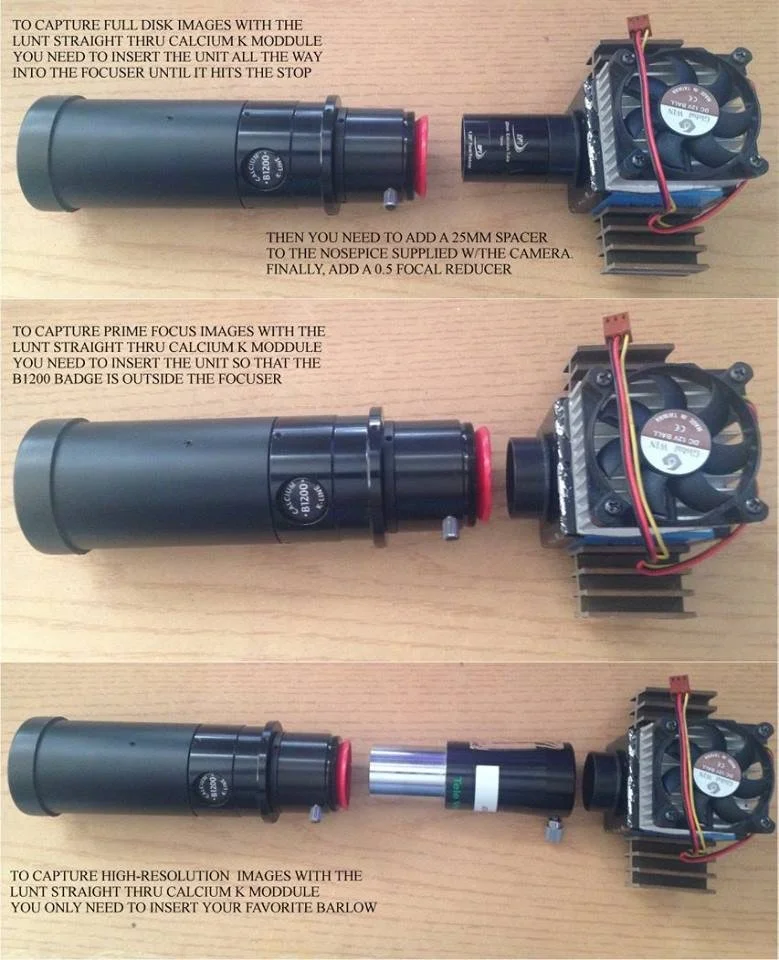
Illustration 3
If your primary use is imaging, then the LUNT Calcium K Module, with it’s <2.4Å bandpass may be the right choice for you. As a workaround for it’s lack of visual acuity, you can do outreach with the LUNT Filter if you haul around a laptop and some kind of structure to shield the screen from the glaring sunlight. Configuring the LUNT Module is not intuitive so I’ve attached a handy reference guide (Illustration 3, right) for utilizing the Module with focal reducers and Barlows.
In conclusion, I hope this guide helps you in determining your goals and what filter is best suited towards your particular needs. As always, perform due diligence and learn as much as possible about each brand of Calcium Filter before making a purchase. Peruse on-line forums, talk to friends in your local astronomy club and google the manufacturers specifications.
Your research will ultimately lead you to make an informed decision and result in your selection of the right filter for you.
John O’Neal, NC Stargazer, 2022