

Review of the ZWO ASI294MM Pro Camera and User Comparison to the ASI1600
Simon Lewis - The Greendale Observatory
Introduction
The astrophotography world always gets into a spin when a major new release comes onto the market and the internet certainly started buzzing when ZWO surprised us with news of the ASI294MM Pro, a new 4/3 format monochrome camera.
Over the past few years, it has become common to see a steady release of new One-Shot Colour Cameras (OSC) being produced but we have seen little in the way of new monochrome cameras. This is not surprising and is mostly due to the low demand on mono sensors. Most of our mono CMOS devices mostly come from the CCTV/security imaging world where high quality colour reigns and I guess monochrome is seen as old technology. So low demand and low user volumes have led to a drought on the mono sensor front.
So, like many astro photographers I was pleased and somewhat surprised to hear news of the ASI294MM Pro. The first thing that interested me was that it does not just use a mono version of the older IMX294 sensor, but is now fitted with the new IMX492 sensor, which has some interesting improvements in its specifications versus the older sensor.
But the big question for many is, would it be worth upgrading if you already own a mono camera such as the venerable ASI1600? Would there be any performance increase worthy of replacing your ASI1600, and would it integrate easily into existing systems?
In this review I will answer all those searching questions and much more and I think you will be pleasantly surprised, but let us start at the beginning, no spoilers here to ruin the show!
ZWO have been synonymous with creating high quality cameras since 2011. Since then, ZWO have taken the market by storm with a range of quality, high performance CMOS cameras for deep sky and planetary use. There will not be many in astrophotography who either do not own a ZWO product or are at least remarkably familiar with the product range.
I have been a long-time user of ZWO products and have found Sam Wen’s team to be fabulously supportive and responsive to requests for new features and new product ideas. So much so that after a visit by him to New Zealand, Sam and I struck up a dialogue on how some active imagers could help support his efforts and so I got involved with the ZWO product development team.
So, for complete transparency, I will say that I am a member of the ZWO product development team and I, along with a small number of other active astro imagers, alpha/beta test a lot of ZWO’s products to ensure they deliver the best possible product on release. A prime example of that work is the ASIAIR and the test and development work that has gone into that, with many hundreds of hours committed by the test team even before the ASIAIR software releases are put into production. I will also add that I did not get paid in dollars or in kind for this review, I and the others provide our input as we enjoy the ZWO product set and are keen to ensure they include the features that any active astro imager would want.

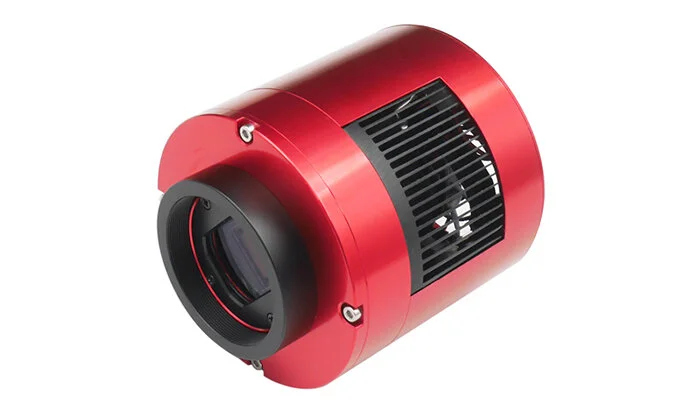
Welcome to the ASI294MM Pro
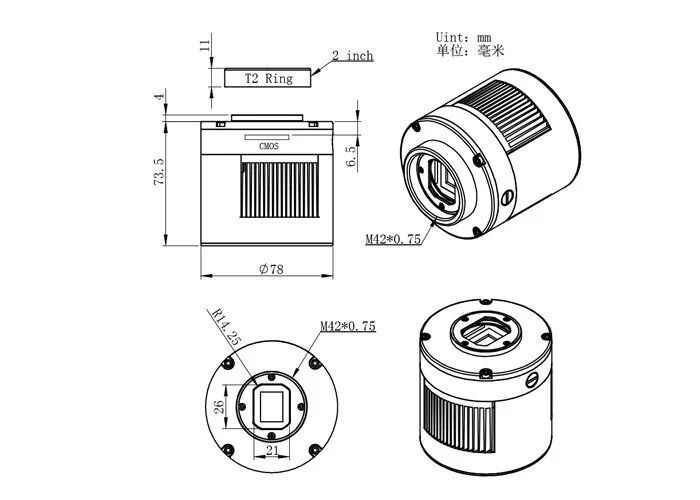
The ASI294MM Pro comes in the same popular format of housing as many of the other ASI cameras. It has the same dimensions as the ASI294MC Pro, its colour companion and so integrates easily into existing systems and fits all current components like the EFW filter wheel range.
But its under the hood where things get quite different! This camera uses a newer generation Sony IMX492 monochrome sensor and while this chip is a generation behind cameras like the ASI2600/6200 series, it is a huge leap forward since the ZWO ASI1600MM-Pro camera and its Panasonic MN34230ALJ sensor. So, what can you expect to get for money with so many generations of change in between?
The basis specifications of the IMX492 are:
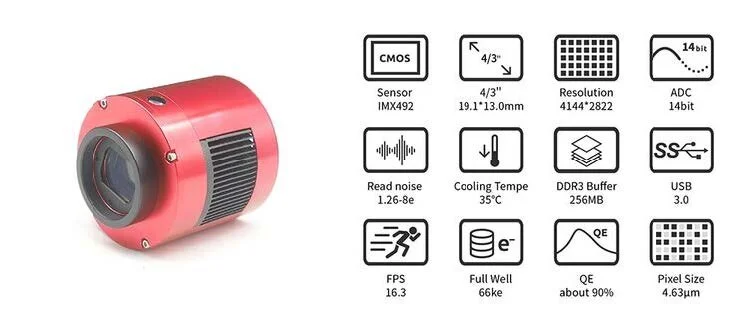
At a quick glance, the sensor size remains around the same, it is slightly larger than the ASI294MC Pro and ASI1600MM but only by a few pixels. The basic pixel size is 4.63um at a resolution of 4144 x 2822.
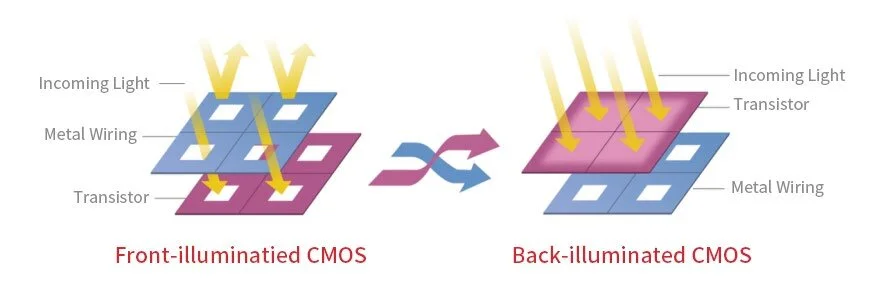
It is a one of a later generation of sensors however and one of Sony’s back illuminated devices. What does all that mean in practise? In older front illuminated sensors, the incoming light must traverse the metal wiring that forms the sensors photo diodes. This means photons are blocked by the mechanical build of the sensor whereas in back-illuminated sensors the structure has been moved to the reverse of the silicon substrate minimizing the degradation of sensitivity to optical angle response, while also increasing the amount of light that enters each pixel due to the lack of mechanical obstacles in its path.
Personally, I cannot comment on the intricacies of back versus front illumination pro’s and con’s and in theory it makes sense, but I was much more interested in the other improvements this later generation of sensor has to offer.
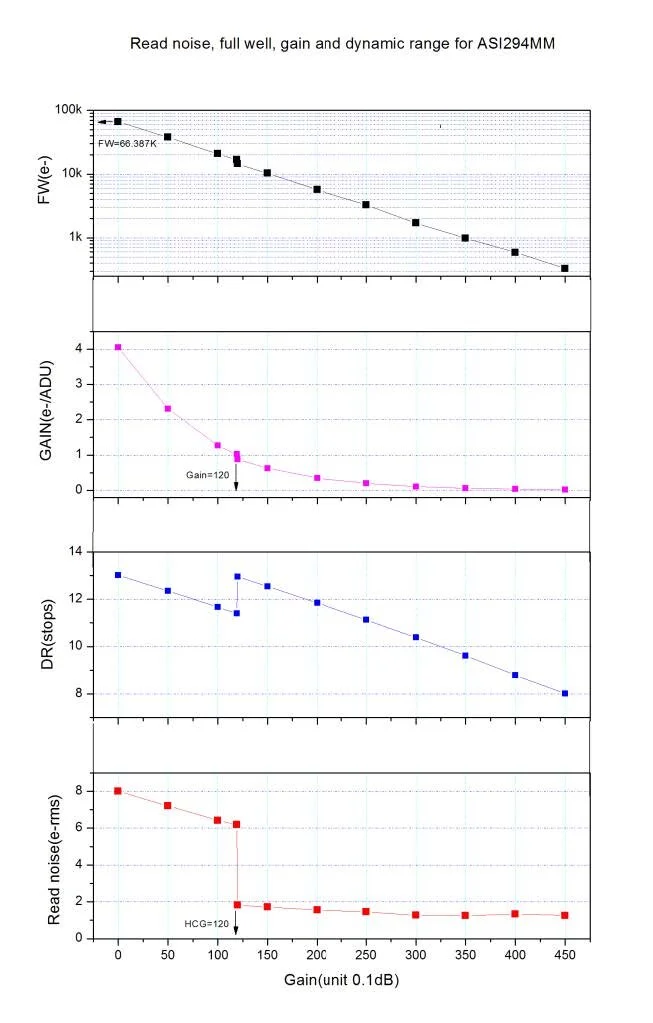
One such improvement is the new IMX492 sensor is a 14bit device, giving you greater bit depth to your images and the improvement that brings.
The ASI294MM Pro has an improved well depth too, which has increased to 66Ke. This will mean that you can run longer subs without saturation and this combined with the improvement in Quantum Efficiency (QE) to a whopping 90% means you will be converting much light to data, so more data for less sky time. This is an interesting looking sensor with these improvements.
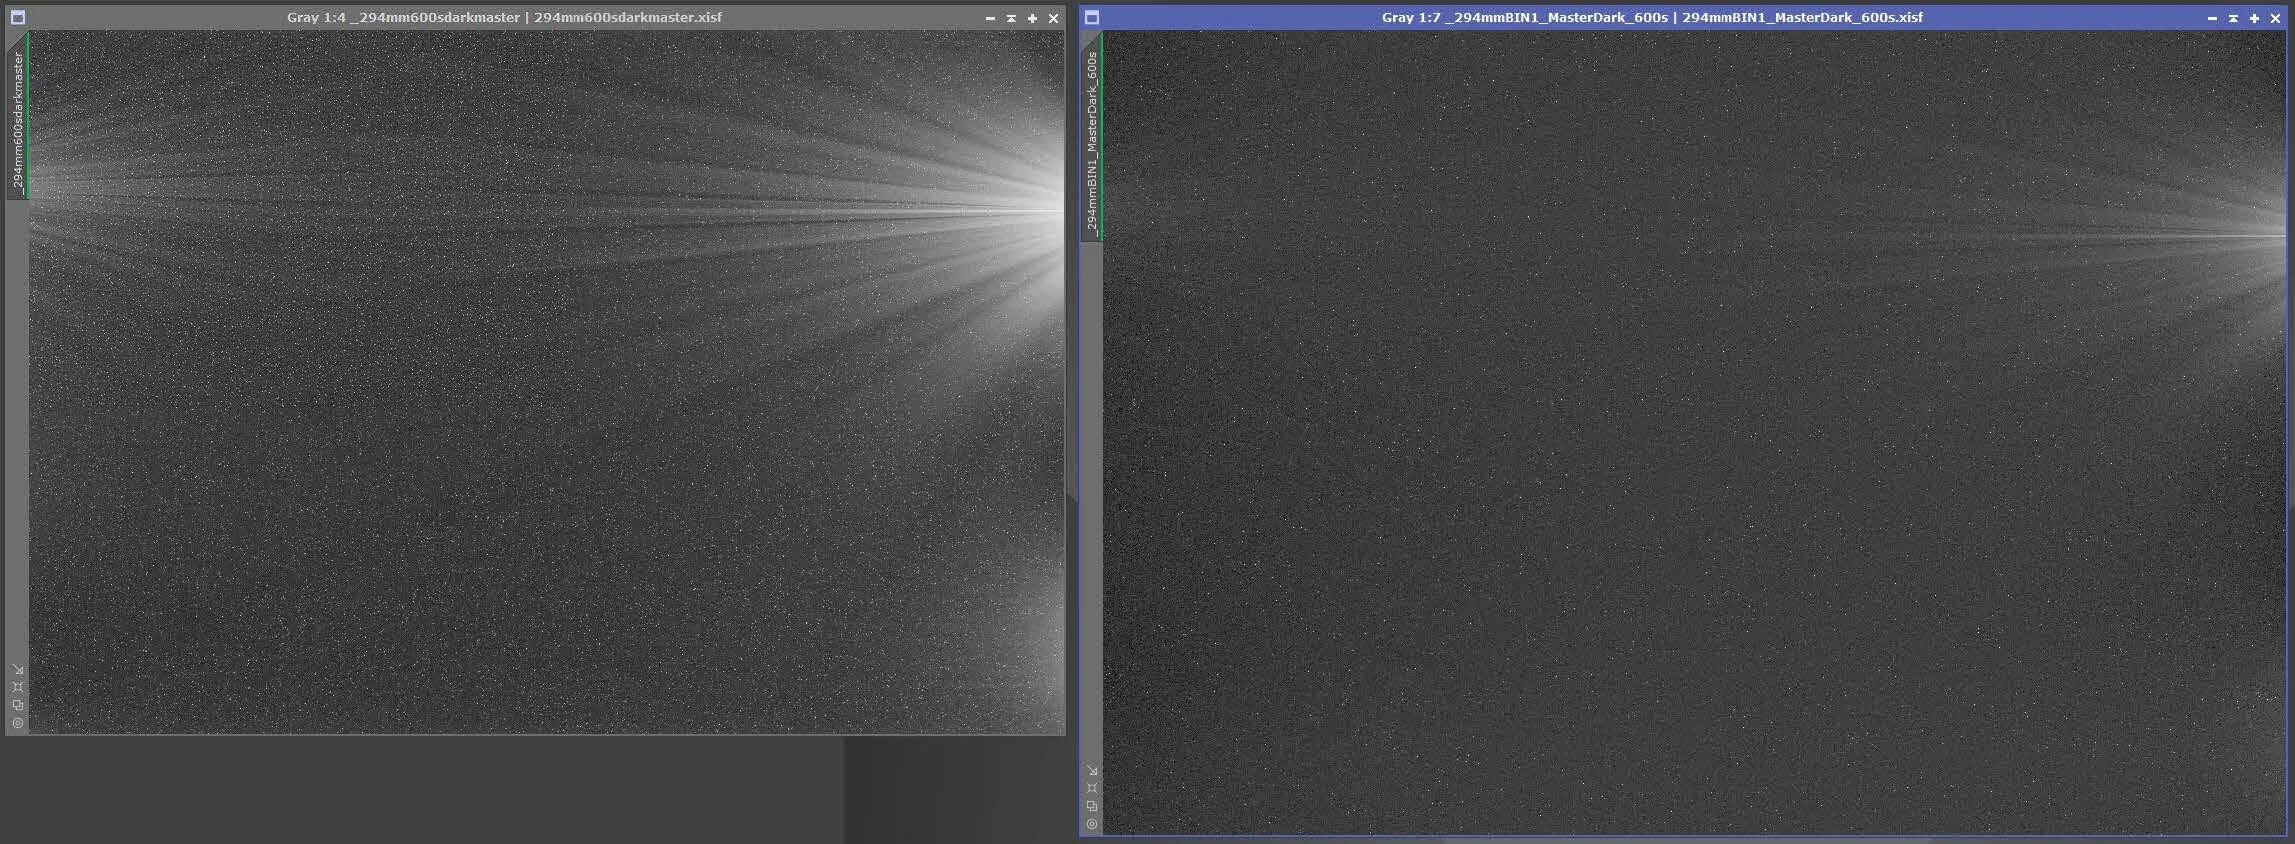
One question that is a regular on the ZWO pages is about the presence of amp glow and was the IMX492 going to be free of amp glow like some of the other ASI camera sensors?
On inspection the IMX492 darks still show some amp glow but one thing I did note is that in Bin 1 mode this seems to be greatly reduced as can be seen in the sample dark frames below.
I personally do not worry about amp glow as I always use calibration frames and as with all the ASI cameras I have tested that have amp glow, the correct use of calibration frames removes the amp glow easily.
All my images are processed using flat’s calibrated by darks that have matching gain, temperatures and exposure length.
I create and use a dark calibrated master flat for my image processing. All sub frames are never less than 3 seconds long to avoid inconsistent ADU values and I do not use bias frames.
Images are processed using a calibrated master for flats and a matching full-length master dark and the light frames. Using this technique, I have never experienced issues with poorly integrated data. This process works well on other cameras with amp glow present to like the ASI1600 and ASI294MC Pro.
ASI294MM Pro Dark Frame Amp Glow (600s masters Bin 1 right - Bin 2 left) – Gain 120 @-20c
Whilst on the subject of using calibration frames, I did notice some sensor patterning on my narrowband flats. I don’t do LRGB imaging, so I am unable to demonstrate this in LRGB flats, but others have confirmed it seems related to narrowband flats and HA/SII seems to show it more than OIII and LRGB seems to be clear from other’s examples.
ASI294MM Pro Narrowband Master Flats
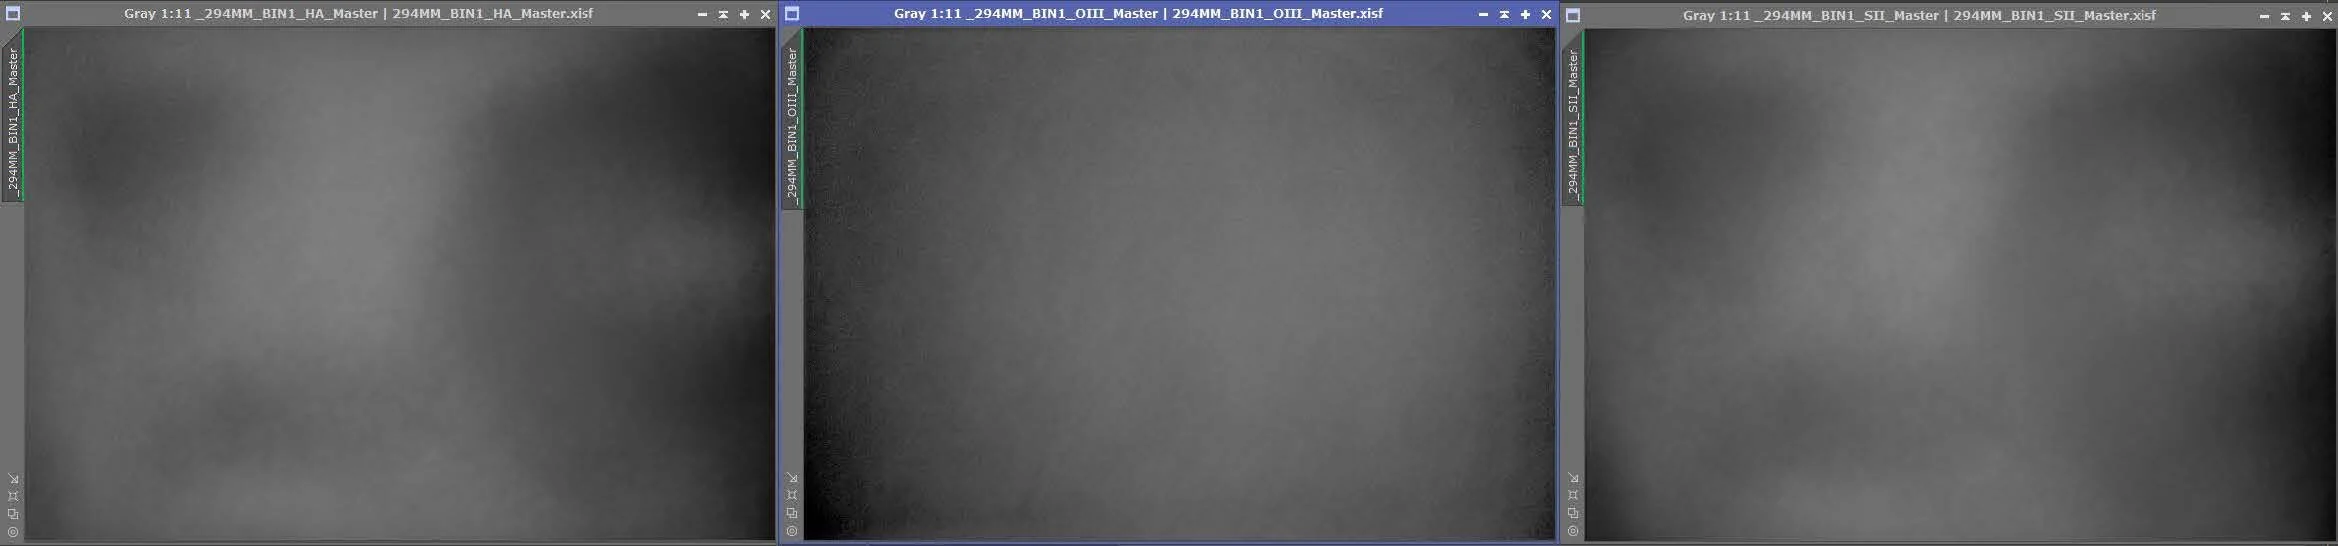
I suspect the patterns seen here are from the sensor build or the glass cover as they respond to various wavelengths in different ways, as can be seen from the master flats below. Others have mentioned they can visibly see the patterning on the sensor under some lighting conditions. I was unable to see anything on mine under inspection, but their flats showed much more pronounced pattering than mine does. Clearly its something to do with the sensor build but it does seem to be variable and certainly easy to calibrate out. Raw subs do not show any patterning.
Again, this patterning is a subject that seems to get some users frothing at the mouth faster than a werewolf under a full moon and like before I have never had an issue with the calibration frames failing to remove these kinds of patterning if processed right.
I have even tested ‘faulty’ cameras sent back to ZWO where I was able to successfully calibrate such ‘faults’ out completely. My experience is that it is very much about how processing techniques are applied to the data.
Make sure you do not take short cuts. Match gains, temperatures and exposures as close as you can and make sure you have the right settings in your processing software, and all will be well with the world!
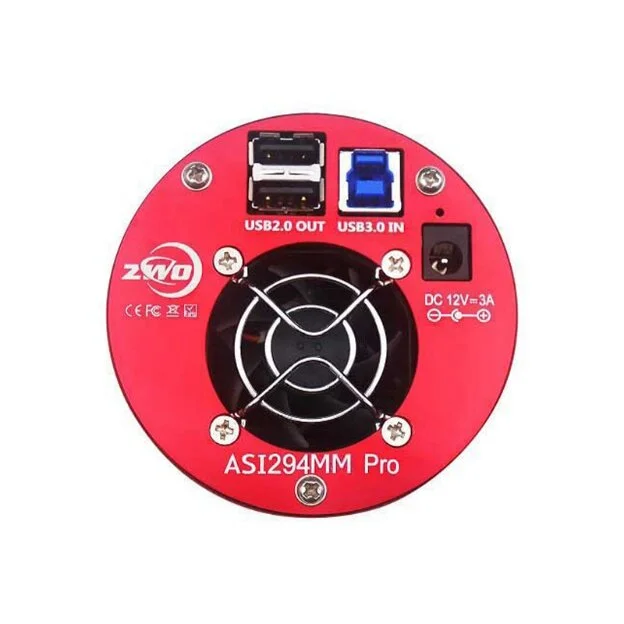
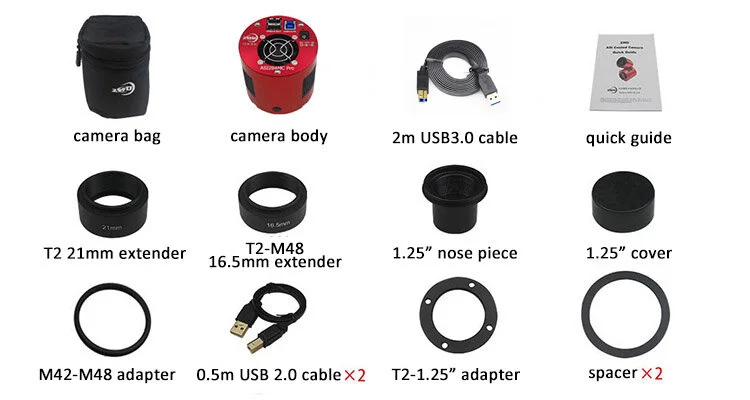
The remainder of the camera is a typical ASI camera, it comes with all the adapters and cables in the box ready for any 55mm back focus application. It fits the current EFW filter wheels and so I matched the test one to my 1.25”/31mm version for these tests and if you have any an existing camera using this format you would be able to do the same.
ASI294MM Pro - What’s in the Box?
ASI294MM vs ASI1600
One of the big questions I see being asked will be is it worth upgrading if I have an ASI1600?
Well, the big sell for the ASI294MM Pro will be of course be the newer sensor with its improved well depth, 14bit sensor and 90% QE and slightly larger pixels but what does that mean in reality?
The resolution is slightly lower than the ASI1600 by a touch, but mainly due to the increase in pixel size, but larger pixels do typically offer improved light gathering capability and will certainly provide a better pixel scale if you have a longer focal lengths, which will help keep those images sharp during moderate seeing conditions too.
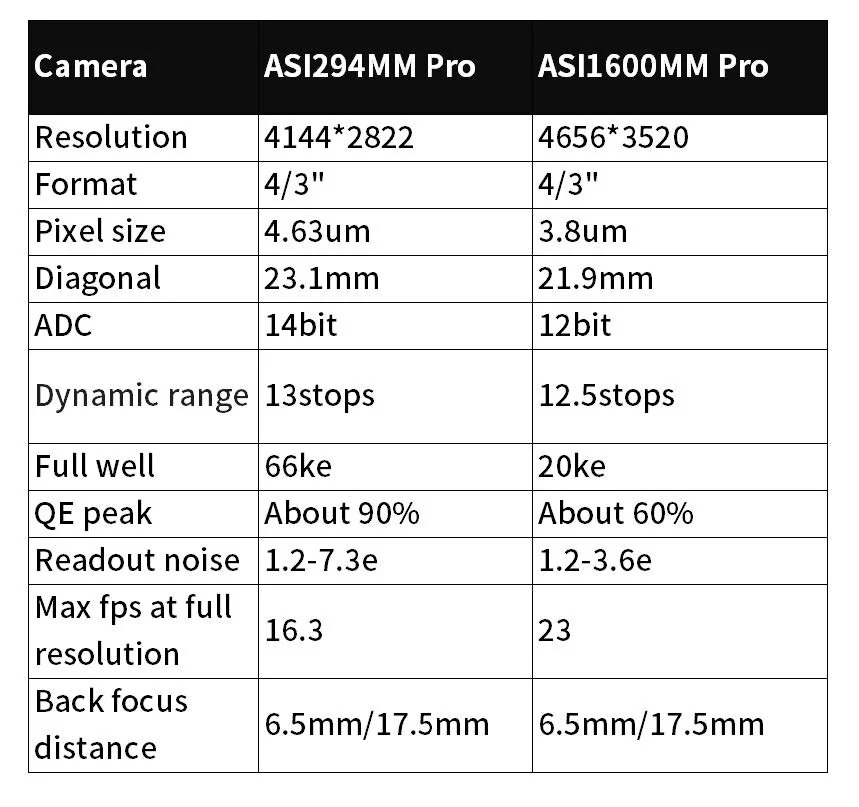
The full well capacity has increased to 66ke from 20ke on the ASI1600 and that means you can run longer subs without saturation.
The QE of 90% compared to the ASI1600’s 60% means that in a single image, you’ll convert 90% of the total light that comes across the sensor into meaningful data, where on the ASI1600 you would only capture 60%. So, given the same integration time on an object, the ASI294MM Pro will gather 30% more light than the ASI1600.
The 14bit ADC is also going to give you two more stops of bit-depth compared to the ASI1600. This will improve image depth and contrast but probably not as dramatic an improvement as the full well and QE changes mentioned above.
All well and good but what does that equate to in real life imaging?
On one of my first imaging runs I started to run my normal 8 hours per channel on the Vela Supernova Remnant, a large and expansive SNR here in our southern skies.
Unfortunately, our summer imaging is fickle at best and I was clouded out with only five hours in the can. While waiting for another clear night I got impatient and decided to integrate what I had and was shocked by the results! I had already gathered a great looking image in a very much shorter time, and I decided to continue with five-hour sessions from then on.

So, in real world imaging terms, I was able to gather a better-looking image in a five-hour session than I would have over eight hours with the ASI1600.
That 30% improvement in QE means that I can now complete a narrowband HOO target in one-night vs two with the ASI1600 and an SHO target in two nights vs three. That is a huge saving for me and one that I really appreciate during our truly short summer nights here in New Zealand. That also means my winter imaging will be much more productive and I am looking forward to some longer sessions in winter where I can image 10-12 hours a night if I wish on one target.
On that basis alone I would say a big resounding yes to the question of is it worth upgrading, but things were about to take an interesting turn during my initial tests which make the ASI294MM Pro a hugely beneficial camera to own.
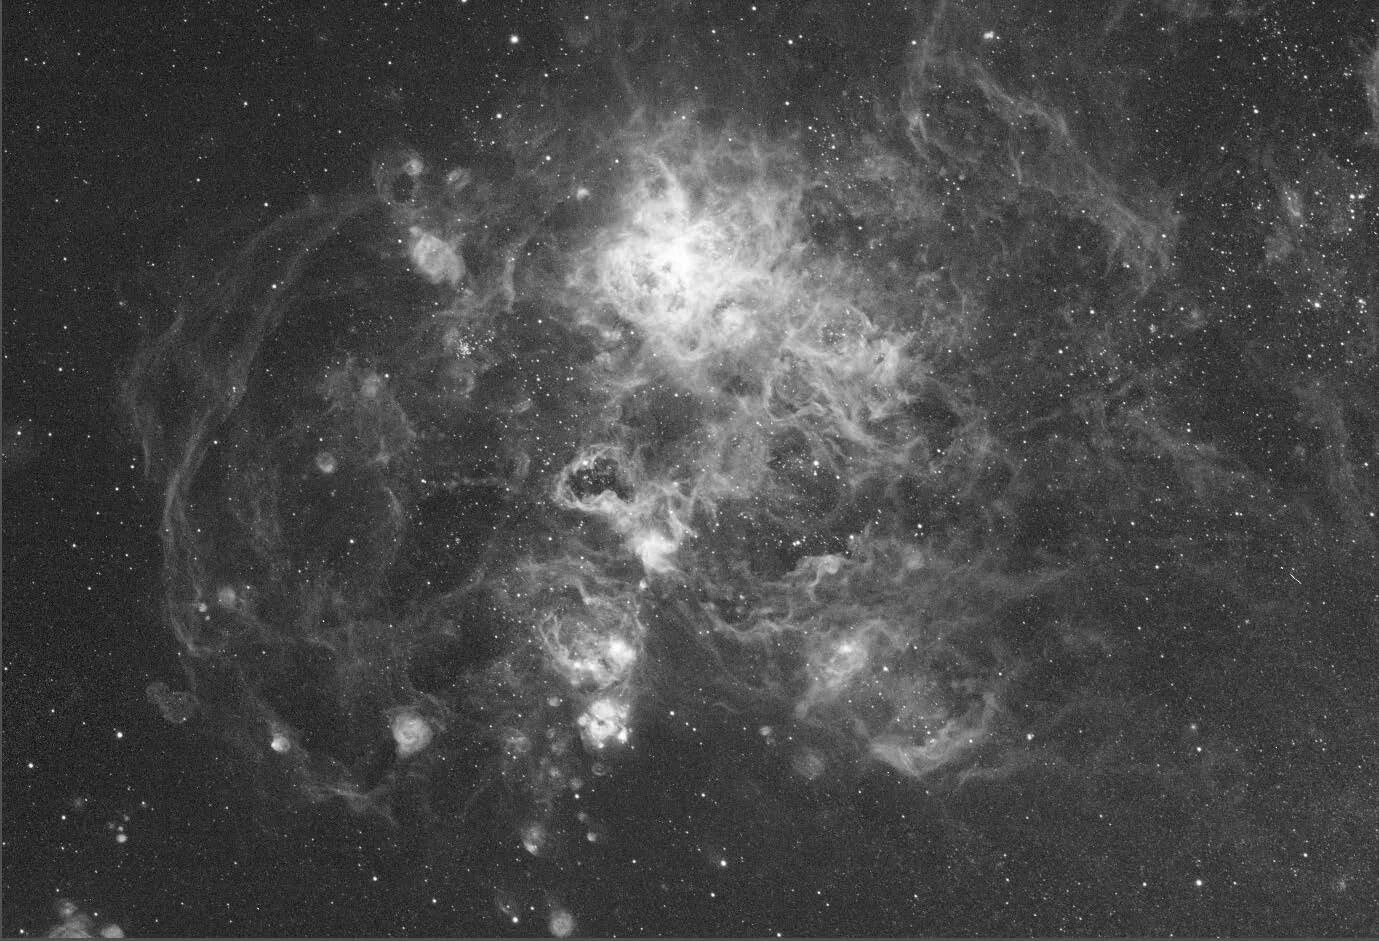
Askar FRA400 + ASI294MM Pro 600s Sub Example NGC2070 (Bin 1 Mode)

Sensor Bin 1 Unlocking
During testing I did some further investigation of the IMX492 sensor and noticed the data sheet was referring to a read-out mode of 2x2 pixels to achieve its 11mpx resolution. But could the ASI294MM Pro use Bin 1 and improve its resolution?
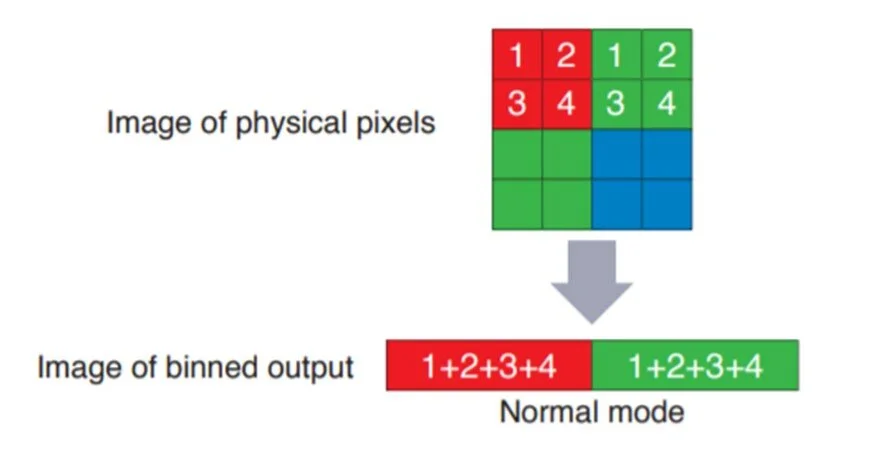
After some long discussion with Sam Wen at ZWO he kindly said he would investigate and consider it and I continued my tests using the 11mpx resolution. During this time, I saw information from QHY they were considering the same and so was pleasantly surprised when Sam quickly announced that they had indeed implemented Bin 1 and opened the resolution to a whopping 47mpx size of 8488 x 5644.
This improved resolution is easy to access using the latest drivers on the ZWO page and needs no configuration changes or firmware updates. To access the full 47mpx size you simply choose Bin 1 mode in your capture software and if you want the original 11mpx resolution you choose Bin 2 – its as simple as that!
So now the camera will give you a 47mpx resolution using its native 2.3um pixel size, which is fabulous if you use small, short focal length refractors, as this really improves the pixel scale and vastly improves the quality of your images by reducing under sampling.
There are some small downsides to this change however in that the bit depth is reduced to 12bits but, I have not found this to be any issue, but it is something to consider.
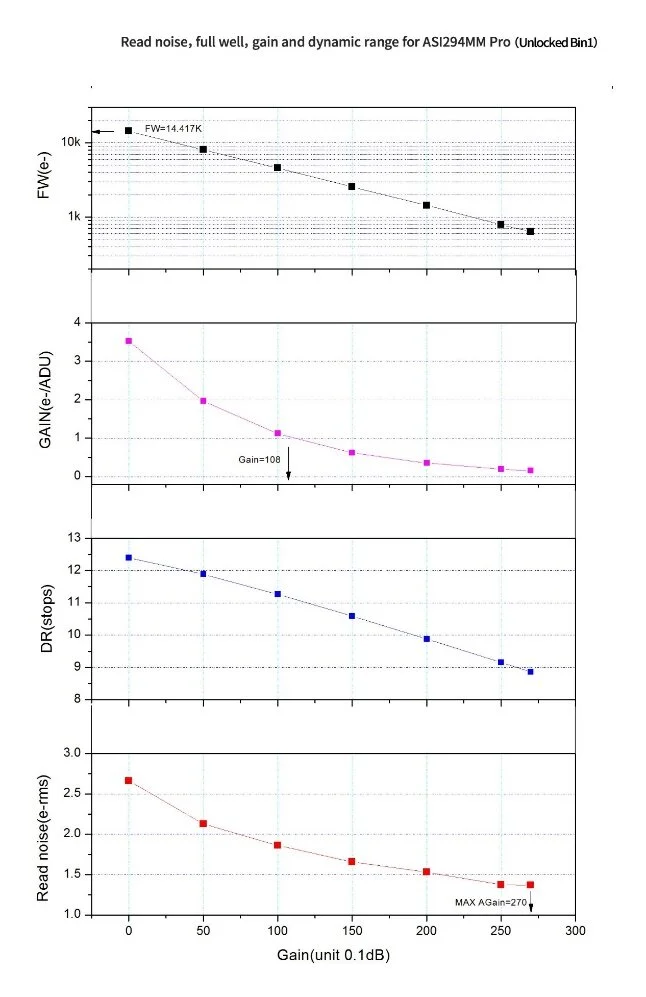
The full well depth is also greatly reduced so this is a mode where brighter objects will need lower exposure times.
Another item to note is that the High Conversion Gain (HCG) mode that normally kicks in at gain 120 is enabled all the time in Bin 1 and so you can choose what gain you like – I remained at gain 120 as well for ease during testing.
So, despite some small downsides, what Bin 1 mode does give you is the ability to open the camera to a range of new possible uses, in that you can use this camera in Bin 1 on your wide field refractor on one night and then move it to a longer focal length scope on another night and use Bin 2 to match the scopes focal length to give you a better pixel scale, or, on good seeing you can drop it to Bin 1 and go whole hog!
It’s like having two cameras in one and really makes the ASI294MM Pro very flexible.
Proof of the pudding is in the eating – time to eat!
My first tests were made using my Esprit 100 and the ASI294MM Pro in its Bin 2 mode which was what was available on the first release camera drivers at the time I started doing my tests.
This setup gives me a pixel scale of 1.74”/px which is generally ok for my skies. This first evening however was a shocker and it really turned into a terrible evening with high cloud and then the fog descended, but it really my only opportunity for weeks so we had to roll with it in what has been a terrible winter of imaging.
The resulting final image comprises only 20 x 600s subs per channel in HOO and was all I could muster in between the cloud banks and fog. This represents only 6.5 hours of data which given the resulting image, is quite impressive.
Esprit 100 + ASI294MM Pro FOV/Pixel Scale
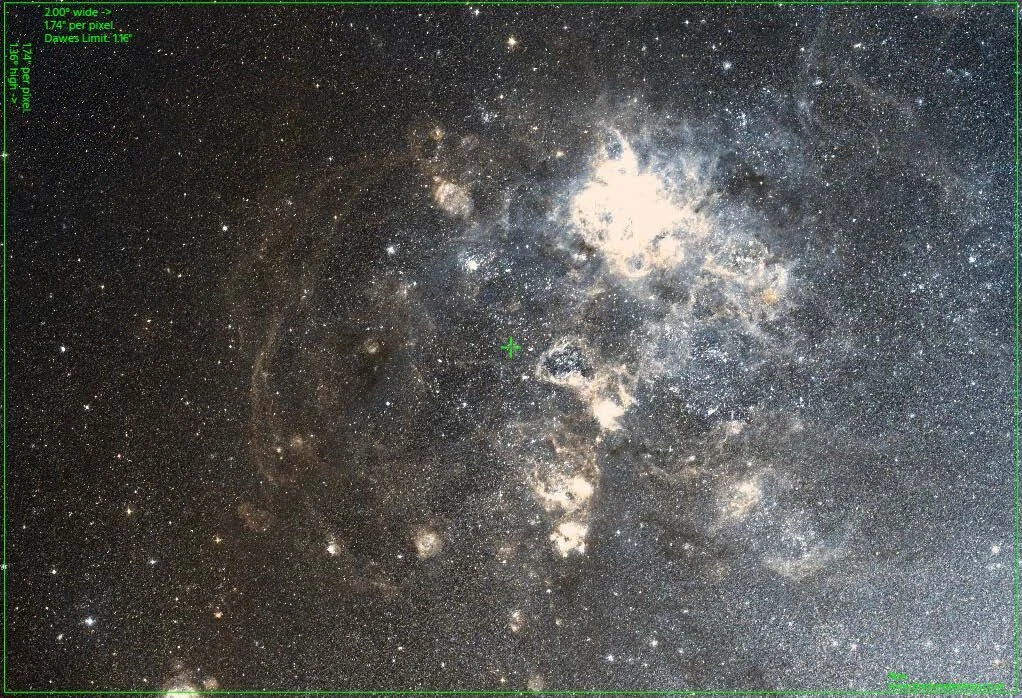
Esprit 100 + ASI294MM Pro 600s Sub Example (4K x 2K Bin 2 mode)
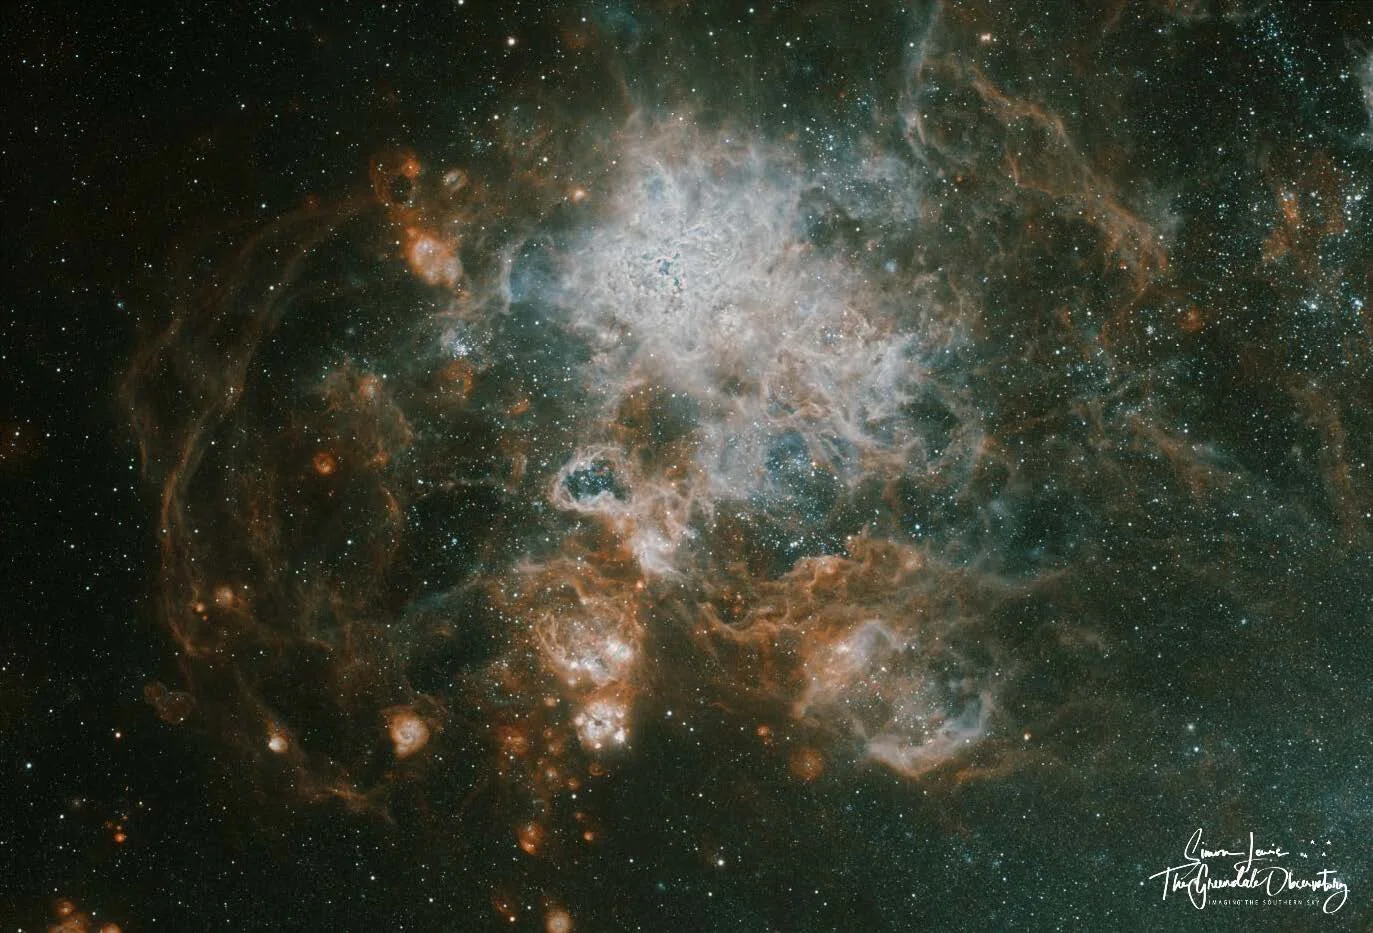
Esprit 100 + ASI294MM Pro Final Test Image on NGC2070 (4K x 2K Bin 2 mode)
For my next tests I swapped the camera onto the superb Askar FRA400 and focal reducer. This has quickly become my “go to” wide field rig these days due to the pin sharp optics of the FRA400 and the beautiful flat field offered by the matching focal reducer.
This setup combined with the ASI294MM Pro’s new Bin 1 mode would be a great test of the new 47mpx resolution and I was not to be disappointed.
Checking the field of view and pixel scales, the new Bin 1 mode reduces the under sampling on this wide field rig from 3.4”/px down to a very acceptable 1.69”/px.
One thing to note is that spreading the light over a much higher resolution in theory leads to longer integration times but how would this play out with the ASI294MM’s higher QE?
Askar FRA400+Matching FRA Focal Reducer+ASI294MM Pro FOV/Pixel Scale in Bin 1 mode
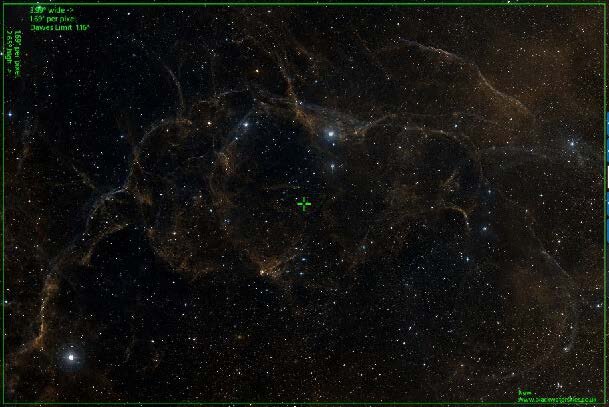
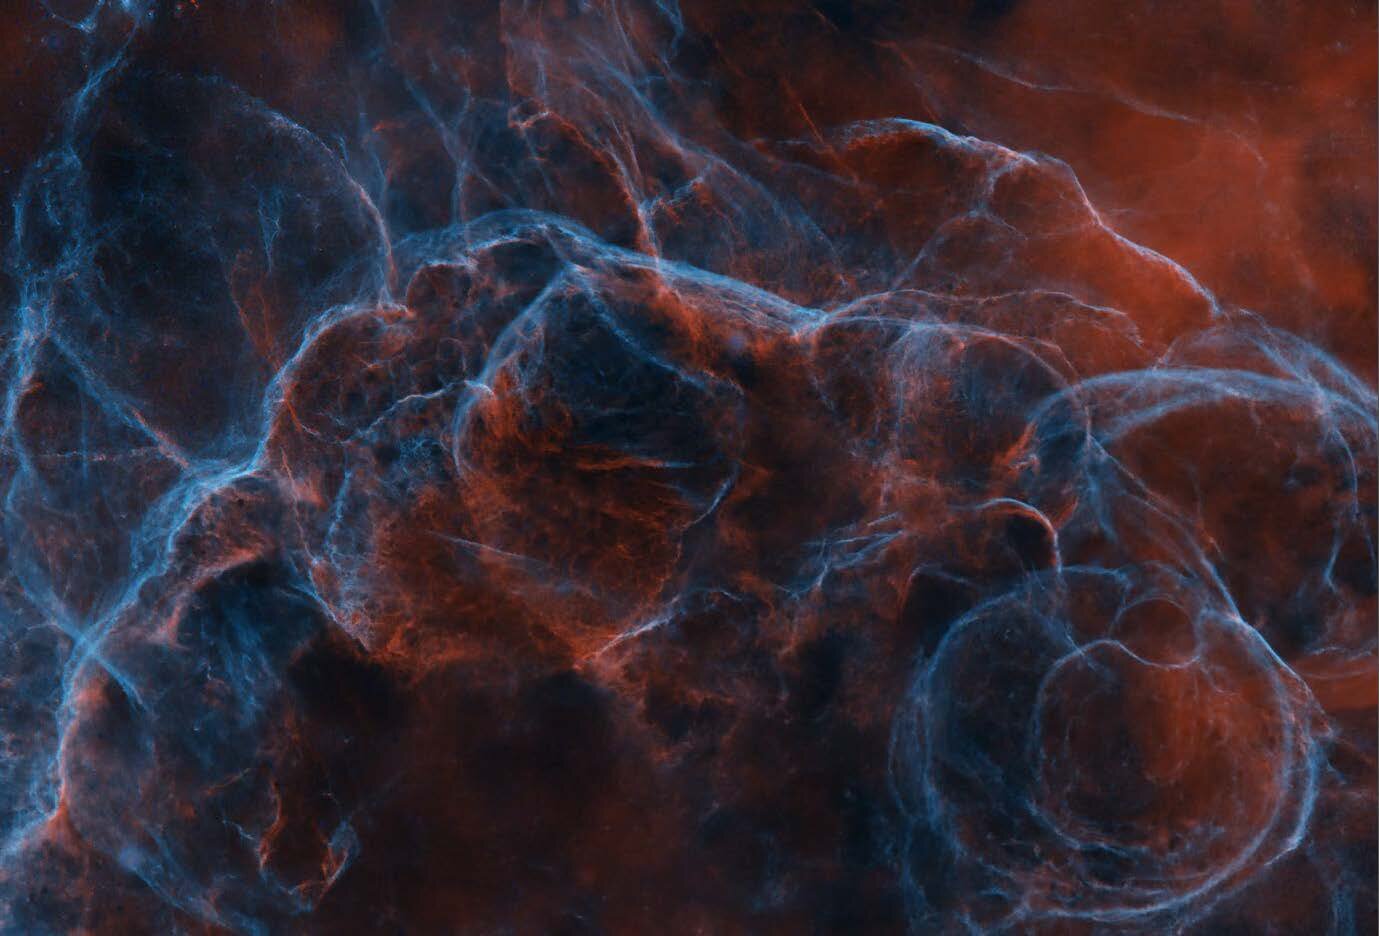
My first subs were astounding – a single 600s sub revealing the delicate filaments of the Vela SNR in a beautifully framed wide field view with superb star sharps to the corners. Zooming in reveals a good sample with round stars. No blocky under sampled stars here and the fine details of this target are beautifully revealed by the large 47mpx resolution of the 294MM Pro’s Bin 1 mode.
My initial worries about the longer exposure times were also unfounded, probably due to the fast nature of the Askar FRA400 and focal reducer, which has a speedy f/3.6 ratio, combined with my 31mm x 3nm Chromas showed this to be an outstanding combination even in Bin 1.
This setup is truly a joy to use and the data is clean, well formed and easy to process. I’m sold on the ASI294MM Pro in Bin 1 mode just for this scope alone!
I captured 30 x 600s frames per channel over 2 nights due to our noticeably short summer nights here in New Zealand and combined these into the normal red/blue HOO images seen on this type of subject. This integrates a total of 10 hours data over 2 channels.
I can honestly say the results are some of the best data I have captured, and this was during our summer where humidity can be high and relatively poor seeing.
Askar FRA400+Matching FRA Focal Reducer+ASI294MM Pro Bin 1 – Sample 600s Sub OIII
Zoomed Bin 1 mode sub OIII

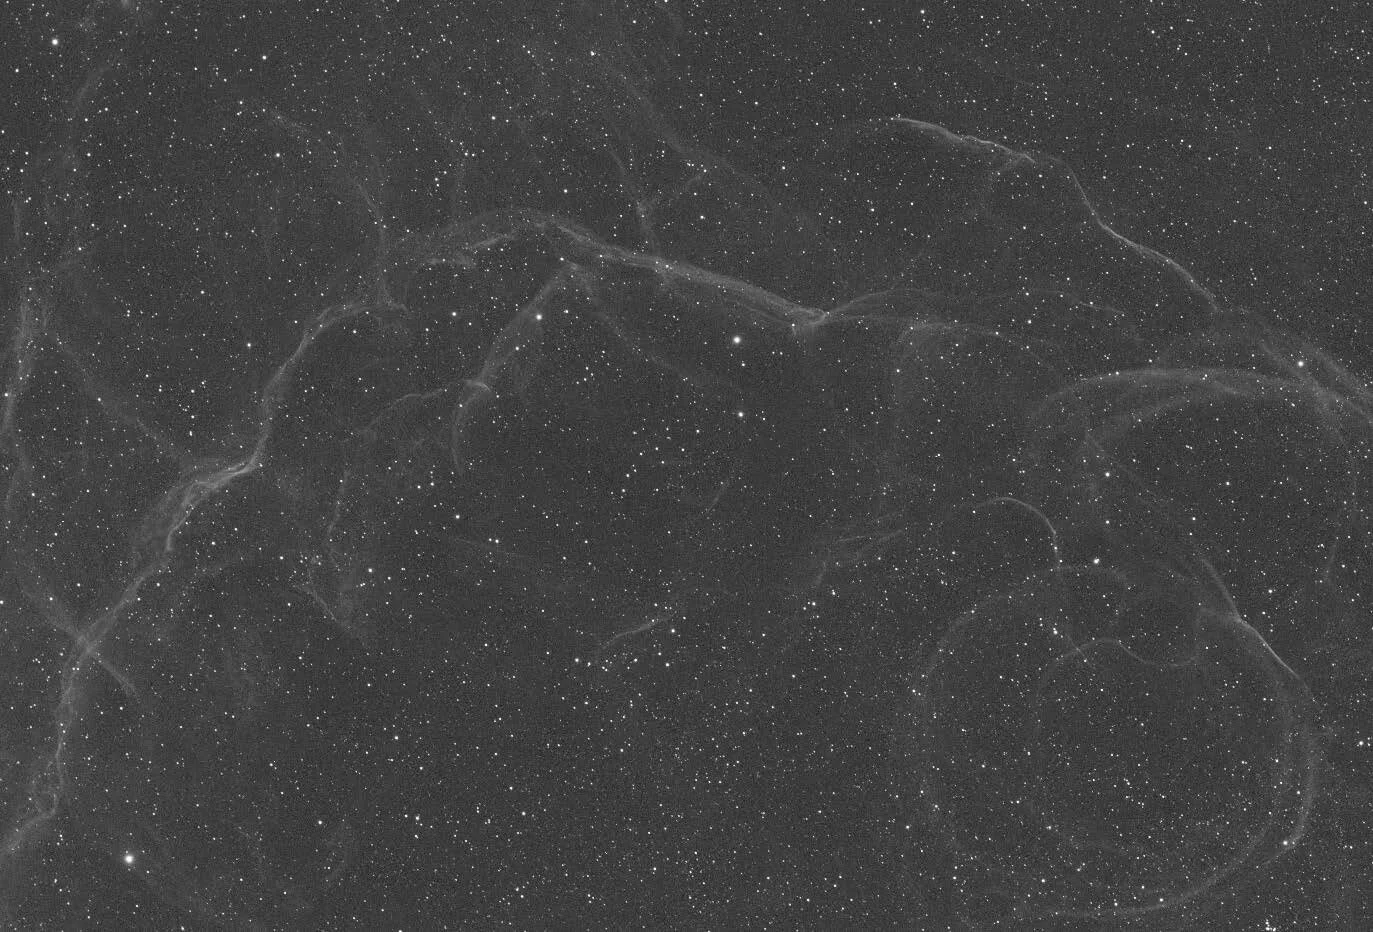
Vela SNR in HOO – Askar FRA400+FR+ASI294MM Pro Bin 1

Conclusion
I started this review by looking at what things this new camera with its new IMX492 sensor could offer and coming from a particular viewpoint of someone who may already own the ASI1600 and might be thinking of upgrading but wondering if it was really an upgrade worthwhile doing.
I think after my tests with the ASI294MM Pro I can say a resounding yes to all the questions I posed earlier, but some of that depends on how you intend to use the ASI294MM Pro.
The new IMX492 sensor has much to offer even if it is not the latest generation of sensor. It still is a modern sensor and far ahead of its older Panasonic cousin with all the added benefits.
That is not to say the ASI1600 is no longer viable or relevant. Far from it! The ASI1600 has turned in a heap of award-winning images worldwide and if you were not able to upgrade, or found a good price on a second-hand camera, then the ASI1600 is still a very worthy camera to own. I still own and use mine and it is still turning out some great images and it should not be a camera you dismiss just yet!
If, on the other hand, you were looking to upgrade, the ASI294MM Pro is very worthy of consideration. The improved sensor specifications like the 90% QE, 66Ke well depth and increased bit depth are most definitely worth considering as they do reduce the amount of sky time needed for targets and the larger pixel size would also help with longer focal lengths telescopes.
Vela SNR in HOO(Starless) – Askar FRA400+FR+ASI294MM Pro Bin 1
If you own both short focal length refractors and something longer as well like a Newtonian or Schmidt Cassegrain, then this is the camera for you. The ability to flick between 11mpx and 47mpx mode is very flexible and the new 47mpx Bin 1 mode is simply great for wide field rigs and with the improved specs above, I found it a great match.
Coupled with a fast scope like the Askar FRA400 this really is an amazing setup. But it does need some thought as this 47mpx mode is a doubled edged sword as there are some downsides to it, but in real life use the Bin 1 mode is amazing and you get that high resolution mode found in Full Frame cameras but without the issues of having to deal with full frame flatteners or reducers. It is a comprise like all things, but I certainly found it an OK compromise!
Finally
In short, I found a lot to like about the ASI294MM Pro. The improved sensor performance really makes this a sensitive camera and combined with the flexibility of the Bin 1 mode resolution it can make a very versatile camera for your narrowband/LRGB imaging setup.
The simple access to this mode via the ASCOM drivers and the compatibility with existing ZWO accessories, such as filter wheels, makes it an easy upgrade path.
So, if you are looking to upgrade or are looking to start out in monochrome imaging then the ASI294MM Pro is definitely worth looking at.
Further Reading