
Solar eclipse of October 25, 2022
Here is a selection of amazing images of the Solar eclipse of October 25, 2022
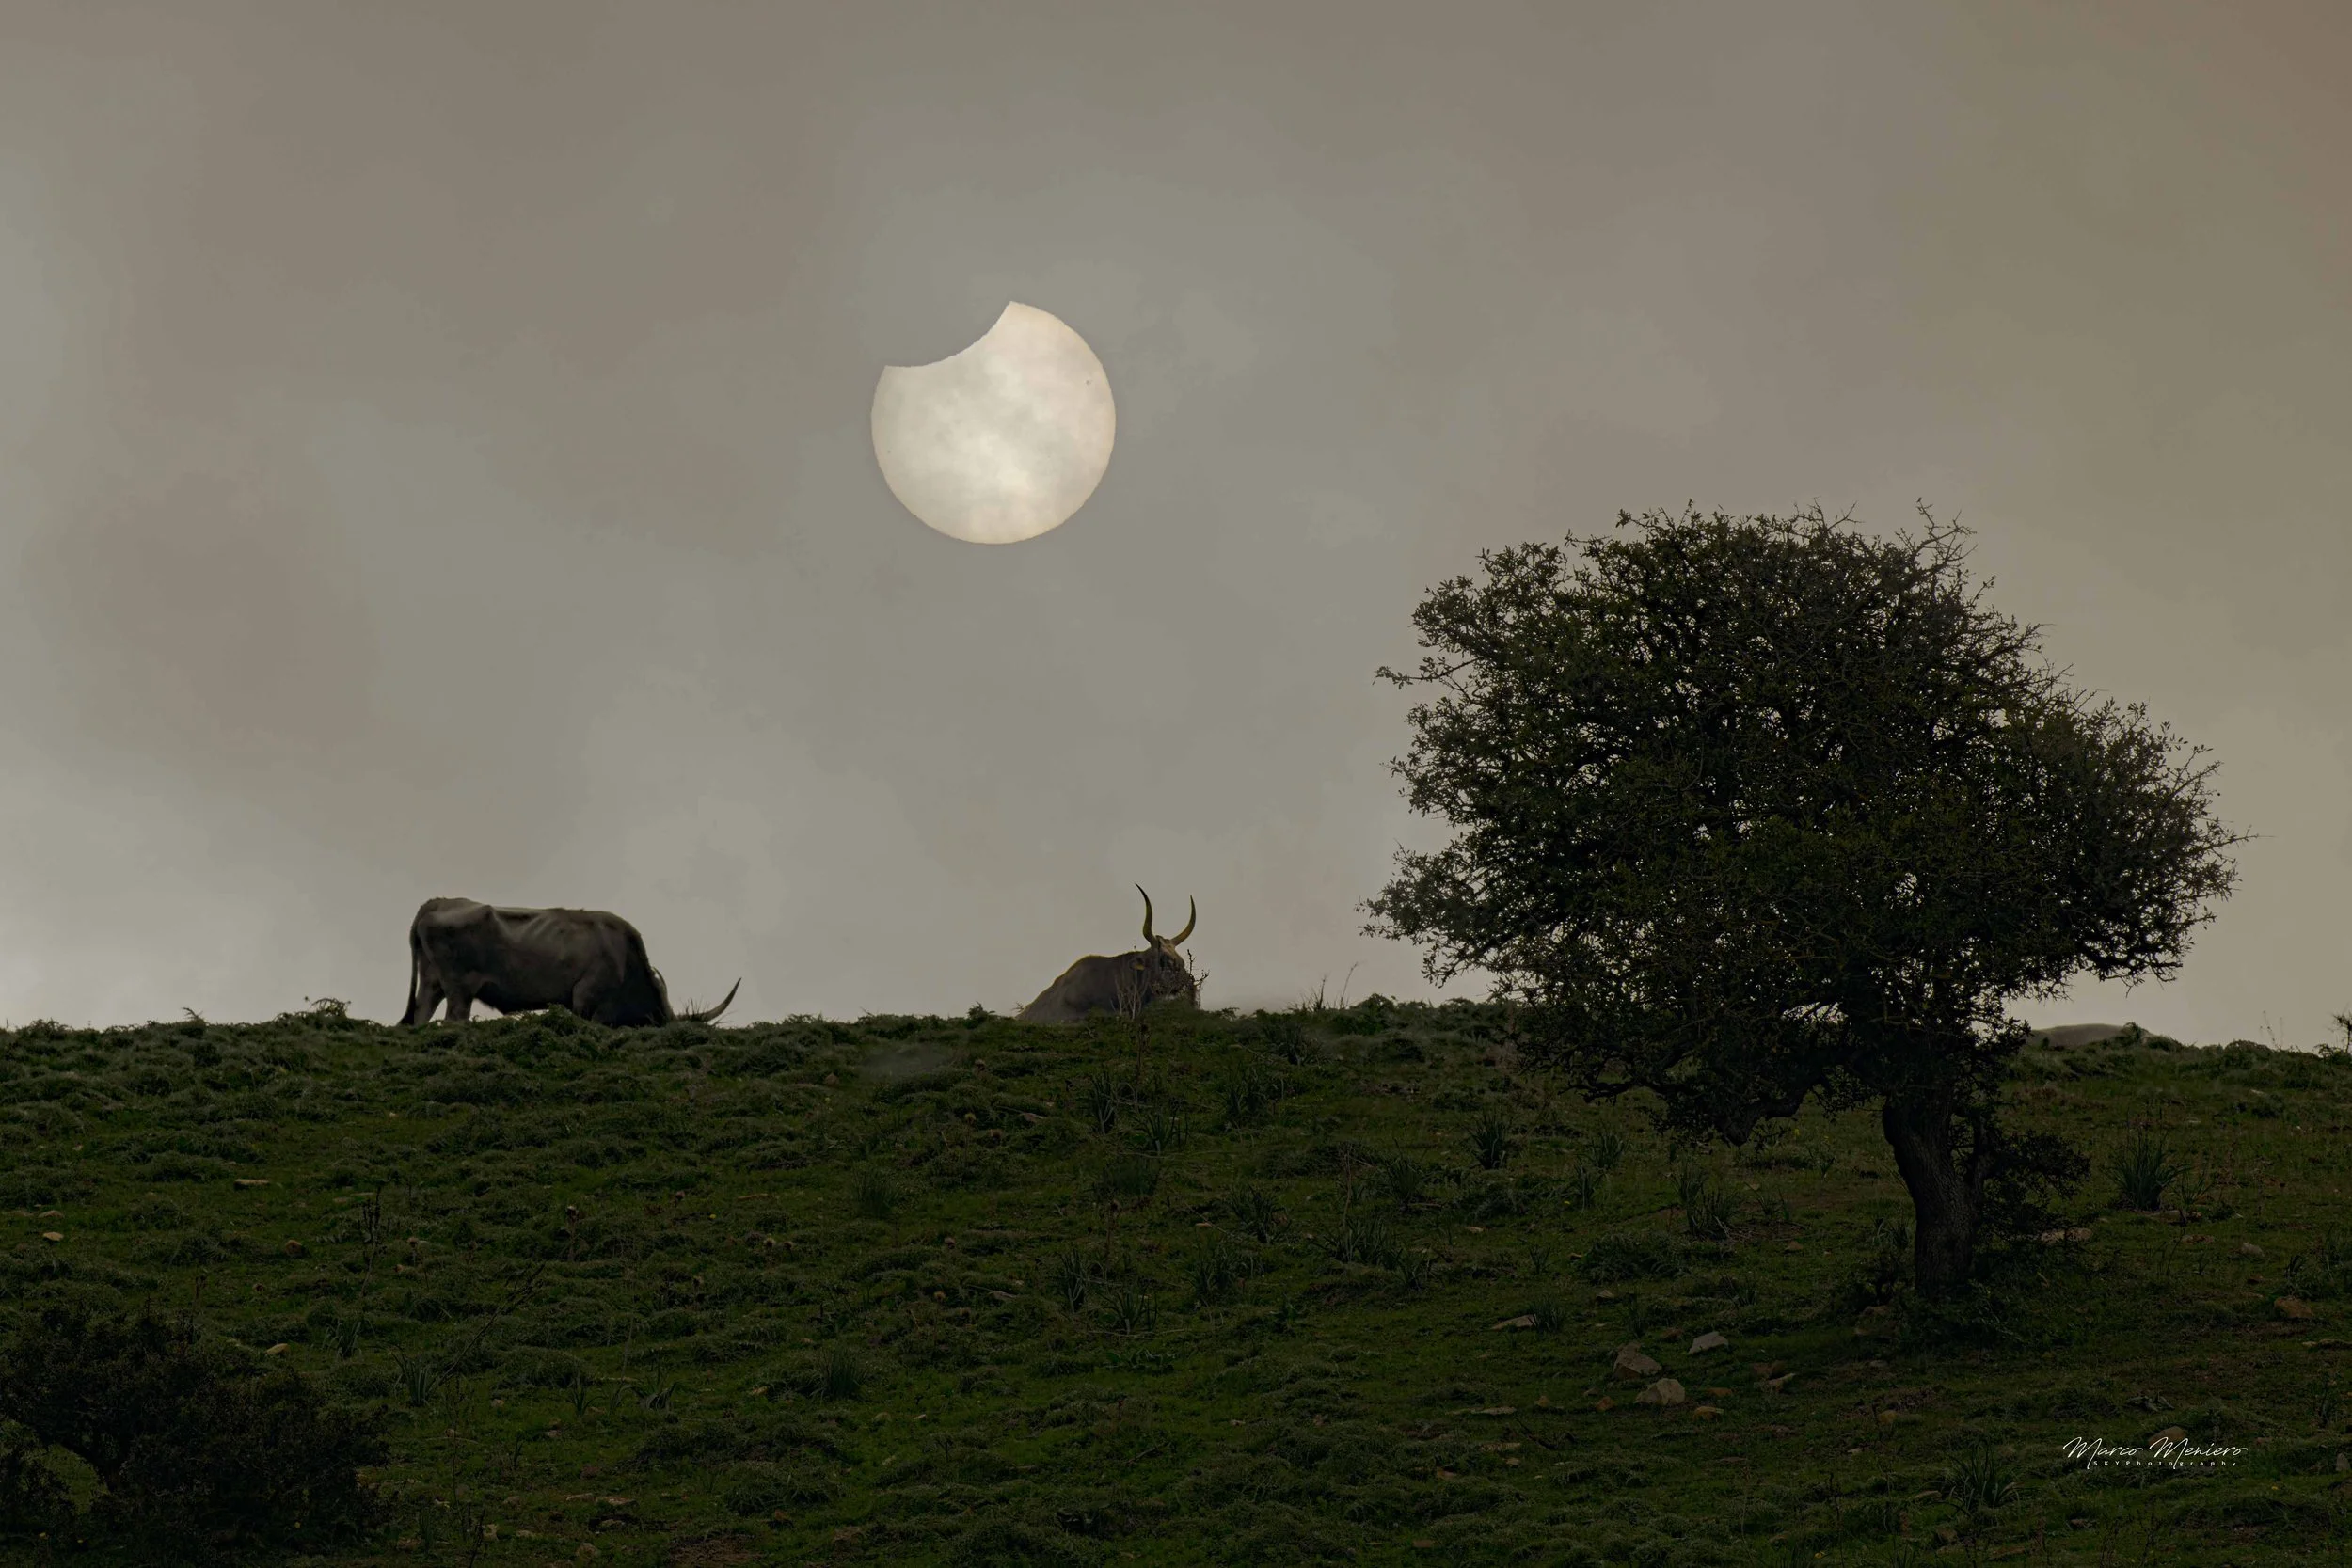
Bulls grazing under the eclipse
Image by Marco Meniero
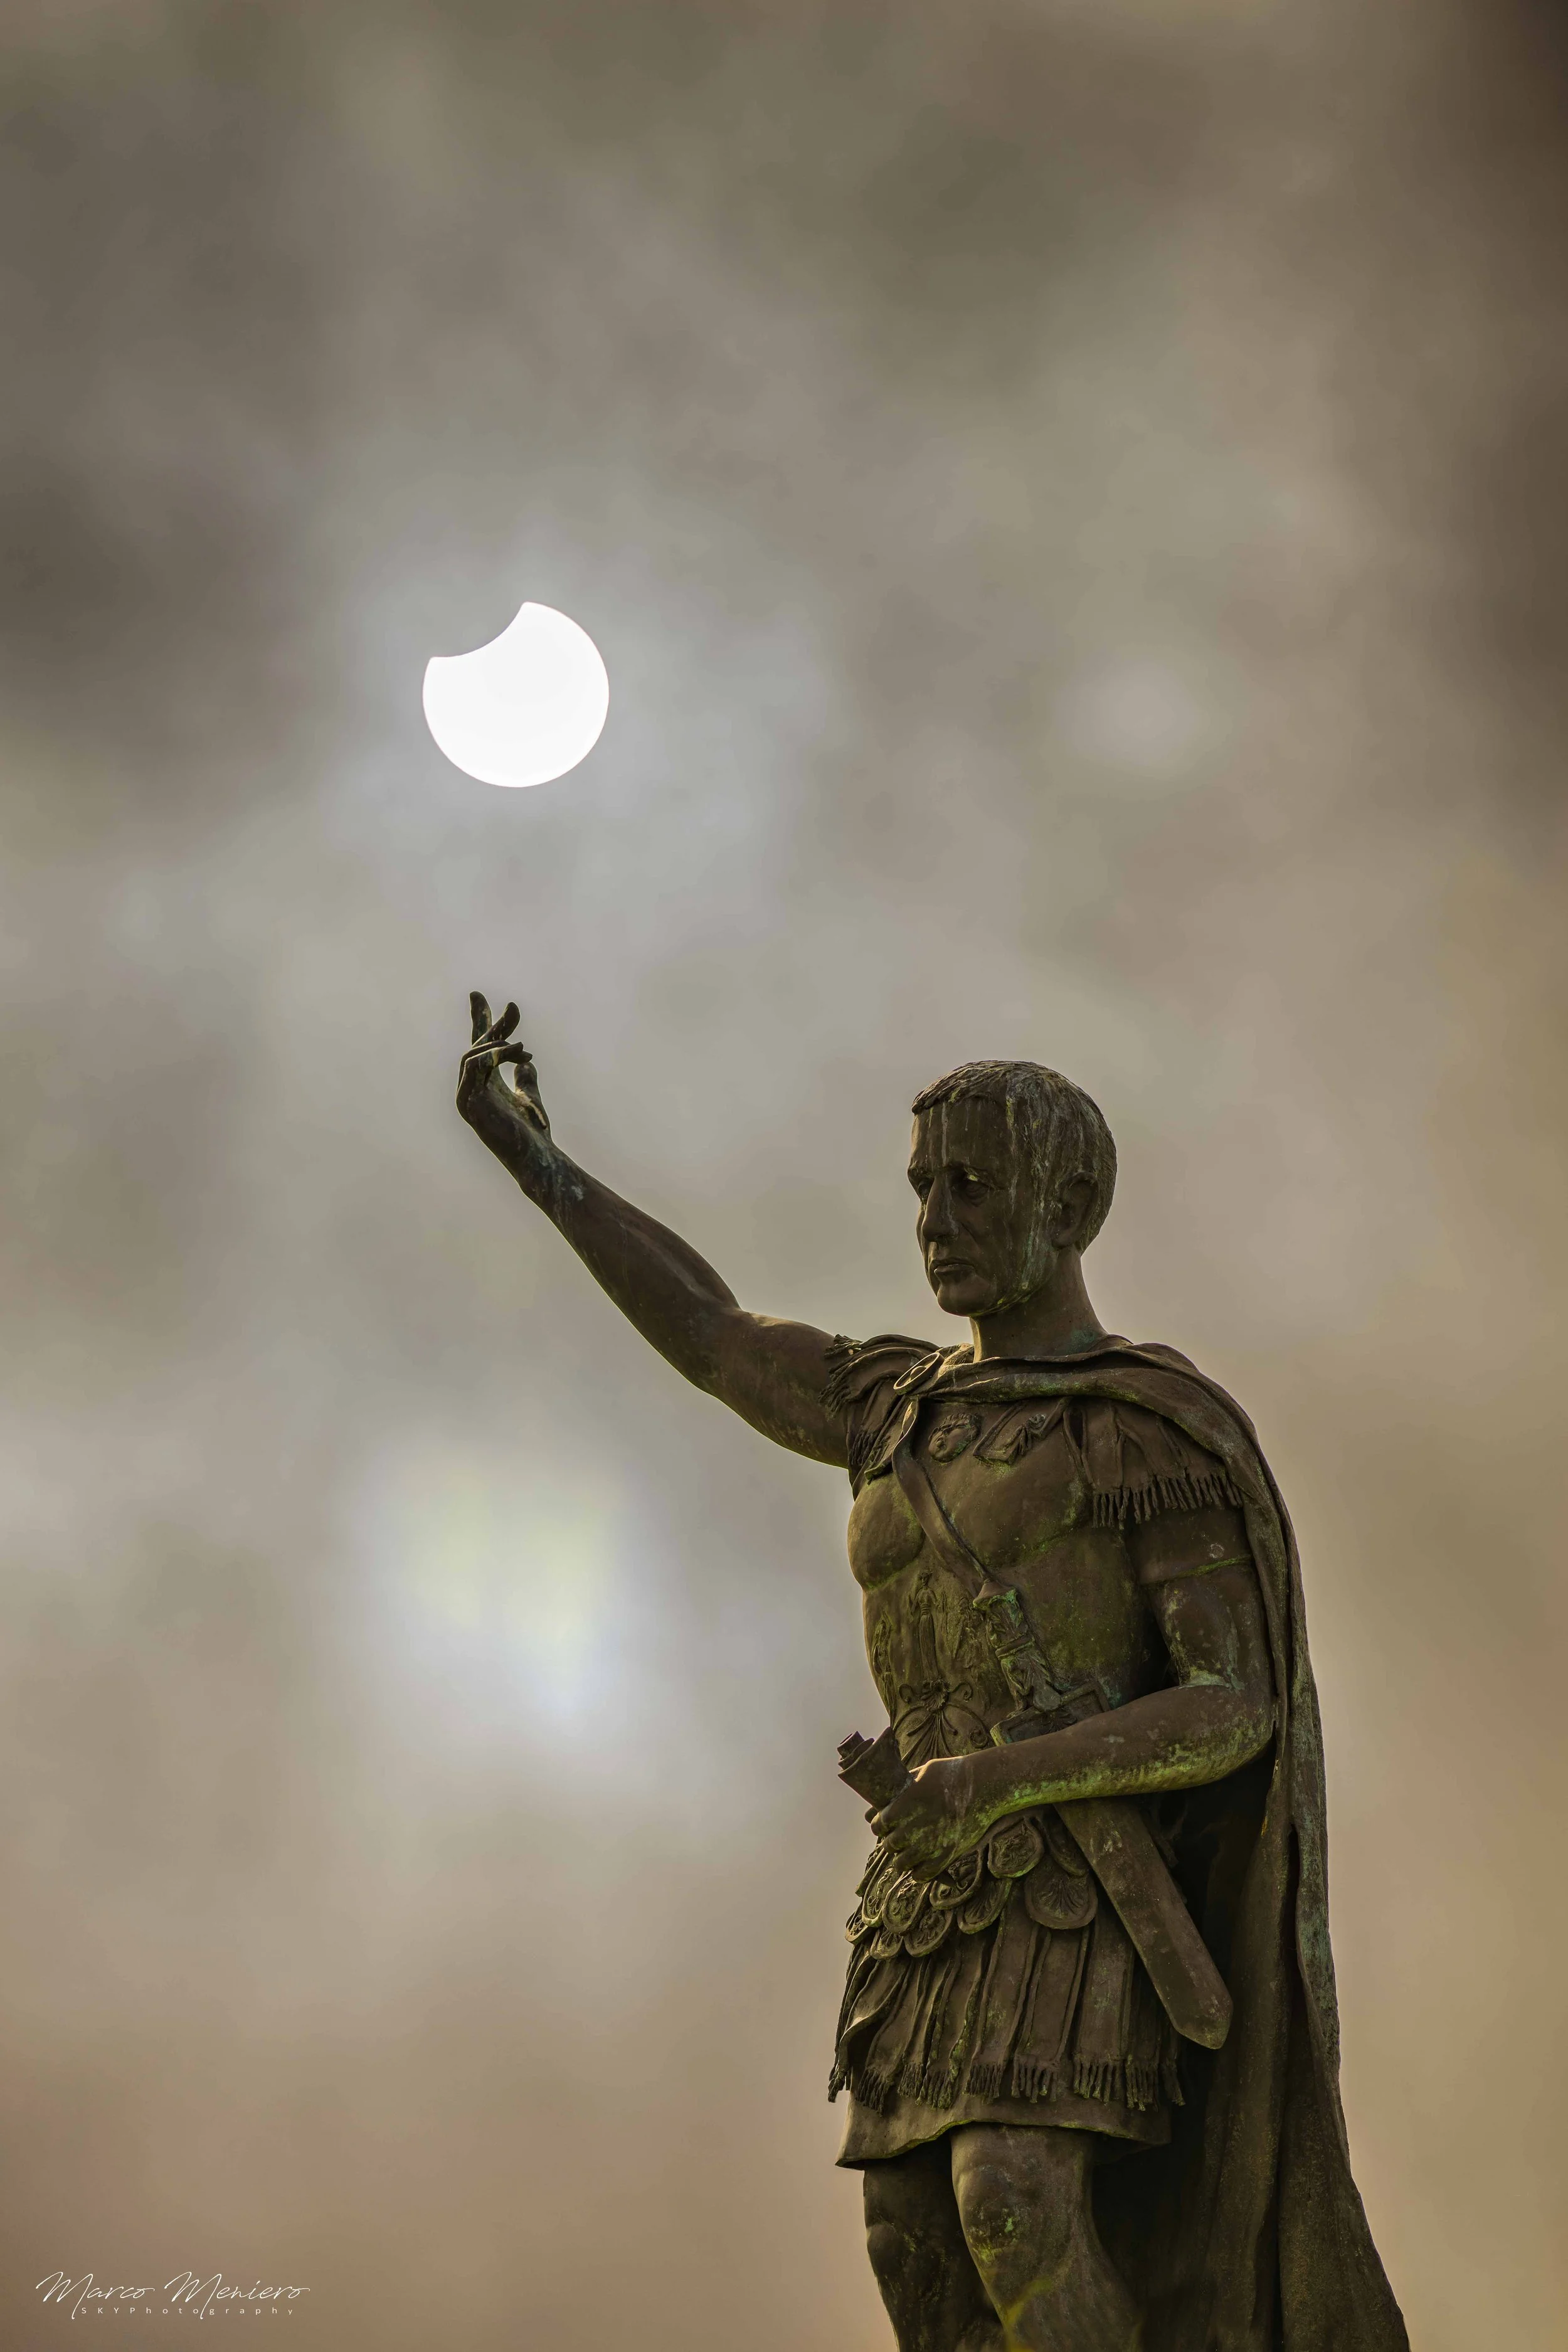
Roman Imperator Marco Ulpio Traiano, founder of the city of Civitavecchia who died 1900 years ago.
Image by Marco Meniero
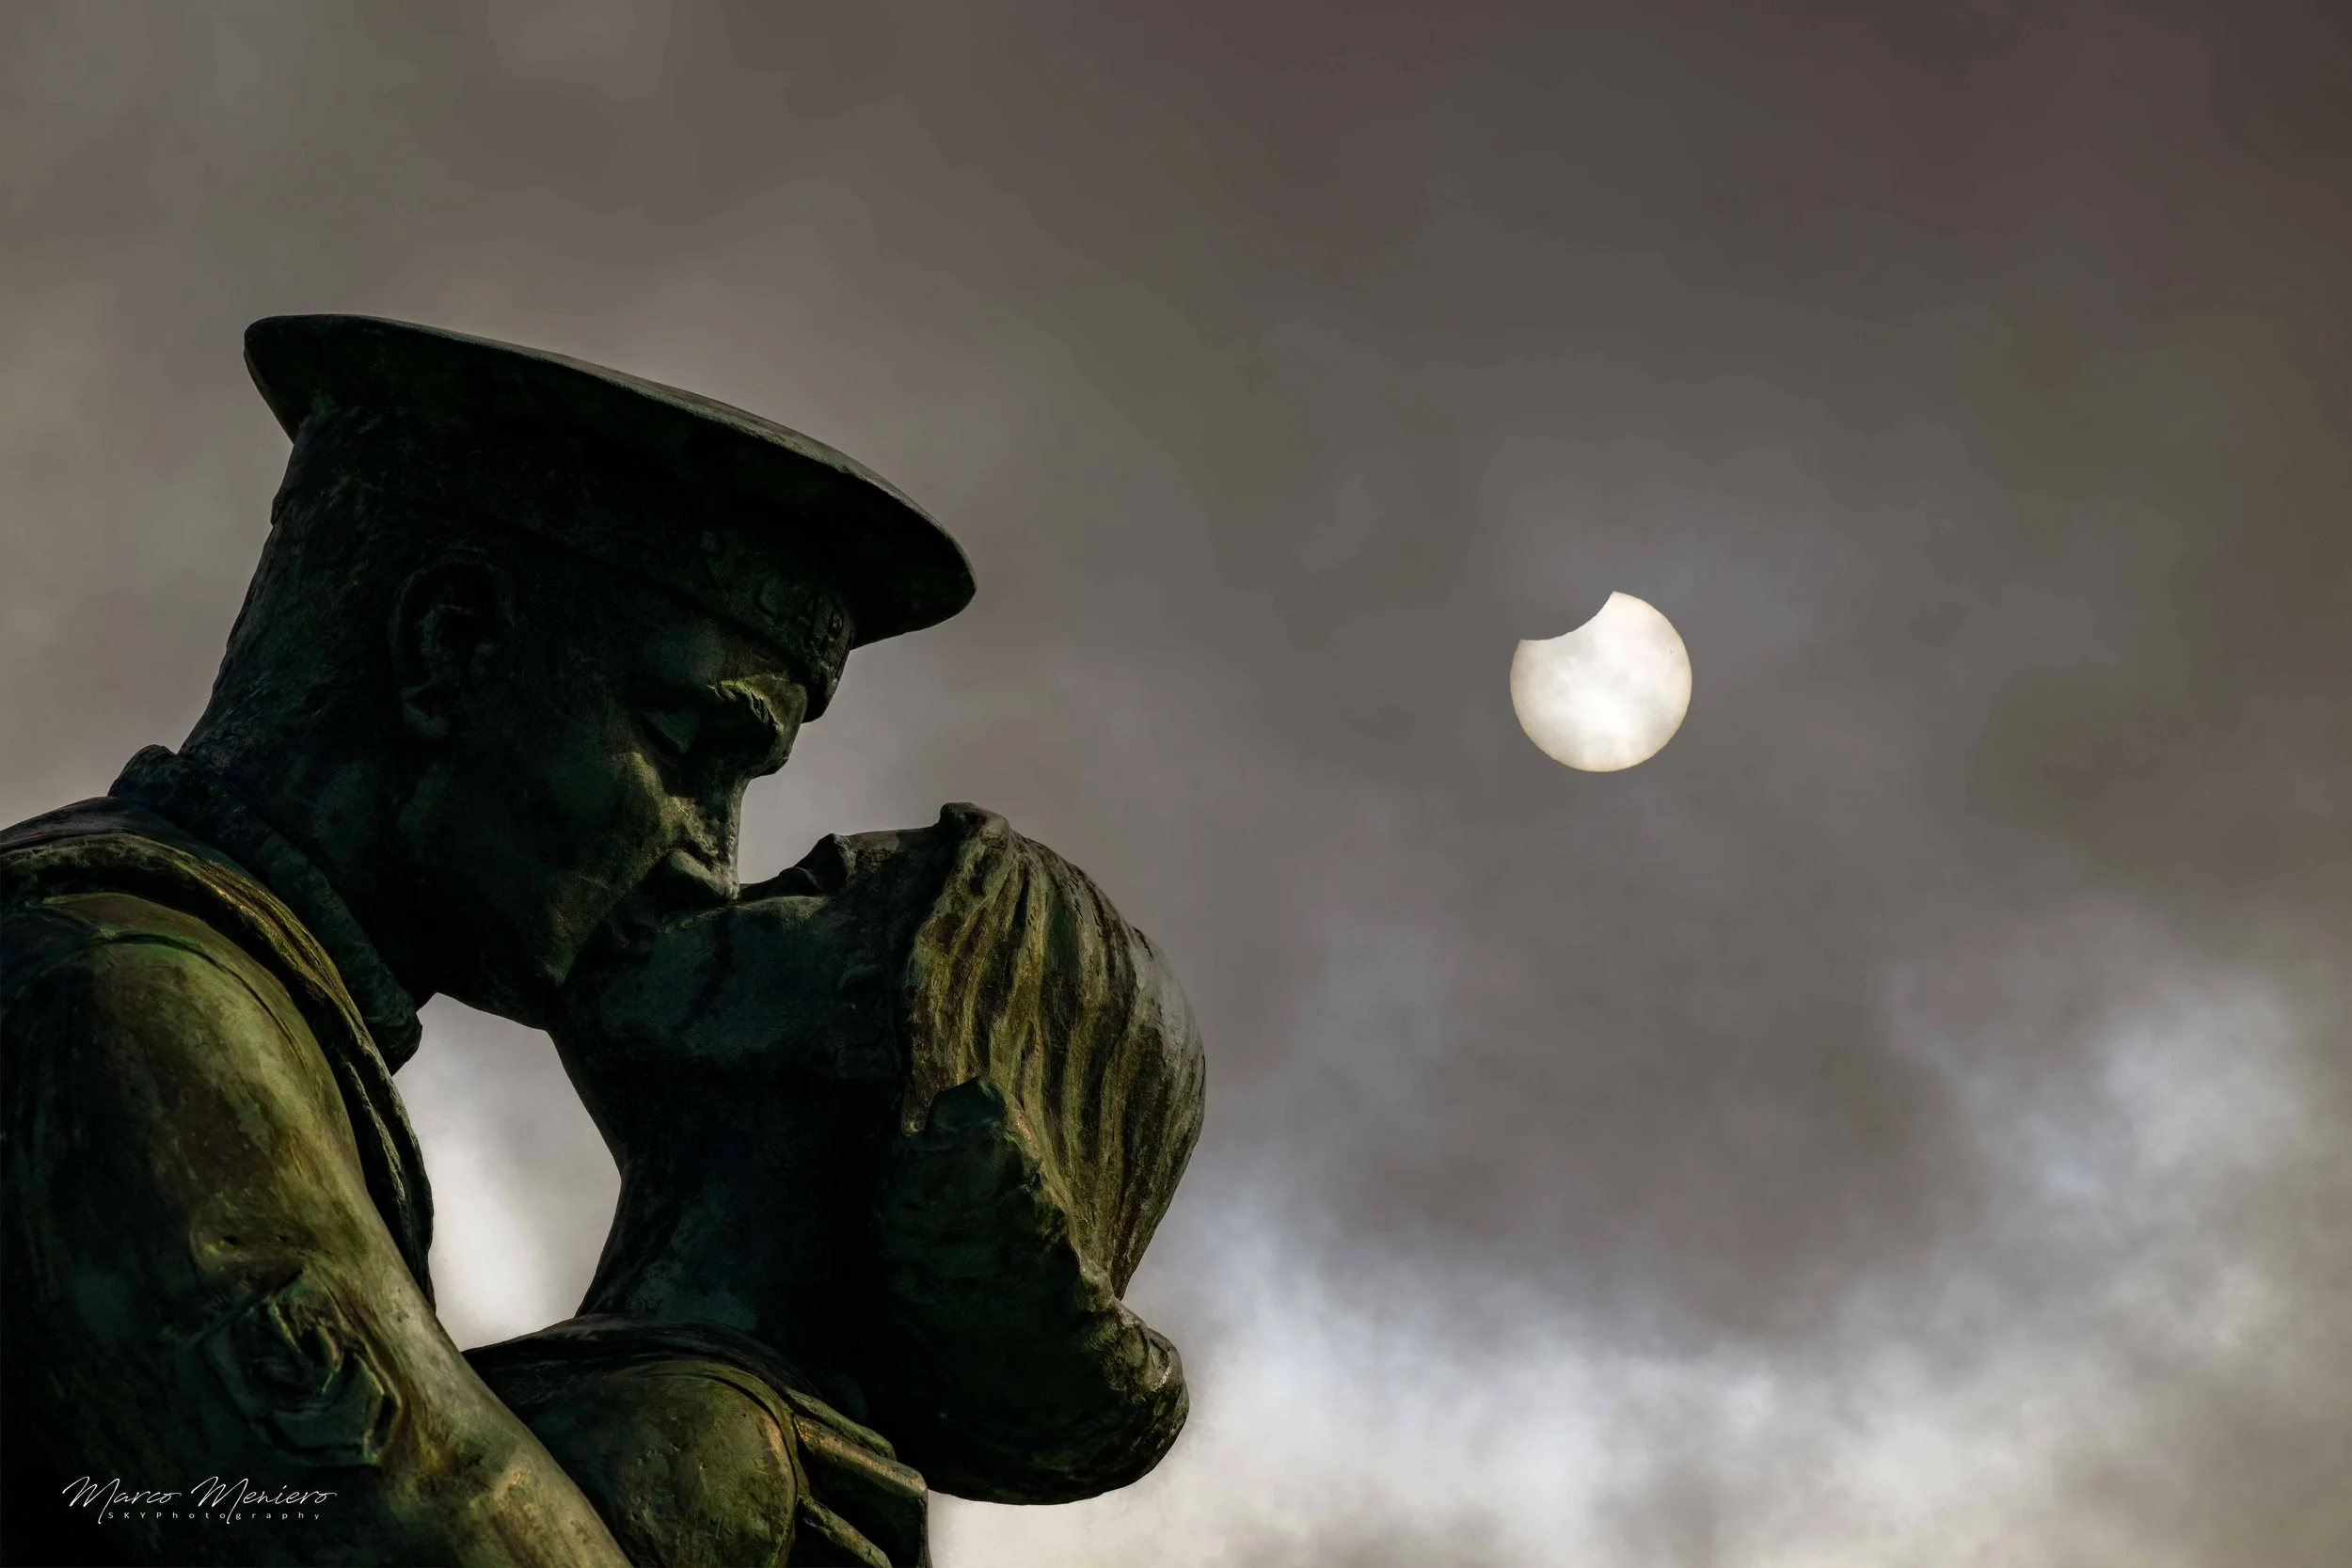
two lovers, a sailor and his mistress who are in the port of the city
Image by Marco Meniero
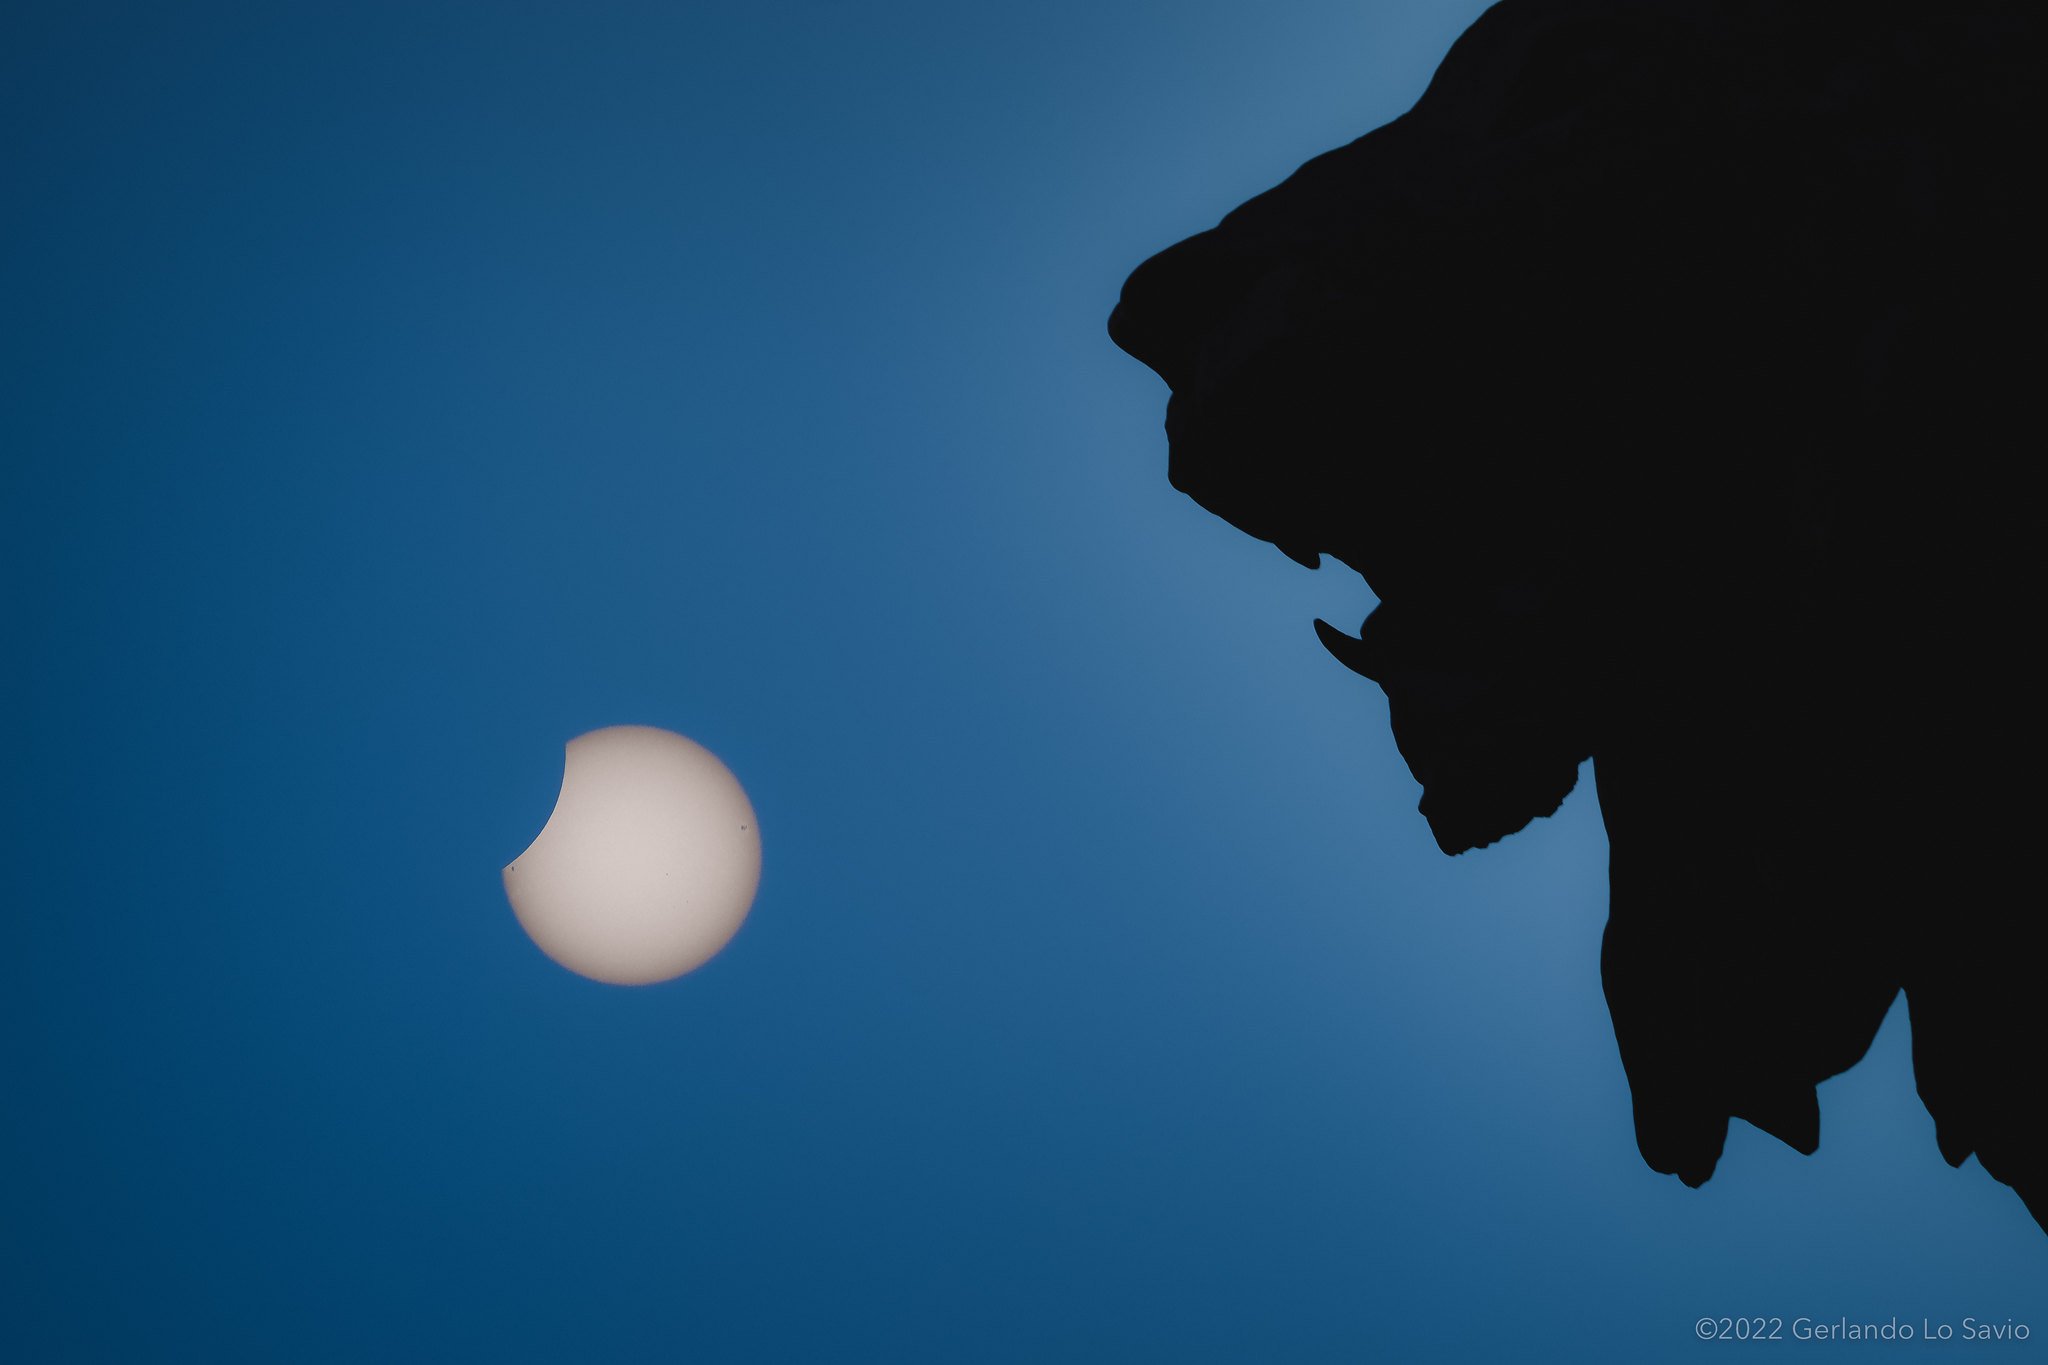
Eclissi parziale di Sole dal Teatro Massimo di Palermo
Il leone a guardia del Teatro Massimo di Palermo che "morde" il sole durante un'eclissi parziale di Sole.
The lion guarding the entrance of Massimo Theater in Palermo, Italy, "biting" the sun, during the today's partial eclipse.
Shot on Olympus EM-5 mk iii + Canon 55-250 f/4-5.6 @250mm mounted with Viltrox EF-M1 adapter. Sun shot with an ND1000 filter stacked with an ND64 filter. Foreground and sky shot with ND64 filter.
Image by gerlos
https://www.amateurastrophotography.com/back-issue-downloads
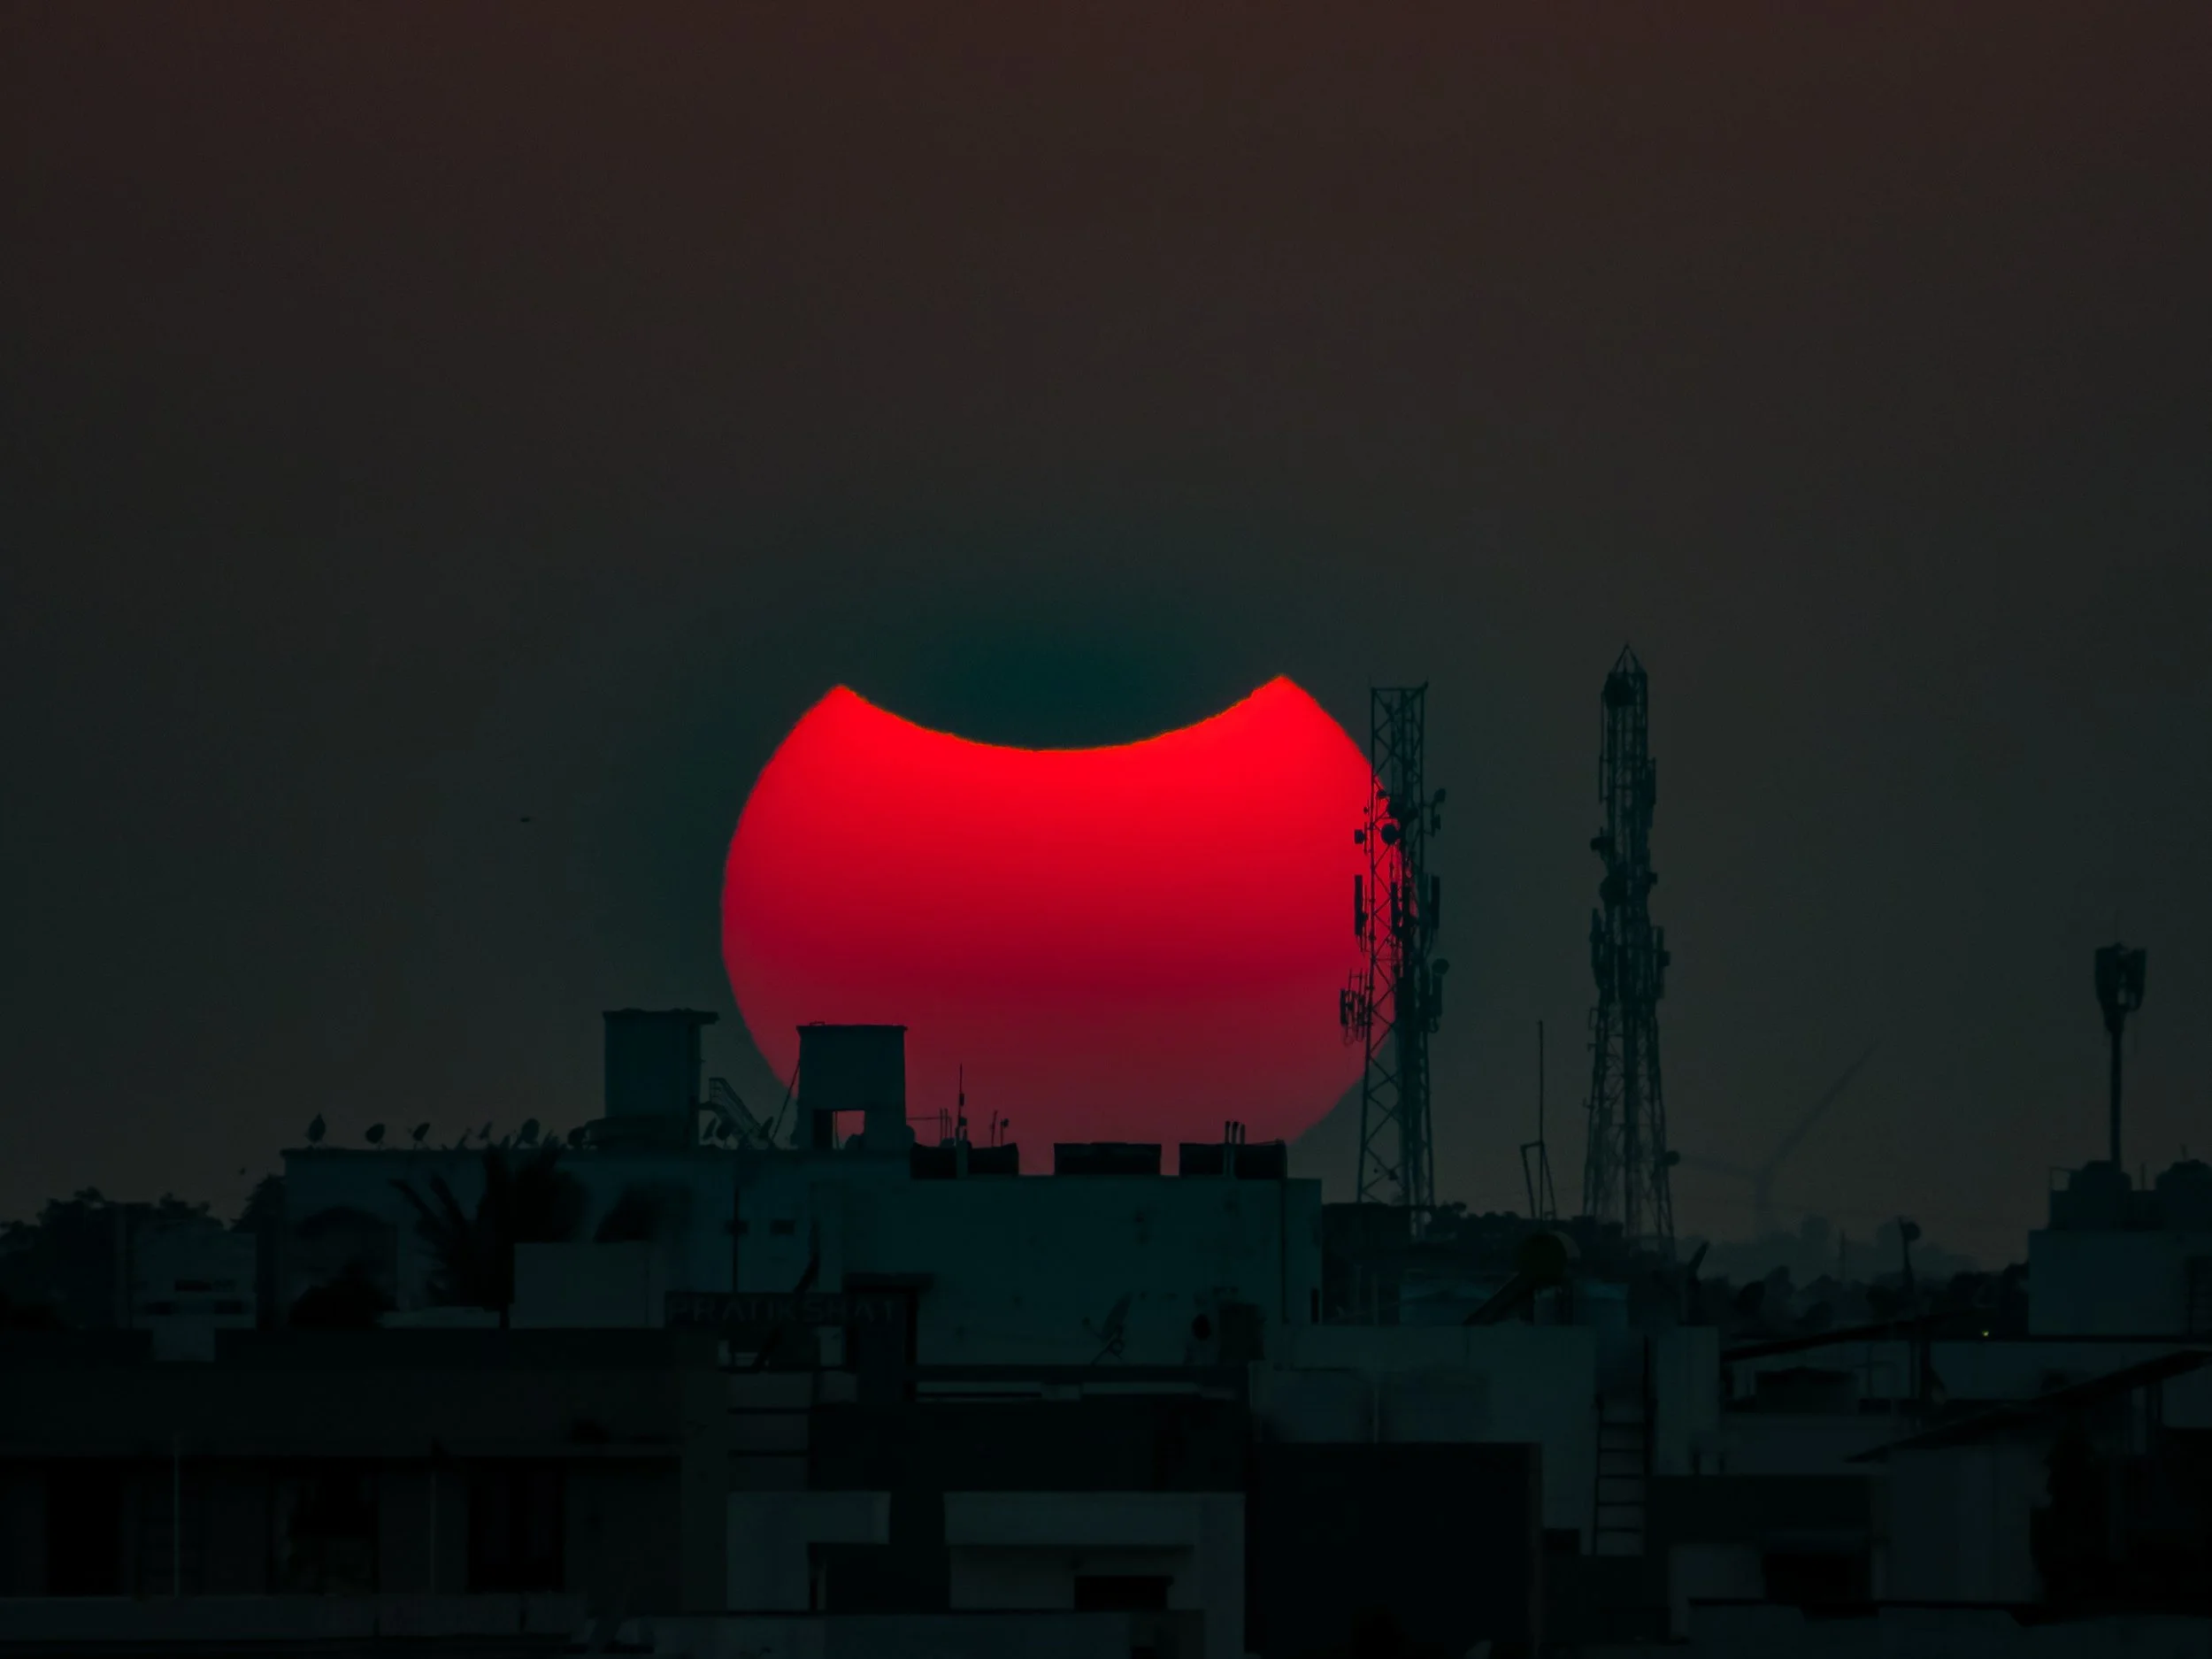
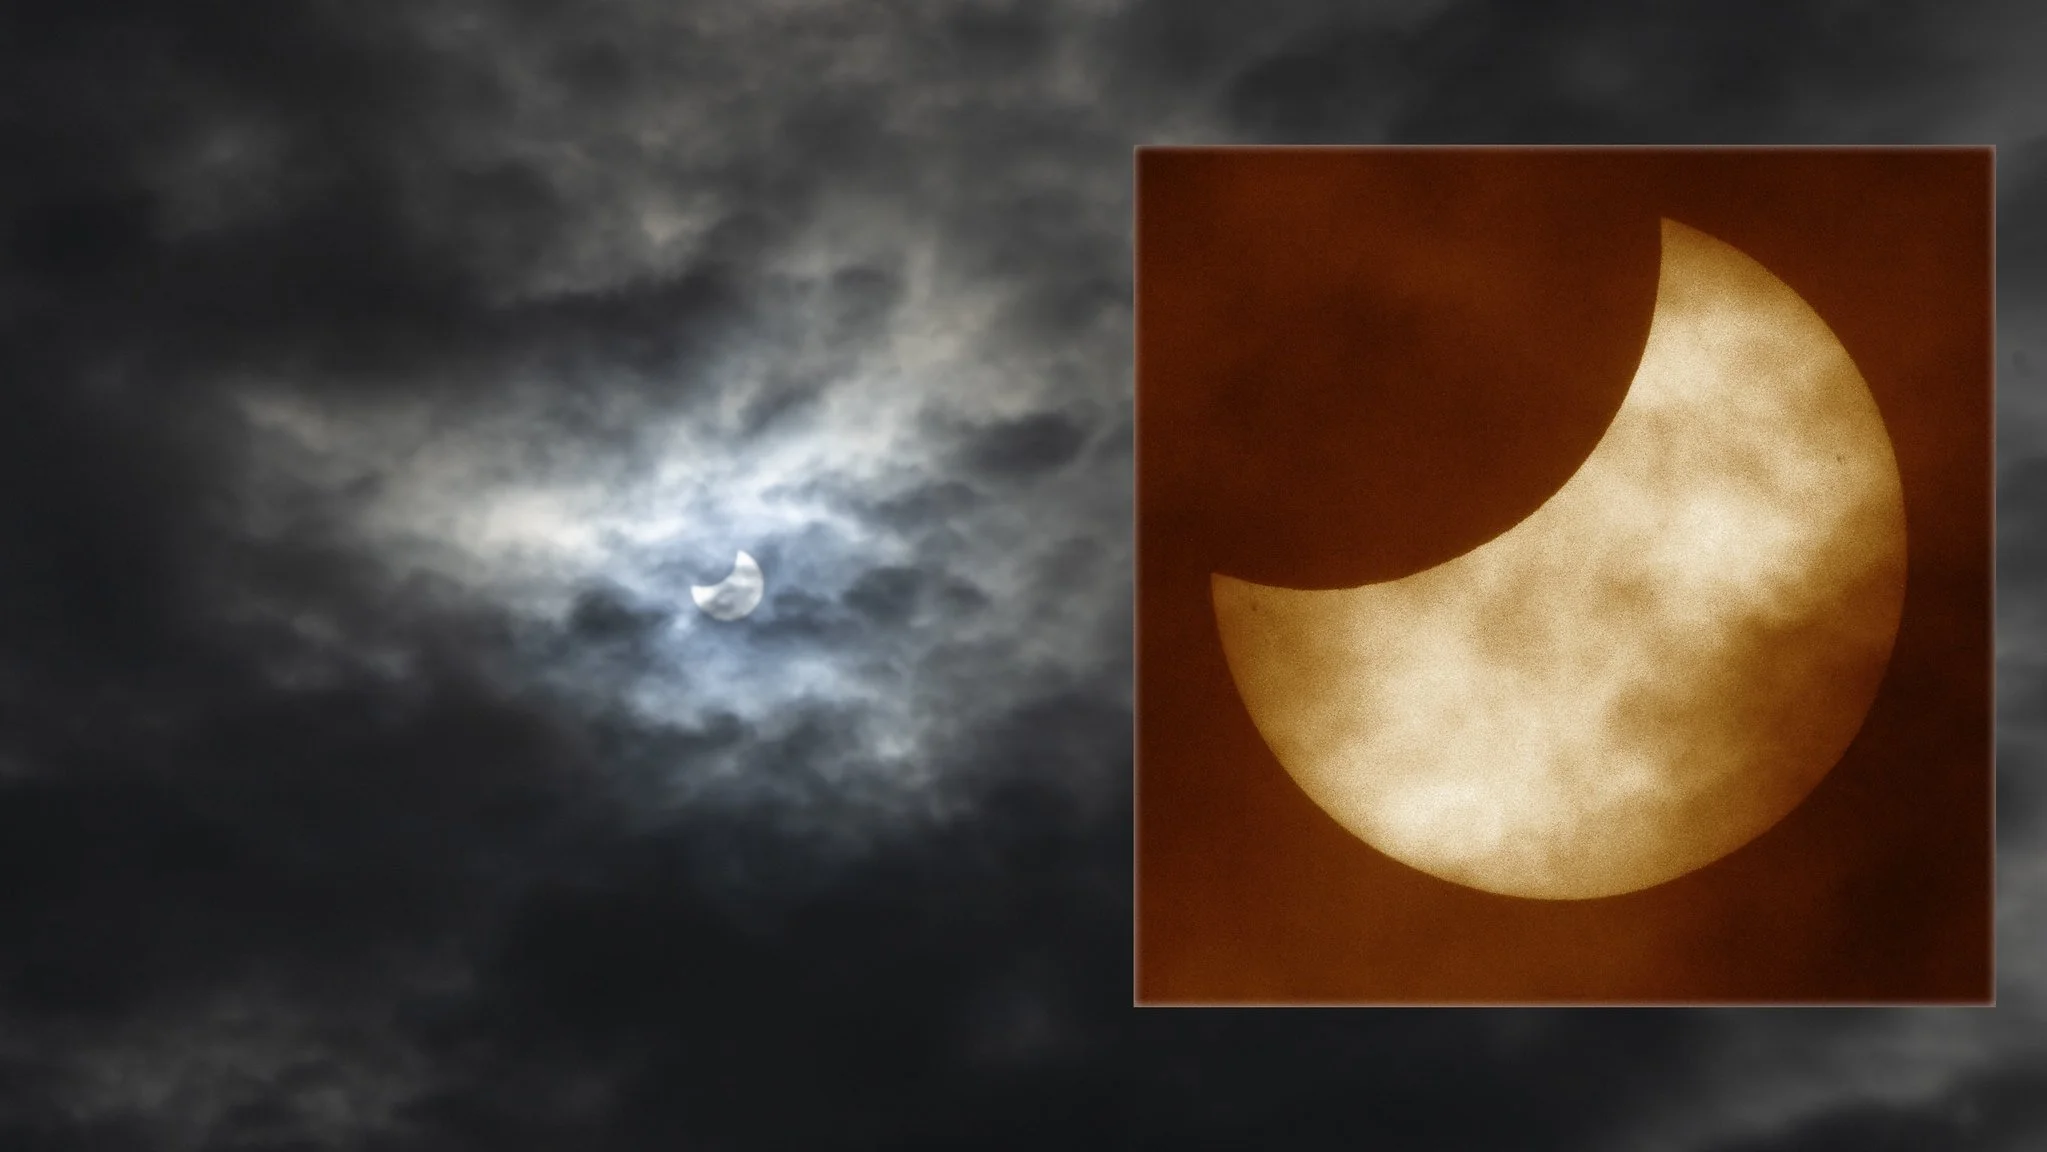
No Solar filter, no Tripod, even No DSLR!!
Still, I thought, let's give it a try.. let's take a picture of the eclipse. Climbed up the stairs to the roof and made a small attempt with my Canon Powershot.
Location: Gandhidham, Kutch, Gujarat, India
Date and Time: 25-10-2022, 06.21 PM
Equipment: Canon Powershot SX540 HS
Processing: Adobe Lightroom Mobile App.
Exif:
Exposure: 1/125 Sec
ISO: 80
Aperture: f/6.5
Focal Length: 215mm
Name: ARIJIT GHOSH
PLACE: Gandhidham, Kutch, Gujarat
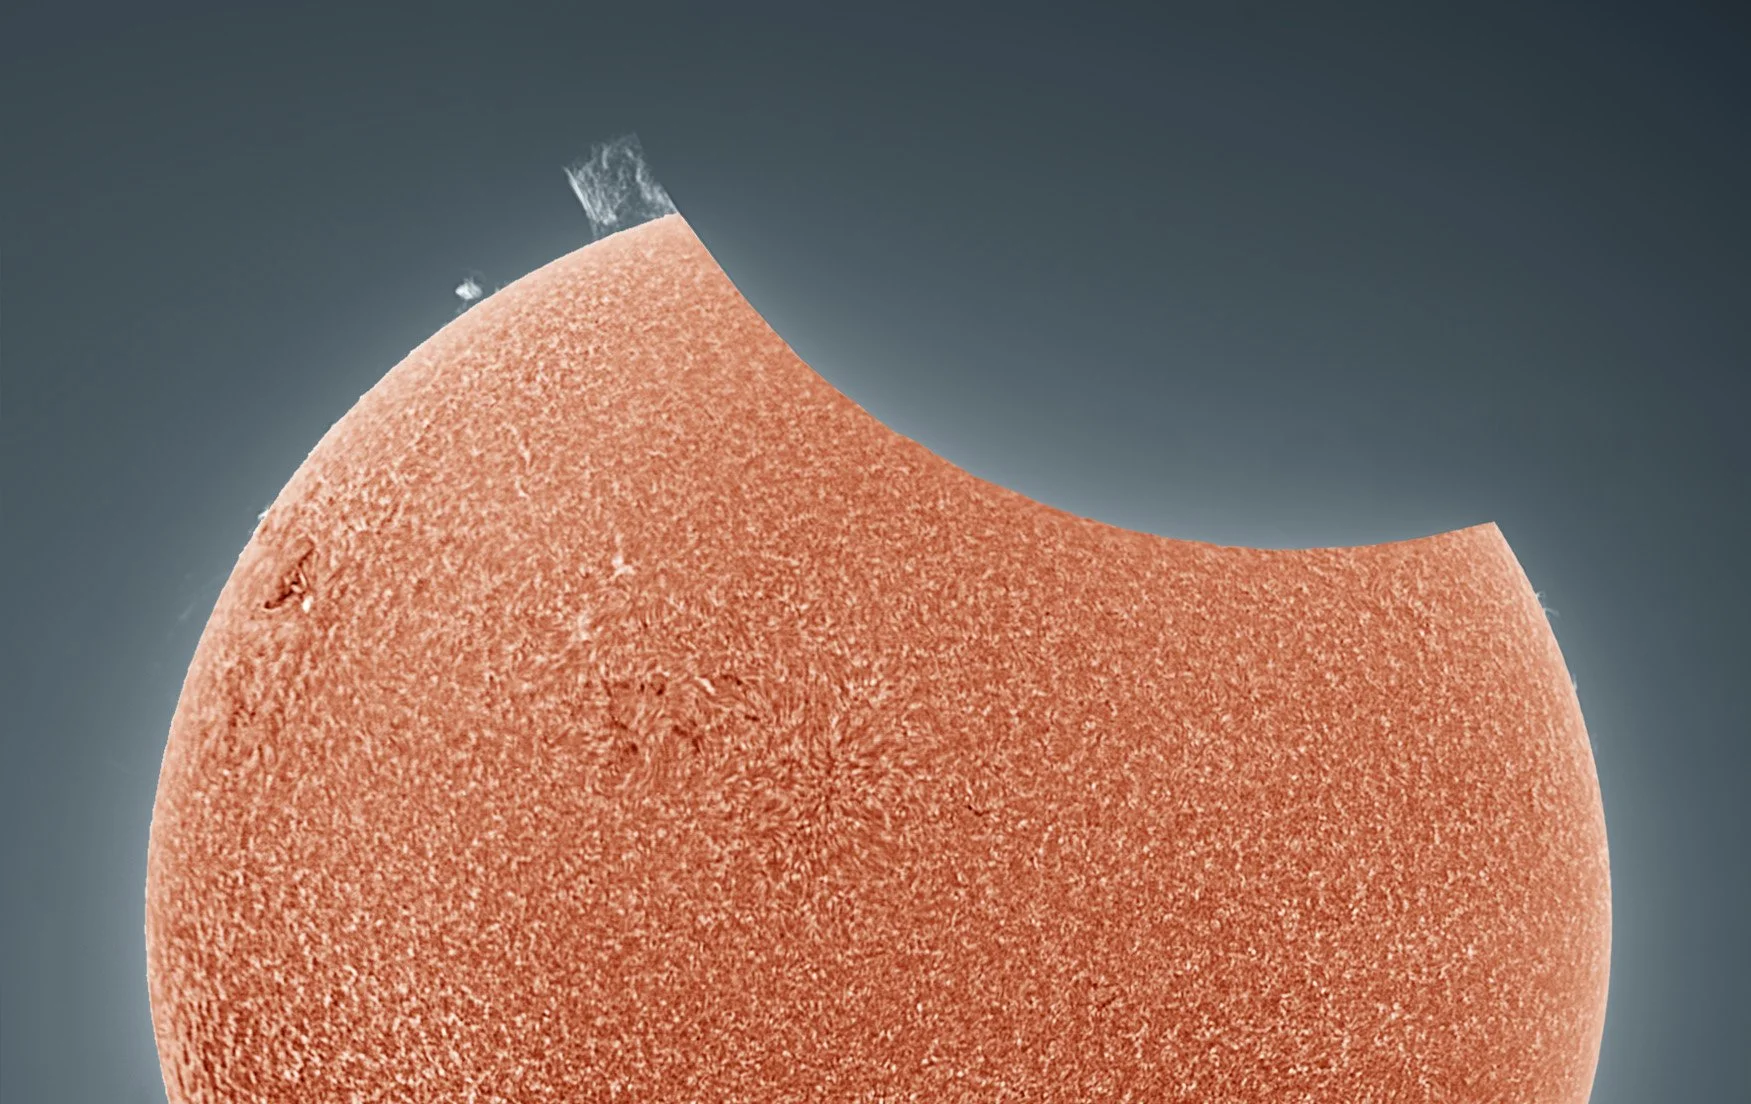
Today’s (25th October) partial solar eclipse captured at 09.34 UT in Ha light from Kent, UK, with my Lunt LS152THa, and Altair Hypercam 174M cooled camera. This was imaged between rain showers and thick clouds. Notice the moon occulting the large prominence.
Image by Paul Andrew
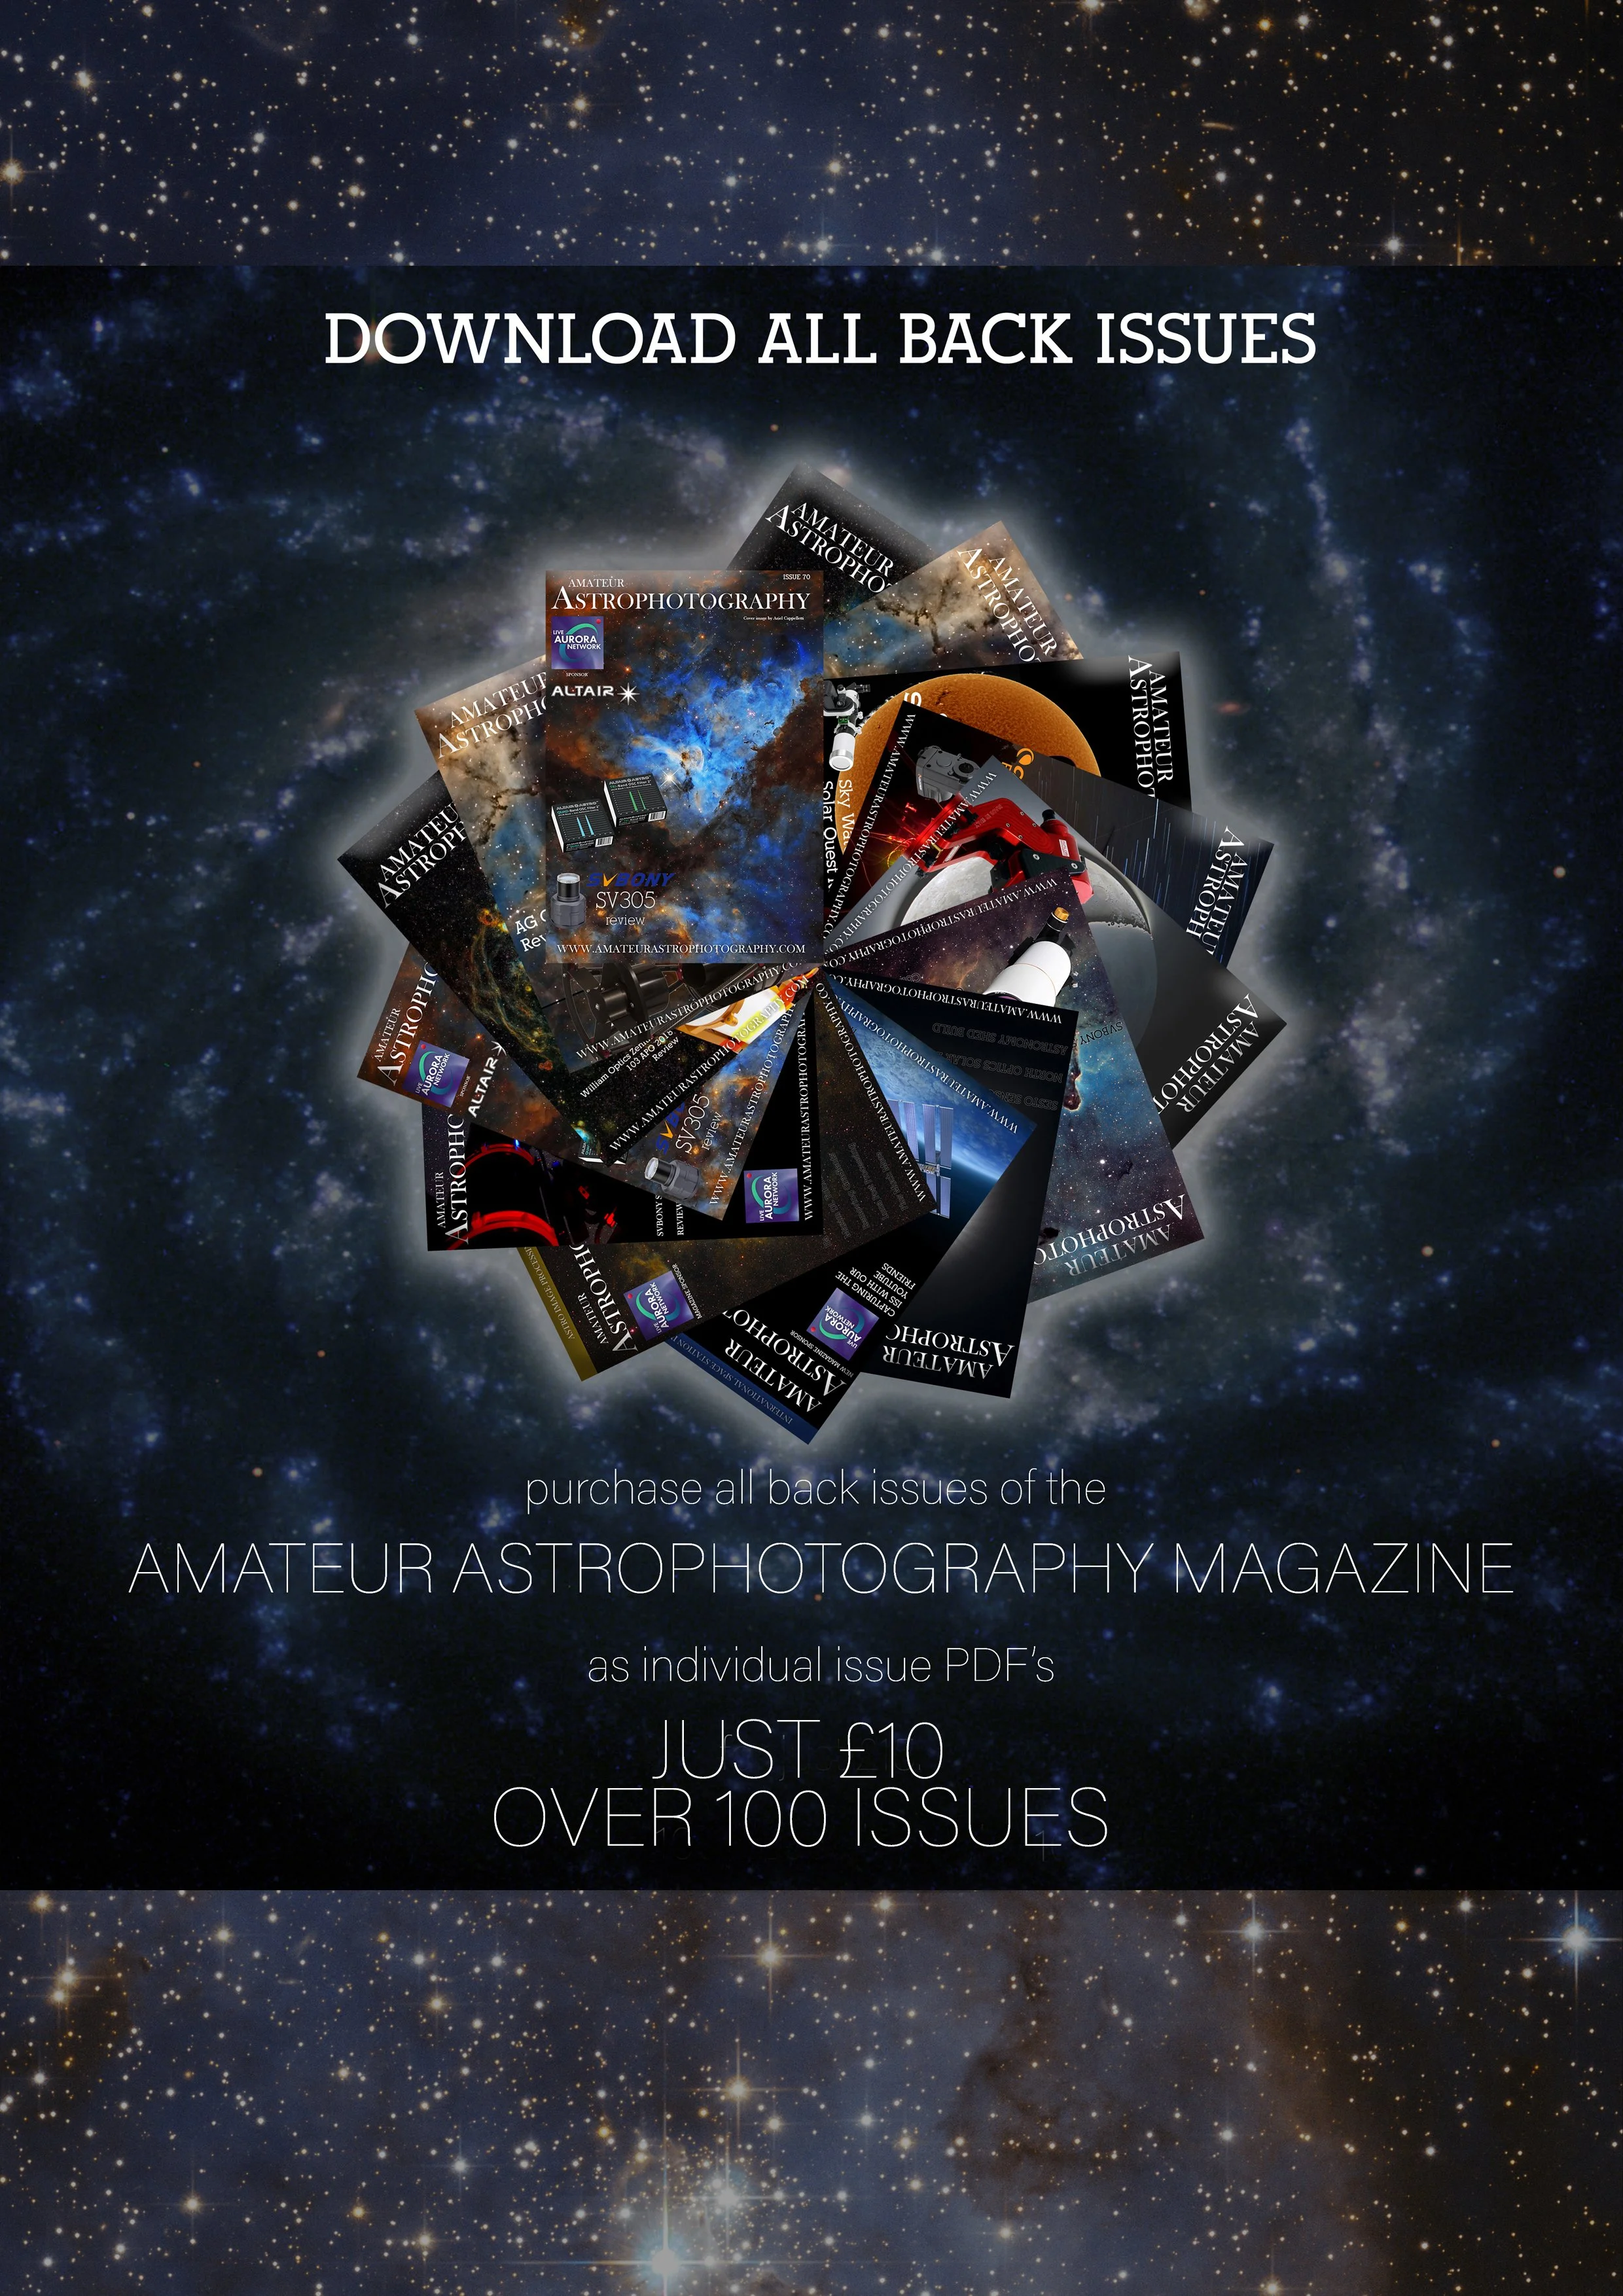
https://www.amateurastrophotography.com/back-issue-downloads
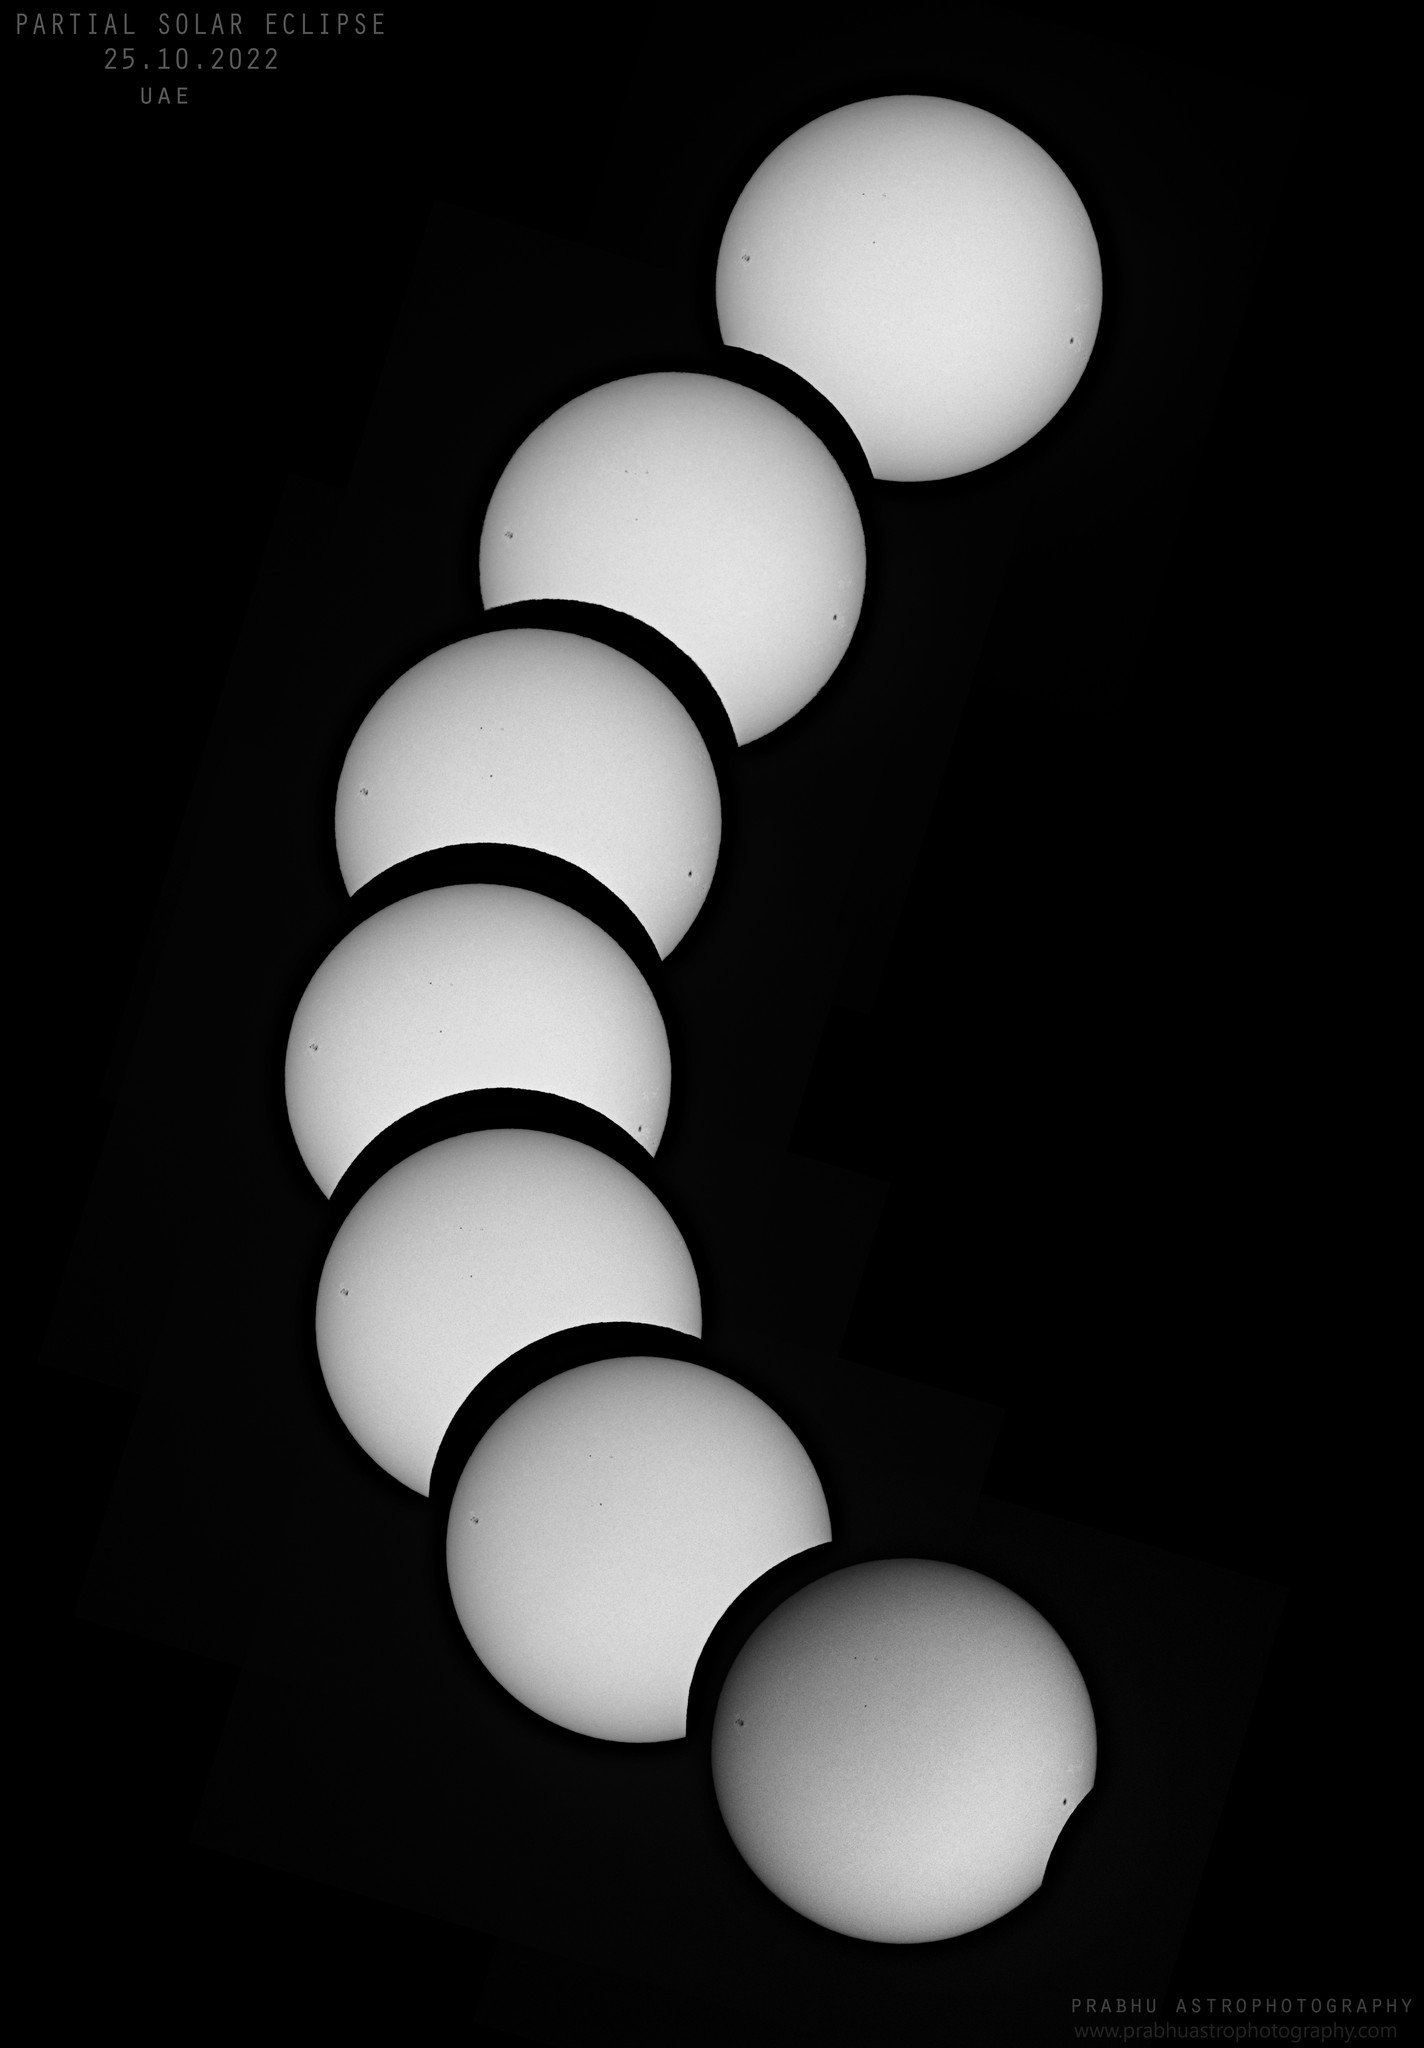
Collage of the Partial Solar eclipse - 2022
We witnessed the partial solar eclipse from Abu Dhabi, UAE starting from 14:44 GST till 16:55 GST. This collage might look like a 3D image of the sun in vertical view but if you tilt the image 90 degrees you will see the collage of the eclipse.
The sequence starts from the top to bottom showing the start of the eclipse, the maximum eclipse, and the end of the eclipse.
Equipment: Esprit APO 80mm - ZWO 294MMPro - Antlia 36mm Red filter - Baader Solar filter
Exposure: 2.80 ms @ Gain:0
25.10.2022
PrabhuAstrophotography
Image by Prabhu S Kutti
Részleges Napfogyatkozás - Partial solar eclipse
Skywatcher 72ED
AZ-GTi
ZWO asi178mc
Canon Eos PR
Canon RF 24-105mm F4, @105mm
2022 10 25
Image by hodorgabor
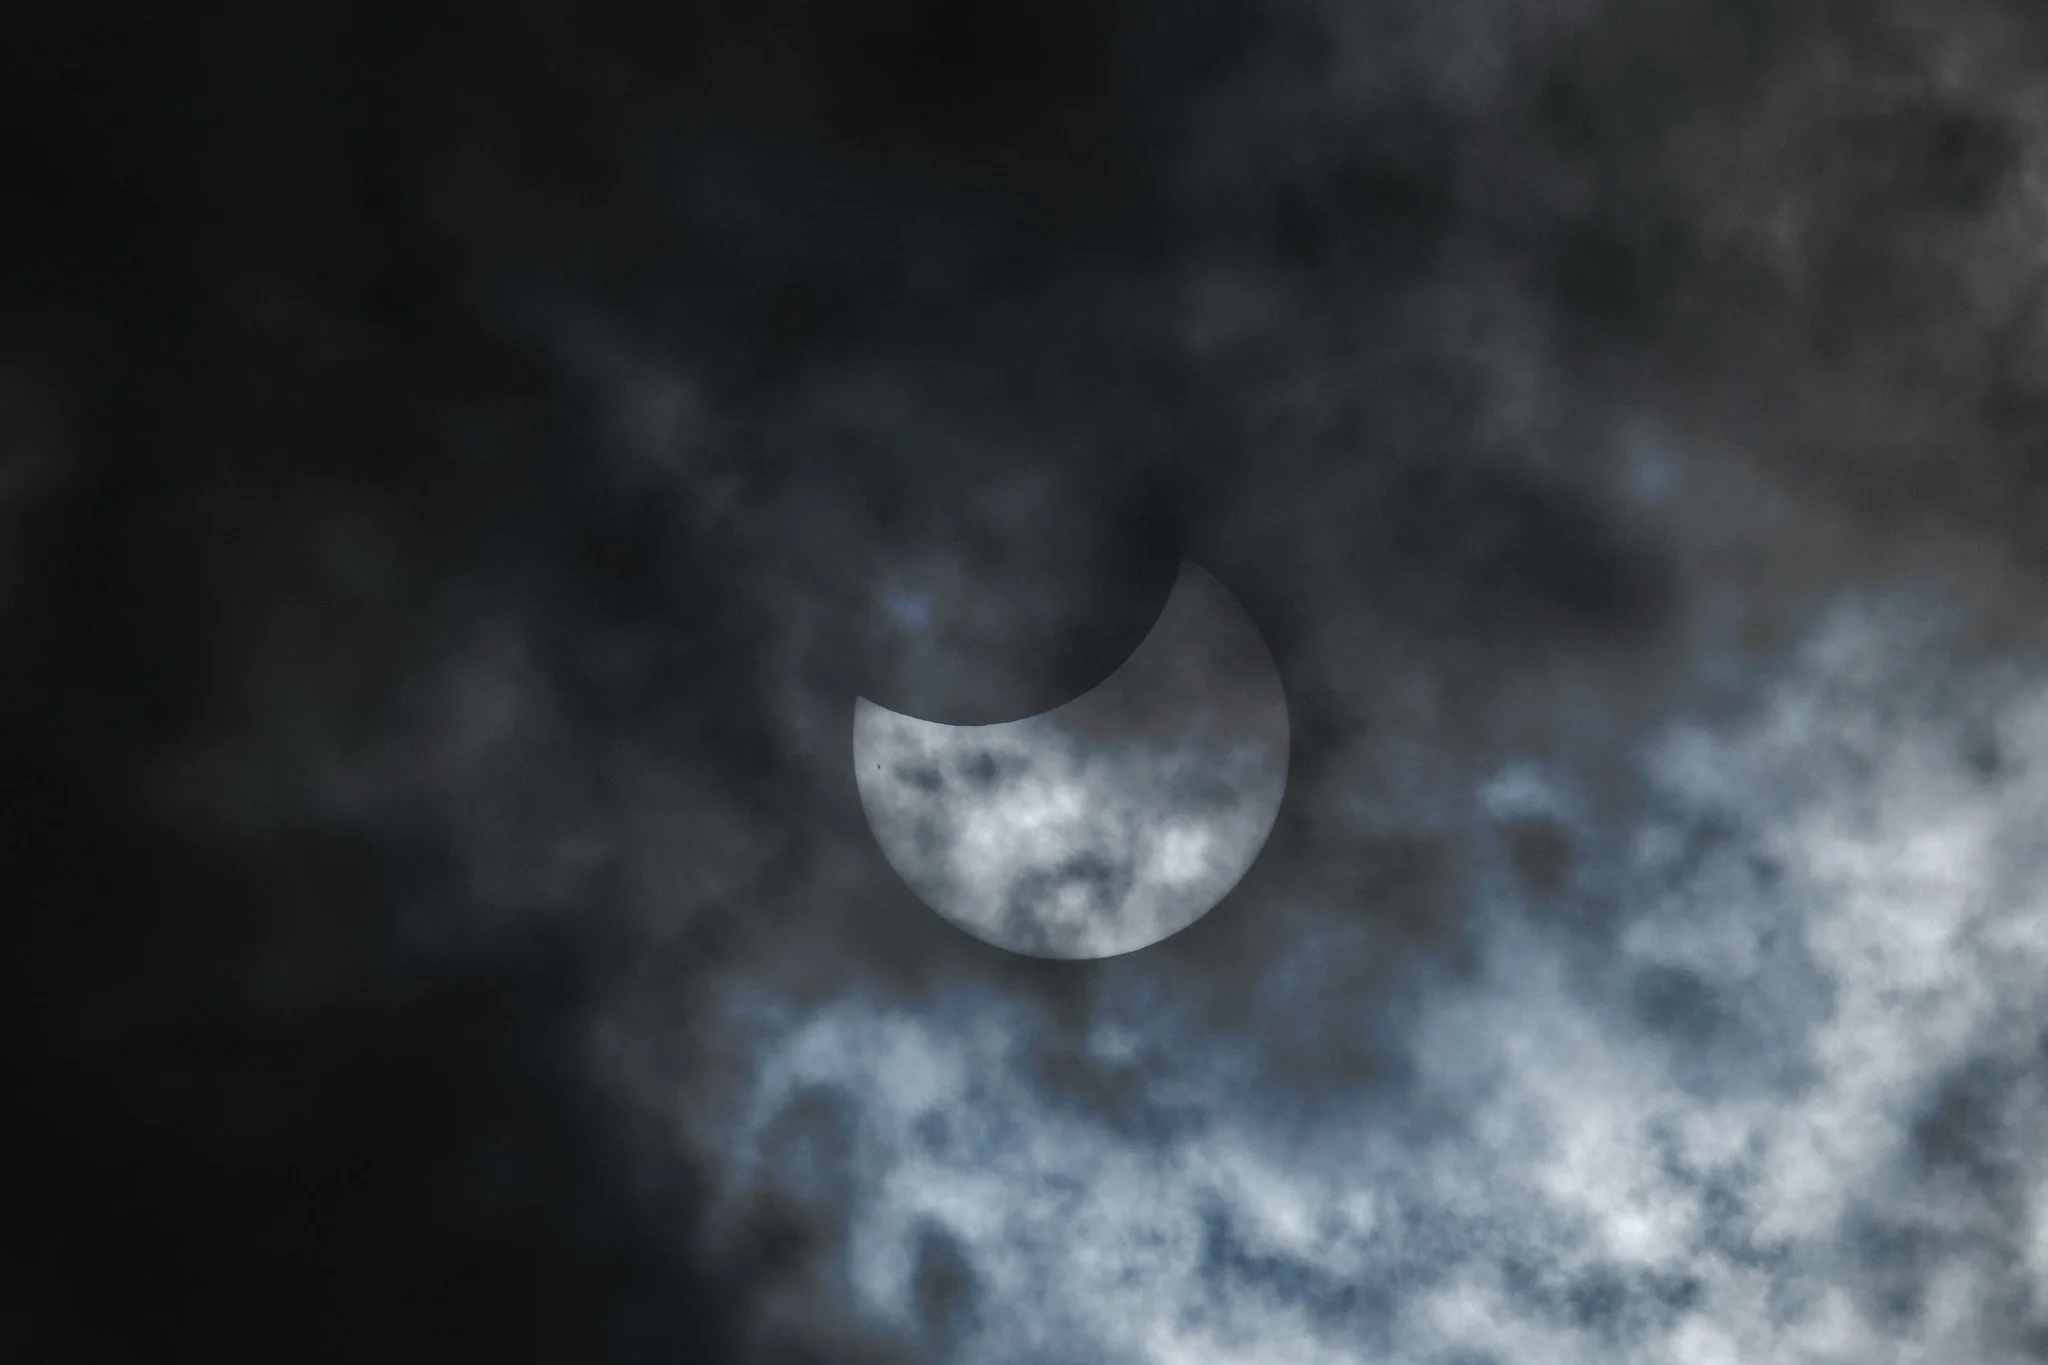
Partial Solar Eclipse 2022-10-25 through Clouds
Partial solar eclipse as seen over Austria, Europe.
This shot was taken at 12:11pm, approximately at maximum occultation. Unfortunately clouds rolled in and prevented further observation.
QHY600M on Skywatcher Esprit 100 at 550mm focal length.
Single shot of 5/100th of a second.
Image by Chris
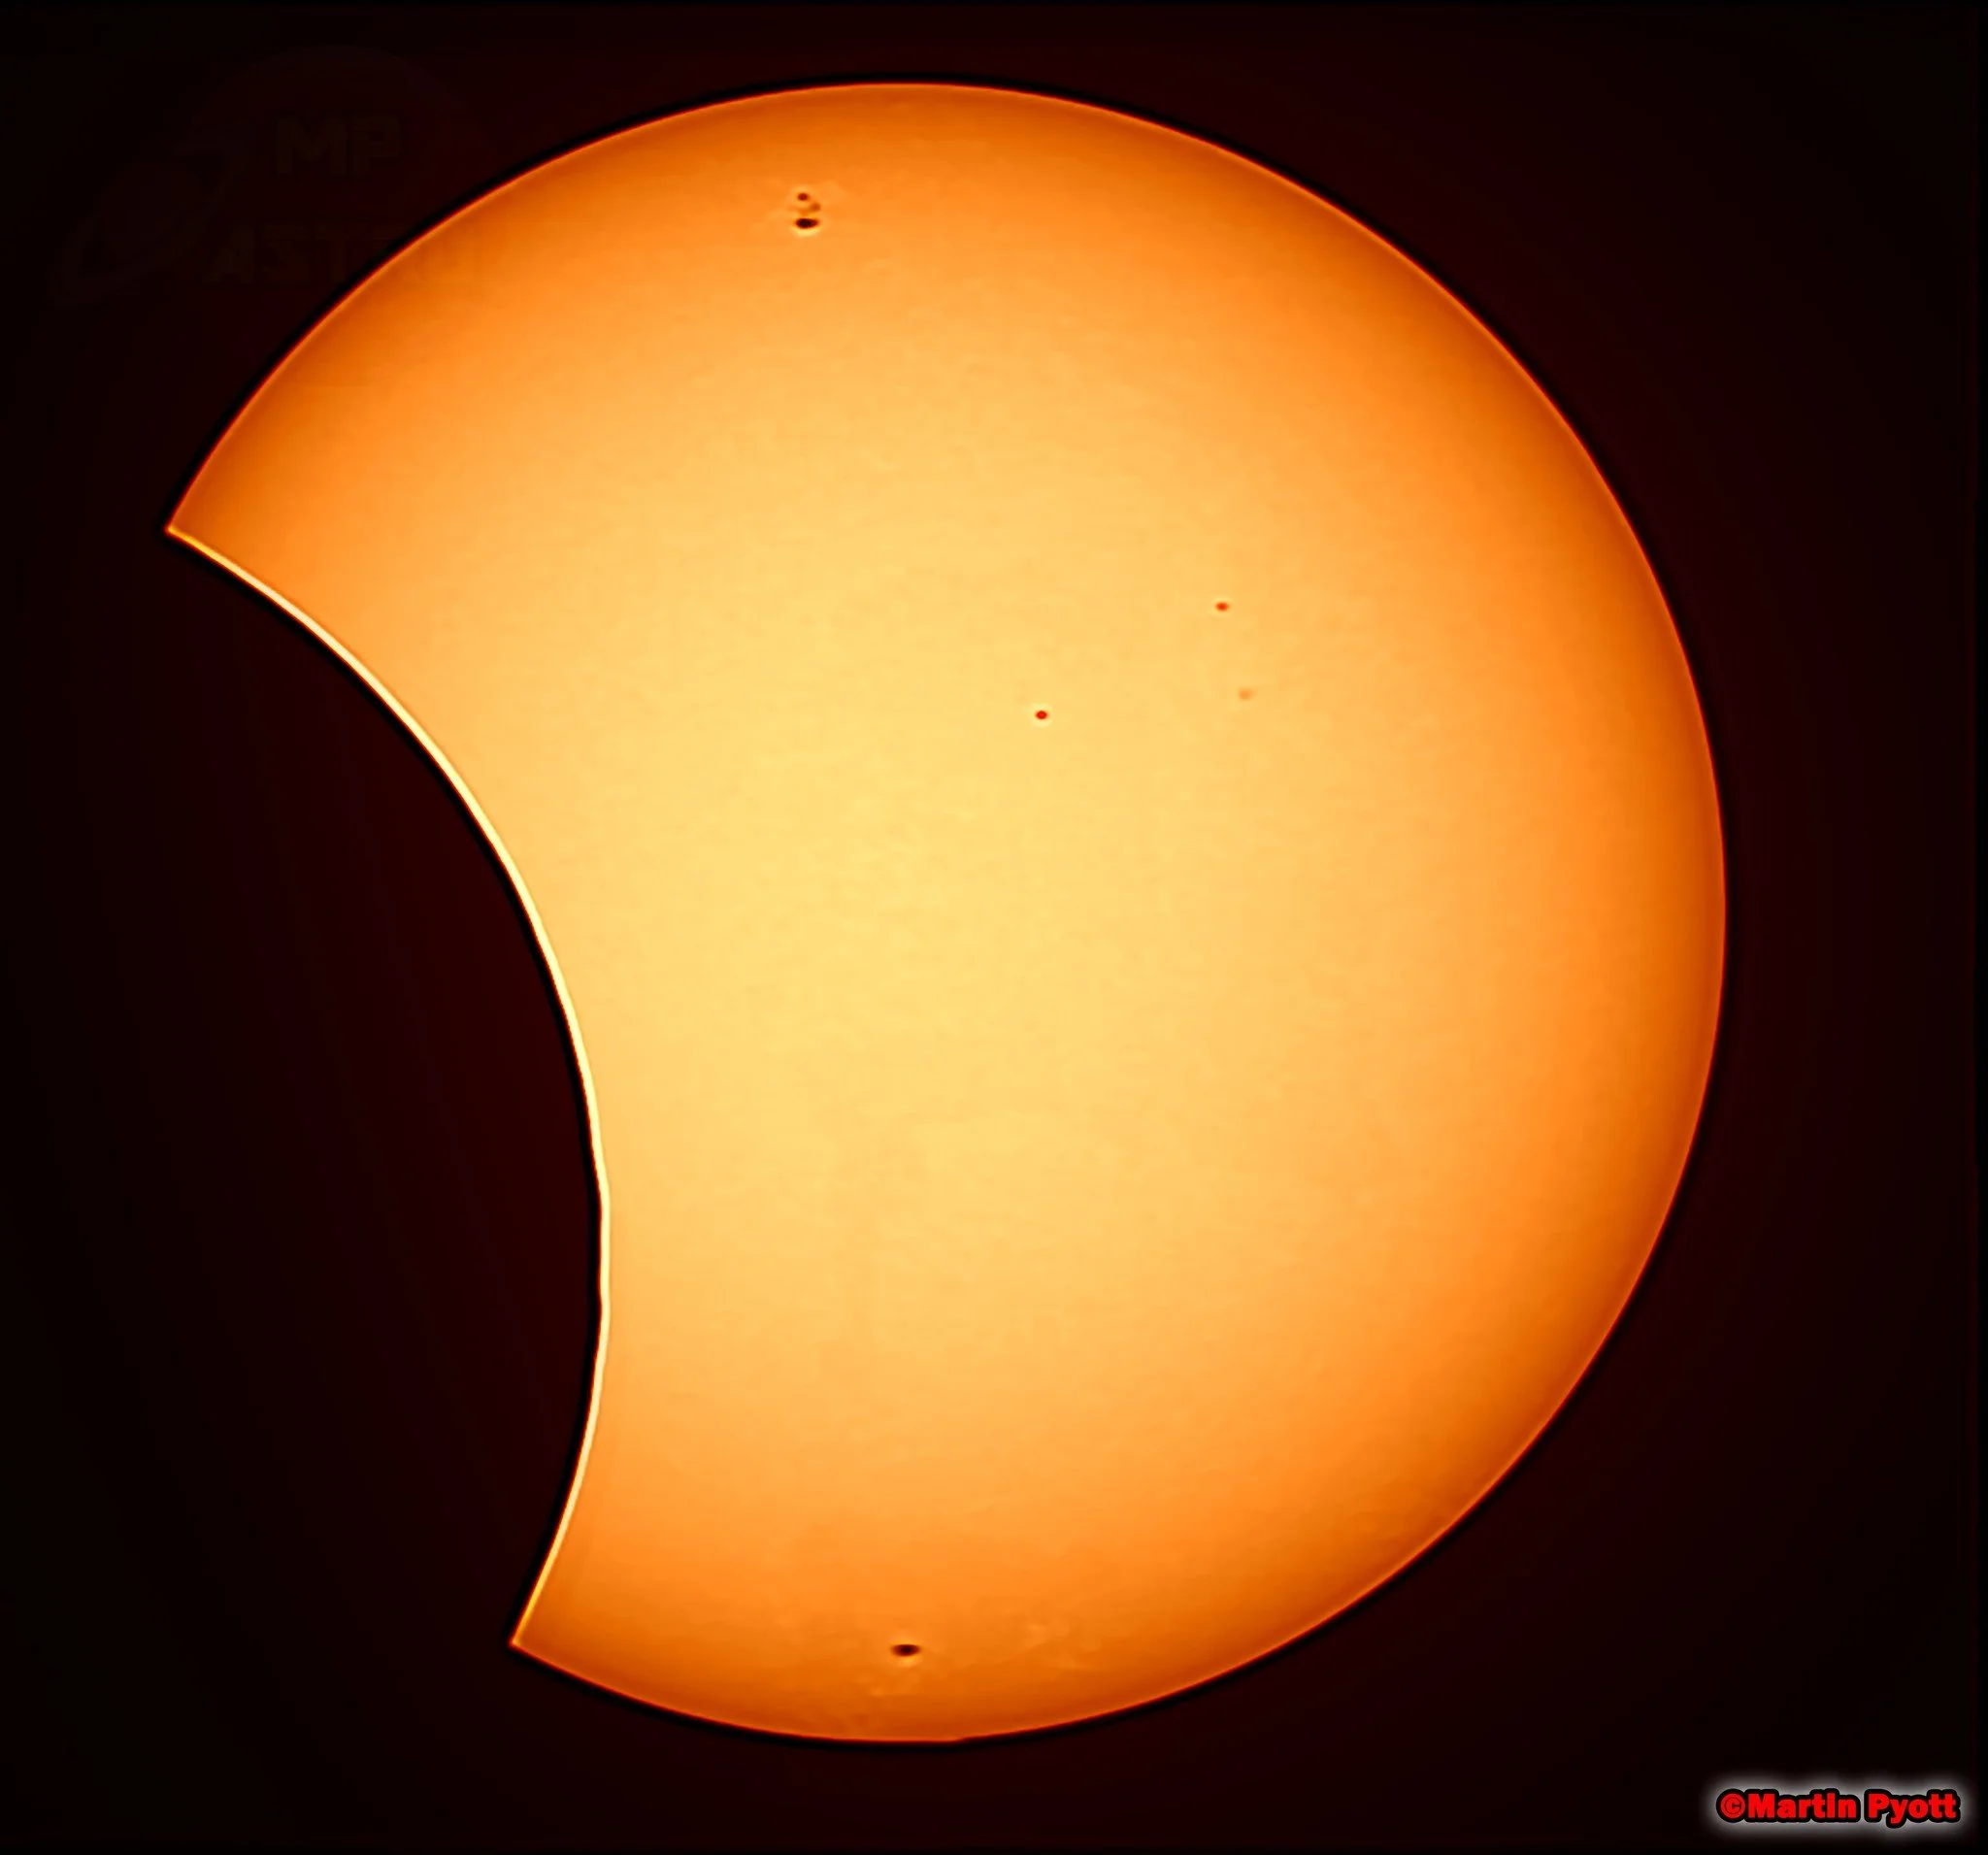
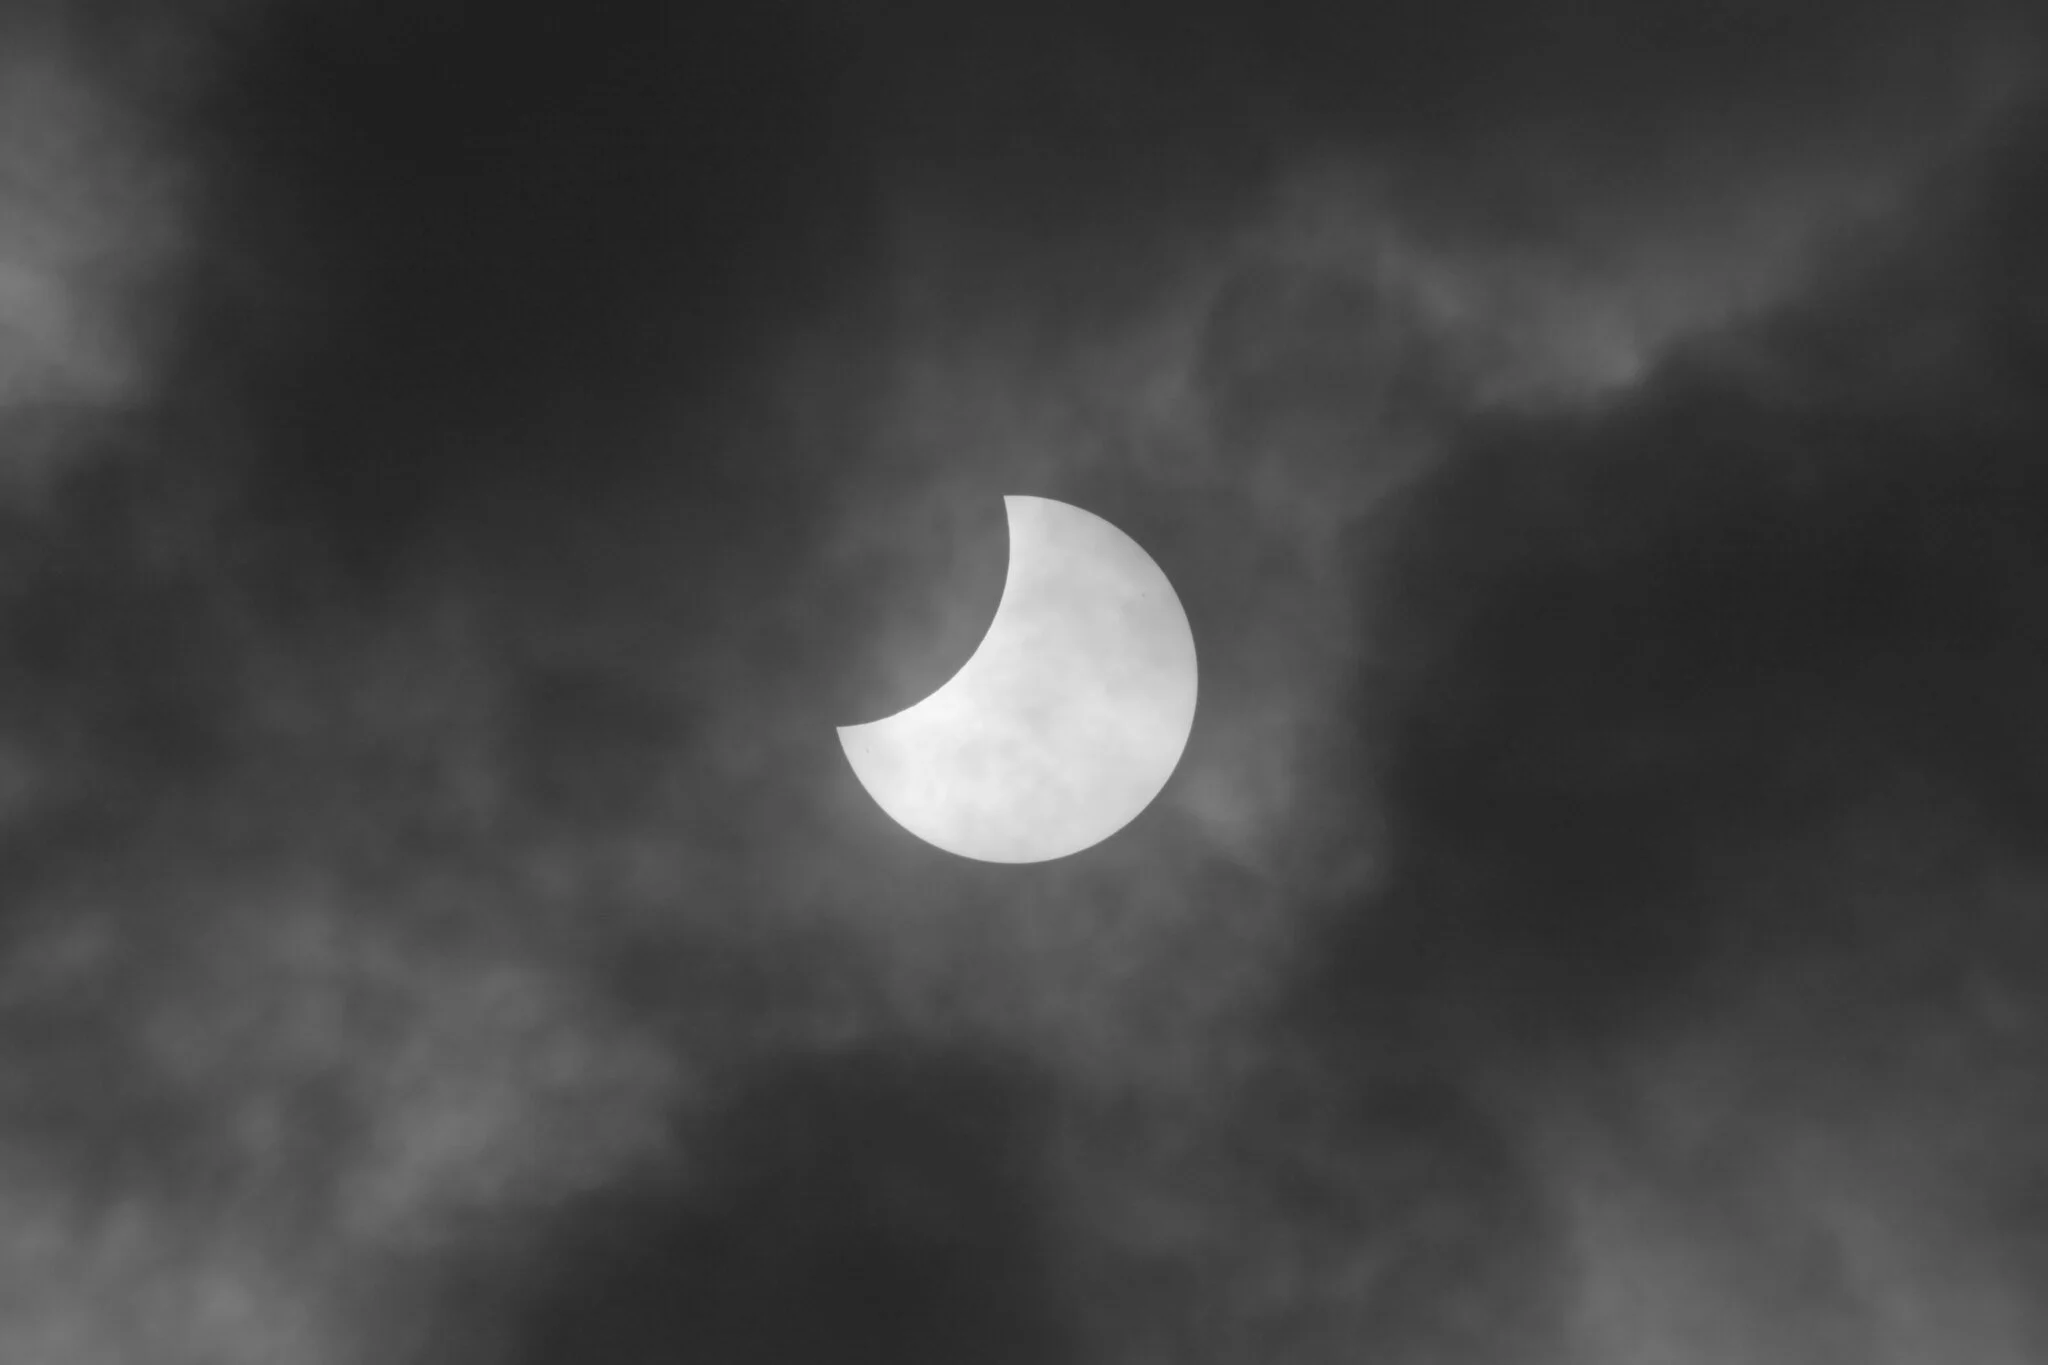
What a day, I'm so glad my boss granted me to do this over break time!! BONUS everyone was thrilled to glimpse the Partial Eclipse today at work through my telescope for the first time, I've never seen their faces drop before.
Equipment:
Altair Astro 66mm ED
Canon 600D
Solar Filter
Skywatcher AZ Advant mount with single RA motor
Baader Contiumin Filter
Badder IR/UV Filter
Image:
1920x1080 HD Video of 3 mins
ISO 200
Exposure: 1/4000
Around 4000 frames stacked in PIPP
50% stacked in AutoSkarkkert 3
Wavelets adjusted in Registax 6
Final Processed in Photoshop CS 2022
Image by Martin Pyott
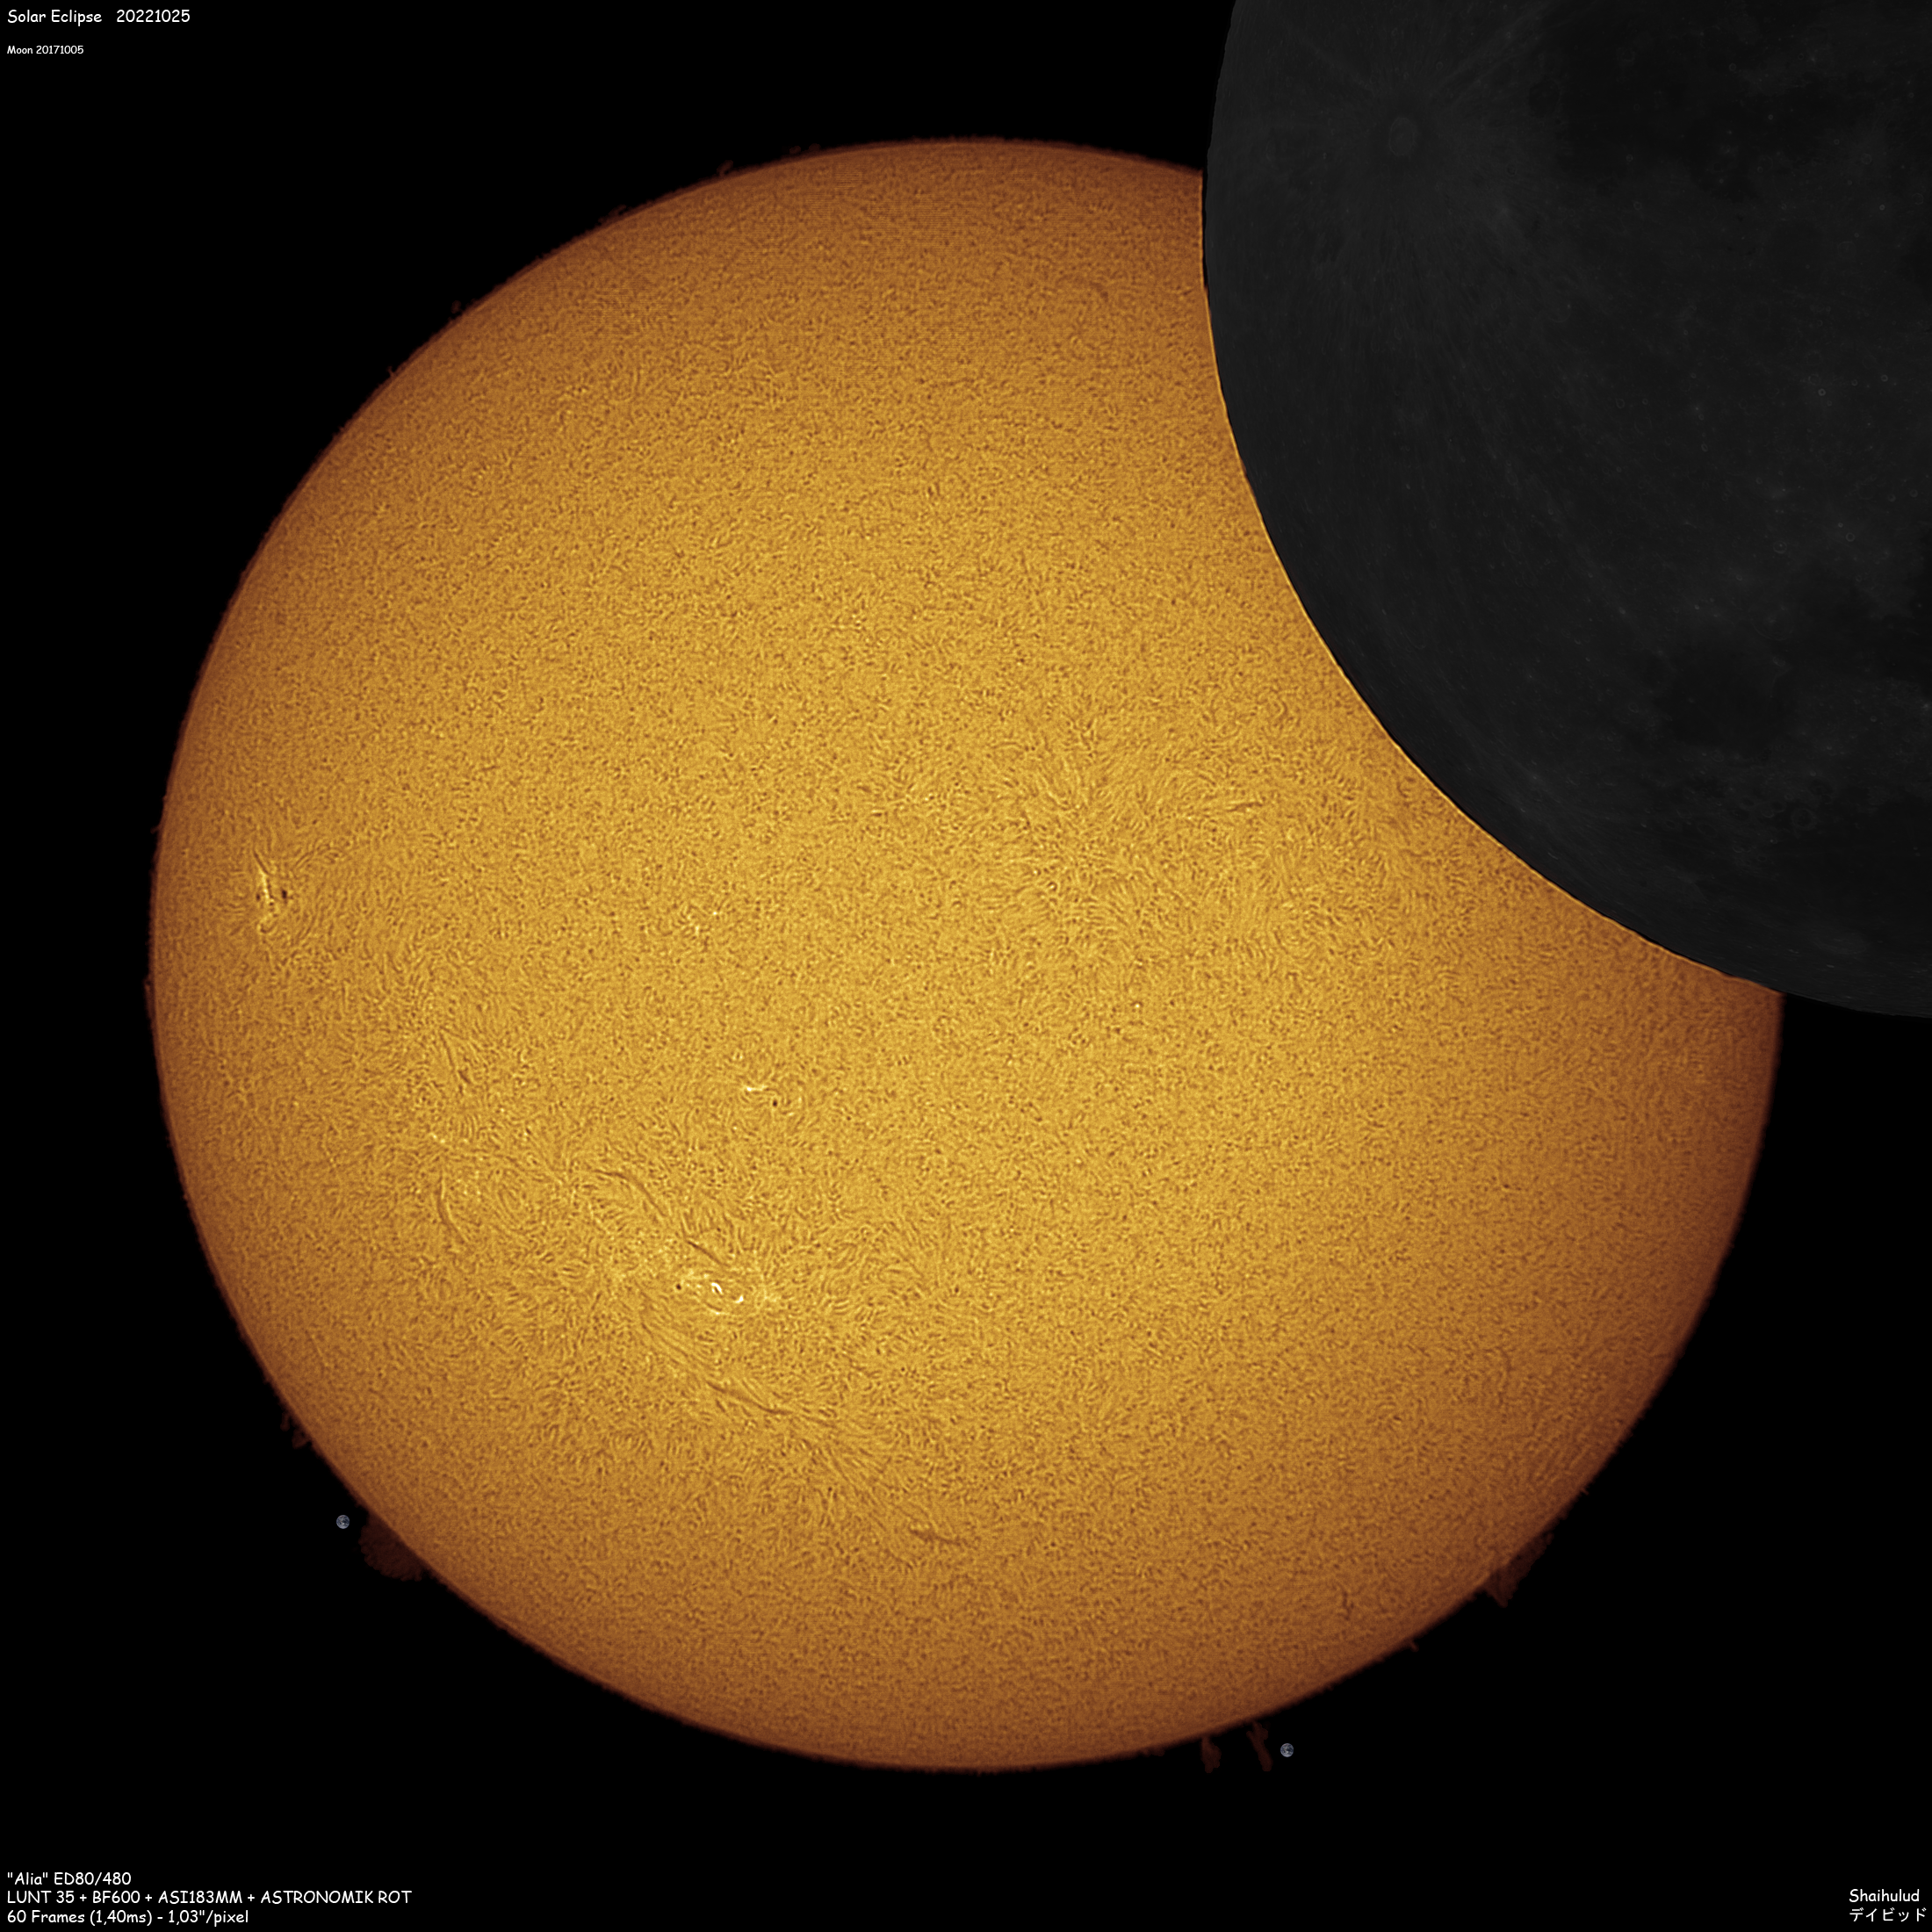
Solar Eclipse 20221025
Moon 20171005
"Alia" ED80/480
LUNT 35 + BF600 + ASI183MM
+ ASTRONOMIK ROT
60 Frames (1,40ms) - 1,03"/pixel
Image by Shaihulud - デイビッド
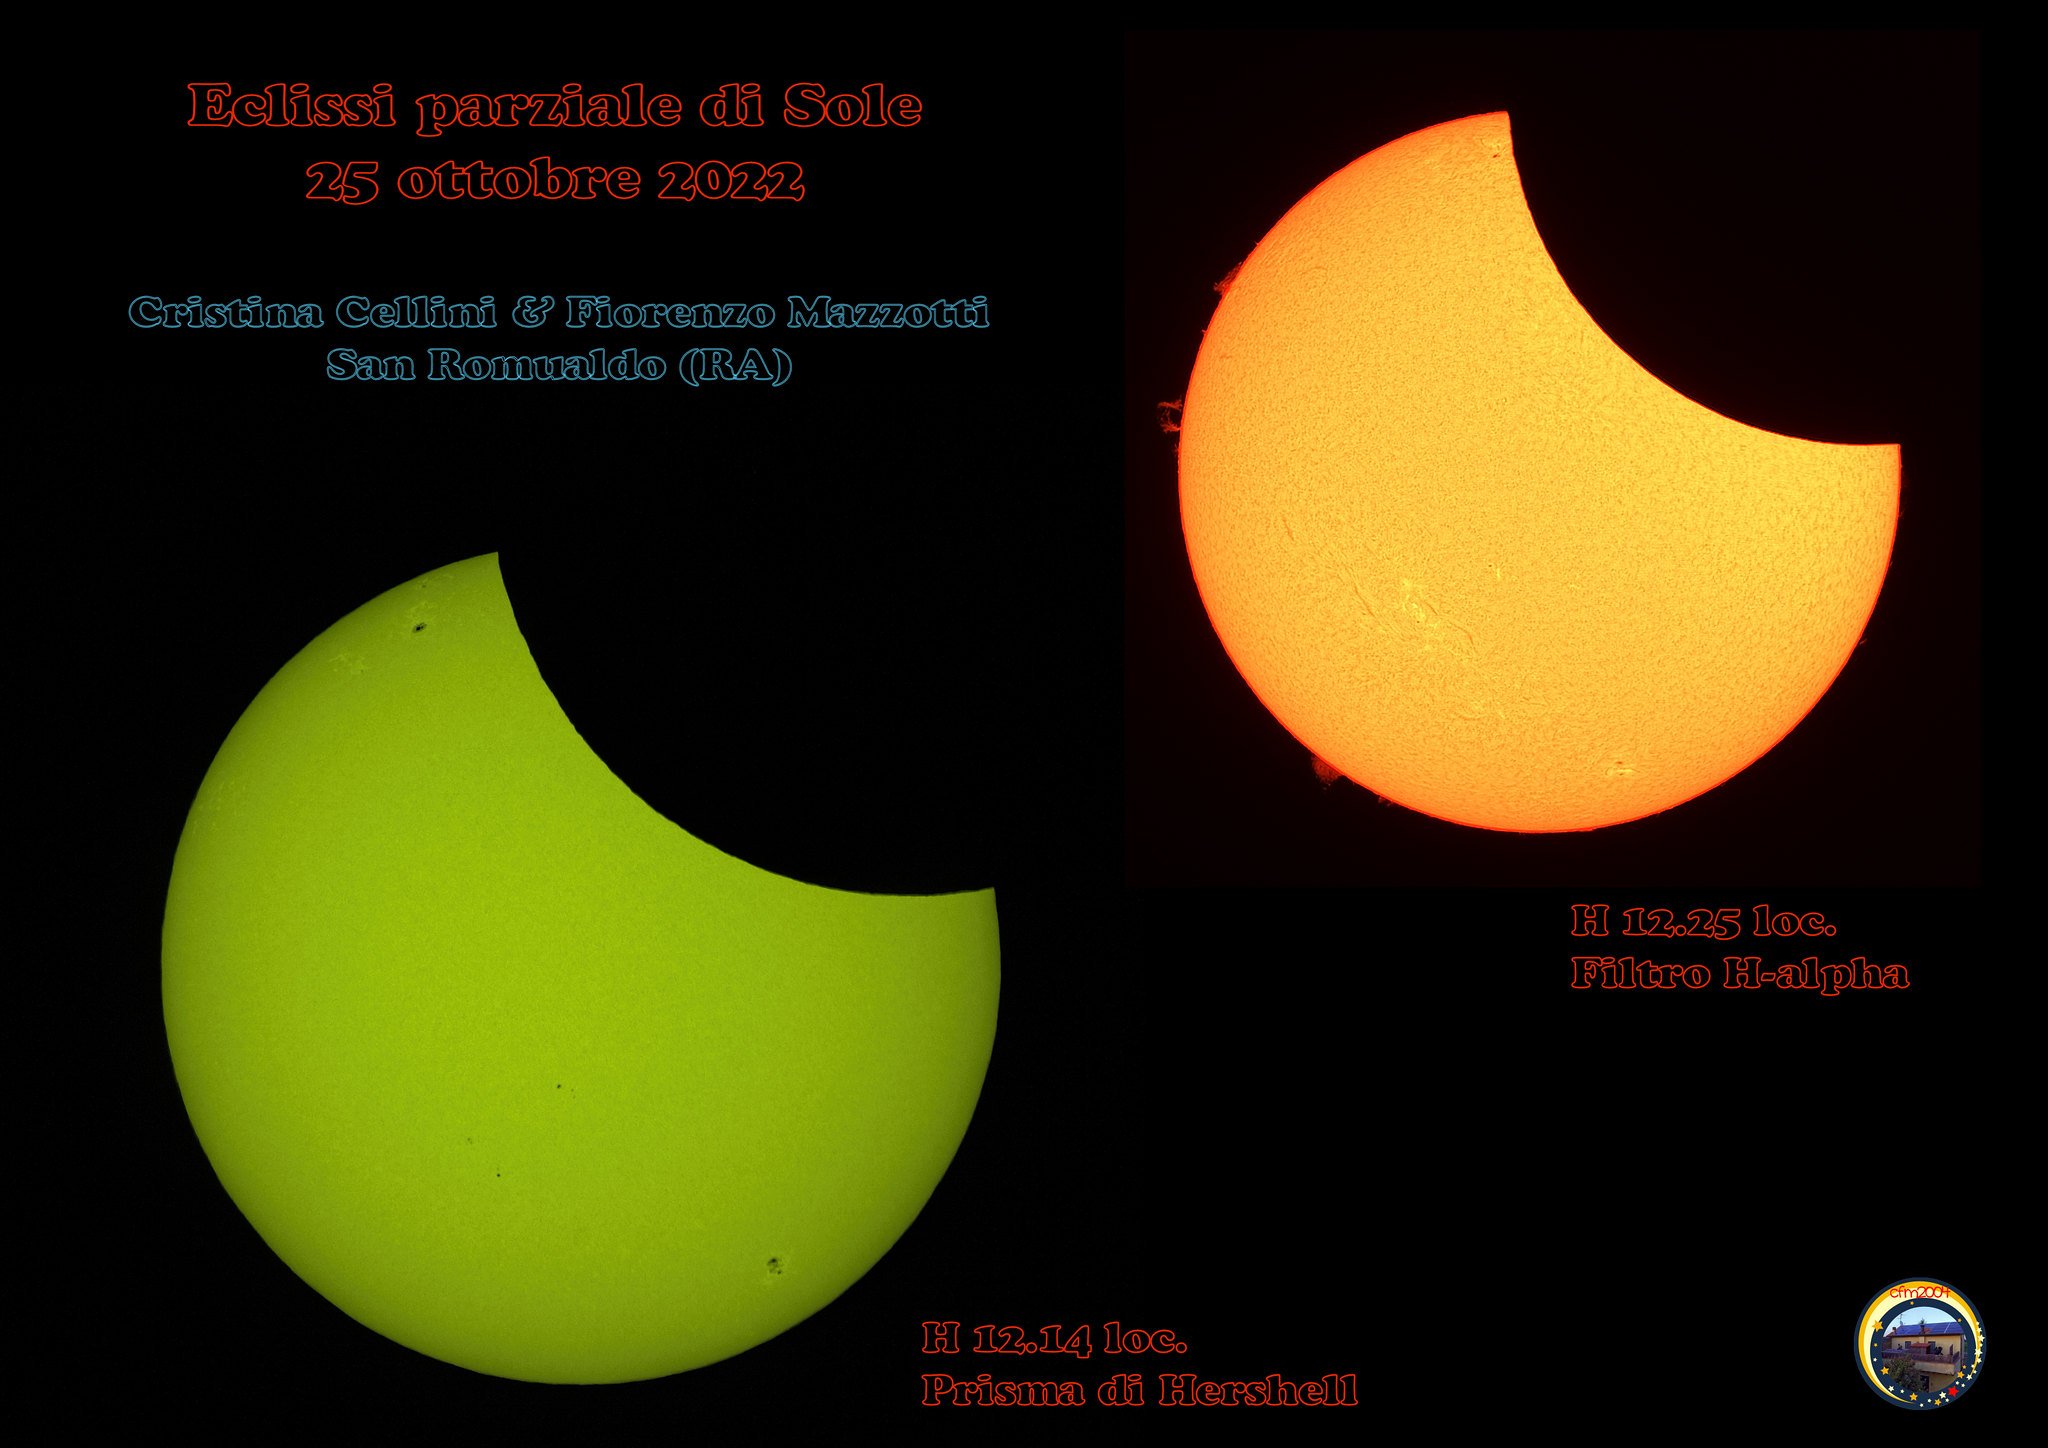
Eclissi di sole
25 ottobre 2022
Luce bianca: Canon 5D MarkII su Antares Callisto 120/1000 con prisma di Hershell.
H-alpha: QHY533C su Pentax75 con filtro Coronado 60 BF15.
Image by Cristina Cellini
Automation Station – Pick of the Automation Products for The Windy Obsy
by Tim Cowell
With the main parts of the observatory in place and good internet communications established, it
was time to attend to the needs of the telescope. All of the major requirements to take a nice picture
were there. To take things a stage further and save a great deal of trotting back and forth in the dark,
it was time for more gadgets - here are the bits fitted or selected for the automation phase.

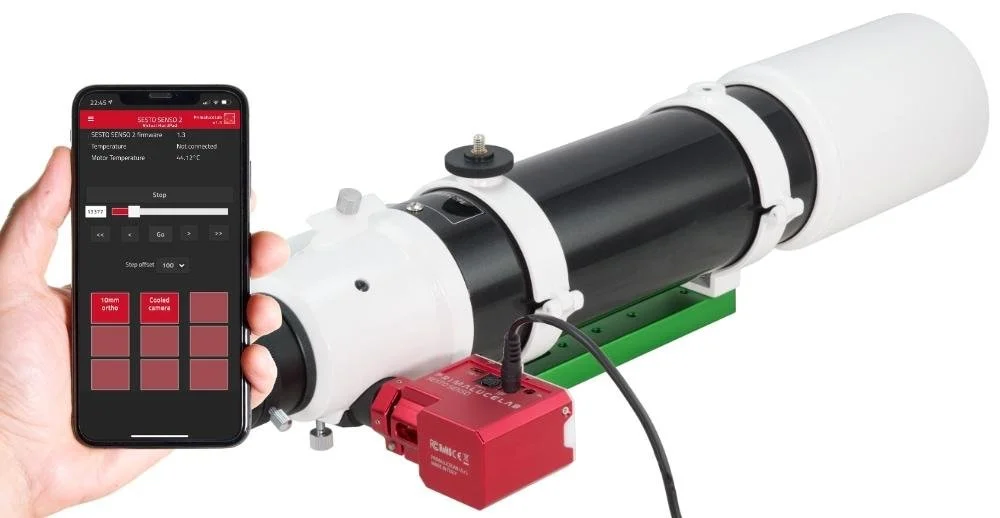
Auto Focus
Auto Focus is a fantastic way to further automate your imaging rig. You'll see the benefits
immediately. The vibrations caused by touching a telescope, especially at high magnifications are
horrible and make focus harder to achieve. The SESTO SENSO 2 provides smooth and precise
focus by way of its powerful, high resolution motor. A simple mounting and coupling system
ensures a fuss-free fitment and it can be operated without a data cable because it has its own WiFi
inside and a special App to configure and control it using your phone or PDA, a laptop or your PC.

The SESTO SENSO 2 integrates into your imaging software as easily as it is fitted to your imaging
train. It is straightforward to configure for automatic focus routines and for time or temperature
changes. It can be used in remote control mode from a phone and with the power off using the
coarse knob on the telescope.
Filter Wheel
The filter wheel is a 'must have' for dedicated mono camera users. I often swap a colour camera
with a mono, so in my 5 position wheel I have the usual 3 narrowband filters alongside matching
Optolong UV/IR Cut and L/Enhance. You can choose many interesting combinations with endless
opportunity to experiment. ZWO have paid attention to the design with their product, making this
very simple to attach to and integrate with most setups.
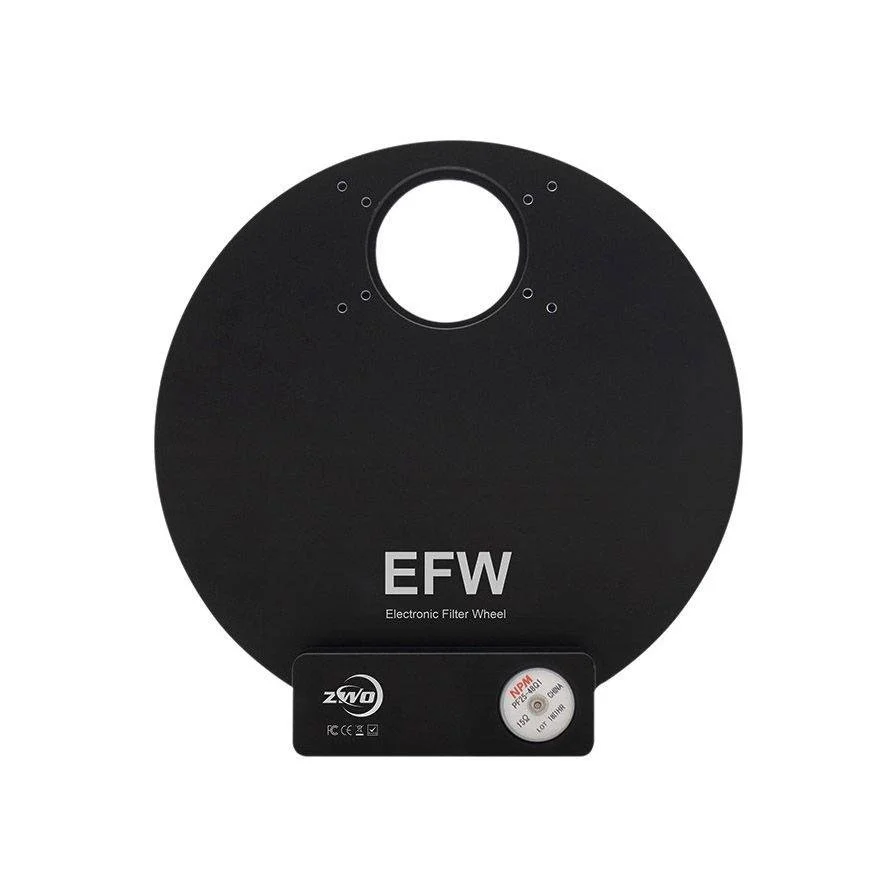
The ZWO 5 Position 2” filter wheel comes with all the bits you probably need in the box (there are
plenty of other choices like their Mini 5 or larger filter wheels), they seem to work easily with most
imaging software and have caused me no problems.
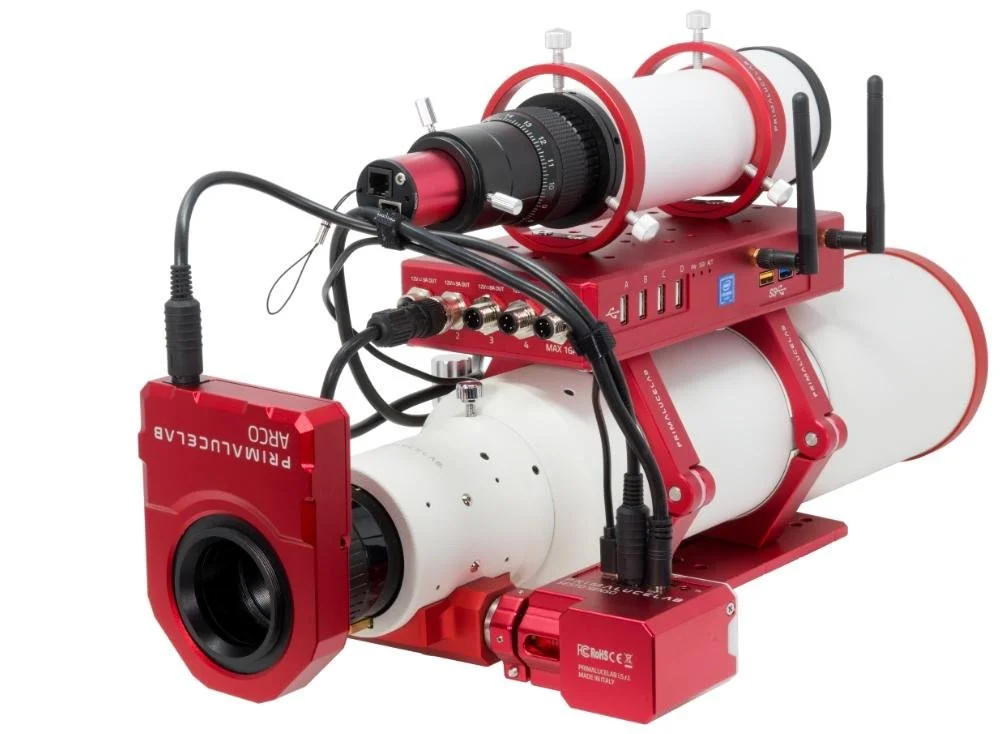
Camera Rotator
The ARCO 2” system is an affordable, ASCOM compatible, robotic rotator. Supremely accurate,
remote control framing is yours. It is only 20mm thick, so can be incorporated into the back-focus
of most installations. Frame de-rotation for Alt-Az is supported too, which I thought was incredibly
interesting and opened up a whole new set of possibilities.
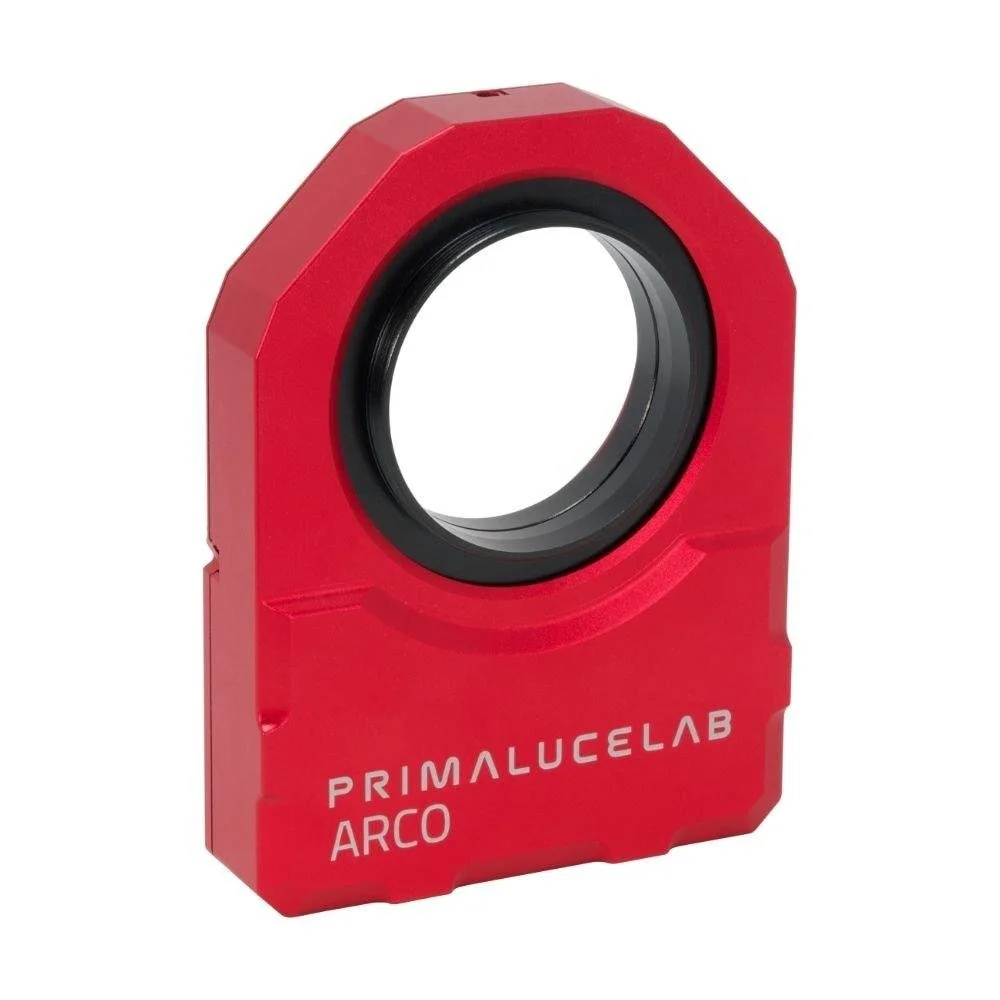
I'm looking forward to being able to get the most of out my framing (something I've not tried very
hard about before) and to be able to match a previous session properly using plate-solving will be
great. The ARCO 2” looks like it will be one of Primaluce Lab's most popular items for automation
aficionados.
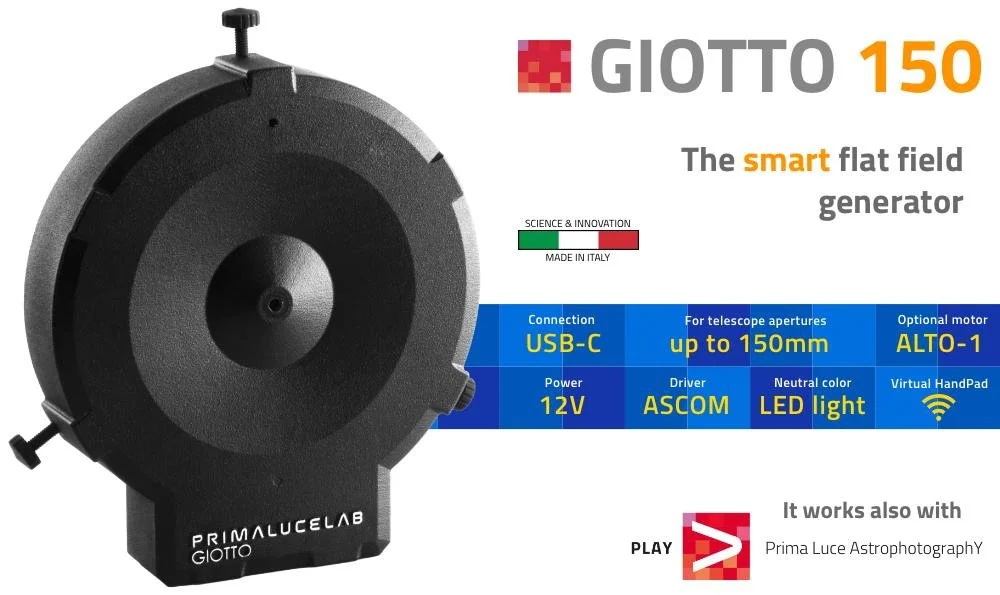
Flat Cap
By combining the GIOTTO Smart Flat Field Generator with the ALTO Telescope Cover Motor you
have a superb way of keeping your optical equipment automatically available and snapping your
flats in the most convenient way imaginable. LED lights have been selected for a special even tone
to recreate the colour temperature of sunlight. A diffuser evenly spreads the light for a perfect flat,
every time. Adjustable intensity in 100 steps (0-100%) to satisfy the most exact of filtering
conditions. This solution for flat capture has its own software and is also fully ASCOM compatible.
Without doubt my 'must have' of the year. I'm done with balancing acts and fancy parking. I tripped
over the light fantastic too many times. Not only does this cap fit, it hangs itself up out of the way.
What sold me? Software controllable brightness. That wraps up the automation needs for this part
of the build. I'll be back with updates as they happen.

La Palma Starlight Reserve
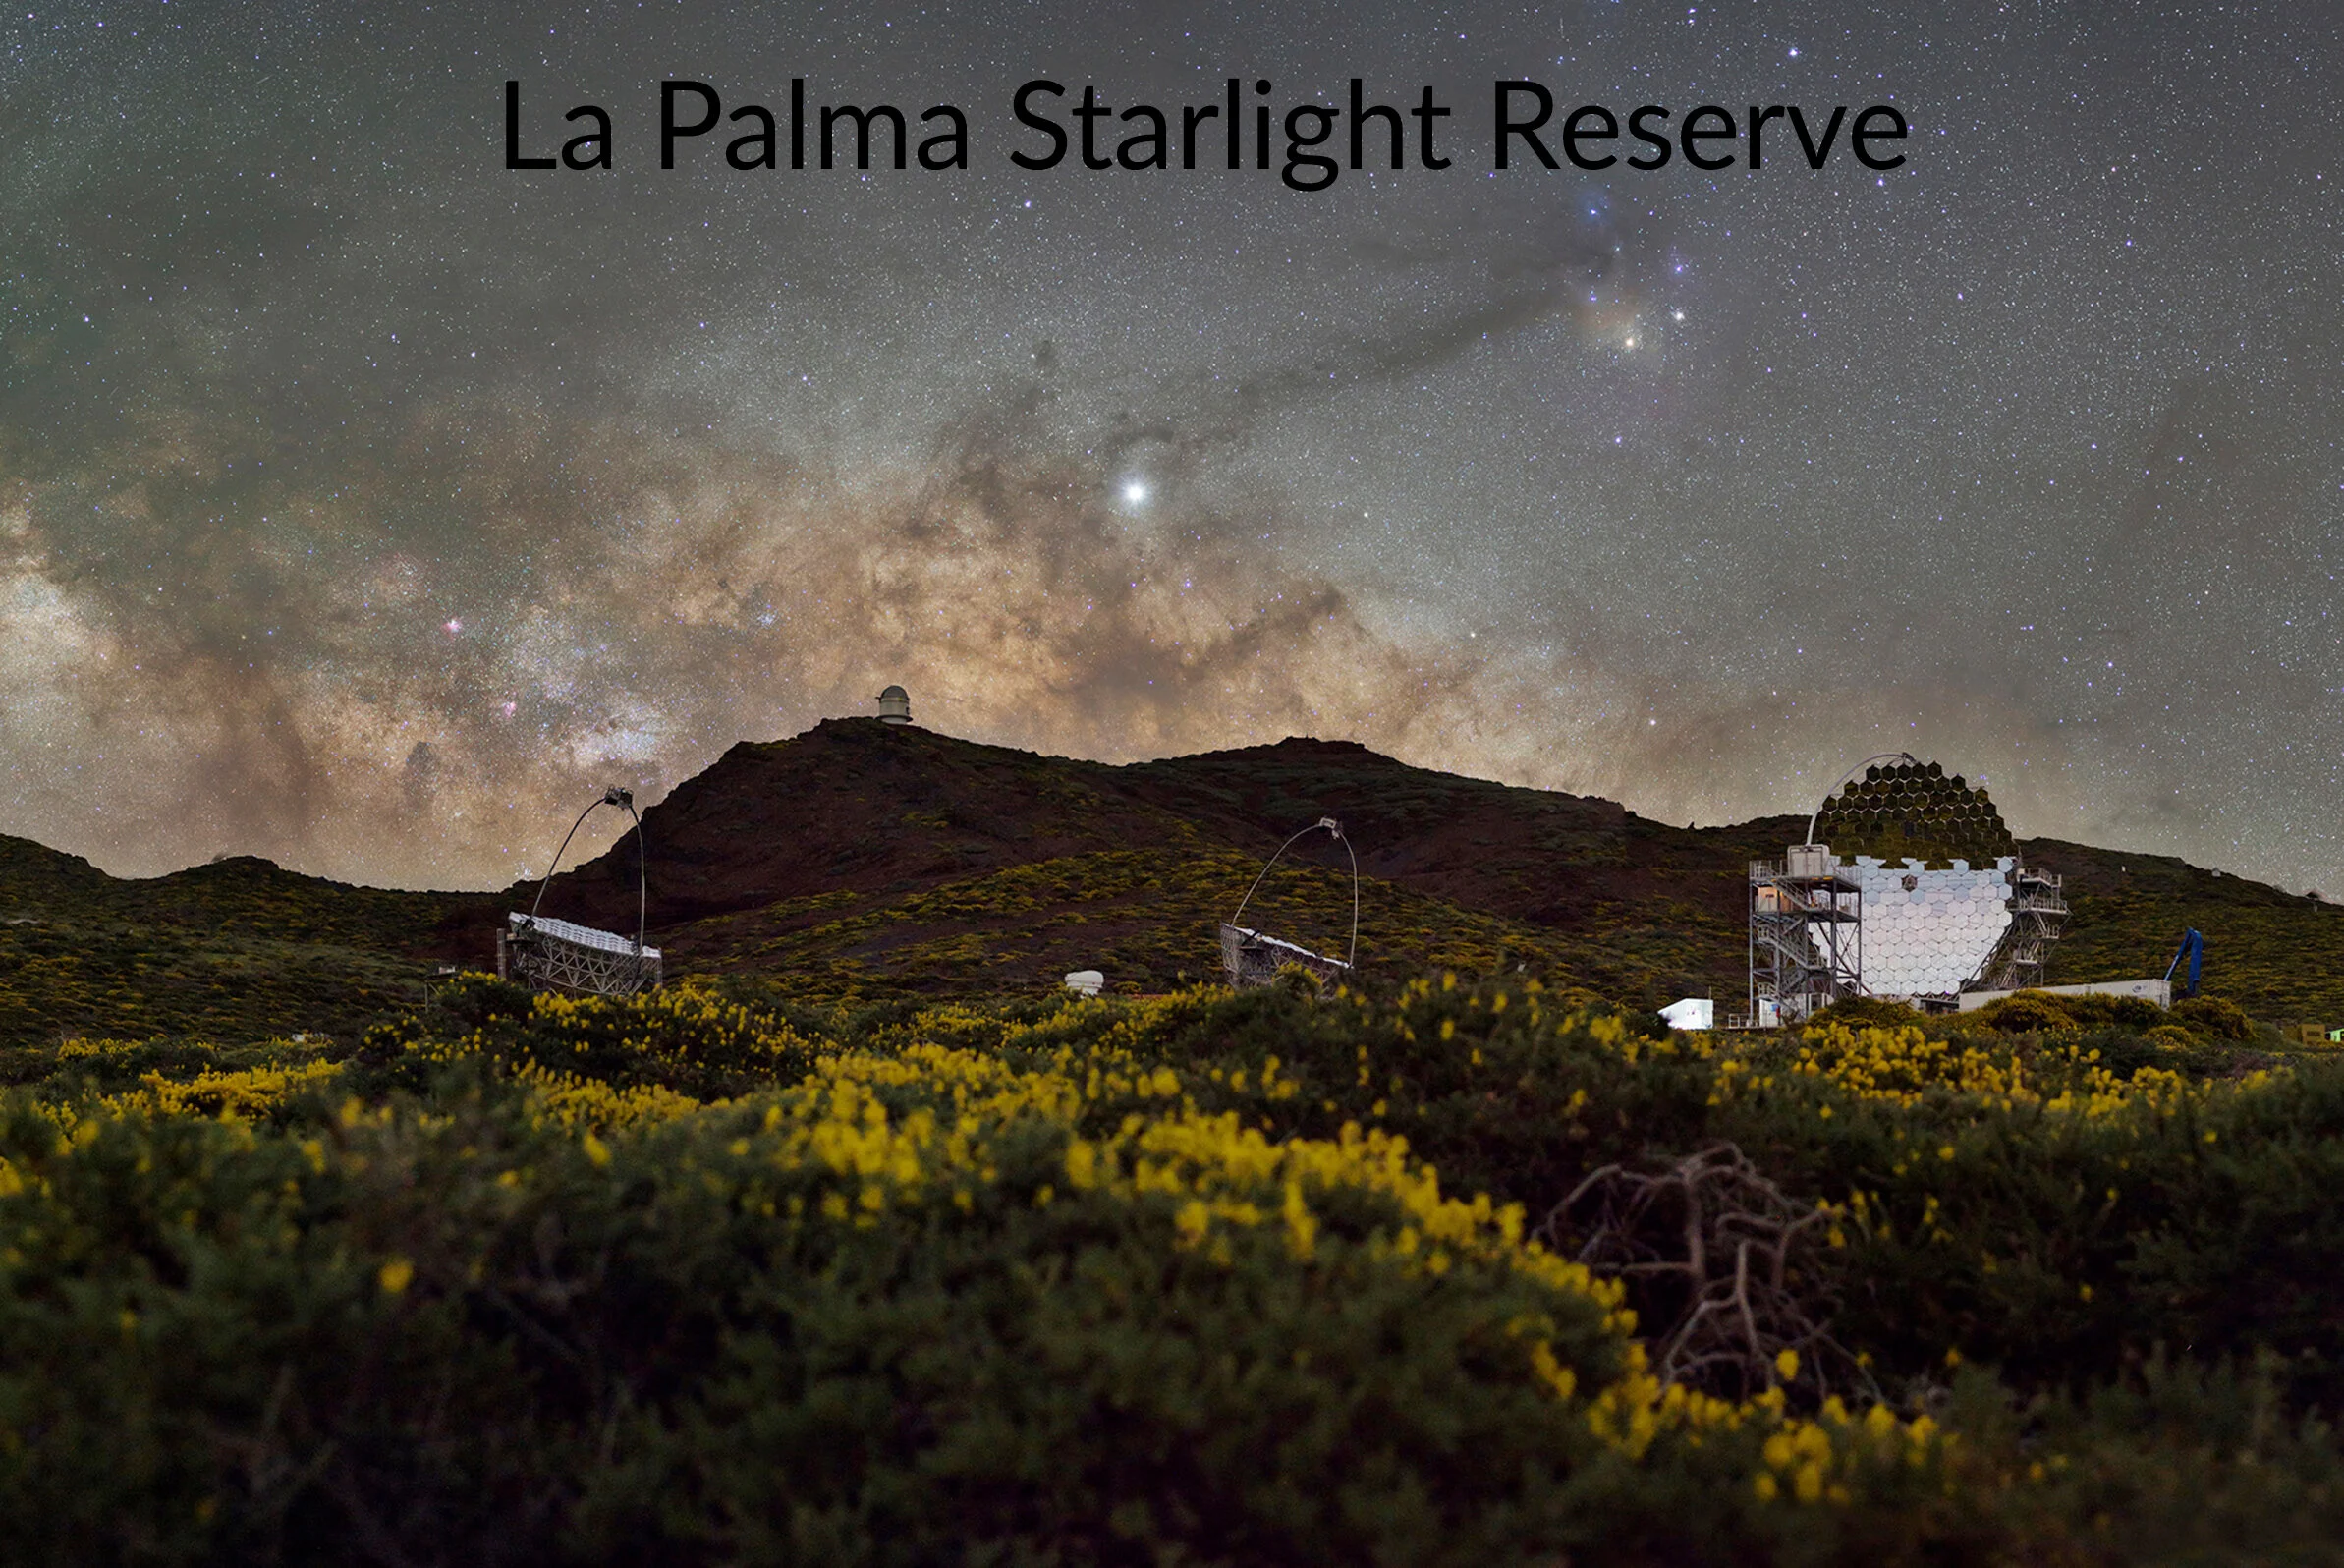
I took my first Milky Way Image in April 2017 after waiting endless hours on a dark road of La Palmas Roque de Los Muchachos until the Milky Way appeared at the horizon. This was the starting point for a formative odyssey that most astrophotographers may relate to. Before I reached that point I was spending my twenties as DJ and VJ at Raves and Festivals. I was already interested in long exposure photography and work as a freelance photographer and graphic designer since 2012 - but in Leipzig are usually Parties, Raves and Electronic Music the common activities at night - at least for me and my social environment as we turned from Ravers to DJs, organizers and operators.
From the first time I ever pressed the button of a smoke machine I wanted to learn all creative-technical aspects of a Nightclub. So somewhen I ended up as a Vj who was responsible for the lights, projection mapping and the mood of the venue. Working with light to support the vibe of the dancefloor and music is awesome - especially at hypnotic techno raves but I realized that this kind of artificial environment is just like an aesthetic simulation driven by desire and longing. I wanted to experience it with all my senses so I started to sneak out into the night to use my skills and love for light, technology and photography to discover the natural origin of these dancefloor moods and feelings.
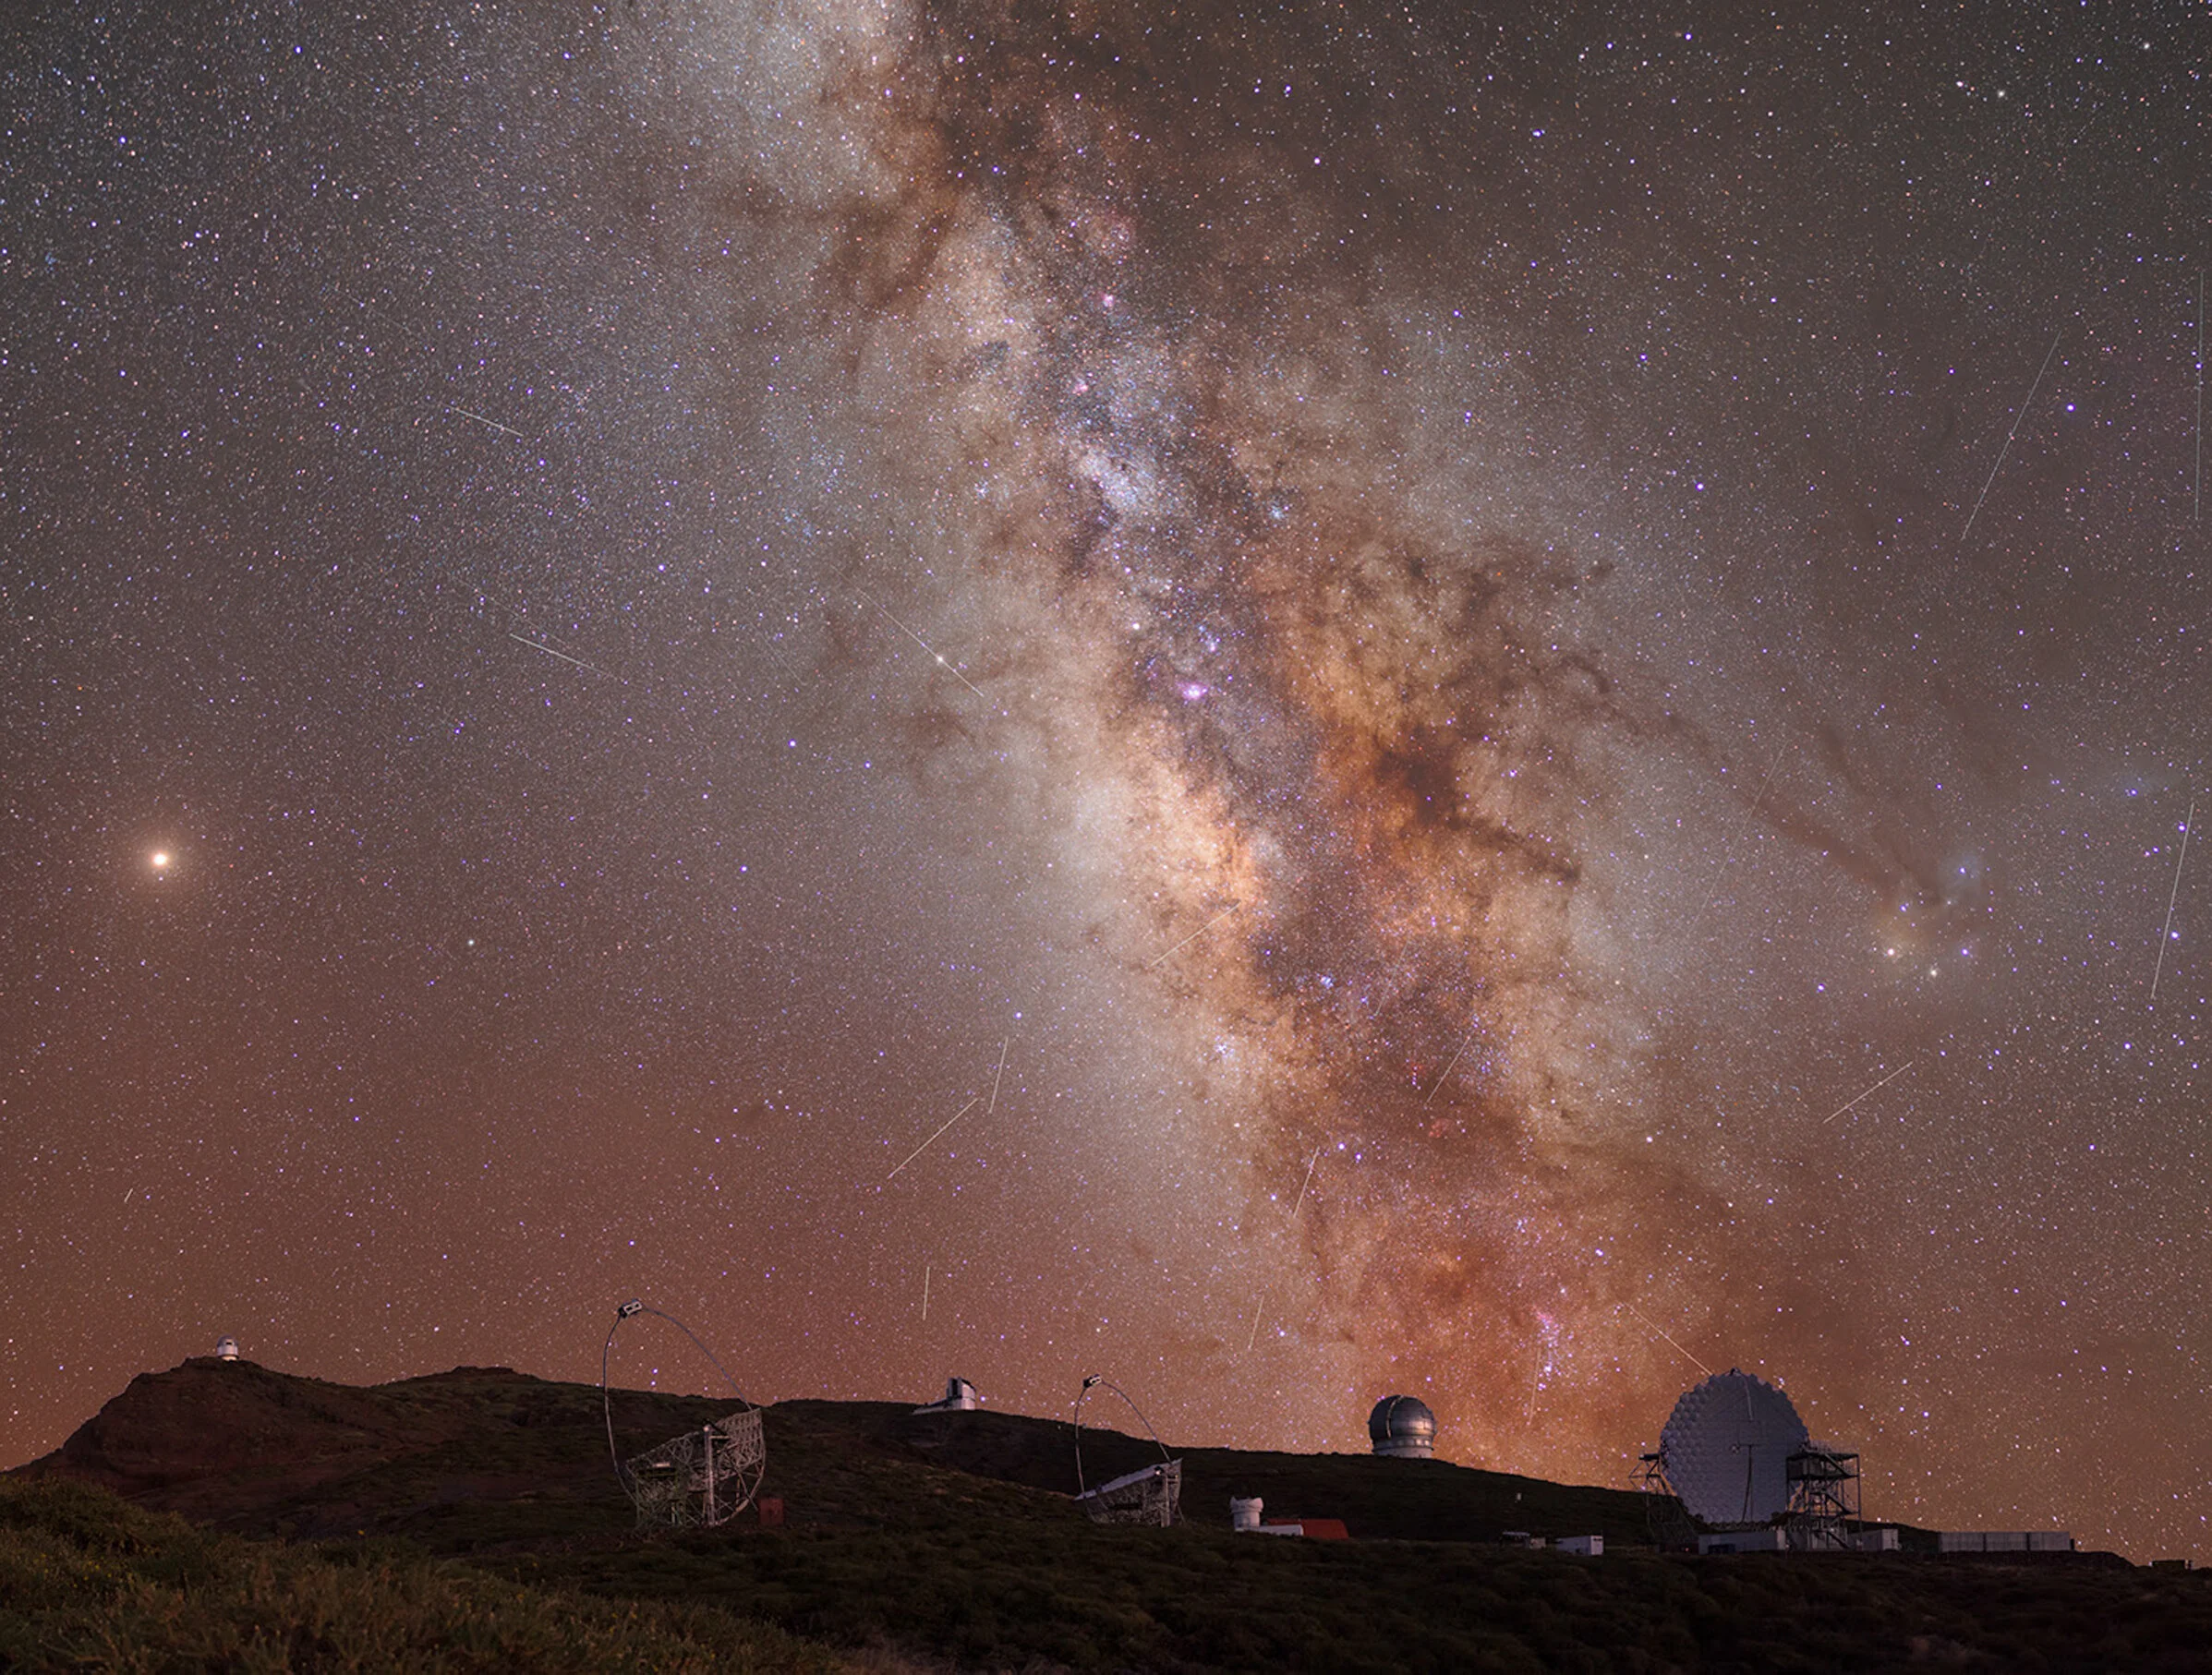
The Milky Way in relation with the contrast between wild landscapes and high technology observatories became my new obsession. In 2018 I started to travel to the Canary Islands regularly - especially to the Isla Bonita - La Palma. I worked on a private building site in a house during the days to keep my trips as cheap and long as possible and became good friends with the owner while I got many chances to explore the famous night sky of the island. At the beginning I brought tons of equipment every night - many different lenses and all kind of stuff. I learned very quick to reduce my gear to the essential and just ended up with my Nikon D810 Full Frame Camera, my beloved AF-S 50mm f/1.8 that I am using almost exclusively, my Samyang 24mm f/1.4, the Vixen Polarie Star Tracker and Manfrotto MT055XPRO3 ALU tripod.
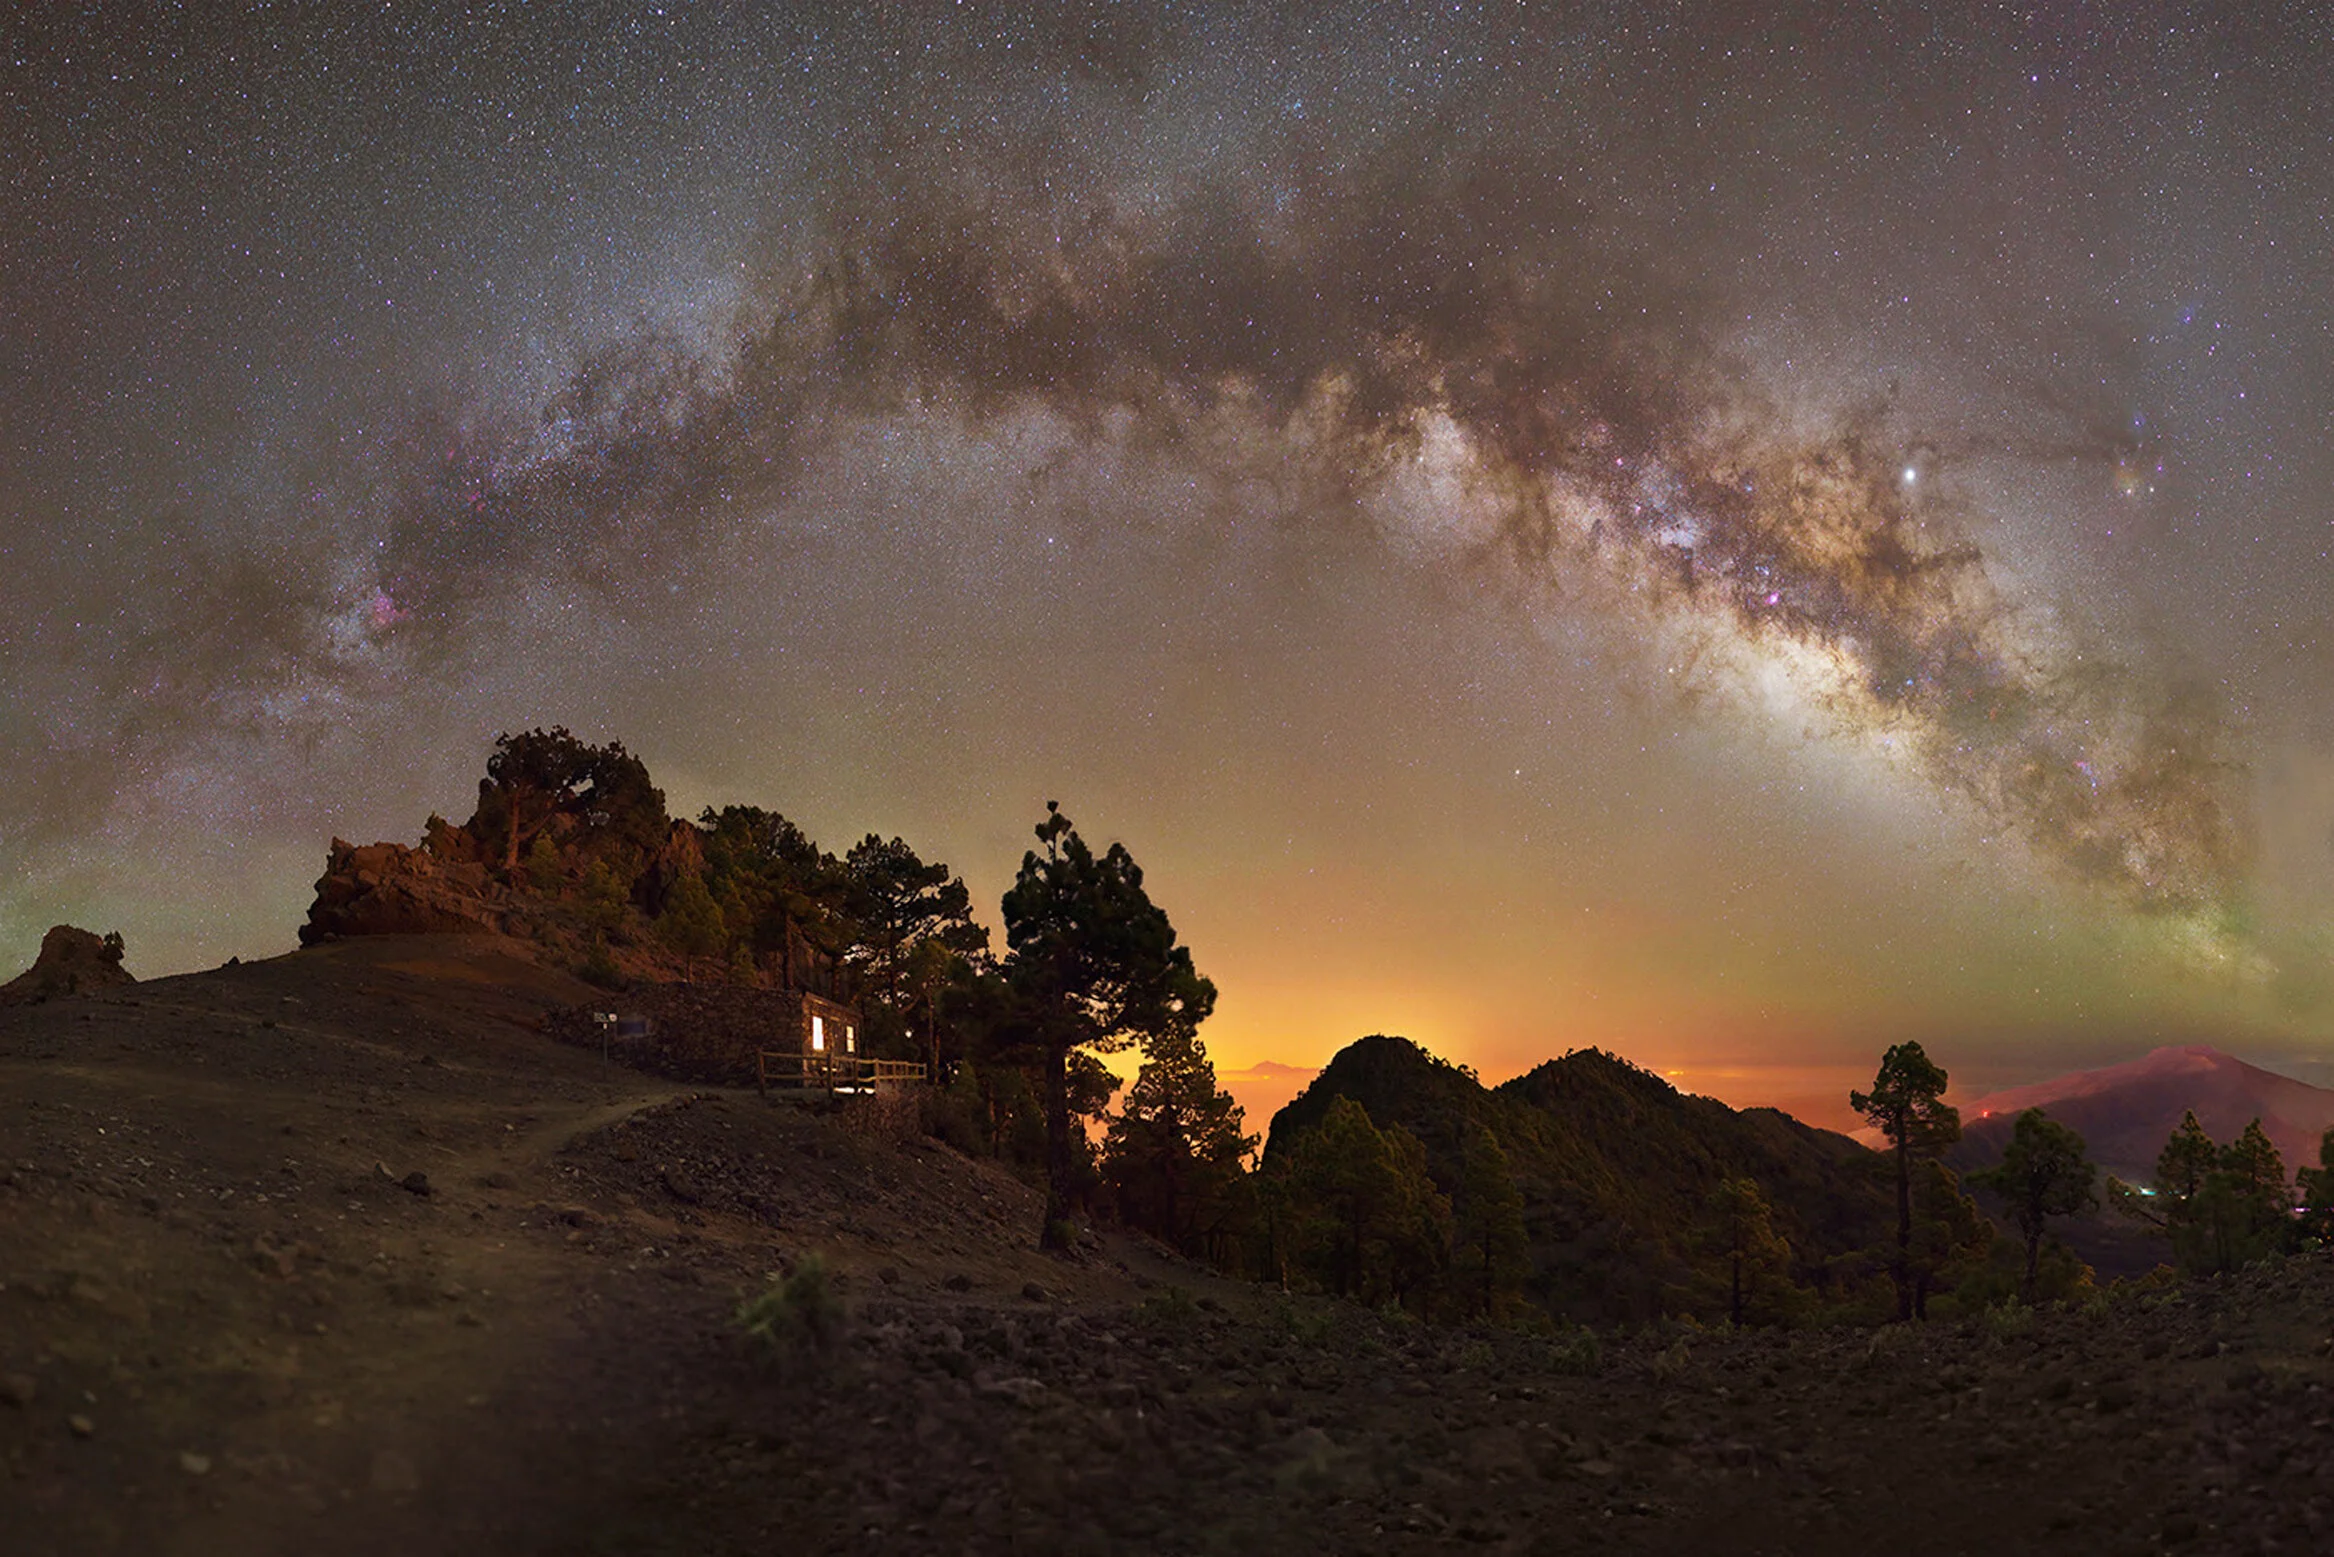
To run the Tracker and to load my phone I also bring a RAVPower 20000mAh Powerbank. Thats actually all I need and with that setup I am very agile and able to walk long distances at night. I am mostly looking for quite complex tracked long exposure panoramas. I love to spend time at the spots and to get more quality and detail into my images with something like 20 images in several rows and 120seconds exposure time - if possible. More work, less images... but the time I am spending out in the field at night is for me as precious as the resulting images. It’s even okay to leave the camera and just enjoy the view - probably caused by the fact that I live my ordinary life in Central Europe under bad light polluted skies.

My favorite location still is La Palma due to the world class conditions, the beautiful telescopes and the extraordinary landscape but I am looking forward to get new input and find new locations. I am graving for the southern sky which was mostly hidden behind a cyclone when I travelled to Mauritius in 2018 to get some images. That’s still one of the things I like so much - even when planning is quite easy nowadays - you can’t control nature and never know what a night will bring. The conditions can turn very rough, the trip exhausting and the fails very painful. But still, the process of learning, improvising and the need for patience make photography - especially of the night sky - so exciting to me and I hope I can keep it up and get into many new adventures and friendships!
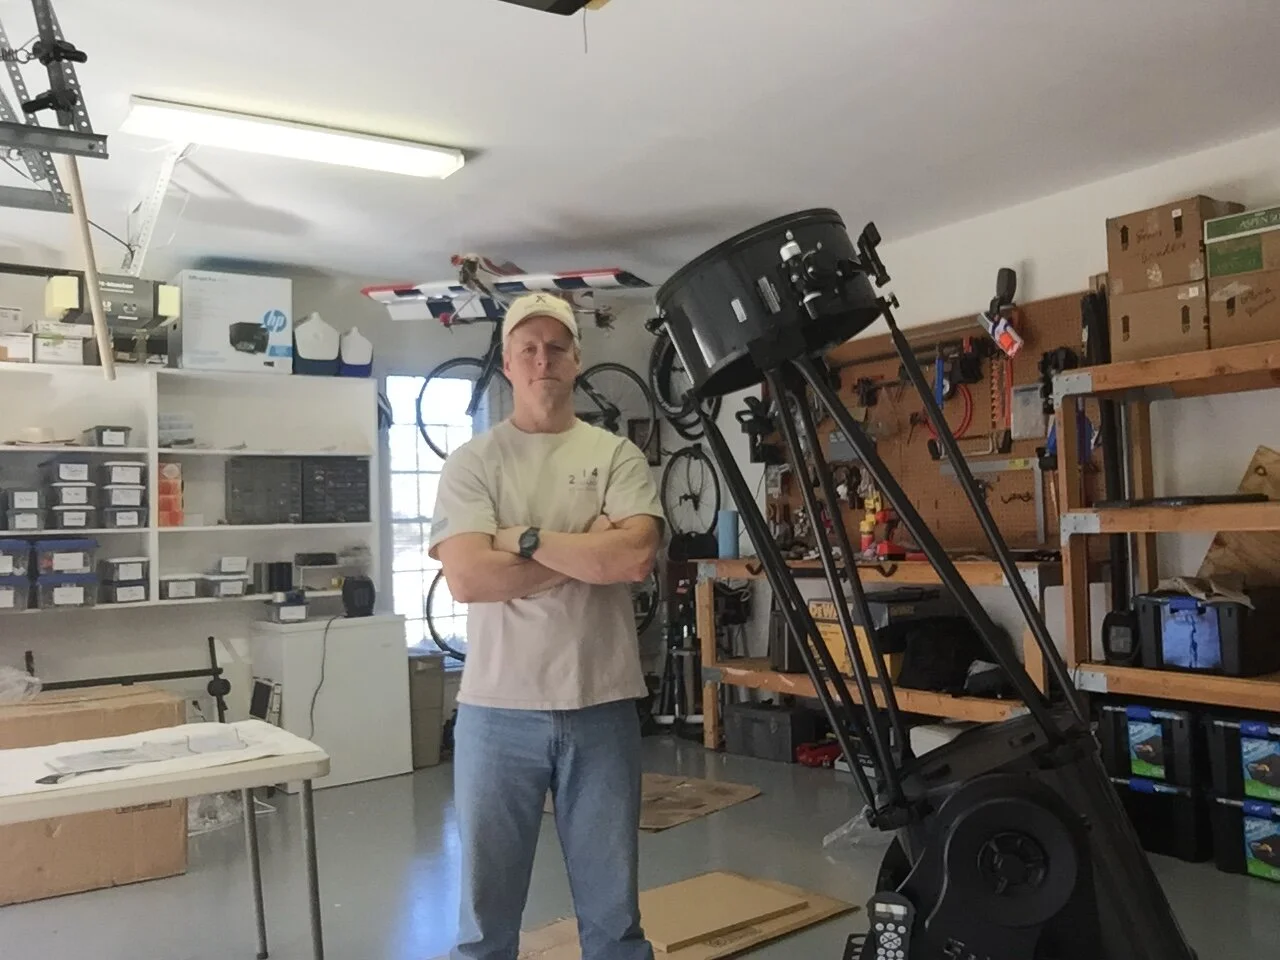
Astrophotography with Dobsonian Telescopes
by Bill Jones.
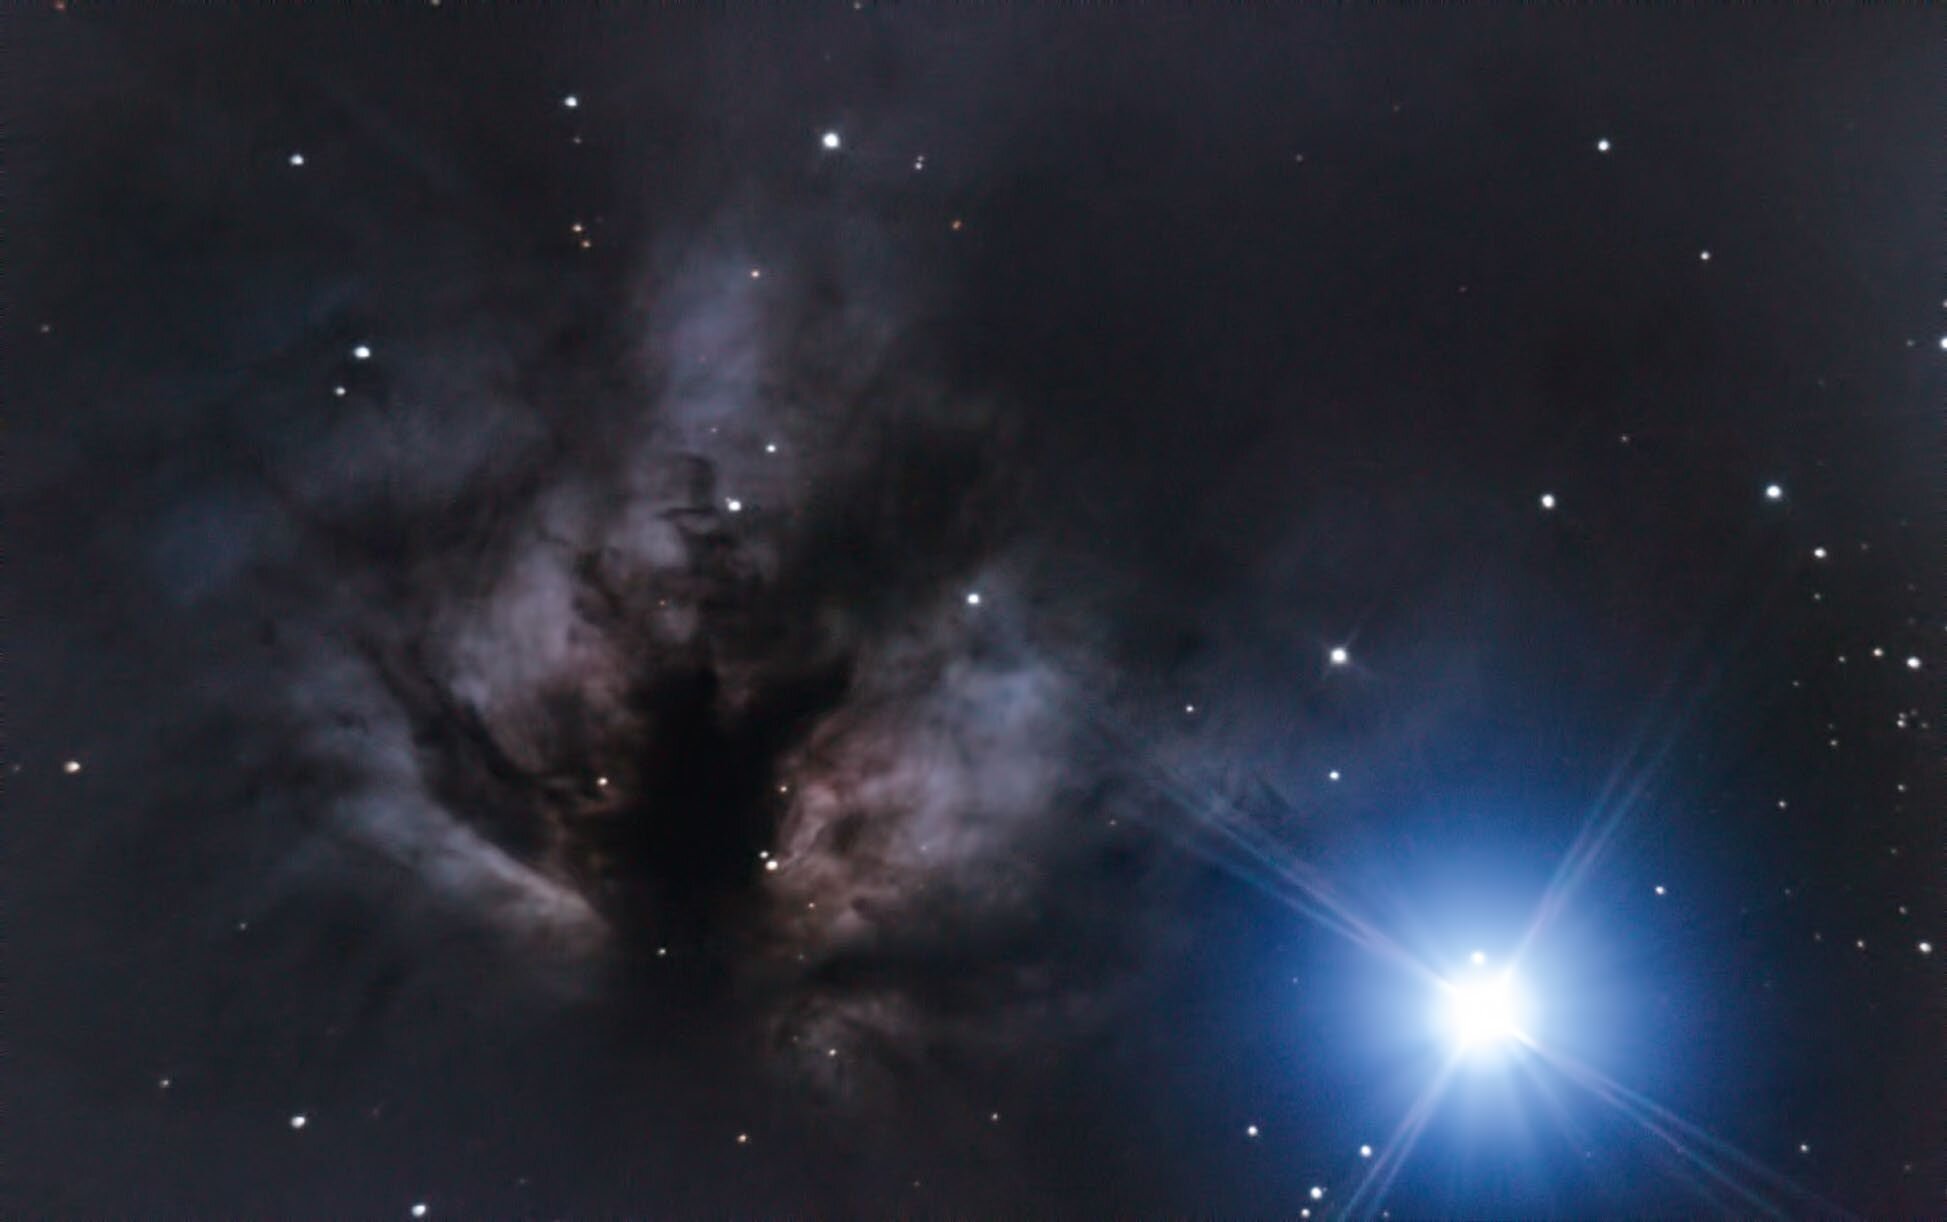
Flame Nebula
Like many of you, my love of this hobby began at an early age. I spent countless hours during many summer nights looking up at the night sky. My first “telescope” was a small spotting scope given to me by my grandfather. Its objective lens was perhaps 1 inch across. I distinctly remember setting it up on the hood of my grandmother’s car and pointing it at the moon. That was it, I was hooked! Let’s clear the water a bit before we press forward. A Dobsonian telescope, simply put, is a Newtonian OTA (optical tube assembly) mounted on an alt/az mount. When John Dobson invented the Dobsonian he wanted the general public to have access to an inexpensive, lightweight, and yet at the same time a large aperture scope. Dobs since then have morphed quite a bit; truss tubes, outstanding optics, GoTo and tracking capabilities, etc. So, what makes a Dob a Dob? Well, it’s the alt/az mount. If that is the case, then we could call any type of scope (Mak, refractor, SC, astrograph) mounted on an alt/az mount a “Dobsonian.” The point being, the terms “Dob,” “Dobsonian,” “alt/az mount,” are all, generally speaking, synonymous. Typically, when buying a Dob, you are trading the accuracy and precision of an equatorial mount for the larger aperture (mirror size). For a given dollar amount, Dobs have a greater light collecting ability.
I own an Orion 16-inch GoTo Dobsonian and as the name implies, it is a standard GoTo scope with the type of hand controller most of us are familiar with. The scope can be completely disassembled and transported. Total time for tear-down and setup is about 25 min. I have transported it a number of times with zero issues. Total weight of the basic scope is about 195 pounds. It has a focal length of 1,800mm giving it a focal ratio of 4.4. It comes with a 2-inch, dual rate (11:1) Crayford focuser. The tracking and GoTo capabilities are not unlike other mounts. On most days it is spot on and on rare occasion, a few resets are required to get it to behave. And being a Dob, the OTA sits on a standard Alt/Az mount. The optics are outstanding. The scope comes with a true parabolic mirror (versus a spherical mirror). I also purchased the optional shroud to keep stray light from entering the bucket.
It goes without saying visual observing with this scope is phenomenal. A friend of mine with an 11-inch Schmidt-Cassegrain (SC) has told me there is no comparison between the two scopes. Many faint galaxies can be viewed through my Dob whereas they remain invisible in his SCT. And, needless to say, M42 is jaw-dropping. It fills the entire field of view and many of its colors are easily seen. Jupiter’s red spot and Saturn’s Cassini gap are both easily discernable.
Many folks out there (I call these folks the “naysayers”), including formal and professional sites, will tell you Dobsonian scopes cannot do astrophotography. Or some will use the term “not ideal for astrophotography (AP) other than planetary”. I completely disagree on several levels. First, what is AP? It is simply a photograph of something my scope is able to resolve. So, if I take a blurry and somewhat ugly picture of M1, I have just delved into the world of AP. I am not aware of any requirements that AP photos be on the order of something we’d see from HST. Think about it. Why do we do AP? I think part of the reason is the “hunt.” Knowing an elusive and difficult target is out there and we hope to capture it on “film” drives us into the bitter cold night after night. But I also think we are motivated by the following: sharing the love and fascination of the hobby with others. Try this one day. Go to a friend and describe to them what you saw the night before when viewing the Flame Nebula. Note their reaction. Now, do the same thing with another friend but this time show them one of your pictures while doing it. You’ll see the reaction is completely different! Pictures allow us to carry our hobby with us and share its joys with others. If I hold my iPhone to the eyepiece of a small alt/az scope I bought at a garage sale last week and snap a picture then it’s done - I’ve just entered the world of AP and the word “can’t” is instantly removed from my vocabulary!
Second, let’s not tell people what their limitations are. Let’s provide them with inputs, guidance, and advice and let them figure out the challenges and their limits. Notice I said “their limits.” Scopes don’t necessarily have limits, people do. The same exact scope in the hands of two different people will have different capabilities. I’ve imaged the moons of Uranus as well as quasars with this scope and yet I know folks with the same scope still struggling to image planets. That’s perfectly fine. Their performance envelope will expand with trial and error just like ours did. Let’s not quell growth in this hobby by setting limits for people on day one by telling owners or soon to be owners of Dobs, “You can’t do astrophotography.”
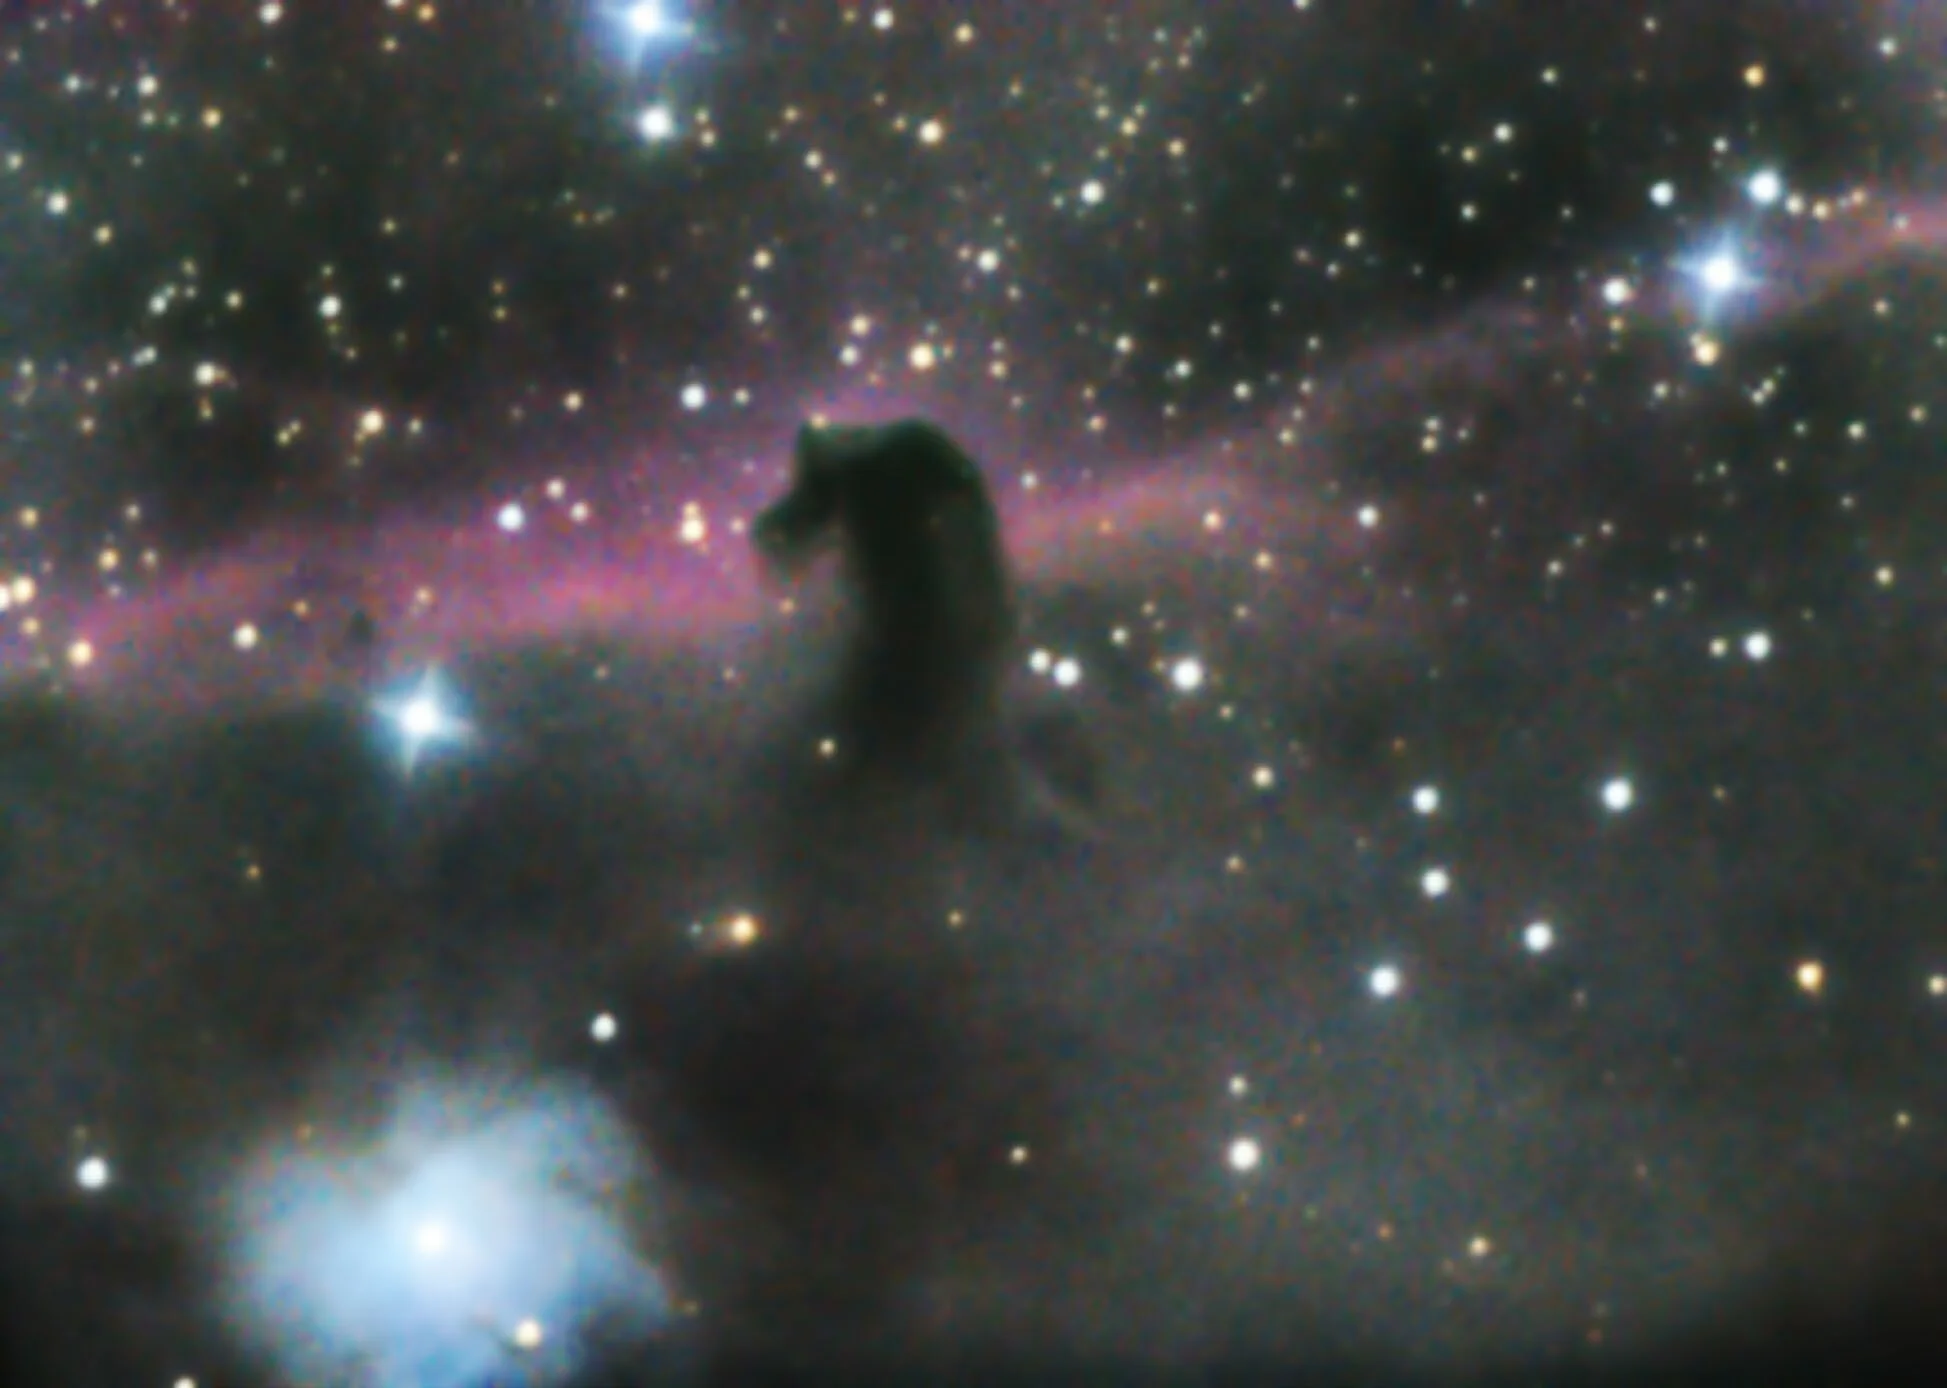
Horsehead Nebula
The cameras I use are the ZWO ASI120MC, Sony QX-1, and Atik 420. I have also imaged with an Orion planetary video camera as well as a NexStar planetary camera. For planetary and lunar, I shoot both stills and video. All stills (planetary or DSO (deep sky objects) are shot in RAW format. My typical video processing: convert to AVI (if needed), process video in AutoStakkert (stack video frames), and pull out details using wavelet layers in RegiStax. For DSO processing, I use Nebulosity to review and toss out bad subs. I then use PixInsight for debayering, dark/flat/bias calibration, image registration, image integration (stacking), and image post processing. I almost always do some bit of post processing in Photoshop. I occasionally use Topaz for additional noise reduction. Now let’s talk specifically about astrophotography with a Dobsonian.
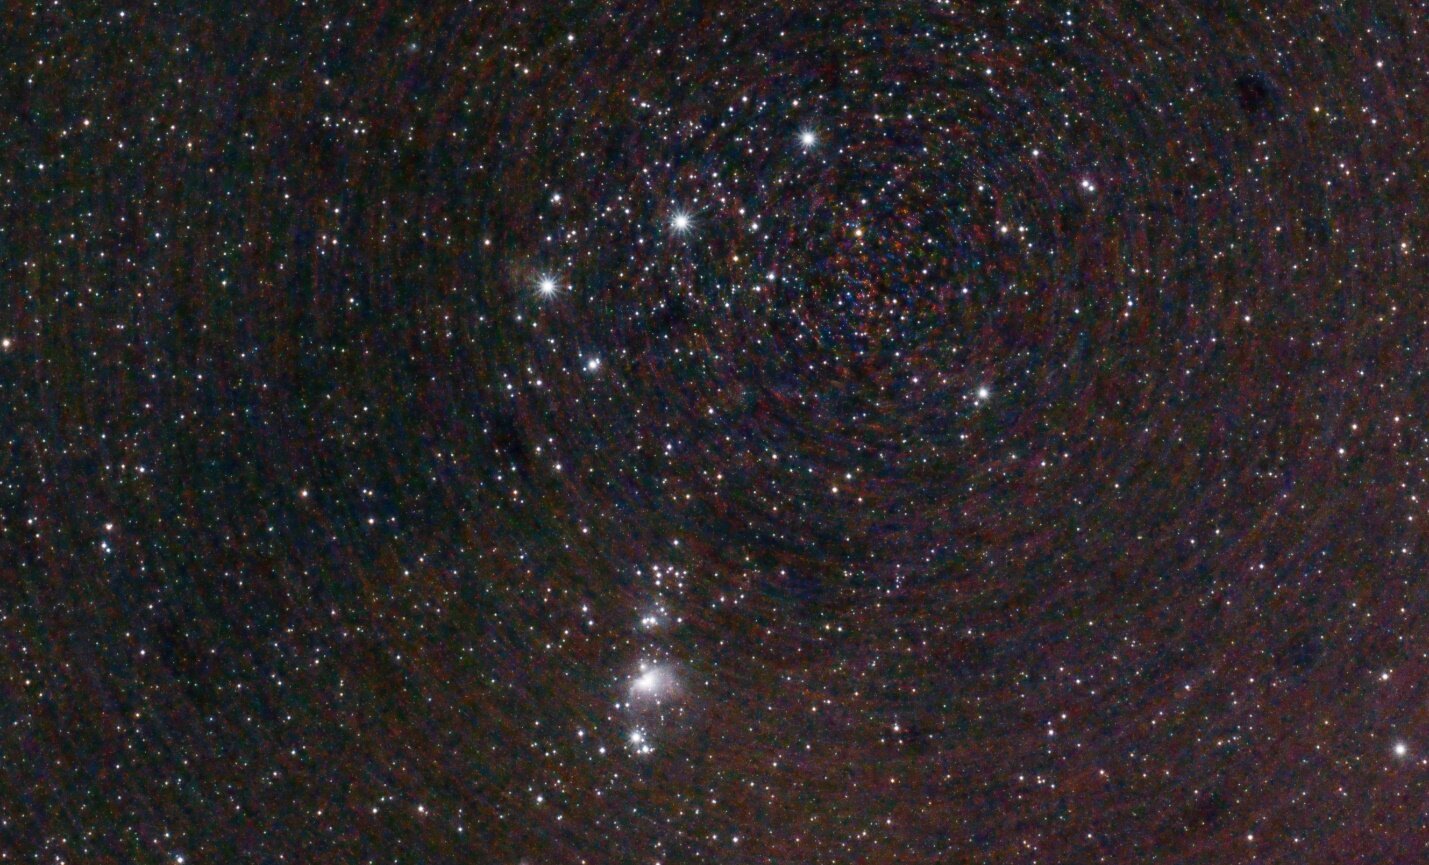
Astrophotography with a Dobsonian brings its own set of unique challenges. Probably first and foremost, and the one most AP hobbyists are familiar with, is field rotation. Field rotation is the apparent rotation of objects in the scope’s field of view, either through the eyepiece or on your camera’s sensor. An easy way to visualize field rotation is to think about the following: when Orion rises in the east, Orion’s trusty hunting dog, Canis Major is below Orion and has yet to rise. But, when Orion sets in the west, his dog has yet to set and is now above Orion in the sky. For Canis Major to appear to move from below Orion to above Orion, the whole scene had to have rotated approximately 180 degrees. Field rotation is rarely noticeable during normal viewing but is certainly an issue for AP. Simply put, field rotation causes objects to form arcs much like star trails. It is important to note, field rotation, generally speaking, is not a problem between exposures. Stacking software such as PixInsight or DeepSkyStacker will fix rotation deltas between exposures during the alignment/registration process. Where field rotation is a problem is during exposures. During exposures, the field rotation effects are being captured by the sensor! Some field rotation effects can be removed during the stacking process however it still leads to poor image quality for longer exposures. Image 1 shows the effects of field rotation. The basic subject, in this case Orion, is certainly discernable, but there are way too many “left overs” for this to be a good photo. In fact, you can tell exactly where the camera was pointing by noting the point about which all of the artifacts are circling.
Field rotation also results in a loss of image data near the edges of the field. So, if you are taking many exposures, make sure you your target is centered in the field of view. Image 2 shows rejected pixels during the image registration process. You can actually see how the “frames” rotate about one another. Additionally, you can easily see that any data (galaxies, etc.) near the edges of the field of view would be rejected and only data near the center of rotation of each frame would survive the pixel rejection process.

There are some systems out there that rotate the camera/focuser in the direction of and at the same rate of the field rotation. These systems are usually found on alt/az systems at large observatories. With that being said, there are some smaller systems out there for an average sized scope. Some of these rotate the camera and some actually rotate the entire OTA. For us average amateurs however, the only viable solution is to limit our exposure times. Generally speaking, the maximum exposure time to minimize and overcome the effects of field rotation is 30 seconds. If we could track Orion the entire day, we’d see him rotating 360 degrees in a 24-hour period. This equates to 15 degrees per hour or .125 degrees every 30 seconds. This seems to be a rate most stacking software can handle.
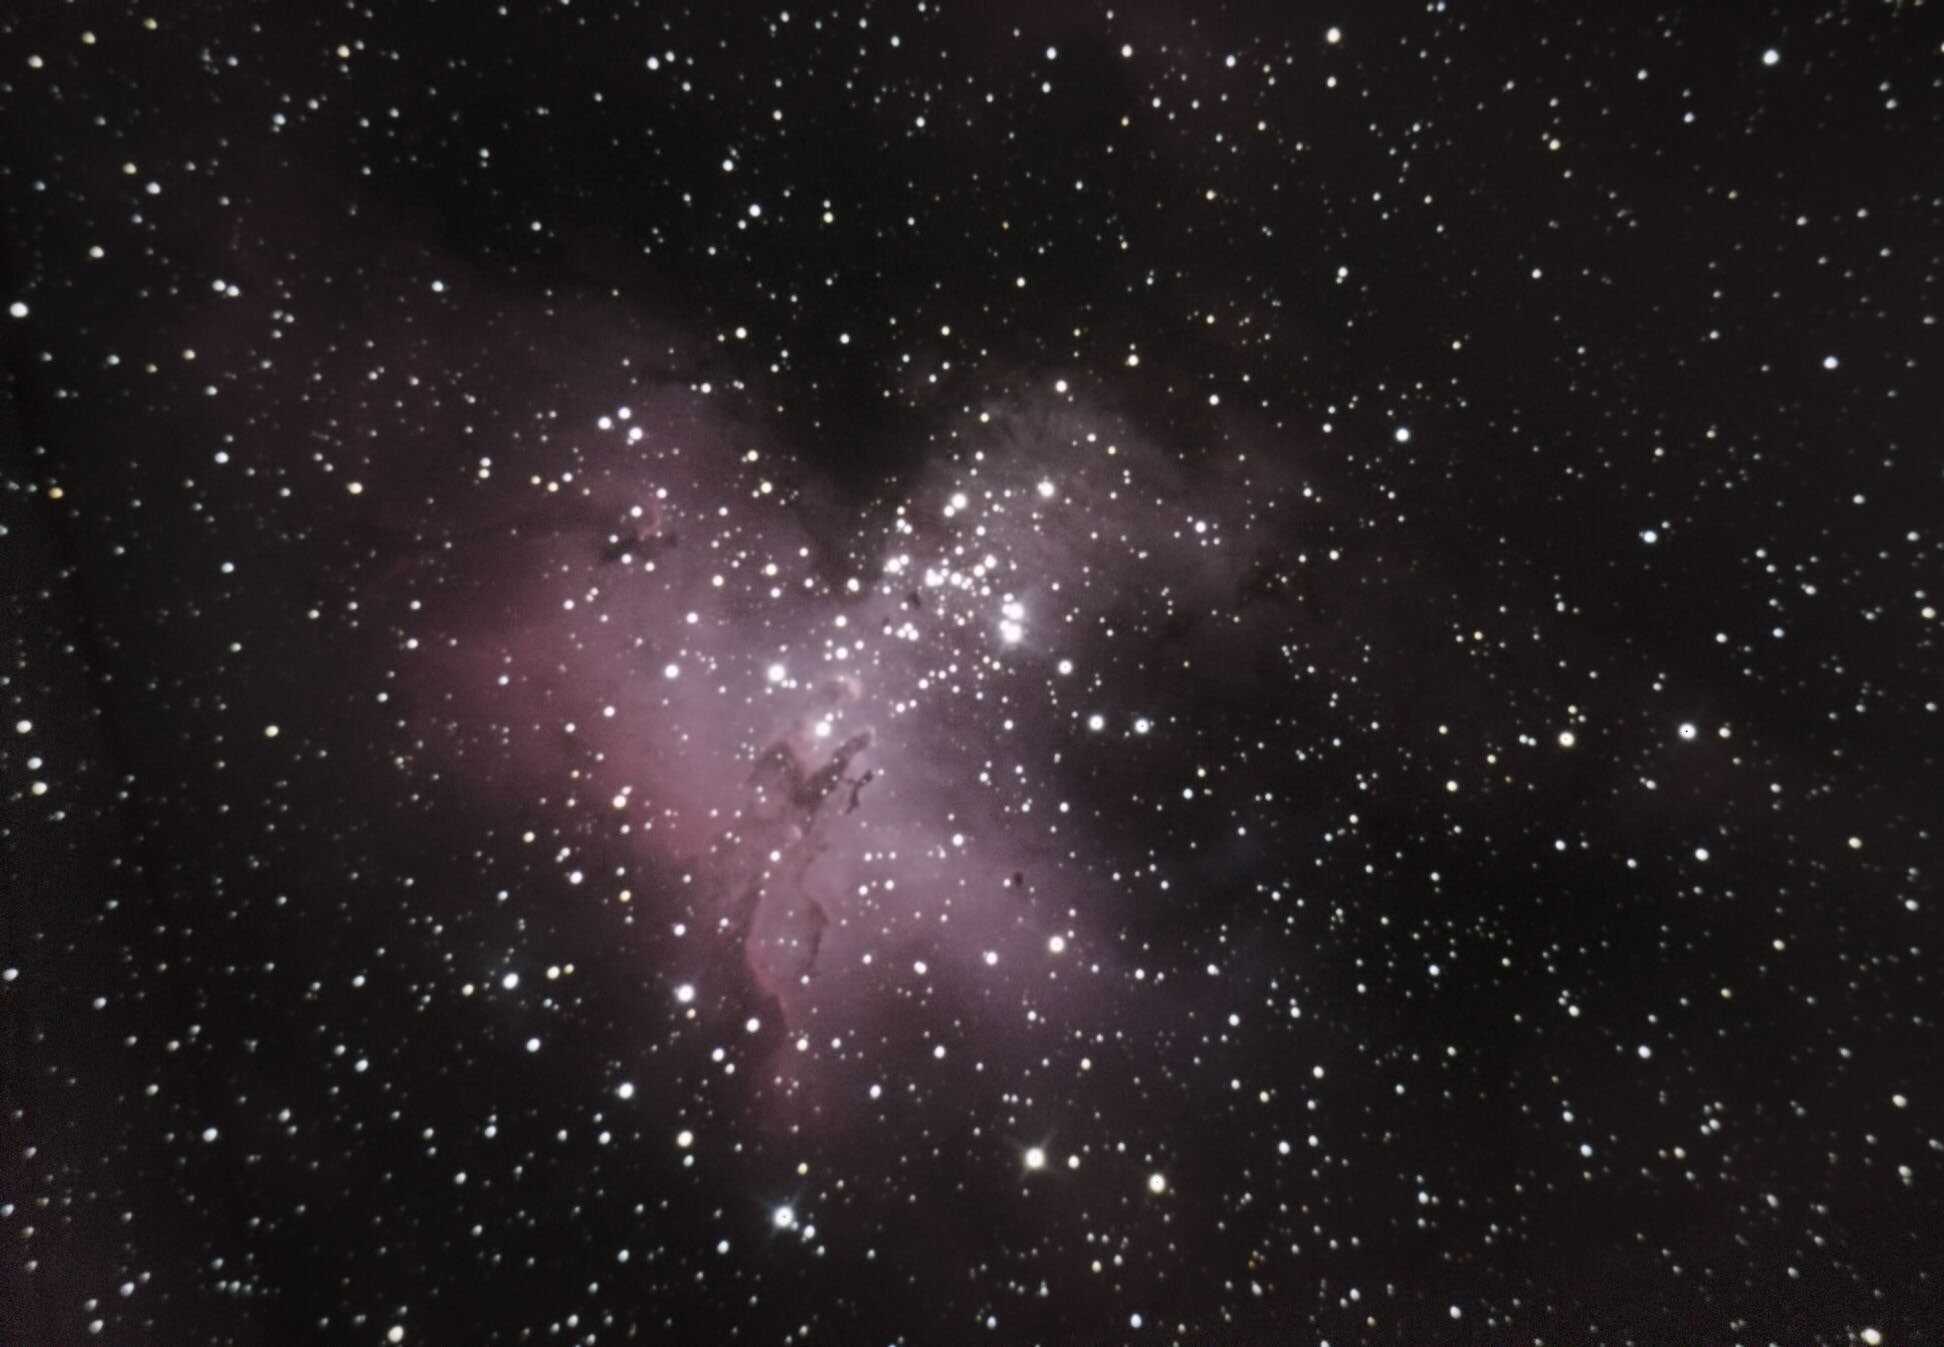
M16
Another challenge to Dobsonian AP with is tracking. Equatorial mounts track in a single azimuth. Meaning, there is only one motor running and therefore only one set of tracking errors to deal with should they occur. Alt/az mounts, however, track in both axes at the same time hence the probability of a bad frame due to a tracking error just about doubles. You can tell if one or both axes are off when reviewing frames (subs, frames, lights, are all synonymous) prior to processing. If a star leaves a straight trail, you are looking at errors in both axes. If a star suddenly trails and then veers off in another direction, you are seeing a one axis tracking error.
Along with tracking errors a lack of auto guiding systems for alt/az mounts can be problematic. Is it possible to auto guide for longer exposures? Yes. However, your guide star needs to be as close to your target as possible. Auto guiding will not eliminate field rotation. It will simply keep the guide star “frozen” in the frame and everything else will appear to rotate around it.
How to overcome these challenges? The first we eluded to already, keep your exposures to 30 seconds or less. Next, take lots and lots of subs! An increase in the number of subs (often referred to as light frames) does several things for us. First, lots of subs can help counter the shorter exposure times. Many stacking software programs will calculate final pixel values using “additive” or “additive with scaling” algorithms. More subs will produce a better result. Additionally, a greater number of subs will substantially assist with noise reduction. If, out of 100 subs, 10 frames have noise at coordinate x,y but the other 90 do not, your stacking software will average the values of all the pixels at location x,y. The final result will have almost no noise in pixel x,y.
Next, when shooting lots of subs with an alt/az mount, stop imaging for a few minutes and do the following. Refer back to your first sub and compare it to the most recent sub. You will probably see some field rotation. Now, rotate your camera such that the live preview (or a test sub) closely matches the first sub taken. You can do this by visually aligning stars within the field of view. Think about it. Suppose you want to shoot 200, 30 second subs of the Horsehead Nebula. That equates to 100 minutes of imaging…or 1.67 hours. Your field will have rotated 1.67 x 15 degrees = 25 degrees! That’s a lot. Especially for a target like the Horsehead Nebula. There are lots of features near the edges of the field that I would not want to lose! And, what if we don’t have the actual horsehead centered in the field of view? Heaven forbid we actually clip off the horse’s head due to field rotation!
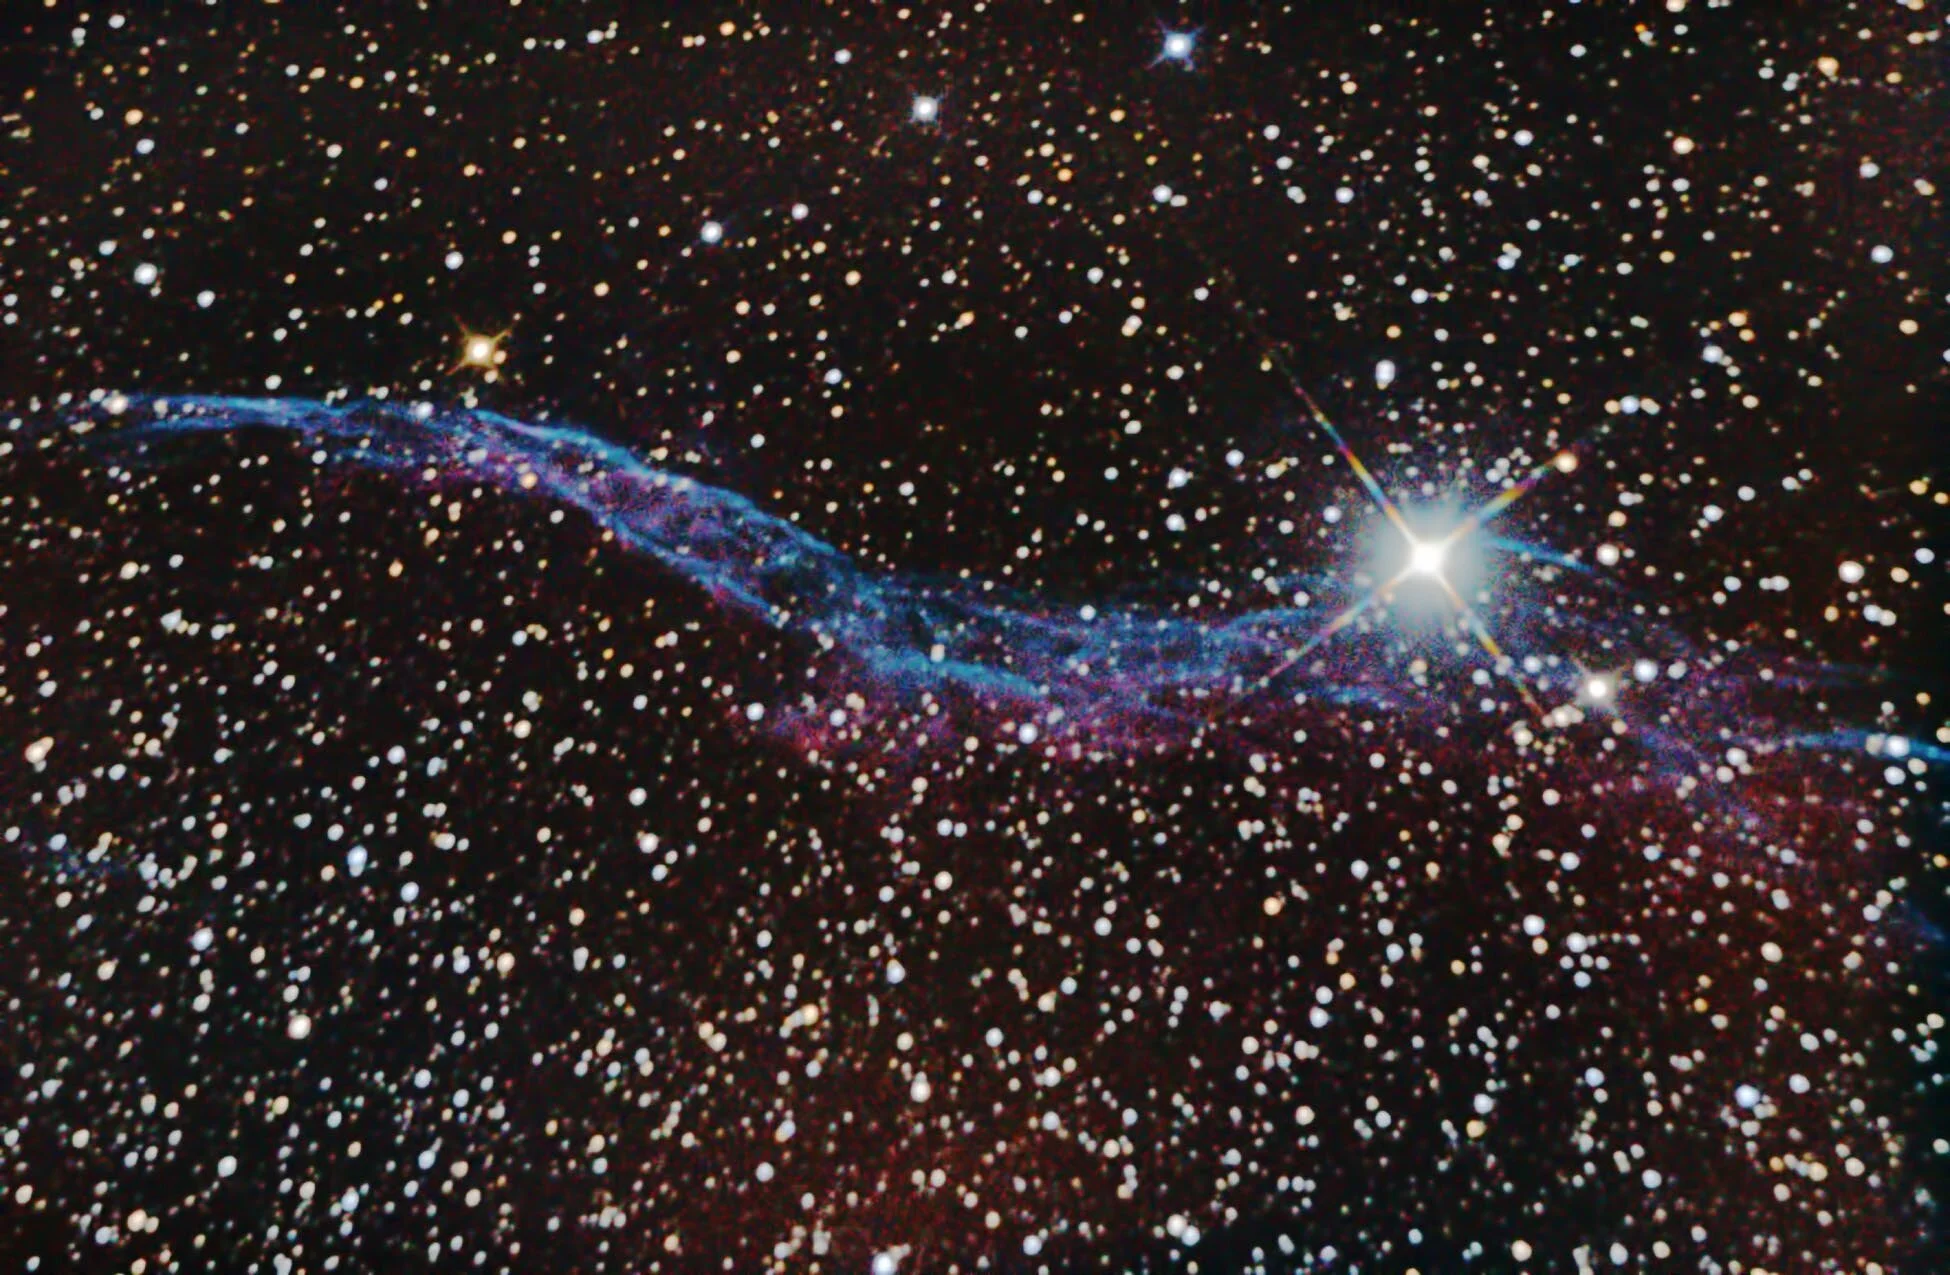
NGC 6960
To minimize tracking errors, I like to shoot no greater than about 50-60 degrees in elevation. I don’t want to shoot too low because I am now competing with the Earth’s atmosphere…but too high of an elevation, I find the azimuth drive doesn’t track as well. And remember, keep the target centered in the field of view during the entire imaging session. I often times stop imaging, recenter the target, and start imaging again.
In summary, AP with a Dobsonian telescope, including DSOs, is indeed very doable! Hopefully some of the mentioned tricks and techniques will help you along the journey. But most importantly, develop your own! Keep at it! Experiment, take notes, try different techniques and combinations of techniques and tools. That, my friend, is how it is done. Happy hunting! You can view more of this scope’s images at: importantly, develop your own! Keep at it! Experiment, take notes, try different techniques and combinations of techniques and tools. That, my friend, is how it is done. Happy hunting!
SQUIRREL VALLEY OBSERVATORY
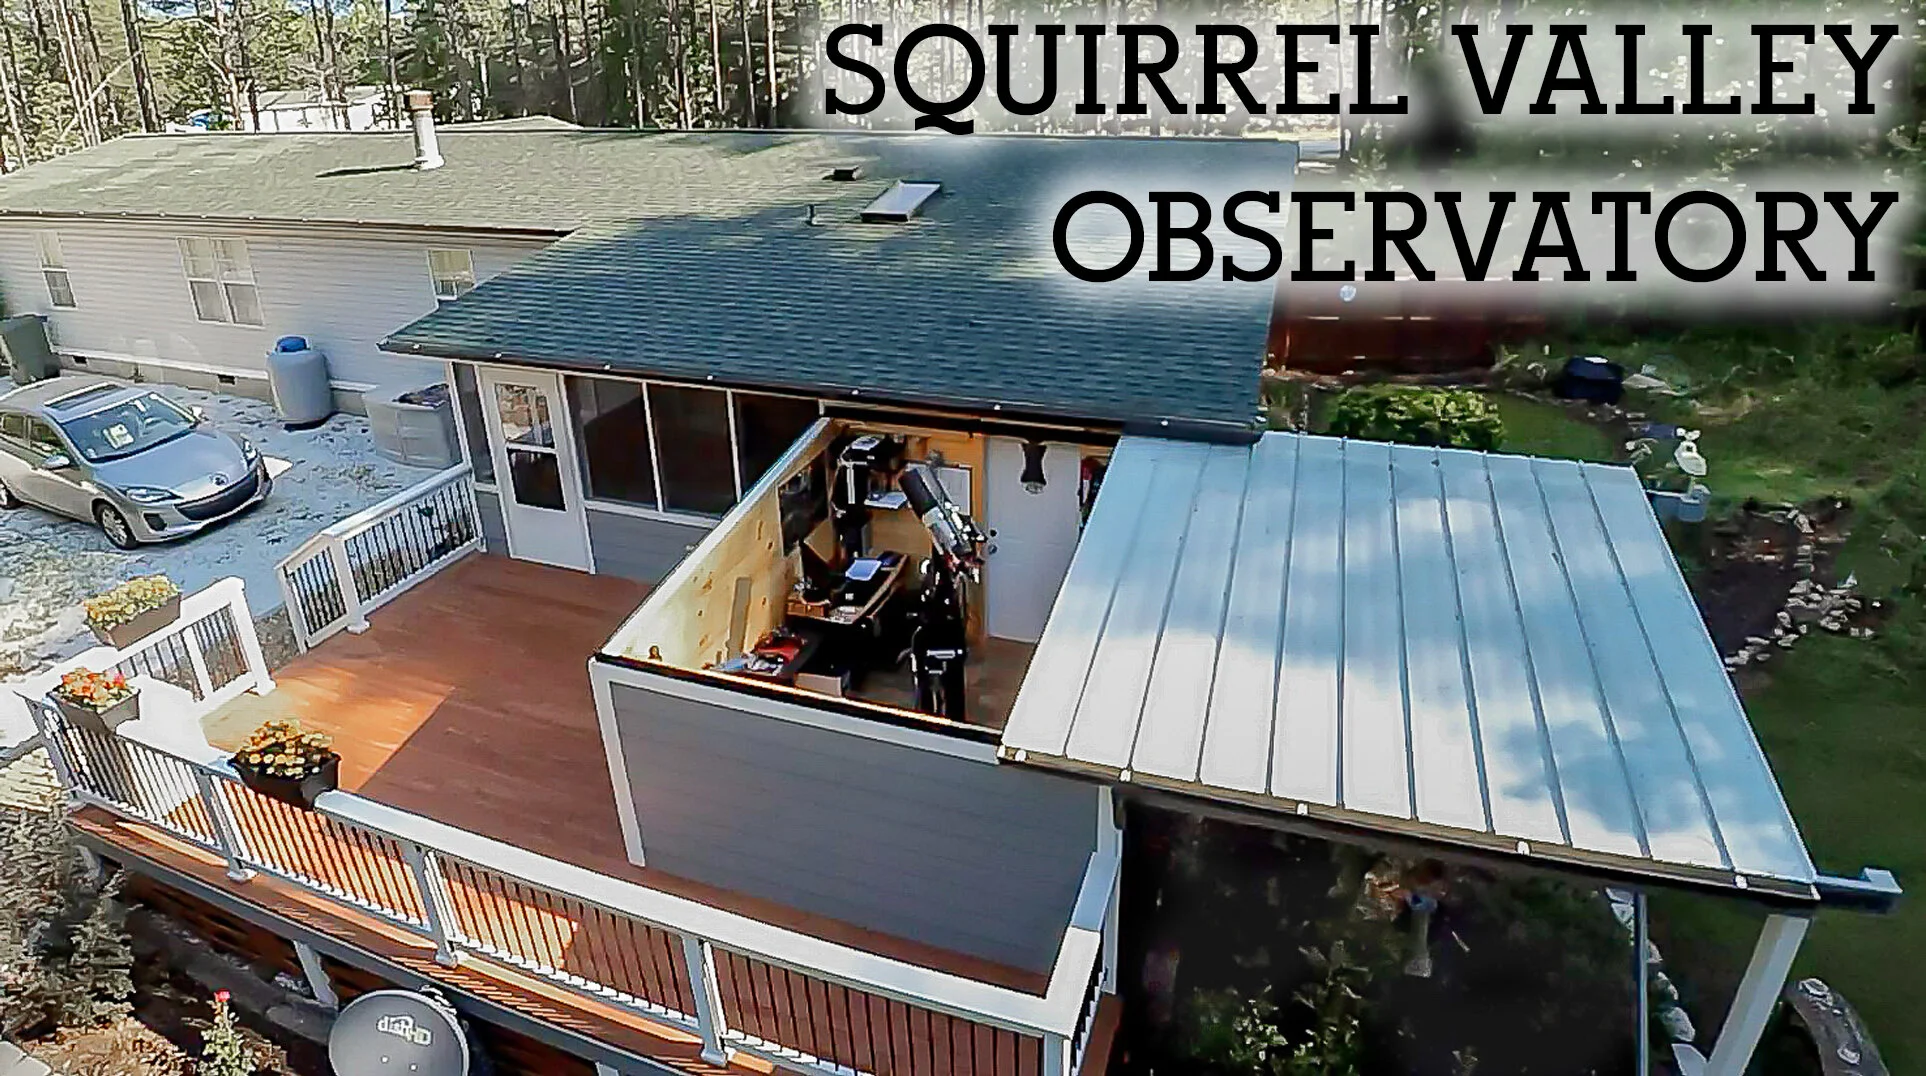
by Randy Fllyn
Squirrel Valley Observatory MPC-W34 is a privately owned roll off roof observatory located in the foothills of western North Carolina. Major construction was completed in the summer of 2015 with equipment upgrades continuing to be made for private research and astrophotography. The observatory is the culmination of a life long dream. In September of 2016 the IAU Minor Planet Center assigned the observatory code, W34, to Squirrel Valley Observatory for it’s endeavors in the tracking and detection of minor planets, including hazardous asteroids and other Near Earth Objects. The primary mission of the observatory is astrometric research (the detection, confirmation and tracking of minor planets,ie hazardous asteroids, near earth objects, comets, and other various types of asteroids) and astrophotography work.
The observatory sends astrometric data to the International Astronomical Union’s Minor Planet Center on a regular basis, where is it used to help refine orbit predictions of various minor planet bodies. Each month the results are published in the minor planet circular. Additional research such as generating light curves for some of the larger exoplanets has also been carried out. The primary optical telescopes are rather modest in size, (a Celestron EdgeHD8 an Explore Scientific CF 127mm triplet refractor and an Explore Scientific 102mm triplet refractor), but with the addition of sensitive imaging cameras they can be used to detect, track and image very faint objects.
Each can be configured for planetary and deep sky imaging as well as visual observations. Our default configuration is an imaging setup used for asteroid astrometry and astrophotography. It is anticipated that minor planet astrometry, supernova detection and exoplanet research will continue to be the primary types of research conducted for the foreseeable future. Today even small facilities such as this are able to make important contributions to astronomical research.
The Celestron EdgeHD scope (8″ aplanatic schmidt-cassegrain), and the 127mm refractor are normally saddled on a side by side mount plate, which tracks the sky using a Losmandy G11/Gemini 2 system mount. This mount is in turn secured to a 12″ steel pier, bolted to an isolated concrete pier/footer. This setup minimizes much of the vibrations that are detrimental to long exposure imaging. An auto-guider is also used to provide for even longer

Celestron EdgeHD8 and Explore Scientific 102 mm triplet refractor on a tandem side by side saddle, mounted on a Losmandy G11/ Gemini 2 mount.
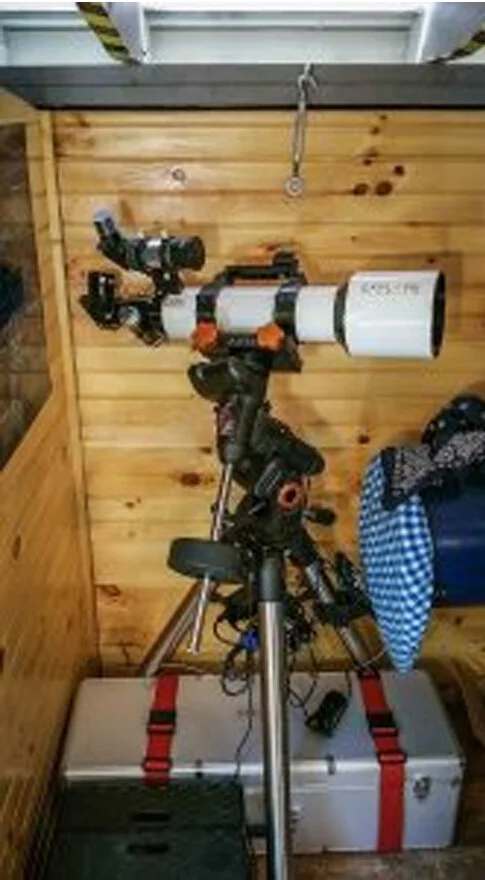
Explore Scientific 102mm APO Refractor mounted on AVX field tripod.
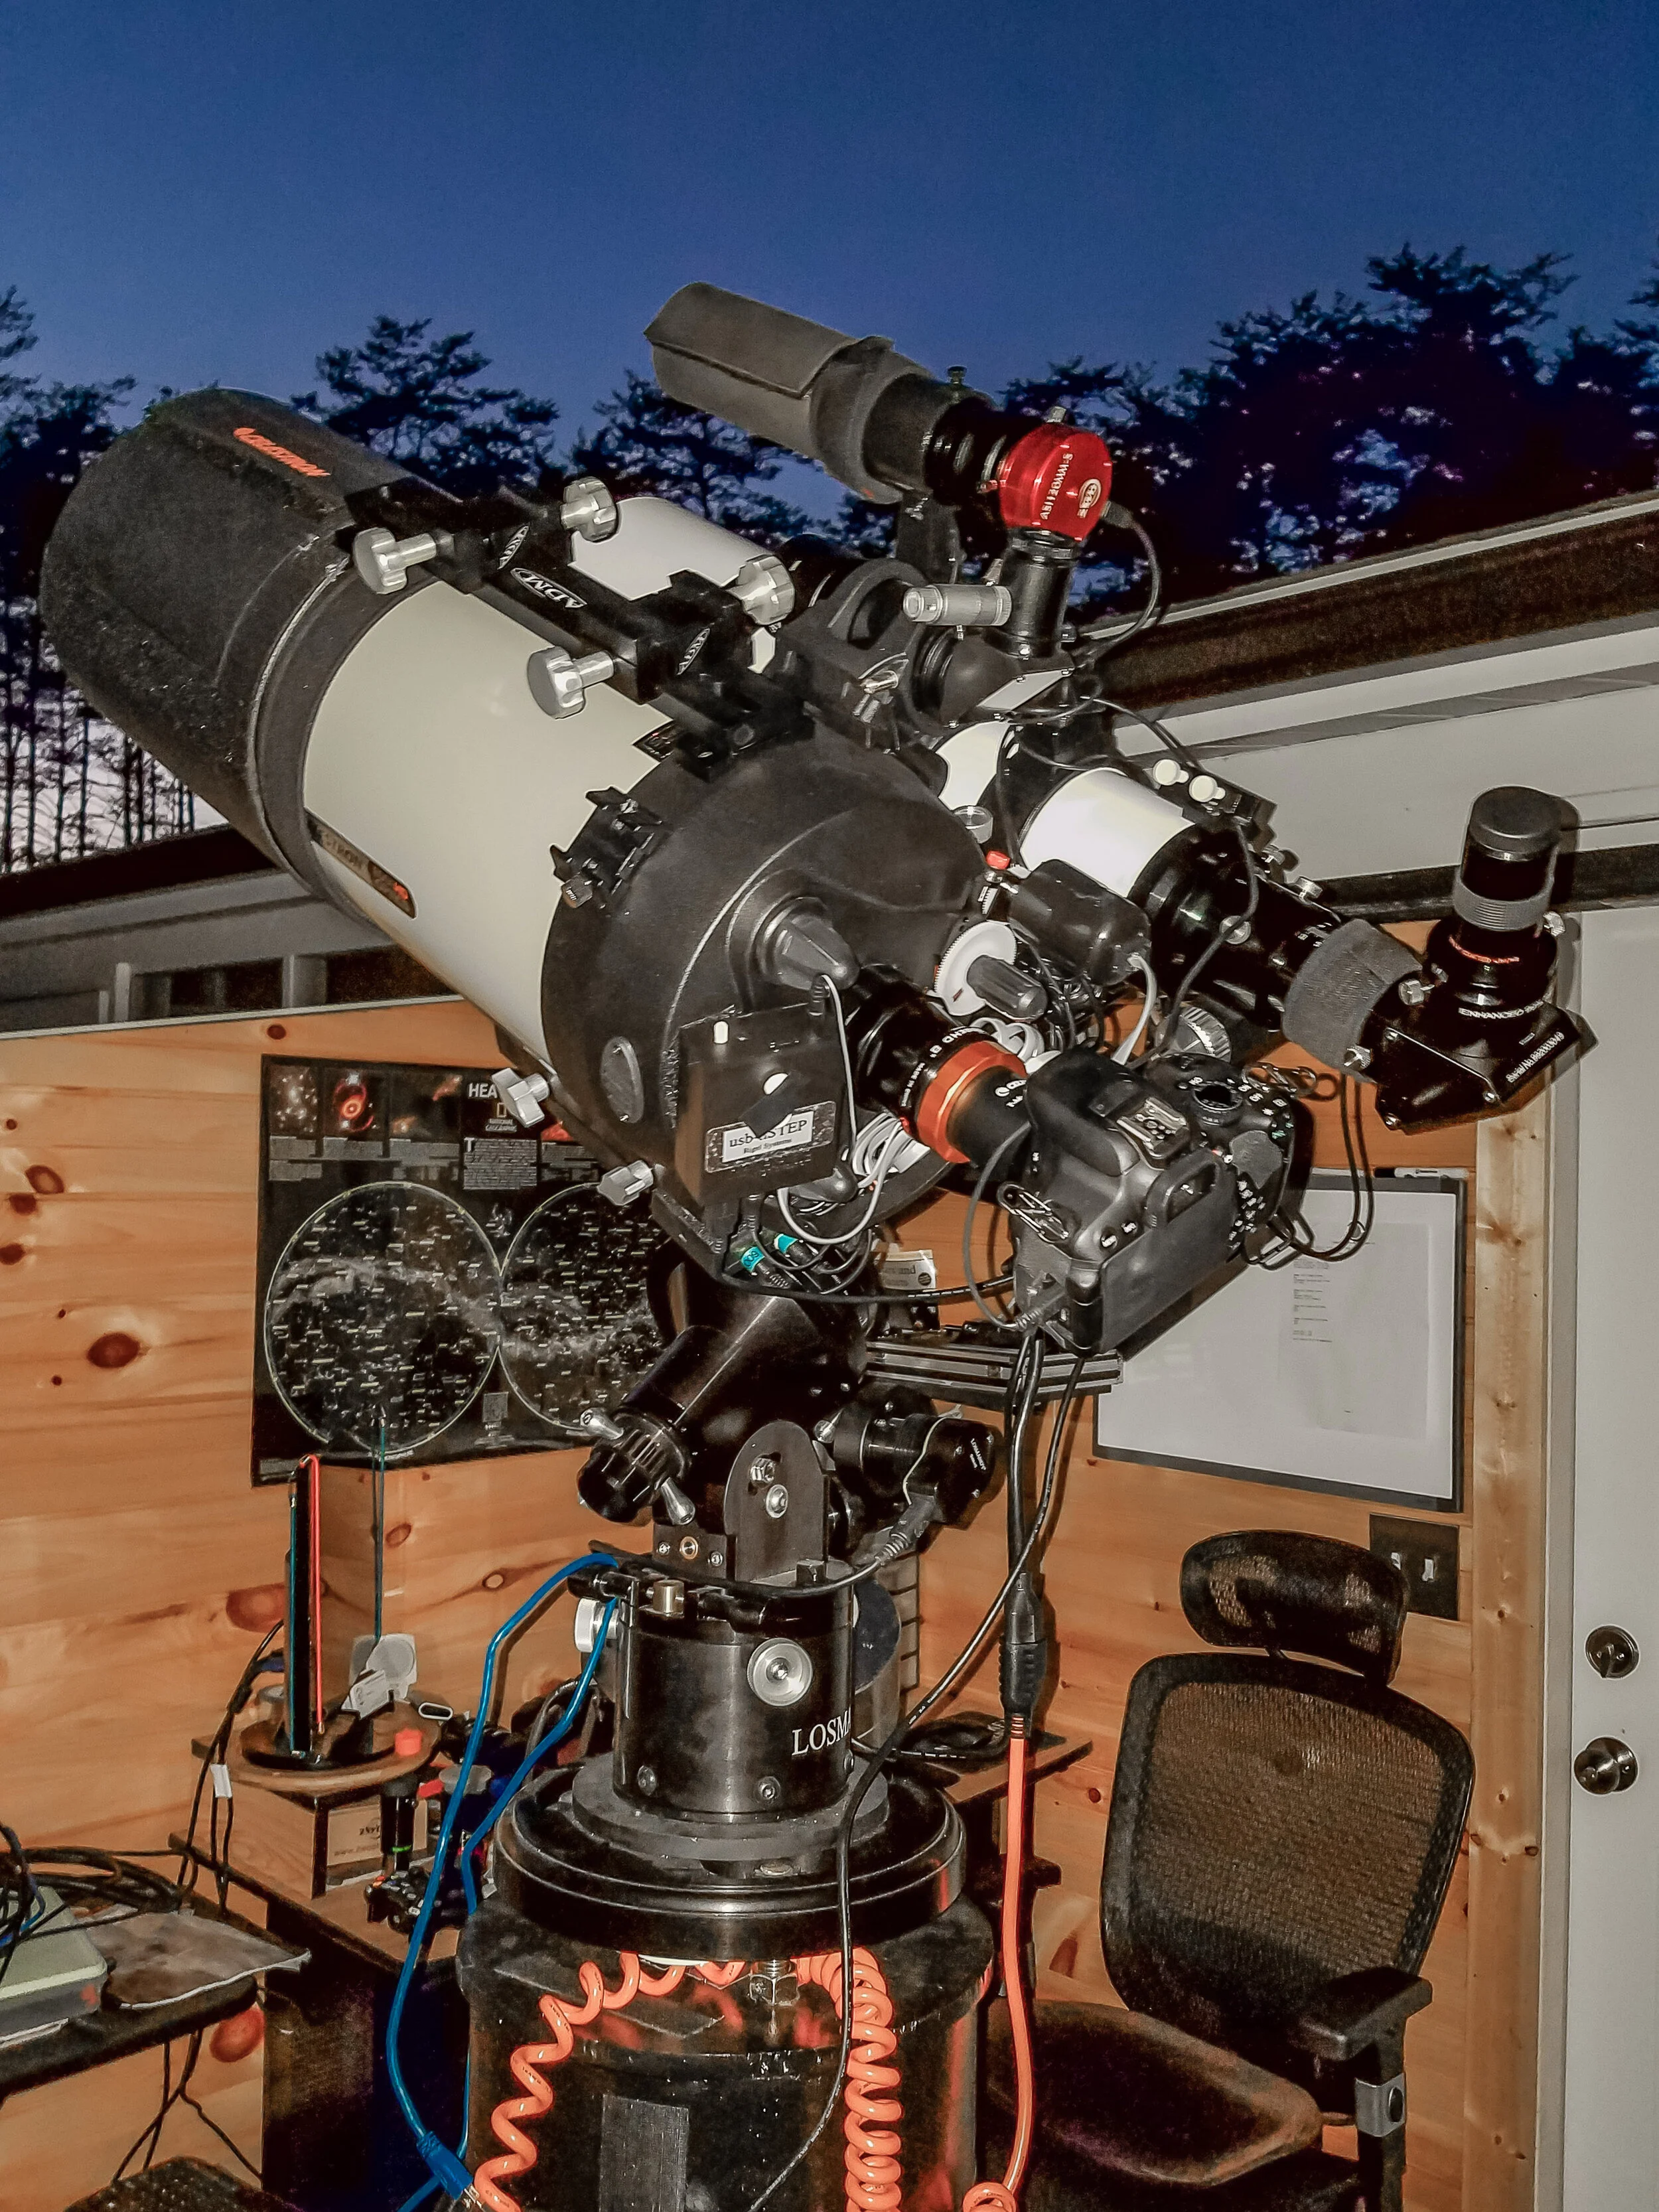
Current imaging configuration: Celestron EdgeHD8 and Ex- plore Scientific 127 mm triplet refractor. ASI 1600MM cool with electronic filter wheel and ASI 224MC cameras ahown.
exposures. An Explore Scientific 102mm triplet refractor is also available for field work on a portable Celestron AVX mount. The primary and secondary scope can be computer controlled from the observatory and from inside the connected warm room in my home. Additional portable telescopes are stored in the observatory. They include a homemade 10″ f5.6 reflecting telescope which is currently in a dobsonian mount configuration (grab and point). It is awaiting some upgrades and much needed maintenance.
The remaining instrument is a small, highly portable Meade ETX 80mm short tube refractor on a Meade goto mount. This is used as a grab and go scope for the brightest of objects and is not intended for serious imaging or research. There is also a Celestron 3″ “FirstScope tabletop reflector available for hands on public educational purposes.
Optical/Imaging
/Imaging telescope: Pier mounted Celestron EdgeHD8 aplanatic schmidt-cassegrain on a Los- mandy G11/Gemini2 mount.
Optical/Imaging telescope: Explore Scientific CF 127 mm F7.5 triplet refractor/w 0.7x reducer = f5.2.
Optical/Imaging telescope: Explore Scientific 102mm F7 triplet refractor/w 0.8x reducer = f5.6.
Additional optical telescopes: 10″ f5.6 Dobsonian reflector. (Currently offline for maintenance) Meade ETX-80mm AT-TC short tube refractor.
Field mount: Celestron AVX
Primary Deep Sky/Asteroid Imaging camera: ZWO ASI 1600MM Cooled Mono CMOS with Electronic Filter Wheel
Primary Deep Sky Imaging camera: ZWO ASI 294MC Cooled Color CMOS Secondary Deep Sky Imaging camera: Canon EOS T4i Primary Planetary Imaging camera: ZWO ASI224MC Autoguider camera: ZWO ASI120MM-S
I spend most of my observatory time acquiring astrometry data on minor planets,(primarily near earth astreroids) for the IAU Minor Planet Center. Astrometry is defined as "the science which deals with the positions and motions of celestial objects. Astrometry is now one of many fields of research within astronomy". (see here) So asteroid astrometry in its most basic definition is determining the position and track of an asteroid whether it is a main belt asteroid, near earth asteroid or any of the other classifications of minor planet.
While this is commonplace for many observatories and amateurs today and years past, what is not as common is the confirmations for new near earth asteroids that are made by small observatories. Near earth asteroids are those asteroids whose orbits could cause them to potentially pose a threat to earth at some point. So how does this work? Large government (and private) funded sky surveys (observatories) like Catalina Sky Survey PAN-Starrs ATLAS and Zwicky Transient Facility. As well a others scan and image large sections of the sky each night.
When they find an object that they can not identify, they immediately post their discovery observations for others to confirm. The Minor Planet Center maintains a web page for these discoveries called the NEOCP (Near Earth Object Confirmation Page). Observers like myself monitor this page for objects that are in their range (RA, Dec and magnitude) for observations.
As soon possible, we image the discovered object normally by taking multiple exposures, then using specialized software to stack the images and find the objects We record our observations and submit them immediately to the Minor Planet Center, providing that the residuals (precision and accuracy of data) is acceptable. This is all normally done within 24 to 72 hours of discovery. CNEOS the Center for Near Earth Object studies computes high-precision orbits for these Near-Earth Objects (NEOs) in support of NASA’s Planetary Defense Coordination Office .
Once an orbit is determined, a designation is issued by the Minor Planet Center, the discover and observatories who helped confirm the object are then published in an MPEC (Minor Planet Electronic Circular). This is an example of an MPEC where Squirrel Valley Observatory W34 helped confirm the discovery of a new near earth asteroid designated 2019 FU (Apollo type) first observed by Catalina Sky Survey 703. MPEC 2019-F121 Granted all this is a somewhat simplified version of the process but accurate. So while all asteroid data submission is important, it is extremely satisfying for a small observatory using modest commercially available equipment to be able to contribute data that helps confirm the existence of a newly discovered near earth asteroid. In some cases even being the the 2nd, 3rd, 4th etc person to see this new object.
And while the images are not the pretty pictures that we often enjoy sharing, the data can be incredibly important. It is a way for the amateur to contribute real and meaningful data that assists the large multi-million dollar sky surveys with huge budgets. To date SVO has submitted data on nearly 1,400 asteroids, about 400 of those being near earth asteroids, but most importantly we have directly helped confirm over 120 near earth asteroids since 2017. All this with an 8 inch scope, a CMOS camera and a Losmandy G11 mount.
The logs of my asteroid observations can be found by clicking the Minor Planet Research tab at the top of the SVO webpage or by clicking on the image of the log on the right side of that page. Alternately you can follow this link. http://svo.space/astrometry/
Imaging
Astronomy has been my hobby and passion for over 40 years. Most of that time was spent on visual astronomy and public outreach. Only in the last 5 years did I begin to fully delve into digital imaging. This is about the same time I built a roll off roof observatory.
I am a member of the following organizations: “American Astronomical Society”, “The Society for Astronomical Sciences”, “The Astronomical League”, “Astronomers Without Borders”, “NASA Night Sky Network” and the “Astronomy Club of Asheville” in North Carolina. My astrobin page is here: http://www.astrobin.com/users/ncwolfie/ I enjoy seeing how in most cases images have improved from the first to the last. I purposely leave the older unpolished images online for that reason.
Squirrel Valley Observatory has sponsored several outreach events for the public and local school systems over the years.
I use Pixinsight processing software now for all of my image processing. In fact my biggest influence in digital astrophotography has been Warren Keller, author of "Inside Pixinsight". Then there is, Harry’s Astroshed and Light Vortex which were and continue to be tremendous aids when using Pixinsight. I refer back to their guides constantly when processing images. Pixinsight processing software changed everything for me.
Before Pixinsight, I used Deep Sky Stacker, a very capable stacking software, and then Photoshop for processing. When I first started out with Deep Sky Stacker, it was Doug German’s Budget Astro tutorials that were instrumental in providing a clear explanation for the basics of image processing. I have two main belt asteroid discoveries pending at Squirrel Valley Observatory, 2017 SR9 and 2017 DV8. Both will take some considerable time and effort to confirm with my current setup due to the fairly long orbital periods and magnitude.

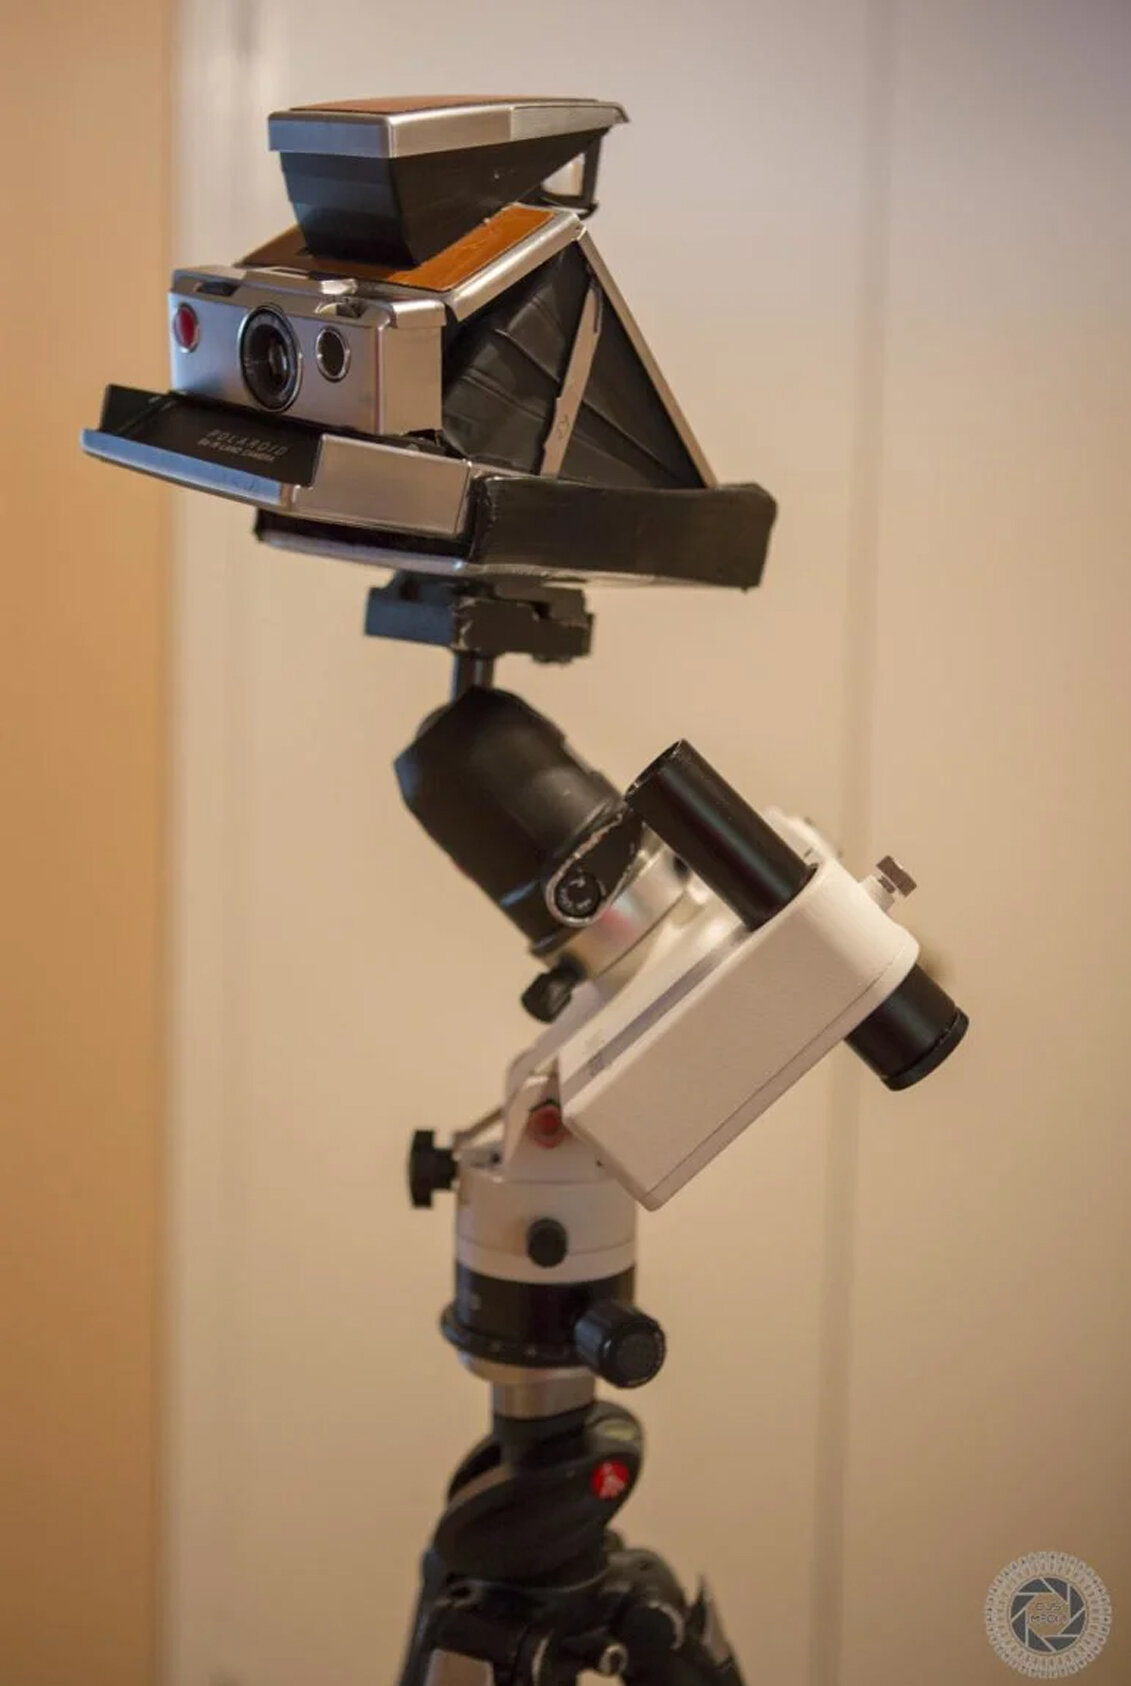
These Beautiful Images of the Milky Way Were Shot on Impossible Project 600 Film
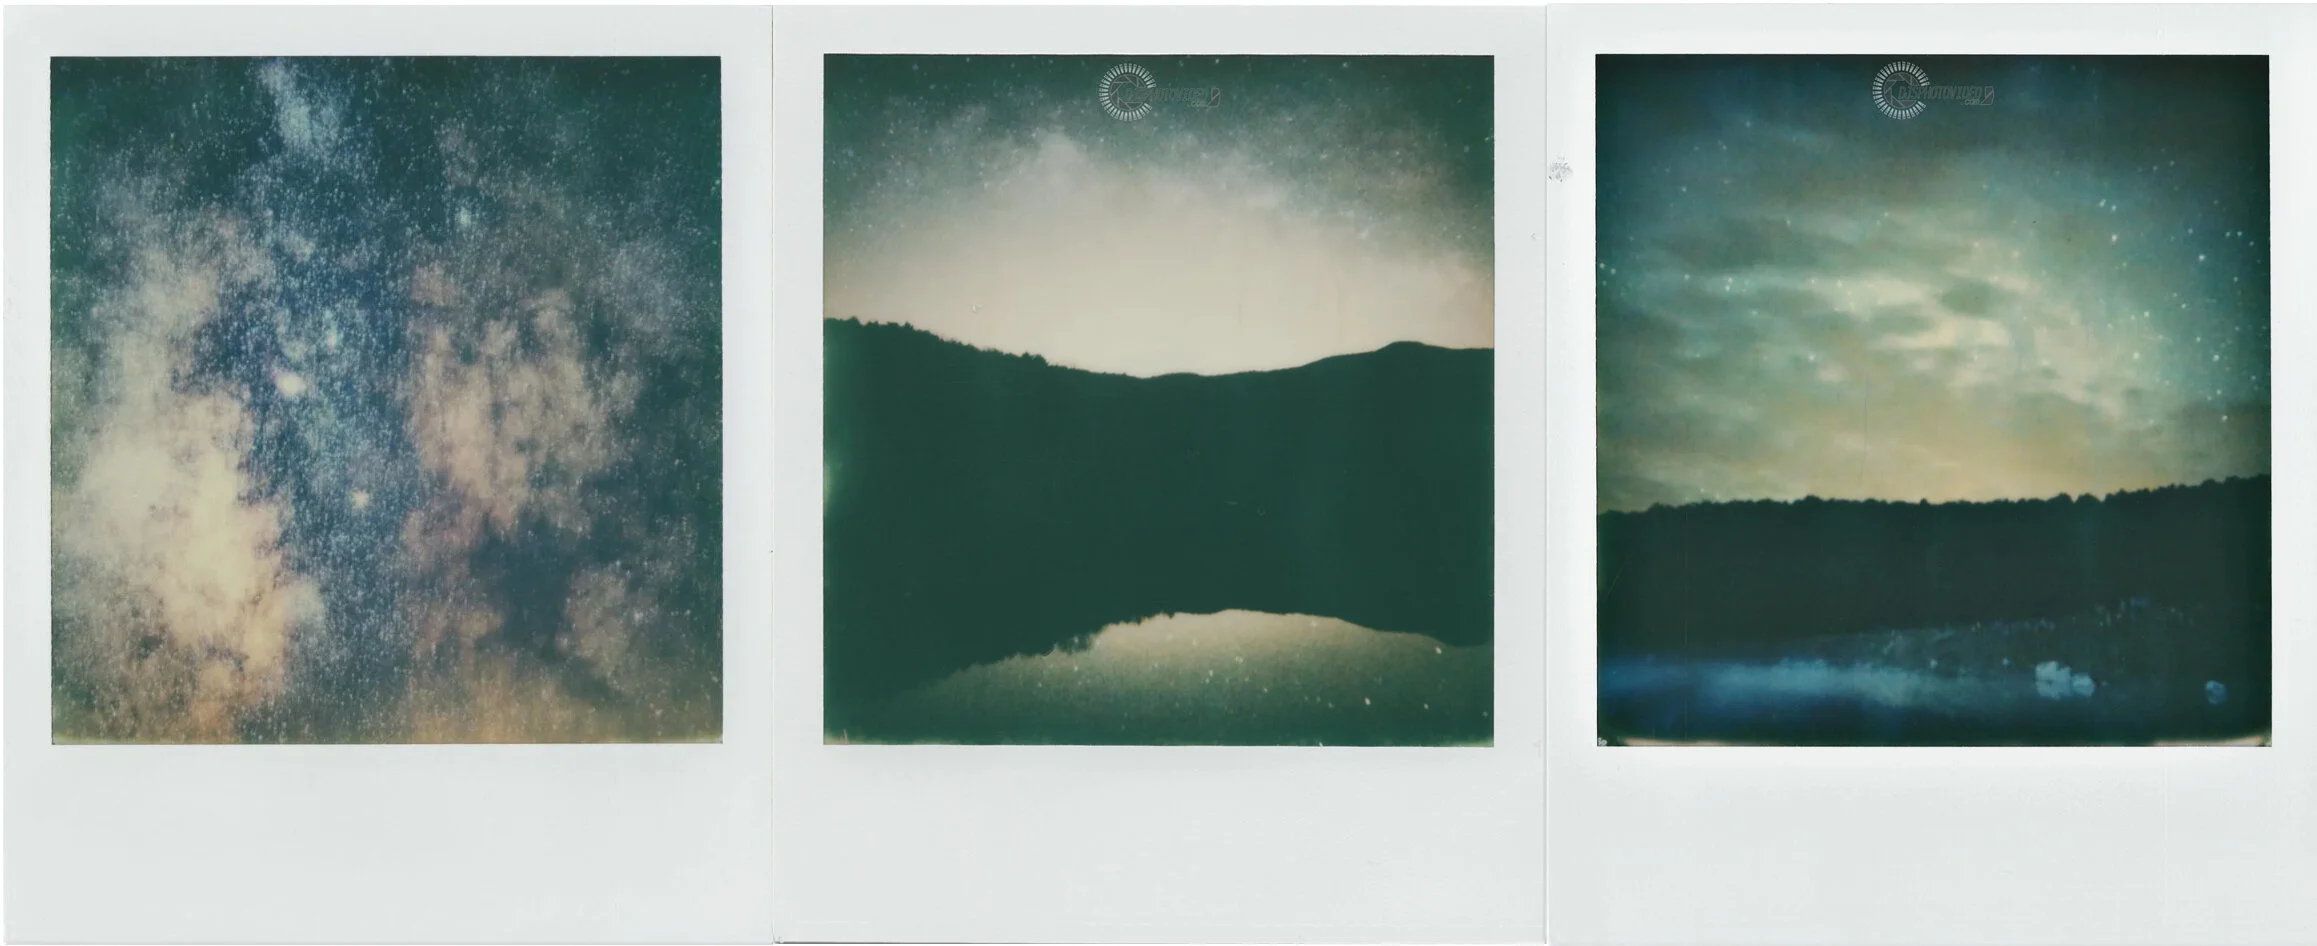
by Daniel Stein
Photographers have very mixed opinions on Impossible Project’s film, but there’s no denying that Daniel Stein nailed this photo of the Milky Way. Using an SX-70 and IP600 film, he was able to use the film to capture this hypnotic and beautiful moment.
“In brief, I first got into photography a long time ago when I was 10 (I am 23 now).” says Dan in an email interview with us. “I am quite visually impaired, seeing primarily out of my left eye only. Holding a viewfinder up to my face gave the world a new meaning to me.” According to Dan, this allowed him to see things beyond what his physical vision could see.
Sounds pretty strange right? Well, it isn’t. I’m legally blind too, and I’ve interviewed a number of photographers that have visual issues but still end up creating beautiful photos.
Dan says that he was actually decent at this vs the more traditional hobbies like sports due to a lack of hand-eye coordination. “But under a red light darkroom where anyone’s vision is just as limited as mine, it was a perfect place.”
Film has been with me ever since until I got to high school where I purchased my first DSLR. Once in college at James Madison University however, I quickly returned to the film world thanks to my school’s state of the art darkroom. This is about when I first explored instant film. Simultaneously, I was also working at my school’s one of a kind planetarium. Like many photographers today this got me into astrophotography on the digital front.
Yet, this was not enough to satisfy me. I needed to create more powerful images, and that is when I decided to experiment with instant film in astrophotography. The problem is that despite the name, Impossible film is not really that instant. With digital, you can take a picture of the Milky Way and know if your shot looks good within minutes. With this film or any film for that matter, you have 30 minutes or until the next time you are in the darkroom to see your results. With that said, I took advantage of the instantaneous feedback from my DSLR to roughly compose an image for my Polaroid.
To take a photo, I assembled my iOptron Skytracker atop a Manfrotto 055XProB tripod and then aligned it with Polaris. Then, I placed a Manfrotto 496RC2 ball head on top of the tracking mount where I can mount my 5D Mark IV. I used the 24-70 f/2.8 L II lens to roughly compose at 70mm. The SX-70 has a focal length of around 65mm, so I figure this is close enough. I messed around with the DSLR for a bit, trying to get a composition that I want to shoot on the SX-70.
Once I was satisfied, I locked the ball head in place and swapped the 5D for the Polaroid on the tripod mount that I created for it. I used a distant star to focus the camera, then I set the exposure compensation dial all the way into the white. After the camera is mounted and the shutter button is pressed, the SX-70 analyzes the light plus the exposure setting and will most likely want to do a 30 second exposure automatically.
During those 30 seconds, I flipped the film lid open, trying not to shake the camera and ruin the exposure in the process. The tracker has to be perfectly aligned for this to work properly. Even the slightest misalignment off by a few nanometers will cause the stars to streak. In the example of the photo I posted, you can see some streaking caused from an imperfect alignment. At the end of the exposure time, which I have determined based on current weather and light pollution conditions, I closed the lid, pressed the button, and then the image ejected. Rather than waiting around for it to develop, I recomposed another image with the 5D and took another exposure.
I will not look at the Polaroids until I am home from the shoot, confident that what I have done worked. I feel as if this gives the images a sense of surprise when they do actually come out. Once that is all said and done, I will scan the images that are successful and place them in an archival/acid free storage box.
Spring 2020 astrohighlights
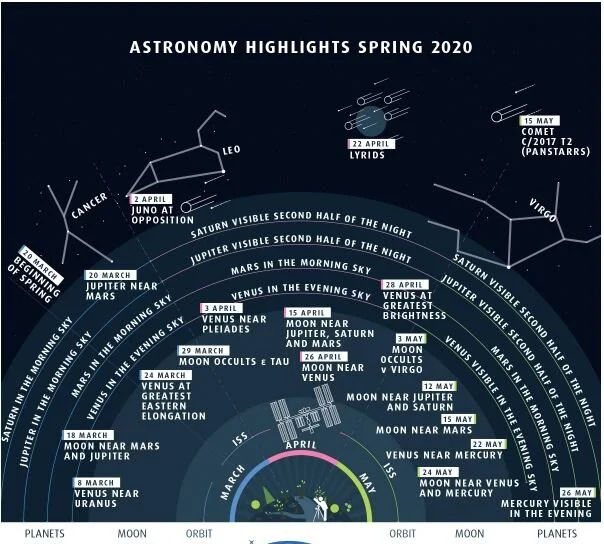
Once again there is plenty going on in the sky this spring. There the gas giants shake hands, a planet meets a star cluster, star occultations take place, and you may even spot a comet with binoculars.
We hope you enjoy the latest astronomical infographic, “Astronomy Highlights Spring 2020”. You will find explanatory descriptions of the events in the following text.
March
8 March: Venus near Uranus
Bright Venus, faint Uranus: these two planets meet one another today at dusk, as Venus hurries past the gas giant at a separation of around 2°. You can identify them easily using binoculars.
18 March: The Moon near Mars and Jupiter
If you get up early this morning you will be rewarded with a very special sight. Above the south-eastern horizon the waning Moon can be identified in an attractive grouping along with Jupiter and Mars. A little further east Saturn joins in too.
20 March: Jupiter near Mars
Once again Mars pays a visit to the big planets. This morning it meets Jupiter, approaching it at a separation of 40 arcseconds. In the coming days it passes by Jupiter and heads towards Saturn.
24 March: Venus at greatest eastern elongation
Half-illuminated, now Venus presents itself as an interesting object to observe. It gleams with a brightness of magnitude -4.3 and appears as a lovely evening star for almost the entire first half of the night, before finally disappearing below the horizon shortly before 23:00 CET.
29 March: The Moon occults Epsilon Tauri
Slowly winter bids farewell to the night sky. But the constellations Orion and Taurus are still visible in the western sky. This evening you can be witness to an interesting occultation of a star by the Moon. At around 21:30 CET the Moon draws near to the magnitude 3.5 star Epsilon Tauri in the Hyades cluster and at 21:35 CET occults it from its dark side.
April
2 April: Juno in opposition
Juno is a large asteroid in the main asteroid belt, with a diameter of 257 kilometres. On 2 April it reaches opposition to the Sun and shines with a brightness of magnitude 9.5.
3 April: Venus near the Pleiades
An unusual encounter: on 3 April we can see how Venus meets the Pleiades in the night sky. It’s a really rare sight, and all the more beautiful if we observe these objects through a telescope or capture the memory in a photograph.
15 April: The Moon near Jupiter, Saturn and Mars
At the moment the trio made up of Jupiter, Saturn and Mars is visible every morning before sunrise in the southeastern sky. Even if you don’t normally get up this early, try it once. For example this morning. Because today the Moon joins in and (together with the planets) offers a fascinating sight.
26 April: The Moon near Venus
The Moon is just three days old and yet lights up the evening sky as a slender, fine crescent. Today it meets Venus, the bright evening star.
28 April: Venus at greatest brightness
A fiery brilliance in the sky. When we take a look at the sky we can see the glistening bright Venus. Many people mistake it for an aircraft with its lights, or even a UFO. But you know it’s Venus which is reflecting more than 75% of the sunlight and so shines so brightly in the sky.
May
3 May: The Moon occults Nu Virginis
The Moon approaches from its dark side and heads towards the star Nu in the constellation Virgo. At 23:48 CET the star disappears behind the Moon and reappears a good 40 minutes later behind the bright side. Before observing check your local occultation times since this can vary slightly according to location.
12 May: The Moon near Jupiter and Saturn
In the last hours of the night, the solar system’s dream team appears over the horizon: bright Jupiter, an even brighter Moon and the somewhat weaker Saturn.
15 May: The Moon near Mars
Shortly before dawn breaks, you can find the Red Planet and the Moon. They approach one another between the constellations Aquarius and Aries at a separation of 3°. Above and to the right at an angular distance of a good 30° you can see the two gas giants Jupiter and Saturn.
15 May: Comet C/2017 T2 (PANSTARRS)
This comet could be a highlight in May. If the forecasts are correct, comet C/2017 T2 (PANSTARRS) could reach a brightness of magnitude 8 and so be easily visible with binoculars. In May it will linger in the circumpolar constellations. In the course of the month it will move from the constellation Camelopardalis (directly next to Ursa Minor), towards Ursa Major. On 23 May it stops close to the galaxies M81 and M82.
22 May: Venus near Mercury
Venus shines like a beacon in the sky. If you didn’t know you could easily mistake it for an aircraft’s lights. This evening Venus meets its direct neighbour, Mercury.
24 May: The Moon near Venus and Mercury
At the end of May everything revolves around Venus and Mercury since both planets are especially well visible at the moment. Today they share the limelight with the slender and only 4% illuminated crescent of the twodayold Moon.
26 May: Mercury visible in the evening
Mercury is so close to the Sun, nimble and very shy. At least this is the impression you can get when you try to observe it. It usually keeps itself close to the horizon. However now it is possible to discover it since it reaches an altitude of around 10° at dusk. It’s best to be on the lookout with binoculars a short time after sunset.
Winter Astronomy Highlights 2019/2020
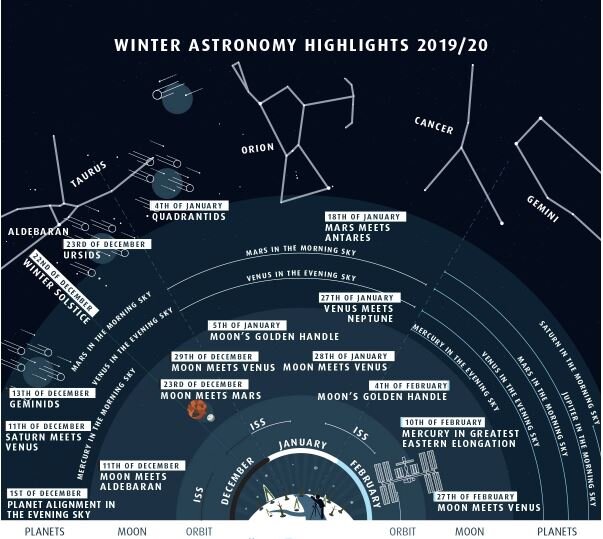
The winter is getting really cold again, but there is no better time than this for really good, early evening, chances to observe the stars. And what will lure you outside better than the Hunter of the Skies, the Seven Sisters or the Eye of the Bull?
The sky calendar with the interesting events for the next three months: the astronomical infographic “Winter Astronomy Highlights 2019/20” shows you when a glance at the sky will be worthwhile.
We wish you lots of fun with your observing!
December
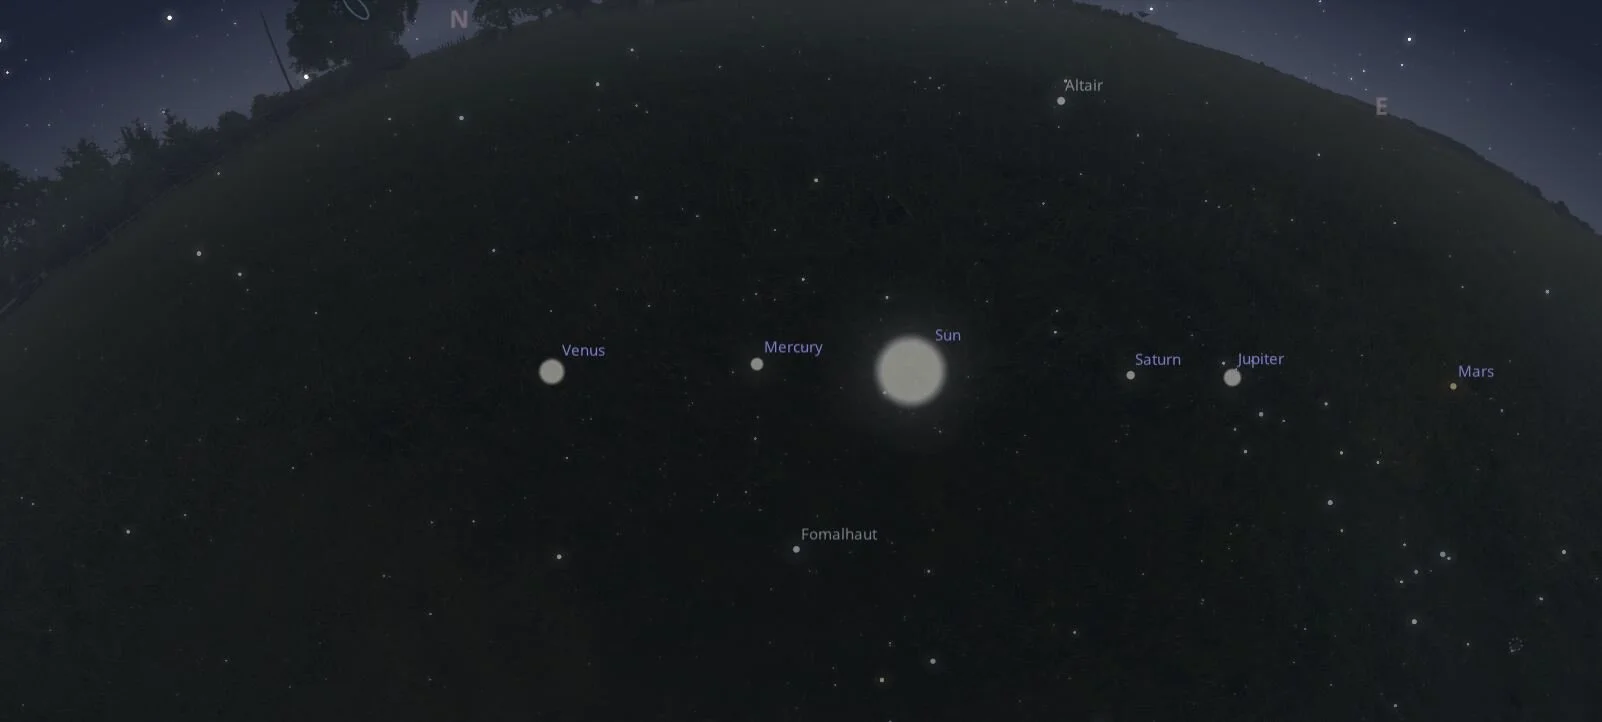
1st of December: Planet alignment
At dusk there is a lovely meeting of the planets Jupiter, Venus and Saturn. They are accompanied by the waxing Moon.
11th of December: Saturn meets Venus
The planets Venus and Saturn meet today at dusk, above the northwest horizon. Look out for the difference in brightness between the two as they race past one another, less than 2 degrees apart.
11th of December: The Moon meets Aldebaran
Already in the early evening we can see Aldebaran, the Eye of the Bull, as it appears above the horizon. However today it reveals itself with the almost fully-illuminated Moon. A great evening for observing planets and double stars.
13th of December: The Geminids
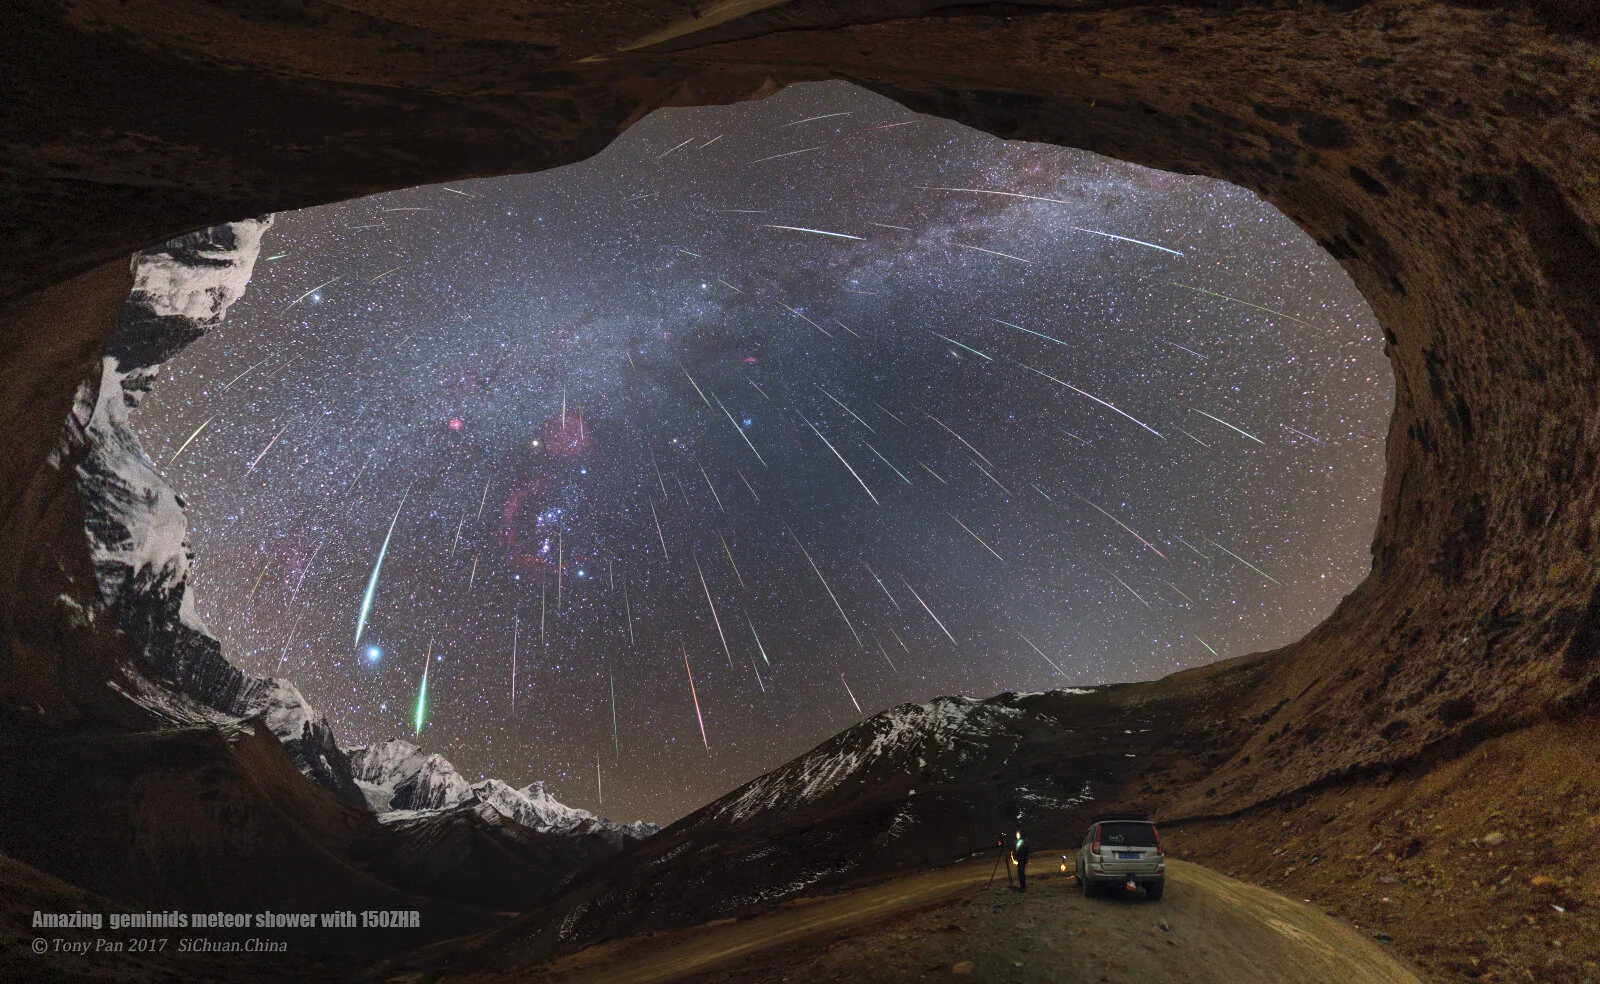
Image by 杨 潘
Amazing geminid meteor shower with 150+ZHR
The Geminids are considered one of the best meteor showers every year because the individual meteors are bright, and the peak can see meteors stream across the sky at rates as high as 120 meteors an hour and in this year this number increased to 150+
If the sky is clear in the evening, it’s best to take a look to the south. Because the Geminids shooting stars appear to originate from the constellation Gemini. To be more precise: from a point two degrees above the star Pollux. The best time for observing is between 21:00 CET and 6:00 CET. At 120 meteors per hour, the Geminids are among the most reliable shooting stars. However this year the full Moon will disrupt the view. Nevertheless, you should not miss this event.
23rd of December: The Moon meets Mars
Early risers take note: one day before Christmas it’s worth getting up early and taking a look at the sky. At dawn a delicate crescent Moon shines, just 10% illuminated, and meets up with Mars, the god of war.
23rd of December: The Ursids
The Ursids are a meteor shower that you can keep your eye on all night. This is because they originate from Ursa Minor, from which these meteors get their name. However these beacons speed across the sky more slowly than the Perseids – at around 35 kilometers per second.

Image by Eliot Herman
Predawn meteor over Tucson AZ
Probably a late Ursid meteor originating near Polaris that had its peak on 4 days prior. The fisheye image was captured with a Nikon D800 and a 8 mm Sigma lens (15 sec exposures). The wide angle image was captured with a Nikon D7100 with a Tokina 12-24 ( 7 sec exposures) mm lens aimed at Polaris. Meteor was at 5:14 am local time. Both cameras operated by interval timers.
A long trail, the wide angle captured the bright portion of the meter's burn, but as shown in the fisheye is stretched well beyond the the field of view of the wide angle ( 20 mm equiv.).
29th of December: Moon meets Venus
As soon as it gets dark we can see them shining above the horizon: the Moon and Venus. Even if this is not the most astronomically interesting event, under a clear twilight sky this sight is probably one of the most beautiful. This evening the Moon can be seen as a wafer-thin crescent and Venus shines in all its splendour.
January
4th of January: The Quadrantids
The Quadrantids are a meteor shower originating from the constellation Böotes. The New Year almost begins with an astronomical fireworks display, which brings us about 120 meteors per hour. In the evening the half-lit Moon is still high in the sky: wait until it disappears under the horizon before you start observing – then it will be dark. Böotes is one of the spring and summer constellations and so now, in winter, it – and therefore also the radiant – does not rise until after midnight. Then observing can become very interesting. Oh and yes, wrap up warmly, because patience is required when observing meteors.
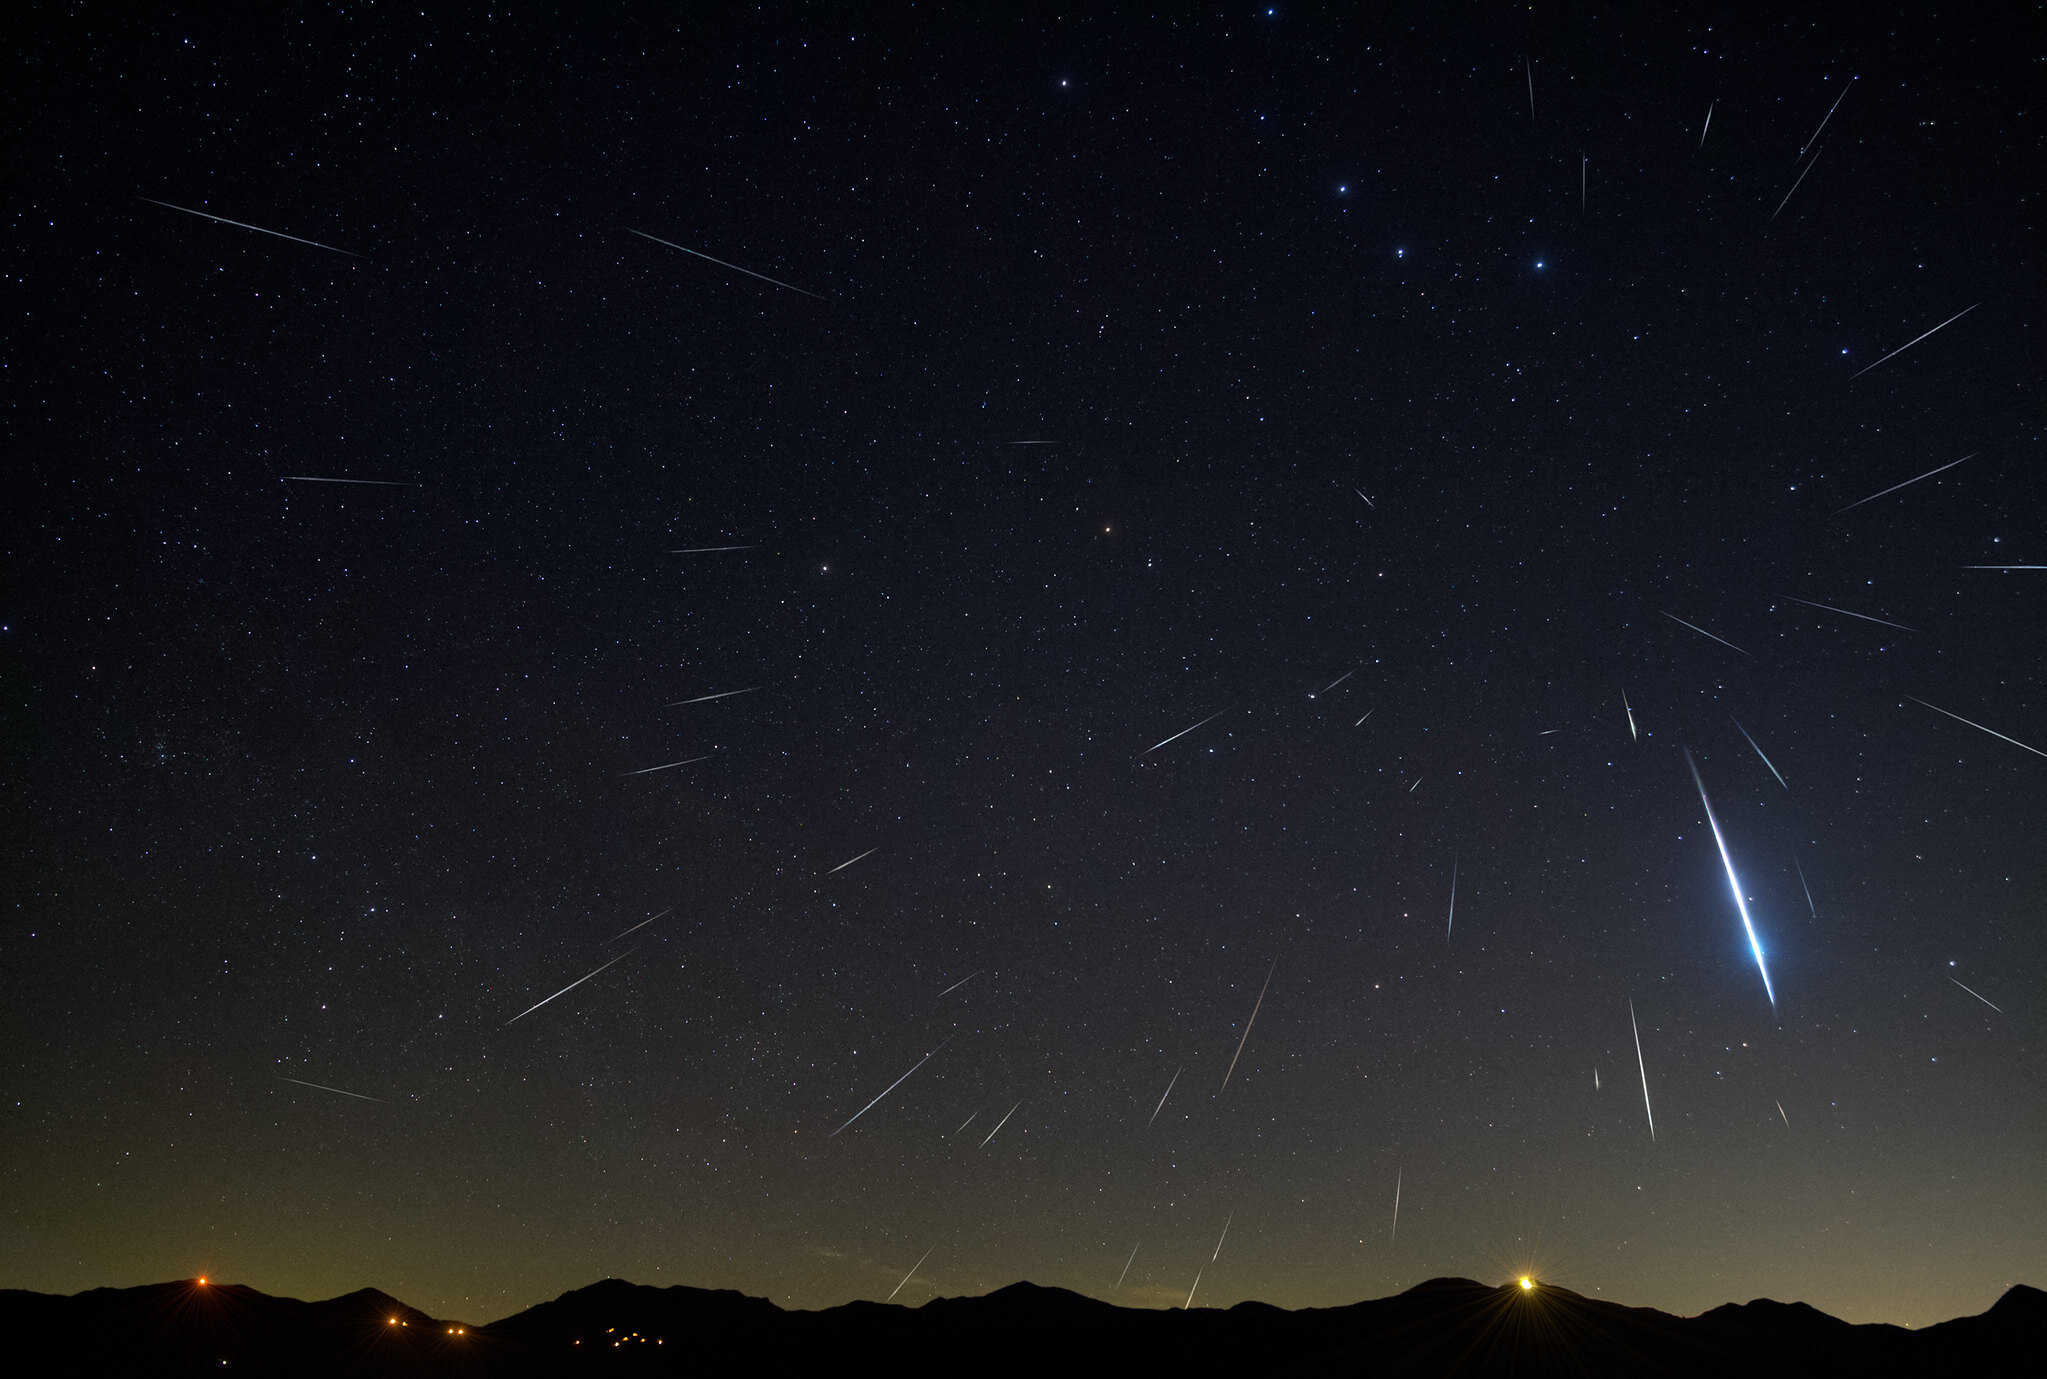
Image by Lamberto Sassoli
Quadrantid meteor shower 04.01.2019
Canon Eos 1100D
Samyang 10 mm lens
f/2.8 - ISO-6400 - 15'' x shot
Skywatcher Star Adventurer
Composite: 02:30-07:00 a.m.
Bolide: 06:35
-2°C
5th of January: The Moon’s Golden Handle
A fascinating event: the Moon’s Golden Handle. Like a handle of light, it breaks the Moon’s darkness just beyond the terminator. We look at Mare Imbrium in the region of Sinus Iridum crater and the high Montes Jura mountain range. The Sun rises here at the boundary between light and shadow. While the crater is still in darkness, the Sun bathes the circular-shaped peaks of Montes Jura in light. A golden ring in the dark.
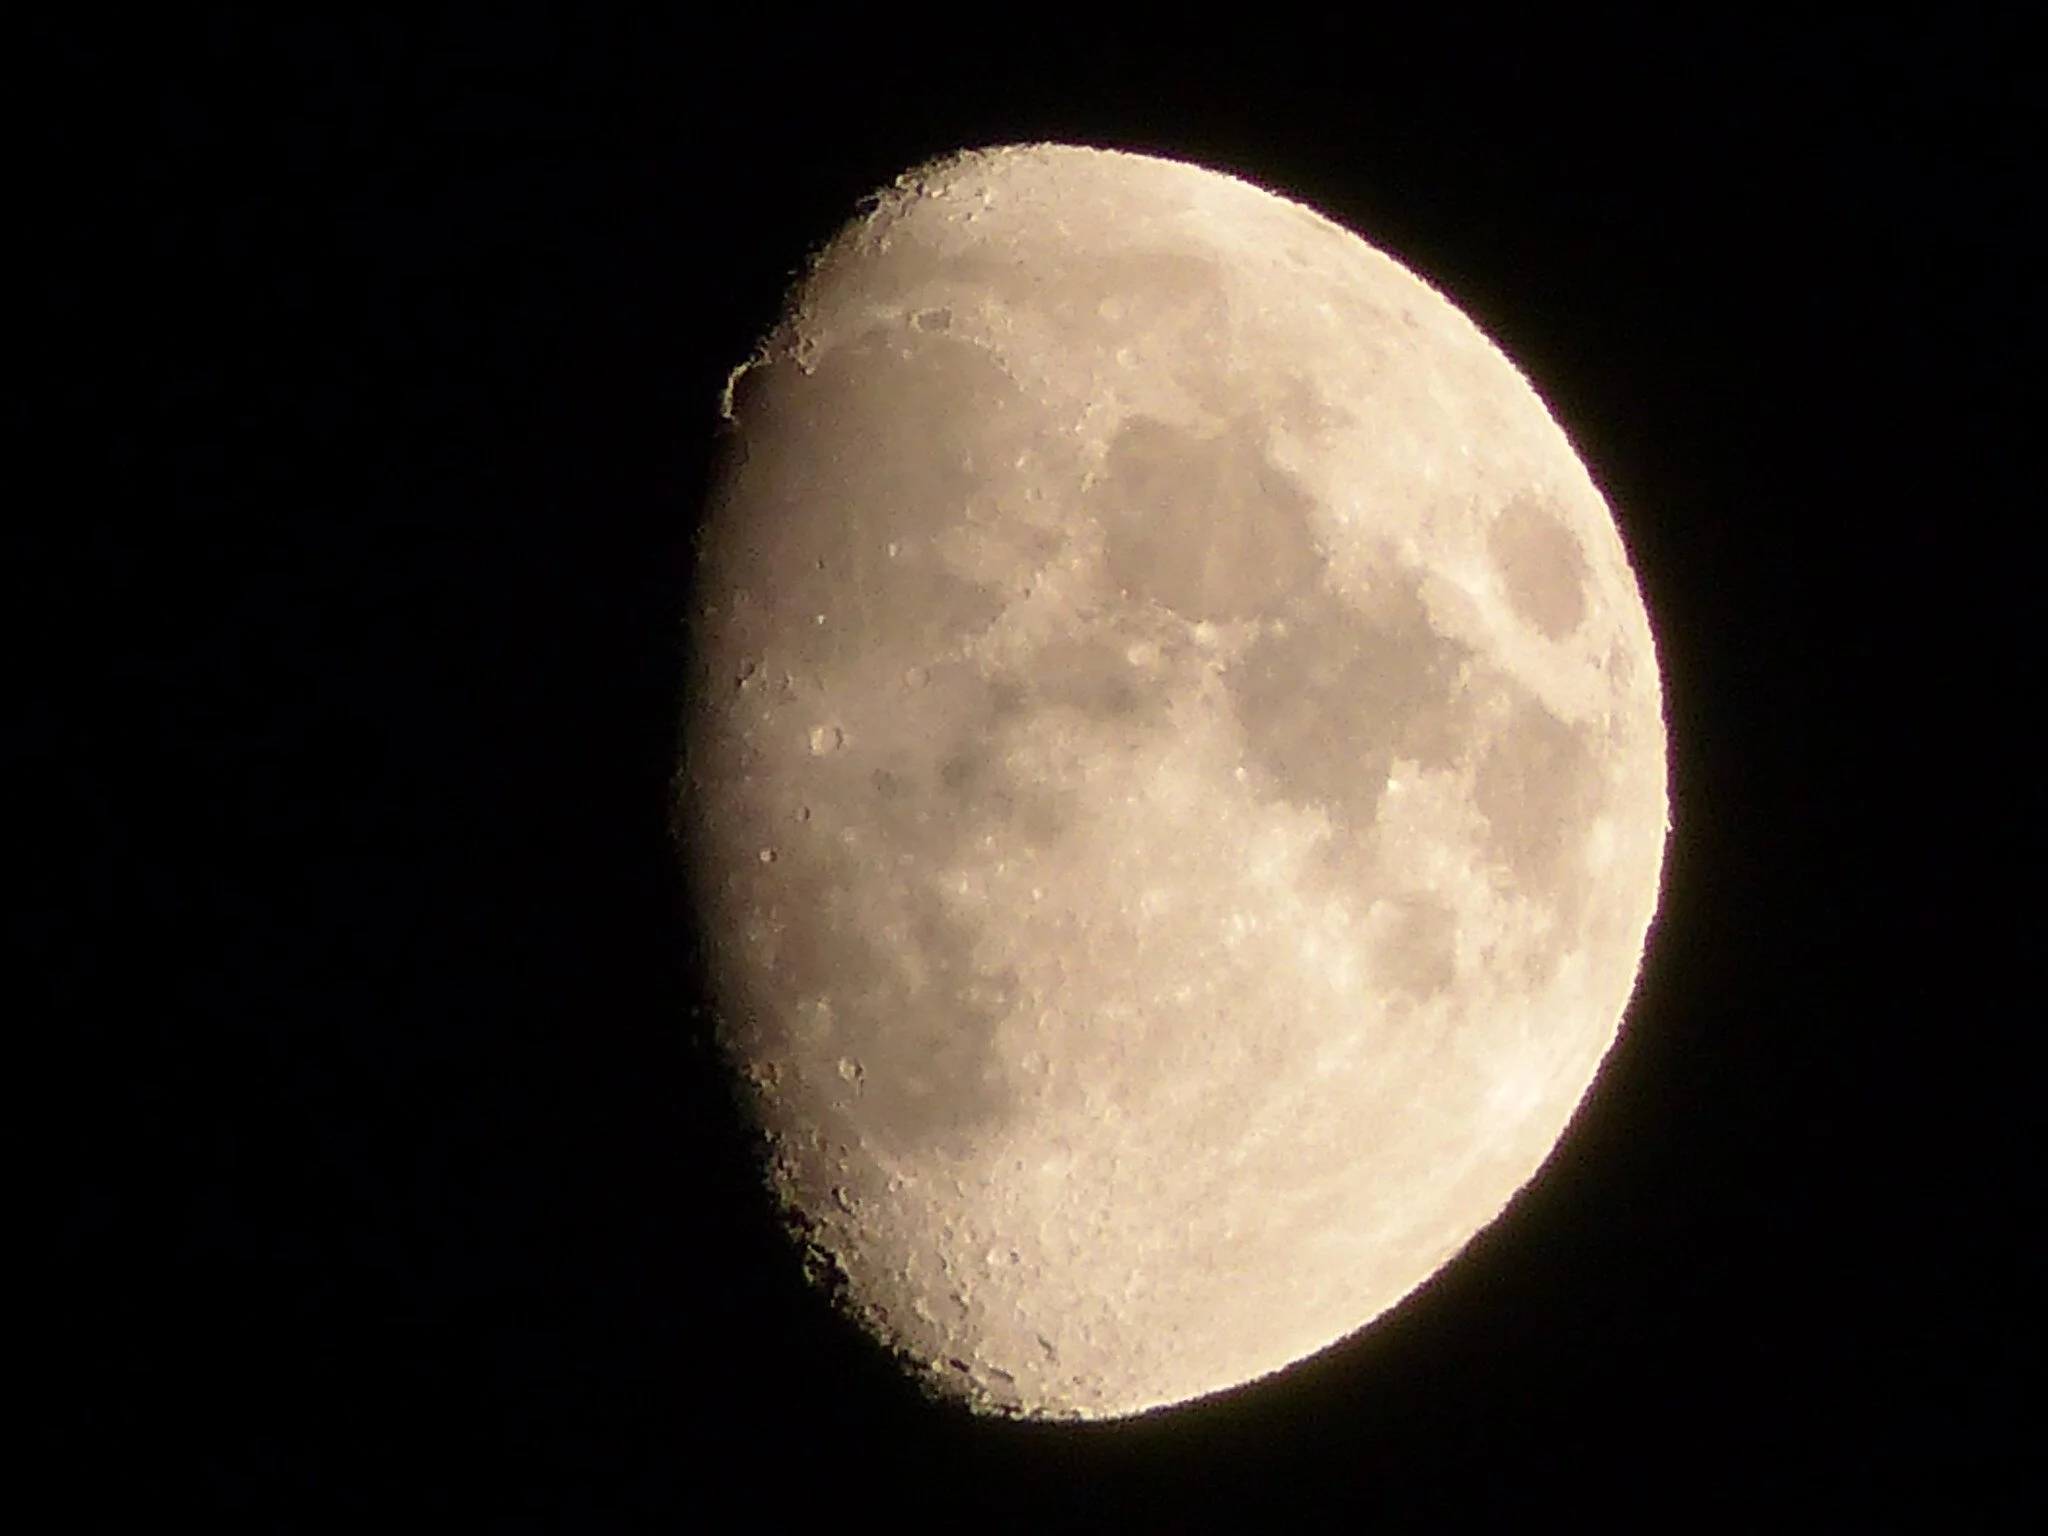
Image by CarenPolarBears
Waxing Gibbous
The Golden Handle (pl. see notebox) is clearly to be seen but only for a few hours - about 10-11 days after new moon or two days after the first quarter - when the sun rises on top of the Jura Mountains, the ridge is illuminated while the Sinus Iridium is in shadow
Handheld taken over the deep countryside in West Wales (Ceredigion)
Date &Time: 25 Feb 2018 – 21:12 GMT
Distance to Earth: 363.299 km
Illumination: 78%
Panasonic Lumix DMC-FZ00
ƒ/4
108.0 mm
1/500
ISO 100
Dedicated to C.F. (ILYWAMHASAM)
18th of January: Mars meets Antares
Antares is a red supergiant in the constellation Scorpius. It shines with an intense red light and resides at the very bottom of the class M spectral type. If it stood in the place of the Sun, Antares would reach beyond the orbit of Mars. But today Mars and Antares meet only visually for us in the sky. Compare the red colours of these two celestial bodies.
27th of January: Venus meets Neptune
One very close, the other very distant: our neighbouring planet Venus meets up with the outpost of our solar system. With just the naked eye, however, we can admire only Venus. But less than a degree north we meet Neptune, which reveals itself in a telescope as a small blue disc.

Image from https://stellarium-web.org/
28th of January: The Moon meets Venus
Another chance to see this beautiful sight: Venus and the narrow, 12% illuminated, crescent Moon. Until around 20:00 CET we can easily follow the two brightest bodies in the sky, before Venus disappears below the horizon, often in haze, a good 40 minutes later.
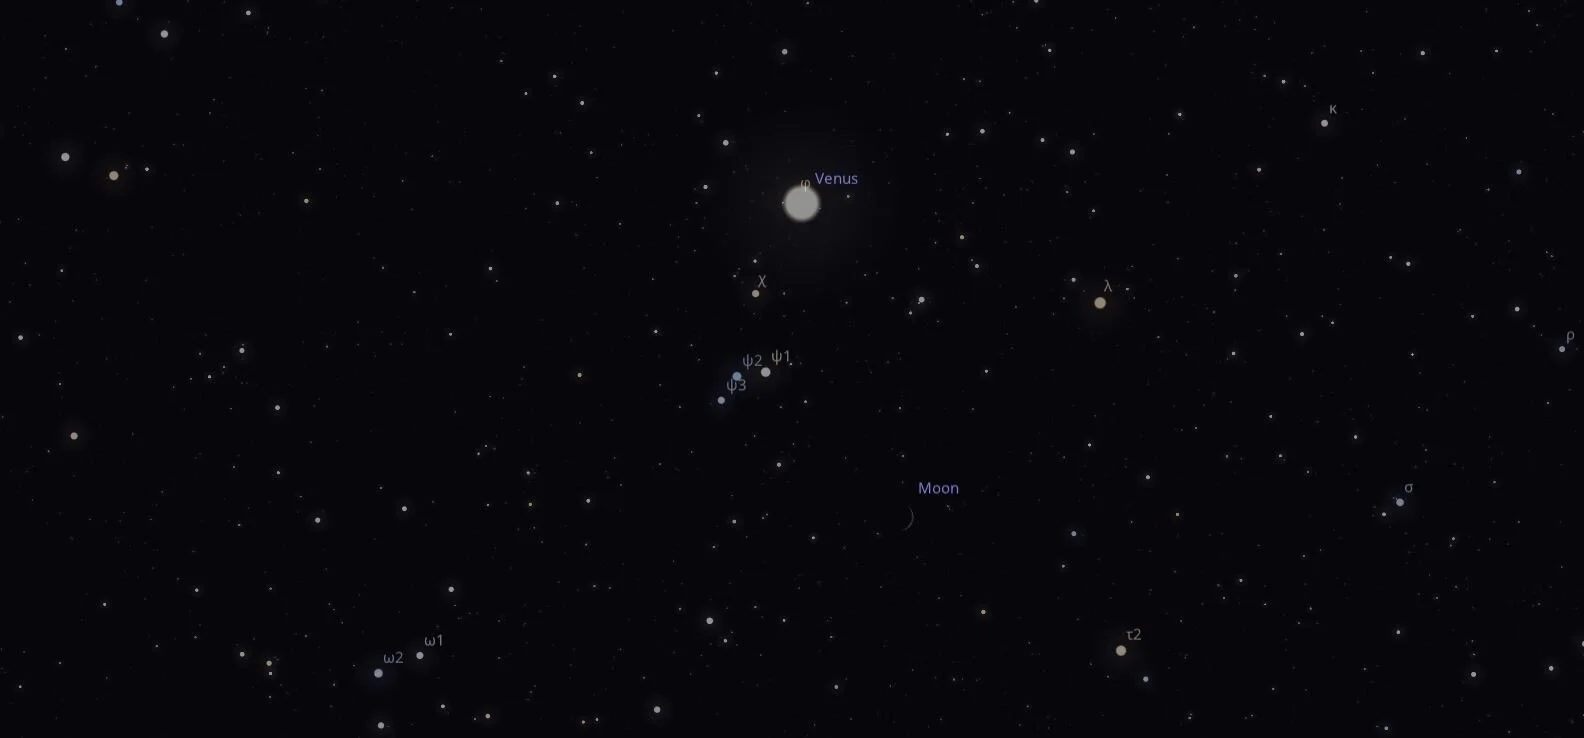
Image by https://stellarium-web.org/
February
4th of February: The Moon’s Golden Handle
As on the 5th of January, today we can once again observe the Moon’s Golden Handle. This is caused by the illuminated peaks of Montes Jura mountain range on the dark side of the terminator.
10th of February: Mercury’s greatest eastern elongation
Mercury is nimble and only rarely visible. But right now our shy friend reveals himself in the evening sky. It is positioned at its greatest angular distance from the Sun and is barely visible in the growing twilight. For this you need a very good view of the horizon, cloud-free and clear weather, and binoculars with which you can discover Mercury.
27th of February: The Moon meets Venus
The second beautiful sighting of the crescent Moon and Venus at dusk. Meanwhile we can follow the splendour of the bright and shining Venus in the sky for some time – as it only disappears under the horizon at around 22:00 CET.
Testing the Venus Optics Laowa 15mm f/2 Lens
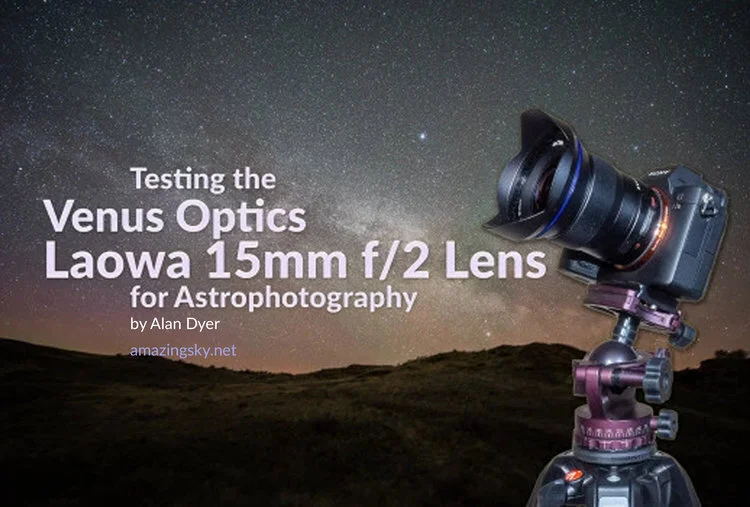
by Alan Dyer of amazingsky.net
I test out a fast and very wide lens designed specifically for Sony mirrorless cameras.
In a test on my blog at www.amazingsky.net published May 31, 2018 I presented results on how well the Sony a7III mirrorless camera performs for nightscape and deep-sky photography. It works very well indeed.
But what about lenses for the Sony? Here’s one ideal for astrophotography.
TL;DR Conclusions
Made for Sony e-mount cameras, the Venus Optics 15mm f/2 Laowa provides excellent on- and off-axis performance in a fast and compact lens ideal for nightscape, time-lapse, and wide-field tracked astrophotography with Sony mirrorless cameras. (Sorry, Canon and Nikon users, it is not available for other lens mounts.)
I use it a lot and highly recommend it.
Size and Weight
While I often use the a7III with my Canon lenses by way of a Metabones adapter, the Sony really comes into its own when matched to a “native” lens made for the Sony e-mount. The selection of fast, wide lenses from Sony itself is limited, with the new Sony 24mm G-Master a popular favourite (I have yet to try it).
However, for much of my nightscape shooting, and certainly for auroras, I prefer lenses even wider than 24mm, and the faster the better.
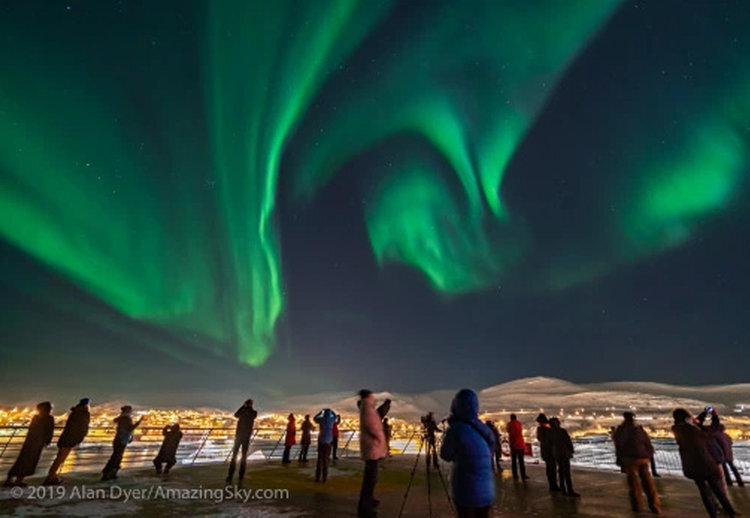
The Laowa 15mm f/2 from Venus Optics fills the bill very nicely, providing excellent speed in a compact lens. While wide, the Laowa is a rectilinear lens providing straight horizons even when aimed up, as shown above. This is not a fish-eye lens.
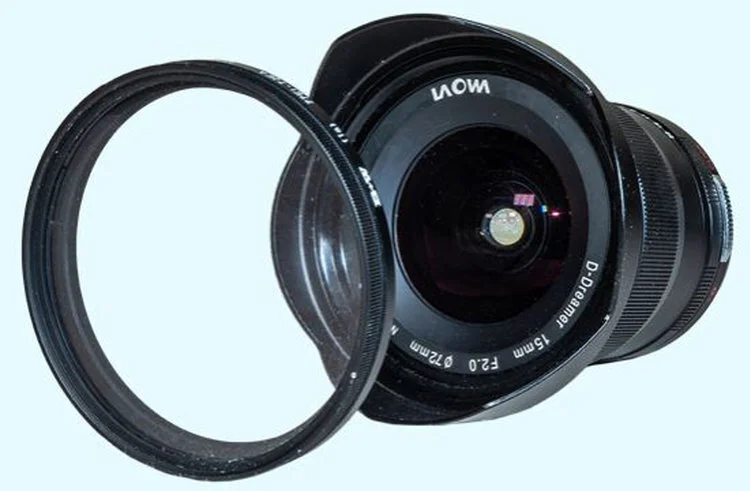
Though a very wide lens, the 15mm Laowa accepts standard 72mm filters. The metal lens hood is removable. © 2019 Alan Dyer
The Venus Optics 15mm realizes the potential of mirrorless cameras and their short flange distance that allows the design of fast, wide lenses without massive bulk.
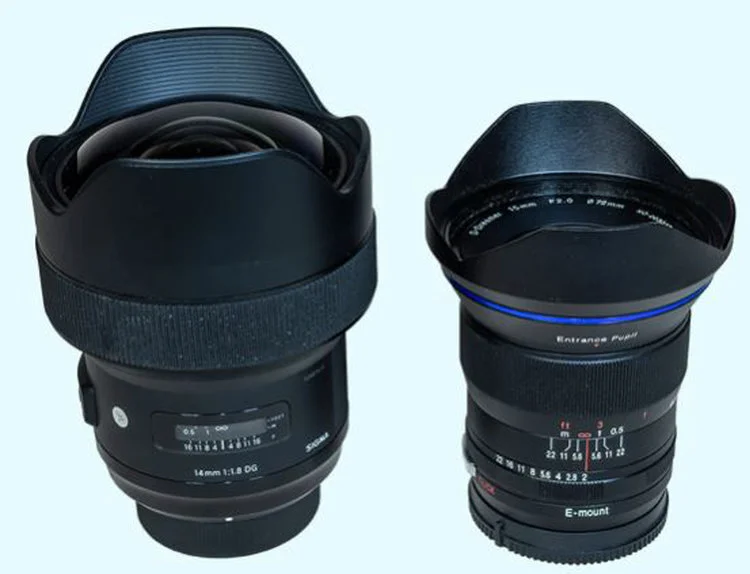
Sigma 14mm f/1.8 Art lens (for Nikon mount) vs. Venus Optics 15mm f/2 lens (for Sony mount). © 2019 Alan Dyer
For me, the Sony-Laowa combination is my first choice for a lightweight travel camera for overseas aurora trips.
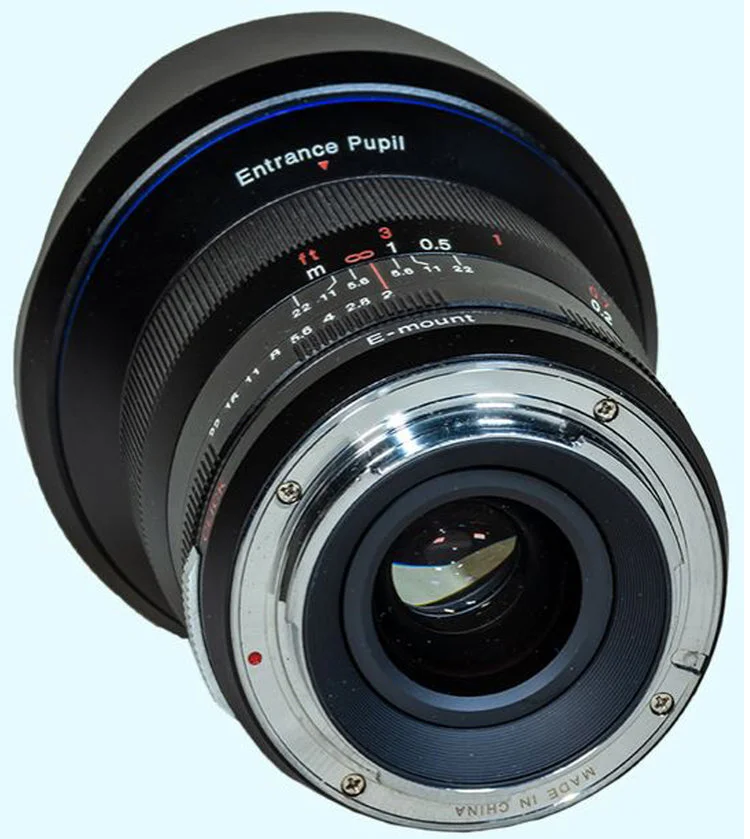
The lens mount showing no electrical contacts to transfer lens metadata to the camera. © 2019 Alan Dyer
However, this is a no-frills manual focus lens. Nor does it even transfer aperture data to the camera, which is a pity. There are no electrical connections between the lens and camera.
However, for nightscape work where all settings are adjusted manually, the Venus Optics 15mm works just fine. The key factor is how good are the optics. I’m happy to report that they are very good indeed.
Testing Under the Stars
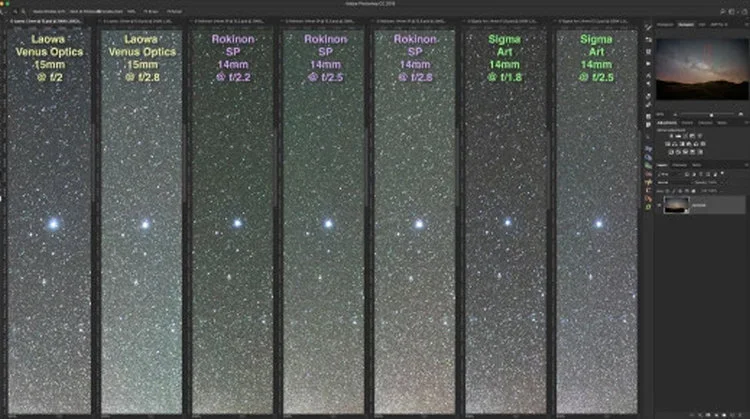
To test the Venus Optics lens I shot “same night” images, all tracked, with the Sigma 14mm f/1.8 Art lens, at left, and the Rokinon 14mm SP (labeled as being f/2.4, at right). Both are much larger lenses, made for DSLRs, with bulbous front elements not able to accept filters. But they are both superb lenses. See my test report on these lenses published in 2018.

The Sigma 14mm f/1.8 Art lens (left) vs. the Rokinon SP 14mm f/2.4. © 2019 Alan Dyer
The next images show blow-ups of the same scene (the nightscape shown in full below, taken at Dinosaur Provincial Park, Alberta), and all taken on a tracker.
I used the Rokinon on the Sony a7III using the Metabones adapter which, unlike some brands of lens adapters, does not compromise the optical quality of the lens by shifting its focal position. But lacking a lens adapter for Nikon-to-Sony at the time of testing, I used the Nikon-mount Sigma lens on a Nikon D750, a DSLR camera with nearly identical sensor specs to the Sony.
Vignetting
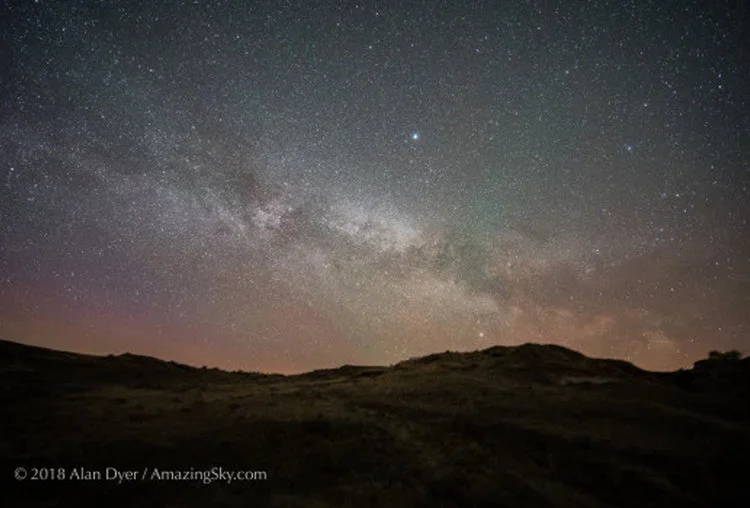
A tracked image with the Venus Optics Laowa 15mm at f/2.
Above is a tracked image (so the stars are not trailed, which would make it hard to tell aberrations from trails), taken wide open at f/2. No lens correction has been applied so the vignetting (the darkening of the frame corners) is as the lens provides.
As shown bottom right, when used wide open at f/2 vignetting is significant, but not much more so than with competitive lenses with much larger lenses, as I compare below.
And the vignetting is correctable in processing. Adobe Camera Raw and Lightroom have this lens in their lens profile database. That’s not the case with current versions (as of April 2019) of other raw developers such as DxO PhotoLab, ON1 Photo RAW, and Raw Therapee where vignetting corrections have to be dialled in manually by eye.
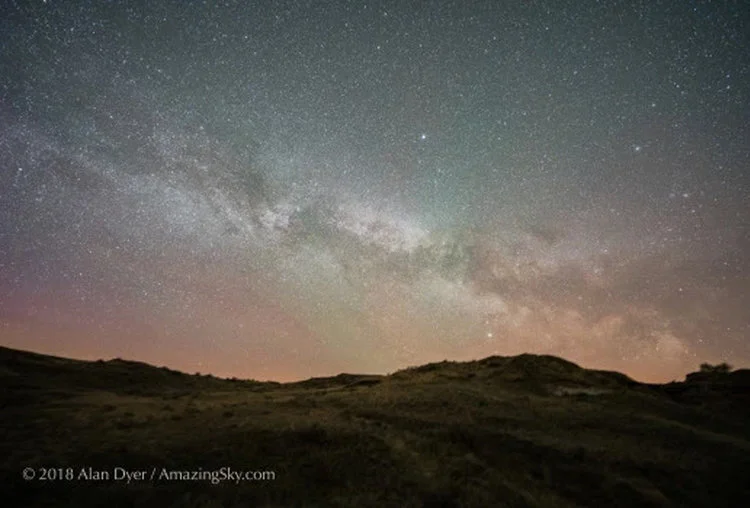
A tracked image with the Venus Optics Laowa 15mm stopped down 1 stop to f/2.8.
When stopped down to f/2.8 the Laowa “flattens” out a lot for vignetting and uniformity of frame illumination. Corner aberrations also improve but are still present. I show those in close-up detail below.
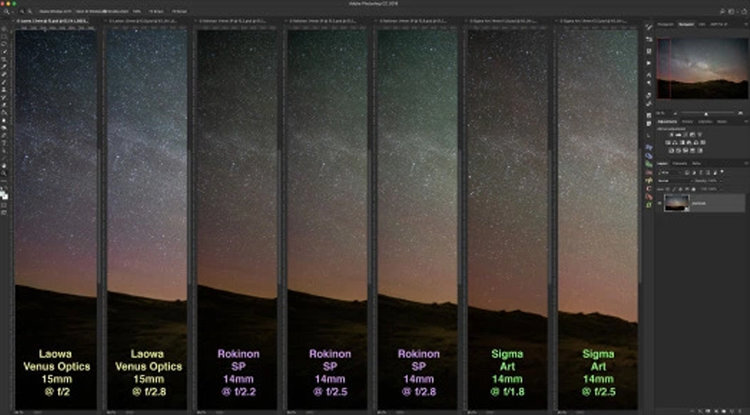
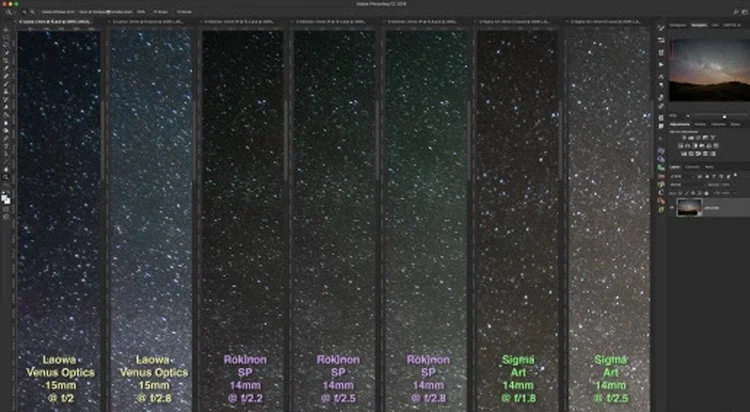
15mm Laowa vs. Rokinon 14mm SP vs. Sigma Art 14mm – Comparing the left side of the image for vignetting (light fall-off), wide open and stopped down. ©2018 Alan Dyer
I compare the vignetting of the three lenses, both wide open and when stopped down. Wide open, all the lenses, even the Sigma and Rokinon despite their large front elements, show quite a bit of drop off in illumination at the corners.
The Rokinon SP actually seems to be the worst of the trio, showing some residual vignetting even at f/2.8, while it is reduced significantly in the Laowa and Sigma lenses. Oddly, the Rokinon SP, even though it is labeled as f/2.4, seemed to open to f/2.2, at least as indicated by the aperture metadata.
On-Axis Performance
15mm Laowa vs. Rokinon 14mm SP vs. Sigma Art 14mm – Comparing the centre of the image for sharpness, wide open and stopped down. Click or tap on an image to download a full-resolution JPG for closer inspection © 2018 Alan Dyer
Above I show lens sharpness on-axis, both wide open and stopped down, to check for spherical and chromatic aberrations with the bright blue star Vega centered. The red box in the Navigator window at top right indicates what portion of the frame I am showing, at 200% magnification in Photoshop.
On-axis, the Venus Optics 15mm shows stars just as sharply as the premium Sigma and Rokinon lenses, with no sign of blurring spherical aberration nor coloured haloes from chromatic aberration.
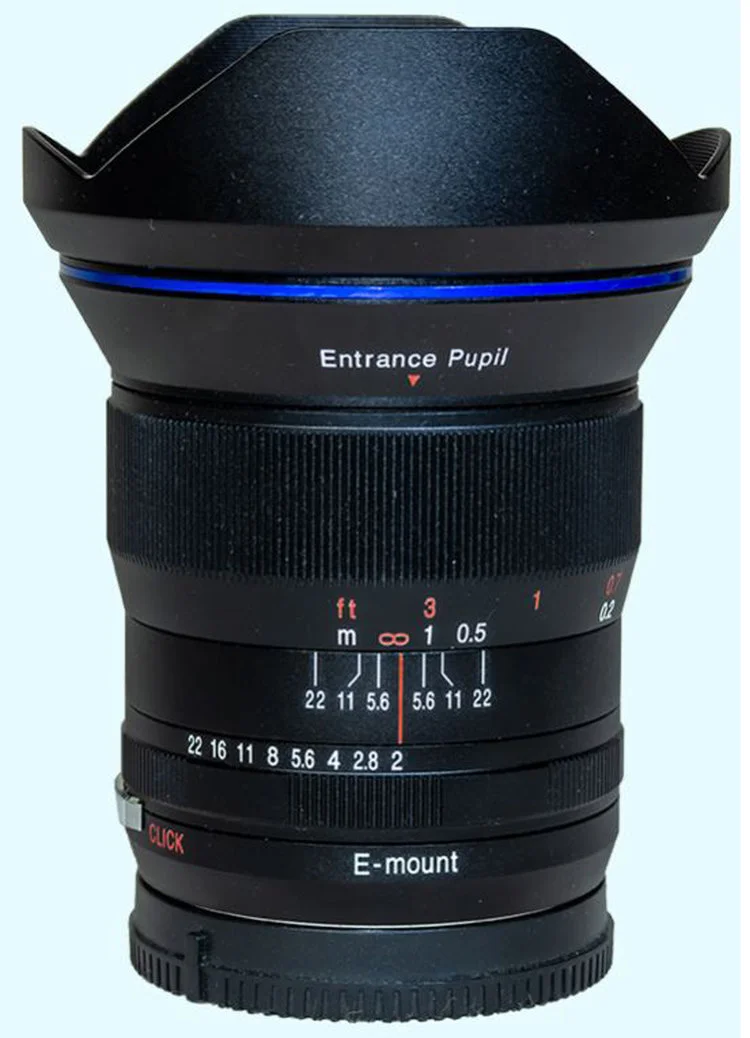
This is where this lens reaches sharpest focus on stars, just shy of the Infinity mark. © 2019 Alan Dyer
Focusing is precise and easy to achieve with the Sony on Live View. My unit reaches sharpest focus on stars with the lens set just shy of the middle of the infinity symbol. This is consistent and allows me to preset focus just by dialing the focus ring, handy for shooting auroras at -35° C, when I prefer to minimize fussing with camera settings, thank you very much!
Off-Axis Performance
15mm Laowa vs. Rokinon 14mm SP vs. Sigma Art 14mm – Comparing
The Laowa and Sigma lenses show similar levels of off-axis coma and astigmatism, with the Laowa exhibiting slightly more lateral chromatic aberration than the Sigma. Both improve a lot when stopped down one stop, but aberrations are still present though to a lesser degree.
However, I find that the Laowa 15mm performs as well as the Sigma 14mm Art for star quality on- and off-axis. And that’s a high standard to match.
The Rokinon SP is the worst of the trio, showing significant elongation of off-axis star images (they look like lines aimed at the frame centre), likely due to astigmatism. With the 14mm SP, this aberration was still present at f/2.8, and was worse at the upper right corner than at the upper left corner, an indication to me that even the premium Rokinon SP lens exhibits slight lens de-centering, an issue users have often found with other Rokinon lenses.
Real-World Examples – The Milky Way
The fast speed of the Laowa 15mm is ideal for shooting tracked wide-field images of the Milky Way, and untracked camera-on-tripod nightscapes and time-lapses of the Milky Way.
Image aberrations are very acceptable at f/2, a speed that allows shutter speed and ISO to be kept lower for minimal star trailing and noise while ensuring a well-exposed frame.
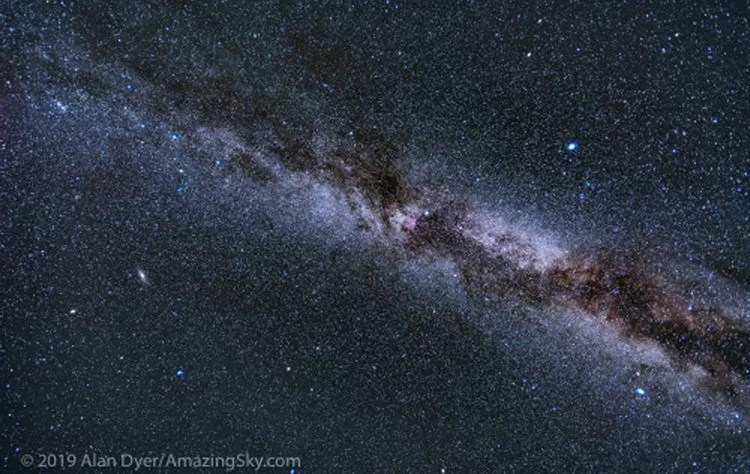
This is a stack of 8 x 2-minute exposures with the Venus Optics Laowa 15mm lens at f/2 and Sony a7III at ISO 800, on the Sky-Watcher Star Adventurer tracker. A single exposure taken through the Kenko Softon A filter layered in with Lighten mode adds the star glows, though exaggerates the lens distortion on the bright stars.
This is a stack of 12 exposures for the ground, mean combined to smooth noise, and one exposure for the sky, all 30 seconds at f/2 with the Laowa 15mm lens on the Sony a7III camera at ISO 6400. These were the last frames in a 340-frame time-lapse sequence.
The fast speed of the Laowa 15mm is ideal for shooting tracked wide-field images of the Milky Way, and untracked camera-on-tripod nightscapes and time-lapses of the Milky Way.
Image aberrations are very acceptable at f/2, a speed that allows shutter speed and ISO to be kept lower for minimal star trailing and noise while ensuring a well-exposed frame.
Wayne Pinkston

By profession I am a Radiologist, recently retired. Photography and Radiology share many of the same principles as far as image capture and display. As photographs moved into digital age imaging so did radiology. I am a visual person. An early interest in photography may have later helped to stimulate an interest in radiology. I have had a longstanding interest in outdoor photography, but now my primary interest is Landscape Astrophotography. Over the years my interest in landscape photography has exposed me to a world that I may have not experienced otherwise.
The photos were taken with a variety of cameras over the years, changing with the times. The 35mm film cameras were initially Canon with a few rare exceptions. Earlier Medium Format cameras were Bronica and Contax. Over the last few years the cameras have been Canon and Nikon DSLR's. Canon cameras include the 6D, 5D Mark III, and 1Dx. More recently I have used the Nikon D810A, D750, and D850. Lenses include the Canon 16-35mm f/2.8L II and the Nikon 12-24 mm f/2.8 zoom. Other lens include the Rokinon 24mm f/1.4, Rokinon 12 mm f/2.8 fisheye, Rokinon 20 mm f/1.8, Rokinon 35 mm f/1.4, and the Sigma 14 mm f/1.8.
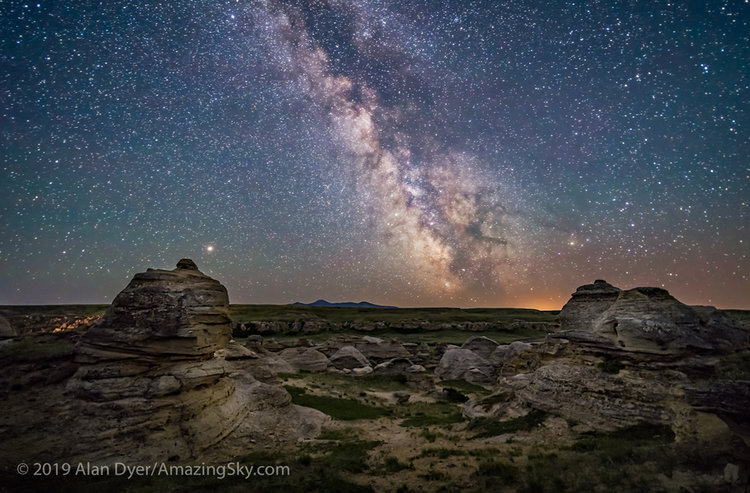
King of Wings
I use a Gitzo carbon fiber tripod and an Acratech ballhead and leveling base. Image processing is done on a Mac Computer with Adobe LightRoom CC and Photoshop CC. I am currently use a commercial lab for printing (Bay Photo). Virtually all of the daytime images were taken with available light. Low Level Lighting is used in many of the night photos. If there are any questions please contact me by email.
There are several names for this type of photography including Landscape Astrophotography, Wide Field Astrophotography, and Nightscapes. It's a type of astrophotography that combines night landscapes with wide field astrophotography. This has only become practical within the last 6-8 years as camera sensor technology advanced.
I became interested in this field after seeing a few early landscape astrophotography photos on the internet 5-6 years ago. The next year I had the chance to try capturing a few Milky Way images along the North Rim of the Grand Canyon. I was immediately hooked when the first image appeared on my camera LCD screen. For me, there was no looking back.
These photos require very dark skies, and were taken in some of the darkest places in this country, and in the world. The eastern half of the USA, most of Europe, and parts of Asia have too much light pollution to perform this kind of photography. The camera captures a lot of subtle color in the night sky that we cannot see with our eyes. The green is primarily airglow, appearing somewhat like the aurora. The sun’s extreme ultraviolet light excites oxygen and nitrogen atoms in the upper atmosphere during the day. The resulting products then interact with other atmospheric components to later produce light emission by chemical luminescence at night.
Wizard of Bisti
This is called airglow and is most often green or red. The camera captures these colors but we see only a faint grey illumination with our eyes. The yellow and orange tones are frequently are due to light pollution but can also be due to the setting or rising sun or moon. Light pollution from a city can be seen for hundreds of miles.
The stars themselves have different colors and there is a lot of subtle color in the core of the Milky Way. In many of these photos the nearby landscape is illuminated to some degree using a technique called Low Level Lighting (http://www.lowlevellighting.org).
So why do I do this at all? Living in the Eastern USA I was not used to seeing the true spectacle of a dark night sky. The light pollution in the East obscures many of the stars as well as the Milky Way. Once I experienced a truly dark sky I knew I wanted more. You have to actively seek the darkest skies in the country to see the sky as our ancestors did. It is exhilarating to be in these places at night and see the Milky Way arching overhead. There is a feeling that is almost primal to see the sky just as our ancestors did thousands of years ago, and this may one of the few experiences we can still share with them.
We have largely forgotten the beauty of the night, especially in the eastern US and Europe. When the sun sets we go indoors and turn on the lights, and spend little time outdoors. As we retreat from the dark we create more and more light pollution and in turn we obscure the night sky even more. I hope that this can change. If there is one primary goal I hope to accomplish, it is to help people remember (or learn) the beauty of the truly dark places. The sky is beautiful, the land is still and quiet, and the crowds of the day are gone. Occasionally a rabbit, fox, mouse, or coyote will appear and then scurry away. It is peaceful and quiet in a way that is rarely possible during the day.
For those that have not tried this kind of photography, here is a little background. Those photos are taken in the darkest places possible, to allow you to see the Milky Way and stars. There are "Dark Sky" apps that can help show you the darkest places in the world.
Delicate Erosion
Moonlight is usually too bright and this means that you take those photos around the time of the new moon, or well after the moon has set. Most of these photography trips are planned around a new moon to minimize moonlight. All of the exposures are long, usually 15-30 seconds. All are taken with a tripod. Since the stars are moving in the sky, you will get "star trails" if you use exposures longer than 15-30 seconds. This means the stars turn from dots into curved lines that look like small commas. Twilight (the time after sunset) lasts much longer than most people realize. There is some residual light from the sun for up to two hours or so after sunset, and most of the photography is obtained after that time. You also need a camera contains a sensor that functions well in low light. As for the landscape, you can provide lighting or leave it natural. There are times each may be best.
Thanks,
Wayne Pinkston
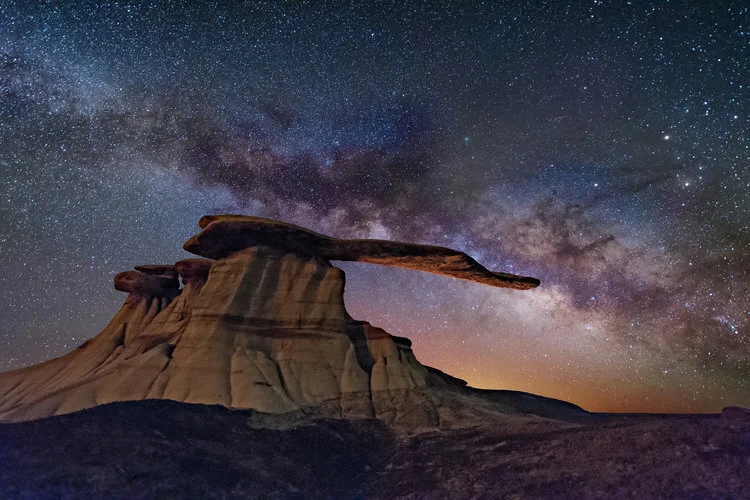
Ralf Rohner
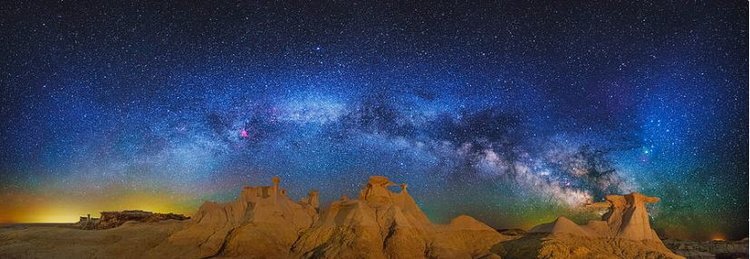
Arching over Alien Lands.
As a landscape photographer and pilot I have the privilege to travel the world and visit some of the most beautiful places on our planet. I started photography as an astro-photographer, which still shows in my passion for nightscapes. While not exclusively shooting at night, a big part of my work shows the beauty of the starry night skies in combination with some iconic landscapes.
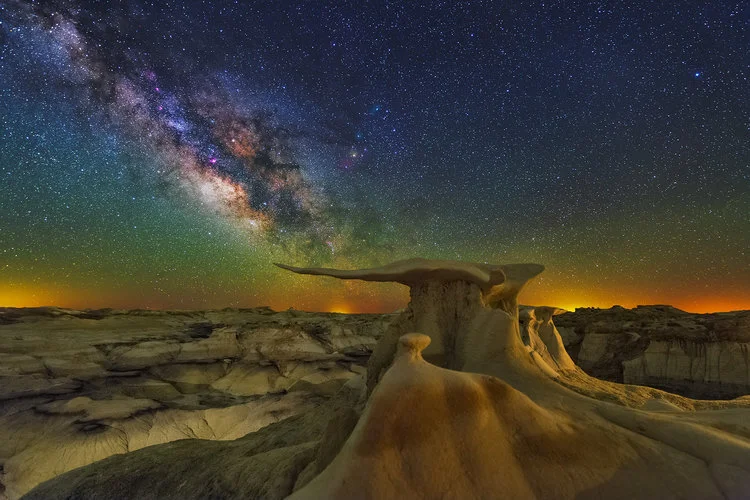
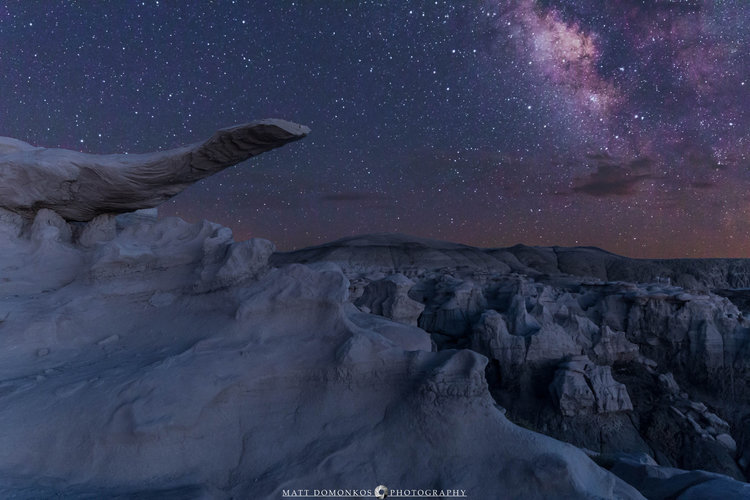
The Universe on a Wing
I took this image during my visit in April. The night was perfectly clear, but very windy and a strong gust tipped over the tripod with my LED light and it dropped into the ravine behind the wing, I was glad that I was able to retrieve it in one piece. EXIFAstro-modified Canon EOS 6DTamron 15-30mm f/2.8Low Level Lighting with 2 LED panels and one omnidirectional light.Fixed Tripod 10 x 20s @ ISO6400 Individually stacked with fitswork for the sky and PS for the foreground. Thanks for all your faves and comments. Prints available :ralf-rohner.pixels.com
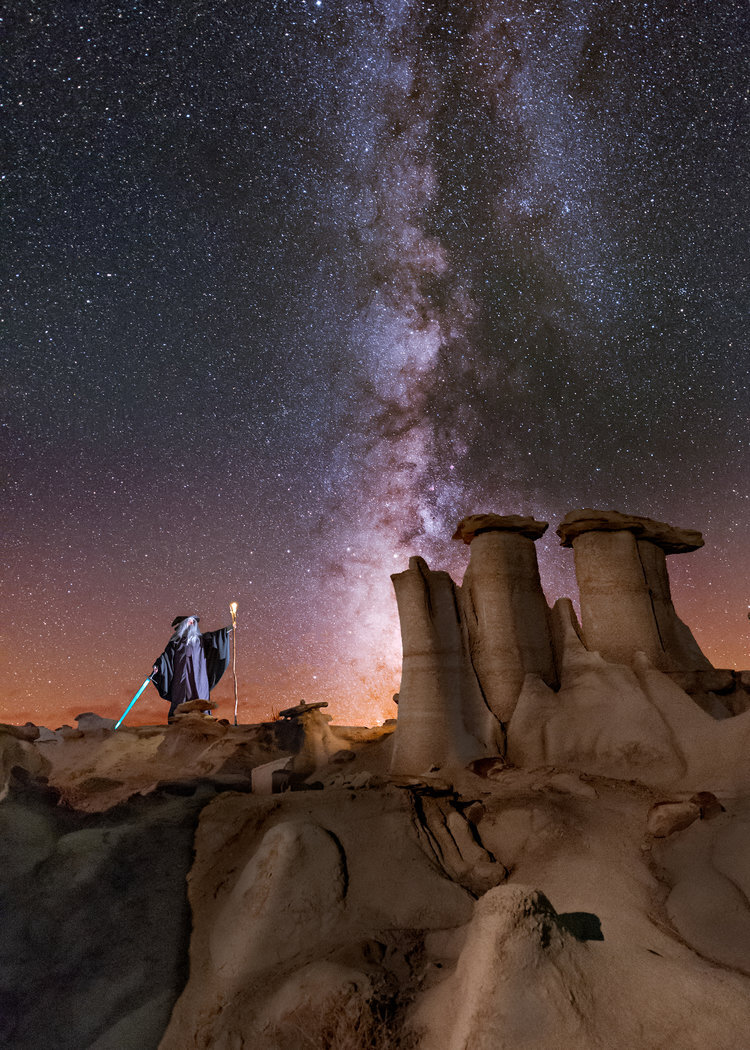
Matt Domonkos
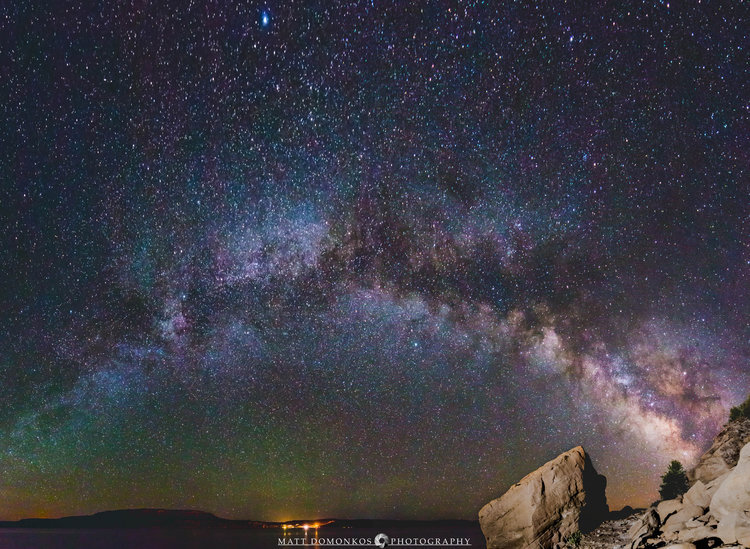
Galaxy Arching over Lake
Based out of Albuquerque in the Land of Enchantment, I spend a good bit of my free time capturing the visible portion the electromagnetic spectrum after it has interacted with or emanated from the natural landscape.
It is my desire to share the beauty, vastness, and variety of creation with others so that we may all grow in our appreciation of this small corner of the universe we call home.
If you'd like a copy of any of these works for yourself, I sell prints, metal prints, and canvas prints through this site. You may also contact me via the email below if you are interested in non-standard size or format (i.e. framed).
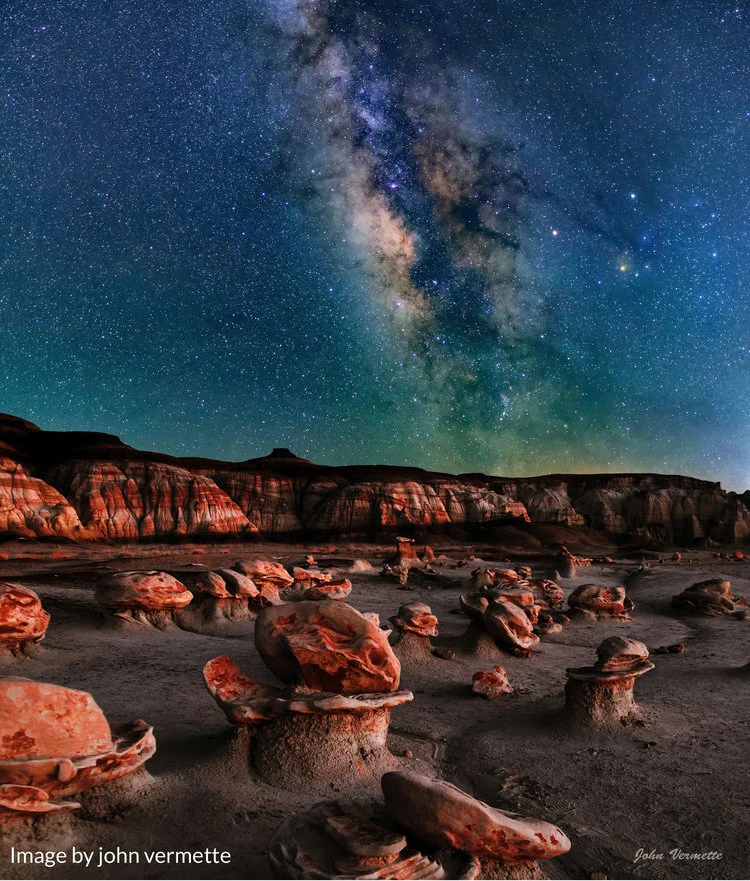
The Other Night in New Mexico
As a New Mexico (nearly) native, I finally made it out to the Bisti Badlands for the (also nearly) new moon. The formations are as varied, other-worldly, and numerous as any search on the location would indicate. Perfect for nightscapes with the Milky Way...did I mention the dark skies of western New Mexico? This image is on top of a nest of hoodoos with the landscape shot at twilight, and the sky a bit later. The clouds had mostly cleared just as the Milky Way was exiting my frame to the west.
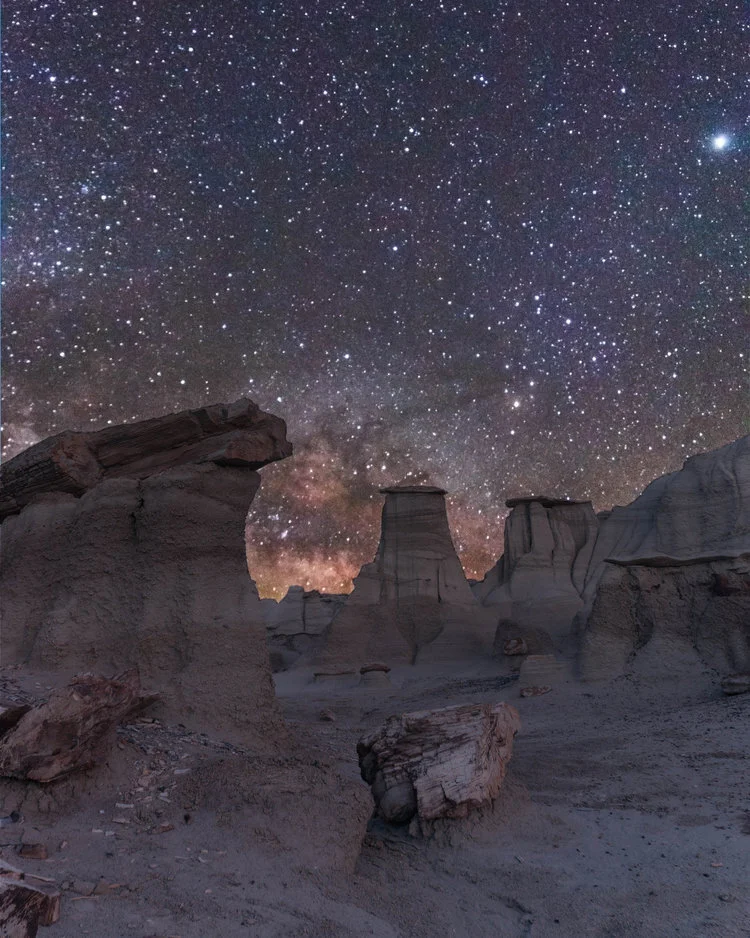
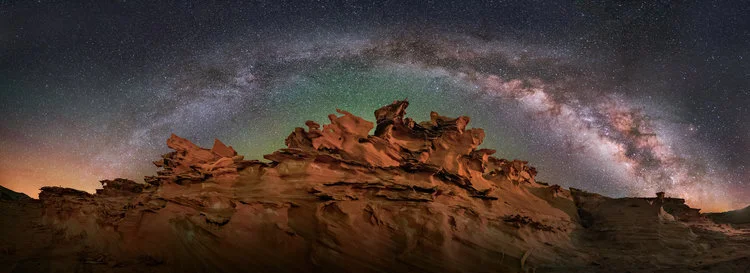
Galaxy Rise
The Bisti Badlands make for an ideal backdrop to other worldly night sky images such as Milky Way rise. The hoodoos, a couple compliments of some petrified wood here, produce a scene that is itself alien for many of us. Add in the dusty portion of the Milky Way before you can discern its form, and you have this scene. Jupiter is blaring away in the upper right for good measure. The landscape is a bit of a composite to retain detail and contrast of earlier light.
Bisti/De-Na-Zin Wilderness
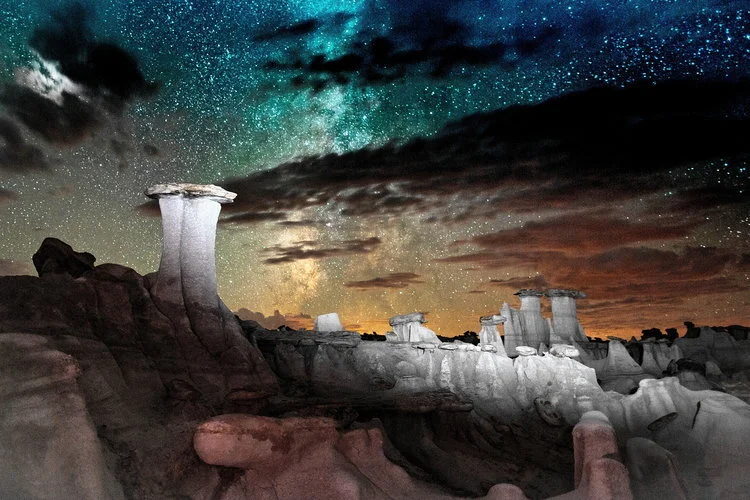
Image by volkhard sturzbecher
The United States Congress designated the Bisti/De-Na-Zin Wilderness (map) in 1984 and it now has a total of 41,170 acres. All of this wilderness is located in New Mexico and is managed by the Bureau of Land Management.
An eerie otherworldliness surrounds Bisti/De-Na-Zin Wilderness, especially when the moon casts shadows across the hoodoos, weird rock formations with mazelike passages. Difficult as it is to believe, this stark landscape was once buried beneath an ancient sea. As the water slowly receded, prehistoric animals roamed about, living off of each other and the lush foliage that flourished along the many riverbanks. Eventually, the water disappeared, leaving behind a 1,400-foot-thick layer of jumbled sandstone, mudstone, shale, and coal that lay undisturbed for 50 million years. Then, 6,000 years ago, the last ice age receded, exposing fossils and eroding the rock into the fantastic hoodoos you see today. The soil underfoot now lies soft and yielding, wrinkled like the surface of stale popcorn. Very few animals inhabit the area--save a handful of cottontail rabbits, coyotes, badgers, and prairie dogs. Similarly, very little vegetation grows out on the badlands, only some sagebrush, tumbleweed, and cacti. Researchers believe that dinosaurs passed into extinction around these parts, so keep an eye out for fossils (if you find one, remember that removing fossils is illegal).
Precipitation in this wilderness averages a mere 8 inches a year, and that typically holds off until July and August when temperatures rise to sweltering highs. When a downpour does occur, the soil, typically baked to ceramic hardness by the sun, softens into a slippery, yielding substance. The sun’s heat, both direct and reflected from the sand, can be surprisingly intense, even at 80 degrees F. In summer, temperatures can quickly climb from 65 in the morning to close to 100 in the afternoon. Winter temperatures can get as cold as 10 degrees in the mornings. Elevation averages around 6,300 feet and the most striking scenery is in the southern two-thirds of the area.
The Wilderness boundaries enclose parcels of private Navajo land. Please respect private property. Carry a map, a compass, and plenty of water. Backpacking and horse packing are unrestricted, but campfires are forbidden. There are two main access points to this area, one is the Bisti Access which has no trails. Visitors may walk into the area in many directions to explore, but will need to keep track of their surroundings to find their way back to their vehicles. The second access point is the De-Na-Zin Trailhead which only extends about 3/4ths of a mile to the De-Na-Zin Wash. As this is a wide-open area with little vegetation, many visitors choose to explore beyond this trail. Chances are you won't encounter a soul here.
Tokina AT-X 14-20mm F/2 PRO DX Review

Can you feel it? The start of Milky Way Galaxy season is less than 6 weeks away! This is the time of year when the core of the Milky Way Galaxy is up at night. It starts being visible in the predawn hours in late February and goes into September. If you shoot with a DLSR with an APS-C (DX) sensor Tokina has an amazing fast apertured super-wide angle zoom that is perfect for shooting the Milky Way Galaxy or any other astrophotography application.
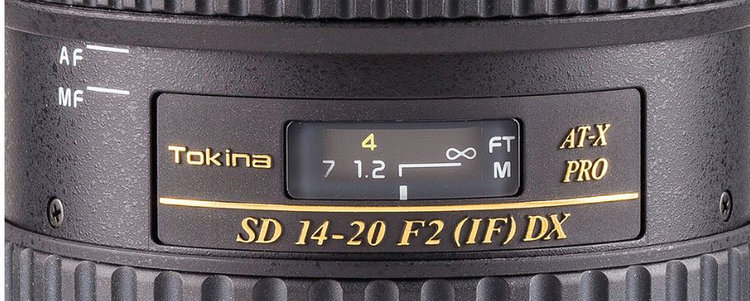
Ladies and Gentlemen, if you don’t know it already please allow me to introduce the Tokina AT-X 14-20mm f/2 PRO DX lens. Not a misprint, its a constant f/2, not 2.8.
Fast Aperture
At the time of writing the constant f/2.0 is the fastest super-wide angle zoom lens available for APS-C sized DSLRs. F/2.0 is nearly a full stop faster than f/2.8 which equates to almost twice as much light entering the camera. More light entering the camera has several advantages; First, it allows the camera to focus in lower light situations. Second, it allows for more light to hit the sensor when doing long exposures at night, the faint light from more distant stars will be recorded making it perfect for astrophotography. More light gathering can also translate into shorter exposure times or lower ISO settings for sharper astro photos with less noise.
Next, the f/2.0 aperture yields a shallower depth of field than f/2.8 or slower lens. This last point allows you to isolate your subject more for a dramatic perspective. In another review I will be doing an in depth comparison of the the AT-X 14-20mm f/2 PRO DX vs the slower AT-X 12-28mm f/4 PRO DX lens so stay tuned to my blog fort that.
Handling and Ergonomics
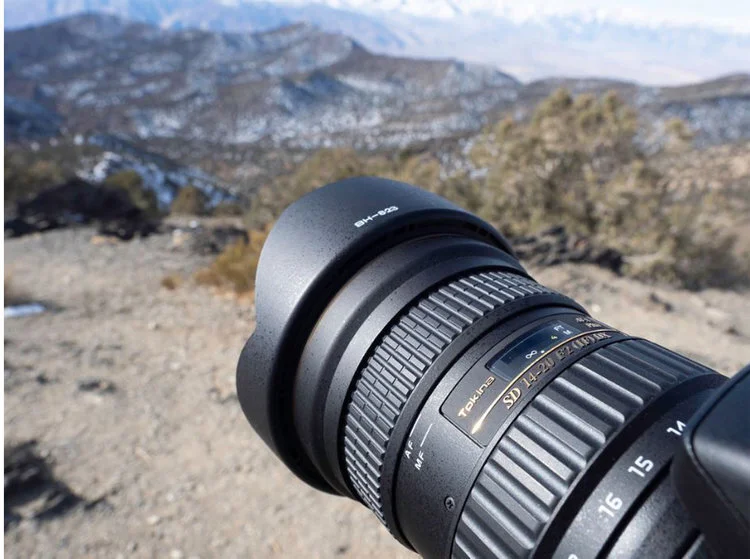
The Tokina 14-20mm is a weighty lens for its size weighing 735g (25.9 oz.). It feels solid, well made and balances well on PRO APS-C bodies like the Nikon 7500 or Canon 7D mkII. It will feel a little front heavy on smaller, lighter APS-C bodies like the Nikon 5600 or any of the Canon digital Rebel cameras but not too much. The reason for the weight is the amount of glass needed to accommodate the bright f/2.0 aperture and the fact that Tokina uses more metal than other manufactures in the internal barrels of the lens making them heavier but more durable.
The lens has common 82mm filter thread so there are a wide variety of filters available for image enhancement and creative possibilities.
Like all other Tokina AT-X PRO lenses, the 14-20mm has a Tokina’s exclusive One-Touch Focus Clutch mechanism for switching between auto focus and manual focus. Just pull the manual focusing ring back toward the base of the lens, the ring will snap back to engage the manual focus and then push it forward to engage auto focus again.
The lenses barrel design makes it very intuitive to handle on location in the dark. The rings are large enough and set far enough apart that I don’t get them confused in the dark or move one ring accidentally while turning the other, even while wearing gloves.
AF
Auto focusing on the Tokina 14-20m is fast and smooth, it won’t break any speed records but its accurate. The lens does emit a little motor noise if you rack the AF between a very close subject and something far away. It’s not enough for anyone standing around you to notice but it might be heard on video using the built in mic so I would recommend using it in manual focus for video. The lens has had no problems acquiring and locking focus in a wide variety of lighting situations.
At night under the stars you will need to focus manual but that goes for any lens. A trick for getting infinity focus at night. If you have a high-power flashlight point it at something you know to be at a greater distance than the infinity scale. With a super-wide lens like the 14-20 something more than 5 meters (more than 15 feet) away, put your AF point on what you are lighting up and AF on it. Then carefully pull the manual focus light back into MF and you should be focused at infinity for the stars. After that, take a test shot and use the camera’s screen to zoom in on the stars to make sure they are in focus. If its not, start by moving the focus ring just a little to the left or right and take another test shot and check it to see if the starts are more or less focused. Repeat until the starts are sharp.
Here’s a tip; painters tape or other adhesive tape that is designed to be temporary and removable. Once you have the lens focused at infinity use a 3-4 cm (1.5 inches) long piece of painters tape to tape down the manual focus ring. That way it wont move accidentally if you move the camera to recompose your shot.
Sharpness
Simply put, this lens is sharp, even wide open the lens is sharp. Other than the fast aperture sharpness is where this lens shines. DXO Mark gave the Tokina AT-X 14-20m f/2 PRO DX lens an over-all score of 26 which is higher than either the AT-X 11-20mm or the old 11-16mm lenses. That has been my experience with the lens as well, its the sharpest of the lenses in this class. The lens does not disappoint and you will be able to make large prints if you are using a camera with a 24+ megapixels sensor.
As with any lens, it is sharper when stopped down and the lens’s critical aperture setting is f/4.5 - f/5.0, I could not see any sharpness difference between these aperture settings and stopping down to f/5.6 did not improve sharpness over f/4.5-5.0. But sharpness wide open is still very good which is necessary for low light photography.
Astrophotography is where this lens is really at home. The Tokina 11-20mm may have a wider angle of view but the f/2 of the 14-20mm allows more light gathering and that means more stars captured and more flexibility to change exposure time or ISO.
Coma is not bad at all and Chromatic Aberrations (CA) are well corrected. In some high contrast situations you will see a just a little purple fringing but it is easy removed in post.
Conclusion
The Tokina AT-X 14-20mm f/2 PRO DX lens is at the top of its class in both fast aperture and sharpness. The constant f/2 aperture is the fastest available in a super-wide zoom lens for APS-C lenses at this time. That coupled with amazing optics makes this lens a natural for low-light photography and a lens that anyone interested in astrophotography should seriously consider.
HOME OF OUTSTANDING DARK NIGHT SKIES AS WELL AS NATURAL BEAUTY.

Outstanding Dark Night Skies
Cranborne Chase can celebrate the fact that more than 50% of the 380 square miles of the AONB still has the lowest levels of light pollution in England - and the rest of the Chase is not far behind.
In fact, the Chase is one of the best places to stargaze in England. Our aim is to help you enjoy this aspect of our AONB as much as our multitude of other ground-based treasures. The great thing is that whether you work, live or visit the Cranborne Chase AONB there is something to see 24 hours a day.
There are currently only two other. areas in England that have been formally recognised for their low levels of light namely Exmoor Dark Sky Reserve and Northumberland Dark Sky Park. With your help Cranborne Chase AONB could be the third.
This important designation will not only put us on the map, but allow us to protect and enhance our night sky for generations to come.
HOW CAN YOU HELP?
Visit Survey monkey to sign our pledge. We would love your support. Please sign our pledge to show your love for our dark skies and our bid to get them protected. We would also love to know what you think of your own local dark skies. Please send us your photos, poems and stargazing adventures.
Do you have an iPhone? We are looking for volunteers to help us take measurements of the night sky. No experience is necessary and it’s as easy as downloading an app, standing outside and pressing a button – and hey presto and we have another piece of evidence to show how amazing our skies are.
DIY SOS (SAVE OUR SKIES)
Why not give your home a low cost dark sky makeover? You would be amazed how easy it can be to make a few small changes that will transform your night view.
Here is an easy guide, but if you need help just let us know. Once you have done it please tell us – it all helps towards gaining Dark Sky Reserve status.
We are looking for volunteers too to work with us to show the accreditors we are serious about protecting our dark skies. Could you help by working with us to reduce light pollution in your community or business? We promise lots of publicity, plus plenty of support along the way.
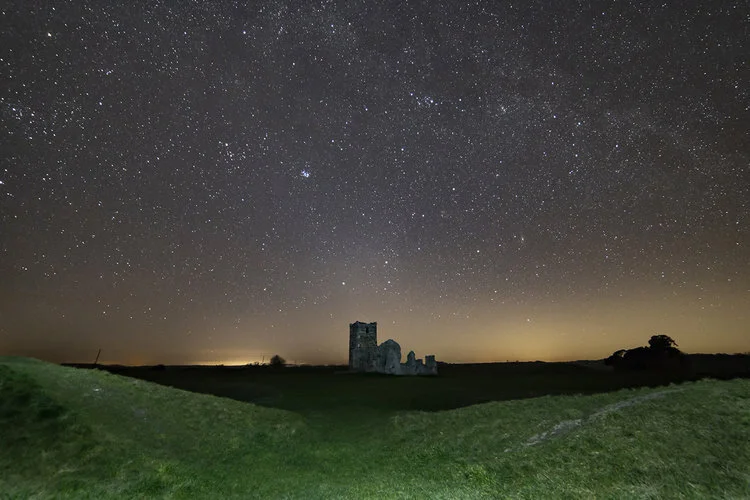
Paul Howell @Pictor Images
Durdle Door, Dorset.
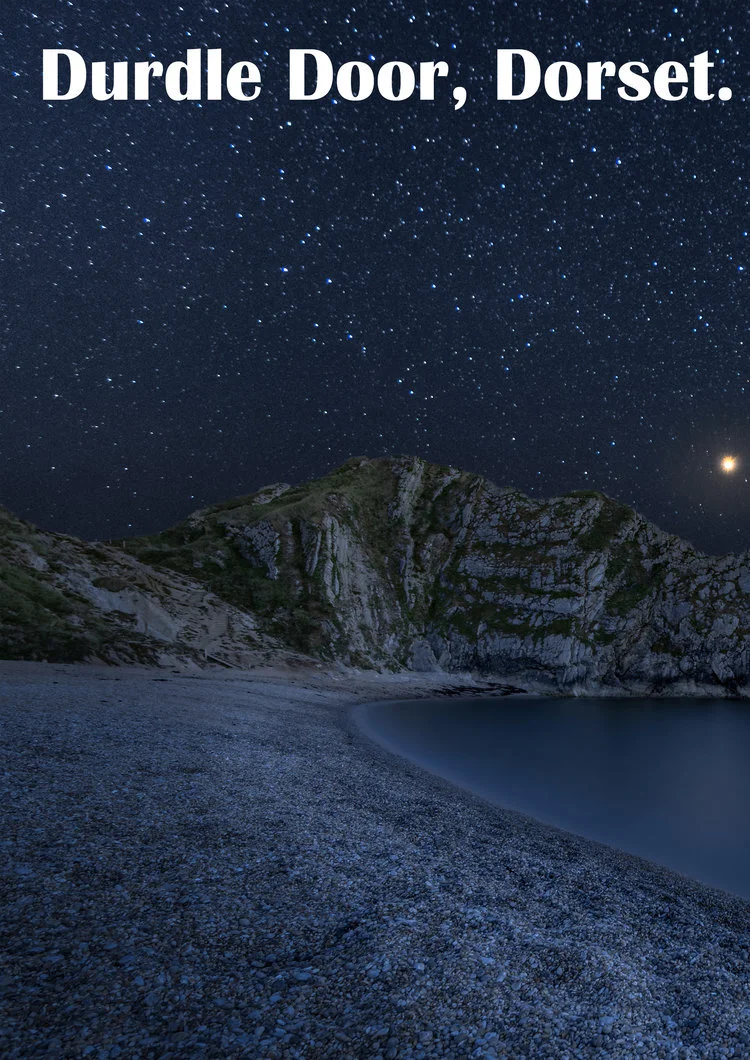
Image by jasty78
Durdle Door (sometimes written Durdle Dor) is a natural limestone arch on the Jurassic Coast near Lulworth in Dorset, England.
It is privately owned by the Welds, a family who owns 12,000 acres (50 km2) in Dorset in the name of the Lulworth Estate. It is open to the public. The name Durdle is derived from the Old English word ‘thirl' meaning bore or drill.
The form of the coastline around Durdle Door is controlled by its geology—both by the contrasting hardnesses of the rocks, and by the local patterns of faults and folds. The arch has formed on a concordant coastline where bands of rock run parallel to the shoreline. The rock strata are almost vertical, and the bands of rock are quite narrow. Originally a band of resistant Portland limestone ran along the shore, the same band that appears one mile along the coast forming the narrow entrance to Lulworth Cove. Behind this is a 120-metre (390 ft) band of weaker, easily eroded rocks, and behind this is a stronger and much thicker band of chalk, which forms the Purbeck Hills. These steeply dipping rocks are part of the Lulworth crumple, itself part of the broader Purbeck Monocline, produced by the building of the Alps during the mid-Cenozoic.
The limestone and chalk are in closer proximity at Durdle Door than at Swanage, 10 miles (16 km) to the east, where the distance is over 2 miles (3 km). Around this part of the coast nearly all of the limestone has been removed by sea erosion, whilst the remainder forms the small headland which includes the arch. Erosion at the western end of the limestone band has resulted in the arch formation.
UNESCO teams monitor the condition of both the arch and adjacent beach.
The 120-metre (390 ft) isthmus which joins the limestone to the chalk is made of a 50-metre (160 ft) band of Portland limestone, a narrow and compressed band of Cretaceous Wealden clays and sands, and then narrow bands of greensand and sandstone.
In Man O' War Bay, the small bay immediately east of Durdle Door, the band of Portland and Purbeck limestone has not been entirely eroded away, and is visible above the waves as Man O'War Rocks. Similarly, offshore to the west, the eroded limestone outcrop forms a line of small rocky islets called (from east to west) The Bull, The Blind Cow, The Cow, and The Calf.
As the coastline in this area is generally an eroding landscape, the cliffs are subject to occasional rockfalls and landslides; a particularly large slide occurred just to the east of Durdle Door in April 2013, resulting in destruction of part of the South West Coast Path.
There is a dearth of early written records about the arch, though it has kept a name given to it probably over a thousand years ago. In the late eighteenth century there is a description of the "magnificent arch of Durdle-rock Door", and early nineteenth-century maps called it 'Duddledoor' and 'Durdle' or 'Dudde Door'. In 1811 the first Ordnance Survey map of the area named it as 'Dirdale Door'. 'Durdle' is derived from the Old English 'thirl', meaning to pierce, bore or drill which in turn derives from 'thyrel', meaning hole. Similar names in the region include Durlston Bay and Durlston Head further east, where a oastal stack suggests the existence of an earlier arch, and the Thurlestone, an arched rock in the neighbouring county of Devon to the west. The 'Door' part of the name probably maintains its modern meaning, referring to the arched shape of the rock; in the late nineteenth century there is reference to it being called the "Barn-door", and is described as being "sufficiently high for a good-sized sailing boat to pass through it."
Music videos have been filmed at Durdle Door, including parts of Tears for Fears' "Shout", Billy Ocean's "Loverboy", and Cliff Richard's "Saviour's Day"
The landscape around Durdle Door has been used in scenes in several films, including Wilde (1997) starring Stephen Fry, Nanny McPhee starring Emma Thompson,
the 1967 production of Far From The Madding Crowd (the latter also filmed around nearby Scratchy Bottom), and the Bollywood film Housefull 3.
Ron Dawson's children's story Scary Bones meets the Dinosaurs of the Jurassic Coast creates a myth of how Durdle Door came to be, as an 'undiscovered' dinosaur called Durdle Doorus is magically transformed into rock.
Dorset-born Arthur Moule, a friend of Thomas Hardy and missionary to China, wrote these lines about Durdle Door for his 1879 book of poetry Songs of heaven and home, written in a foreign land:
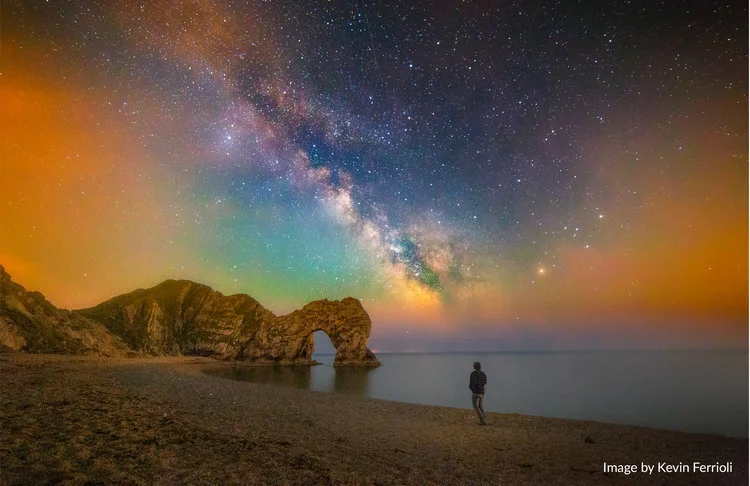
Dorset, UK
by Kevin Ferriol
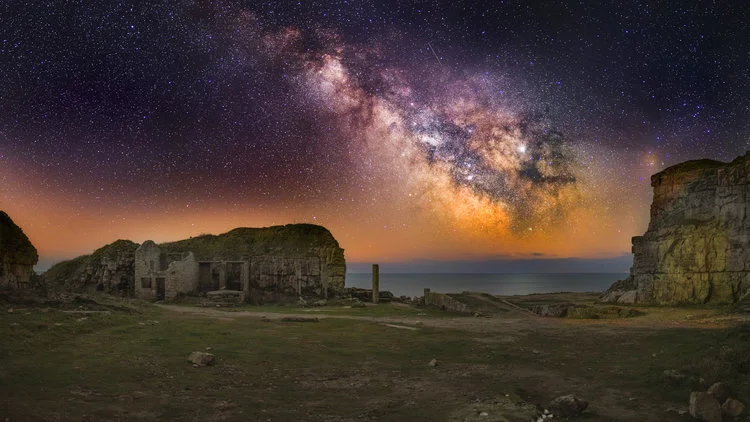
I’m a SQL analyst and developer by profession, living in Dorset, United Kingdom, which is an amazing place for people who love outdoor activities. I love mountain biking which has taken me to stunning locations, and there are miles of breath-taking walks with lots of nature and history around – every corner has a surprise, it’s like living in a fantasy, at least that’s how I see it.
Since I was a child, I’ve always had a fascination for the stars. I had the opportunity to visit places near the equator with true dark skies, where the Milky Way core is visible up in the sky – unlike in the UK where the core is barely visible on the horizon. It’s of unbelievable beauty. I spent most of my childhood visiting locations in the rain forest, flat lands and my favourite – the mountains, especially over 4000 meters.
My fascination for the night sky has always been with me and I have always wanted to capture their beauty. One day, I saw images from Michael Shainblum and he then became my main influence and inspiration. I’ve never looked to replicate his style or the others, it was just that I loved how his images made me feel so immersed. It inspired me to do the same with my photos, to capture an image that would put the viewer under the stars.
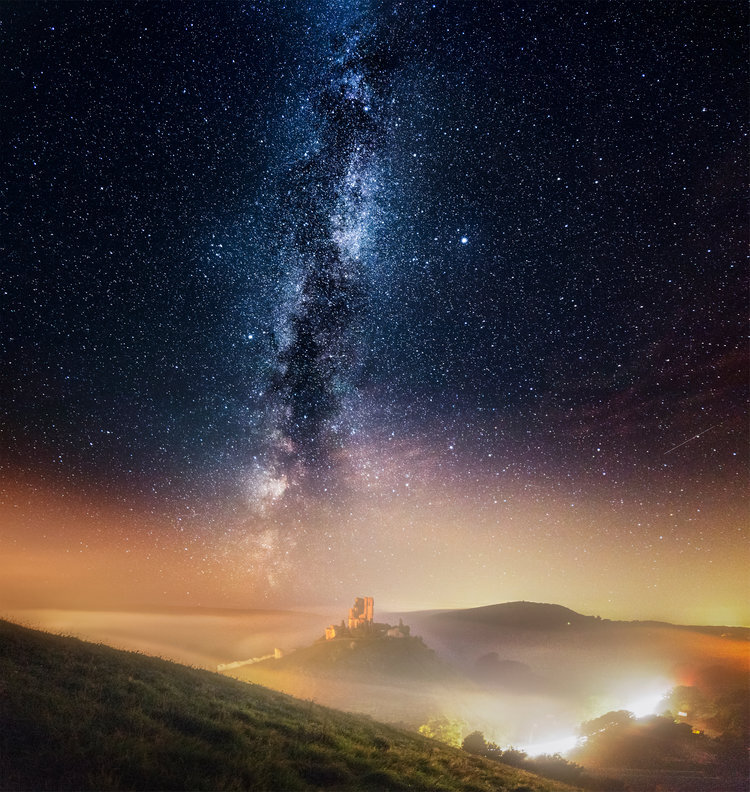


As I did last year, I went again to the same place for my first Milky Way, Peveril Point, Swanage, Dorset UK. For my previous attempt, I used a Sigma Art lens 20mm F1.4. The idea was to capture more detailed foregrounds. The lens proved to be excellent for low light but it has four major downsides: first, photos of the night sky taken with this lens were extremely difficult to edit. Second, it is not very good for panoramas, despite I used a nodal head. Third, the autofocus is the worst of any lens that I have ever owned, it is very difficult to capture a sharp photo even with the best light conditions. And fourth, the lens profile in Lightroom is terrible, it makes the images worse. I was not bothered by the astigmatism distortion of the corners which virtually disappeared in panoramas. Overall, I was not happy with the lens, I felt I wasted my last year trying to use it. So I went back to my trustworthy Samyang lens 14mm F2,8. Coupled with the Canon 6D, still my preferred choice. I have not tested the Sigma 14mm F2 yet, but given the price, I will stick with my Samyang.
The image to the rights is the process used to create it. It is a panorama of 7 photos, Canon 6d and Samyang 14mm F2.8, ISO between 4000 and 5000. Each photo is 25 secs. Stitched in Adobe Lightroom.
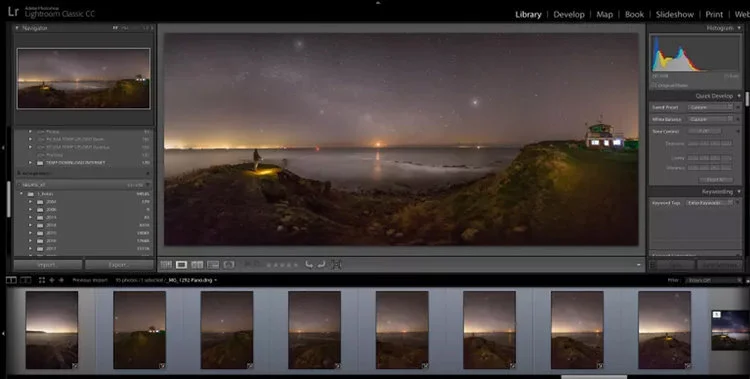
Peveril Point Swanage Milky Way: 7 images highlighted below and stitched in Abobe Lightroom.
The moon rise was spectacular, one of the most beautiful rises from the sea, it was also so dim that allowed to capture the Milky Way up to the last minute before the astronomical dawn. Again, I thank you the nature for this beautiful experience.
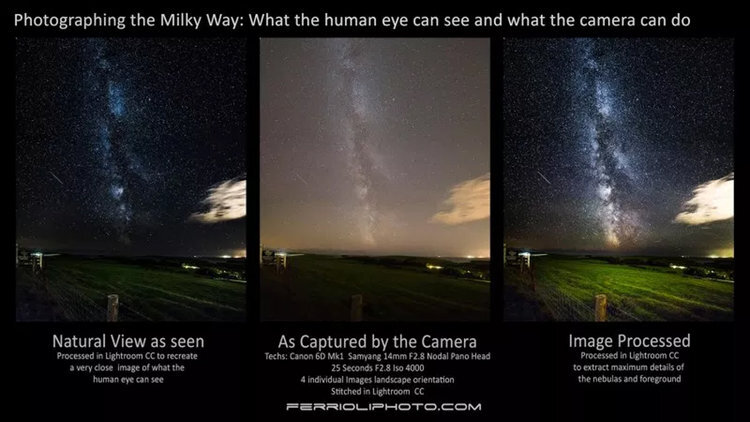
All images have been captured with a Canon 6D Mk1. And most of the images were captured with a Samyang 14mm F2.8 Lens, my more recent work is being captured with the amazing Samyang 14mm F2.4 XP
10 Facts about the Atacama Desert.
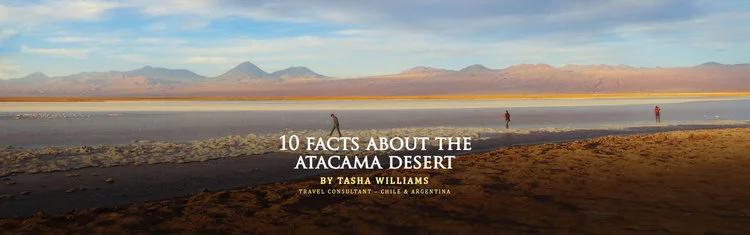
BY TASHA WILLIAMS
TRAVEL CONSULTANT – CHILE & ARGENTINA
quasarex.com
The Atacama Desert in Northern Chile
The Atacama Desert (Spanish: Desierto de Atacama) is a plateau in South America, covering a 1,000-kilometre (600 mi) strip of land on the Pacific coast, west of the Andes mountains. According to estimates the Atacama Desert proper occupies 105,000 square kilometres (41,000 sq mi), or 128,000 square kilometres (49,000 sq mi) if the barren lower slopes of the Andes are included. Most of the desert is composed of stony terrain, salt lakes (salares), sand, and felsic lava that flows towards the Andes. Below, we are sharing 10 Fun Facts about the Atacama Desert.

1. Driest Desert in the World – Studies conducted by NASA have concluded that this desert located in northern Chile is in fact the driest desert in the world. Some weather stations in the Atacama have never received rain. Periods of up to four years have been registered with no rainfall in the central sector, delimited by the cities of Antofagasta, Calama and Copiapó, in Chile. Evidence suggests that the Atacama Desert may not have had any significant rainfall from 1570 to 1971.
2. Rainless (or just about) – Average rain- fall in this region is about 1 mm per year.
Some locations within the desert have never had any rainfall what- soever. Some locations, such as Arica and Iquique, receive 1 to 3 mm (0.04 to 0.12 in) in a year.
Geographically, the aridity of the Atacama is explained by it being situated between two mountain chains (the Andes and the Chilean Coast Range) of sufficient height to prevent moisture advection from either the Pacific or the Atlantic Oceans, a two-sided rain shadow.
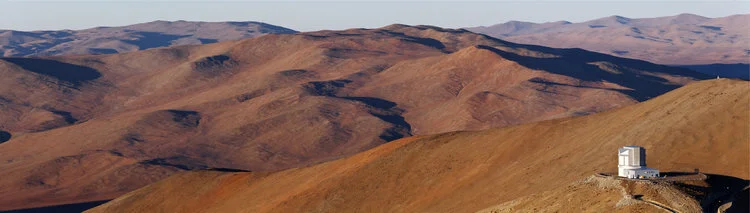
3. Sterile Ground – Both the Andes Mountains and the Chilean Costal Range, which surround this desert, create a blockage of moisture, making the Atacama Desert a kind of death zone for vegetation, depriving the land of water and nutrients.
4. Largest Supply of Sodium Nitrate in the World – This region is the largest natural supply of Sodium Nitrate, which can be used for producing fertilizers and explosives. amongst other things. Mining of this mineral, also called Chile saltpeter, was at a boom in the 1940s and many abandoned mining towns may be spotted and visited in the desert.

5. Extra Terrestrial Soil – Soil samples from this region are very similar to samples from Mars; for this reason, NASA uses this desert for testing instruments for missions to the red planet. The Atacama is also a testing site for the NASA-funded Earth-Mars Cave Detection Program. The Atacama has also been used as a location for filming Mars scenes, most notably in the television series Space Odyssey: Voyage to the Planets.
6. Land Dispute – In the late 1800s, Chile and Bolivia disputed this land in the Guerra del Pacífico (War of the Pacific) because both countries claimed to be rightful owners of this region that, as was said above, had a huge mining potential. At the end of the war Chile took control of the entire region.
7. Extreme Temperatures – During the day, temperatures in the desert can reach around 40º C (104º F), and in the night these temperatures can fall to 5º C (41º F). The climate is magnificent throughout the year, with more than 90% of the days being radiant. For 10 to 12 nights each month there is an astonishing moon and you can enjoy the darkness of the night with its fresh air and lack of clouds, which makes the stars shine as in no other place on earth.
8. Chinchorro Mummies – The oldest artificially mummified human remains have been found in the Atacama Desert. These mummies predate the Egyptian mummies by thousands of years, and the extreme lack of moisture helps in the preservation of these samples. To put this into perspective, the earliest mummy that has been found in Egypt dated around 3000 BC, while the oldest mummy recovered from the Atacama Desert is dated around 7020 BC.
9. Presence of Snow – Despite this being the driest desert in the world and the high temperatures during the day, the high peaks present are topped with snow. This is possible due to the altitude, which does not allow temperatures in these points to increase much.
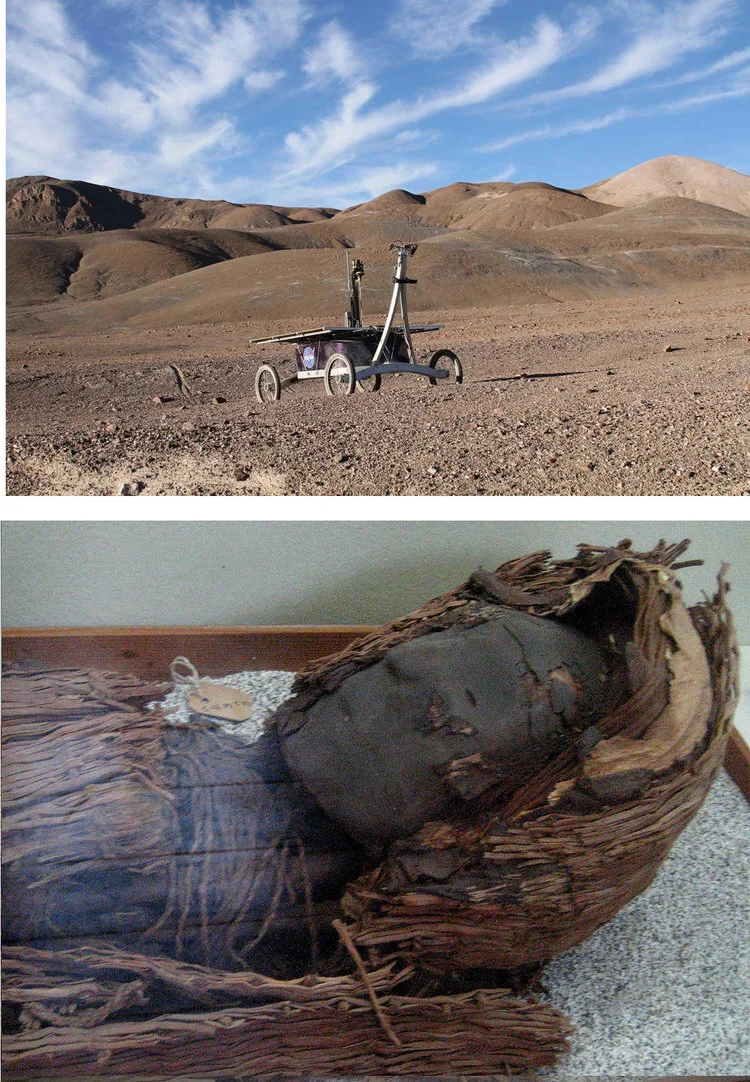
10. Astronomy – The Atacama Desert is one of few locations on the globe with 300+ days with clear skies in a year, along with no light pollution and its high altitude, making it perhaps the best place in the world for observatories. In more recent years, the desert has become the home of the largest ground telescope in the world, ALMA, where studies of the formation of stars are conducted with the help of the images captured by the 66 radio telescopes.