
Galactic 50: A photography project
by Tony Curado
I still remember the first time I saw the Milky Way and the feeling of awe that I got from seeing all those stars. It was a beautiful summer night at Lake George, NY and my brother and I decided to head down to the docks a little while after dinner. As our eyes adjusted, the night sky just kept getting better and better. Even though all we saw that night was a small band of the Milky Way, it was a night that stuck with me for many years to come. Since I was born and raised in New Jersey, it would be almost 3 years before I saw a sky that dark again.
When I began photographing the Milky Way, I was living in Durango, Colorado. It’s an amazing small town in the San Juan Mountain Range, - with minimal light pollution and clean mountain air. The night sky is so dark in Durango that I could see the Milky Way from my apartment. If I drove an hour north or south of Durango, -the skies exploded with stars, planets, and the occasional meteor.
My first summer in Durango, some friends and I walked less than a mile from our apartment to view the Perseid Meteor Shower, I remember being in such awe of where I was living that I could barely take any photos. That night would begin a long, passionate journey of learning all about Milky Way photography. That journey has changed my life. I’ve seen beautiful dark sky locations in Moab, Utah; Sedona, Arizona; San Francisco, California and Silverton, Colorado, a small town north of Durango, all in order to capture the stars. Silverton was where I took my first true Milky Way Nightscape, on a camping trip to Animas Forks, one of the largest remaining ghost towns in Colorado.
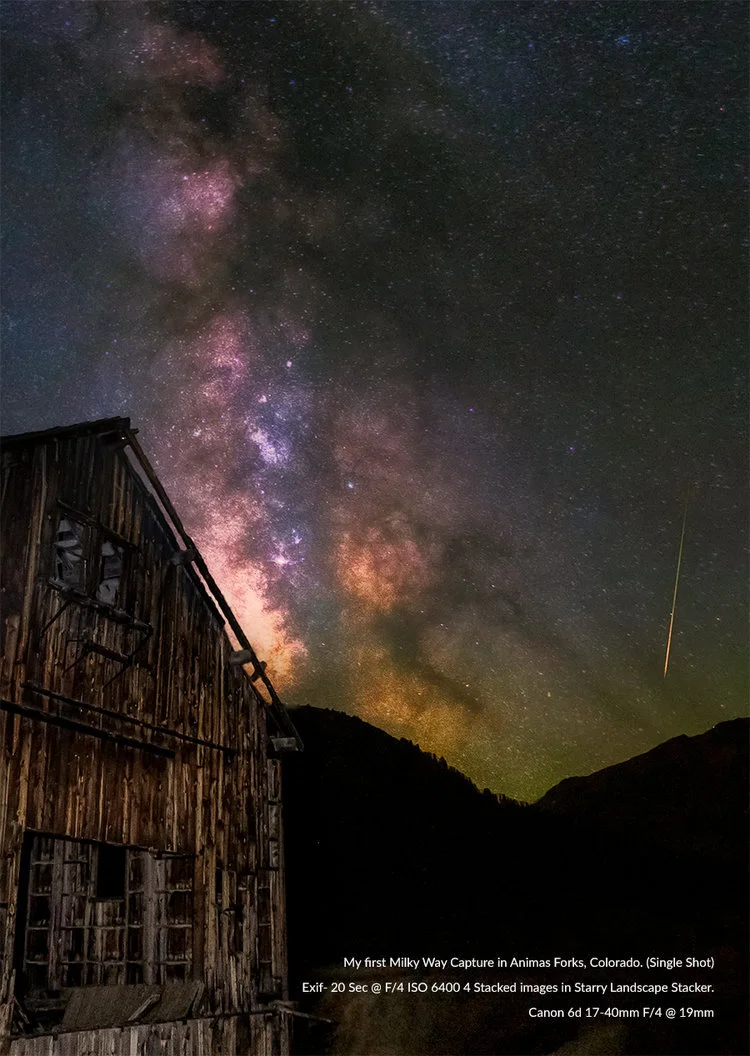
In preparing for the new moon, I rented a wide angle lens, Sigma 15mm f/2.8 EX DG Diagonal Fisheye Lens for Canon, and set out with no idea about Milky Way positioning, except to look to the south. I had my Canon 6D, my $25 intervalometer, and a really cool place to shoot. I photographed all night, exploring every different angle of the old mill among the ruins. Call it beginners luck, but my first picture of the core came when we finally found it sinking behind one of the mountains.
It was perfectly aligned with the old mill below. I set everything up and started shooting my stacks, and as my friend and I sat there a huge green fireball appeared in the sky! I couldn’t believe it, I had never seen anything like that and as a bonus I was able to photograph it! It was an amazing feeling!!
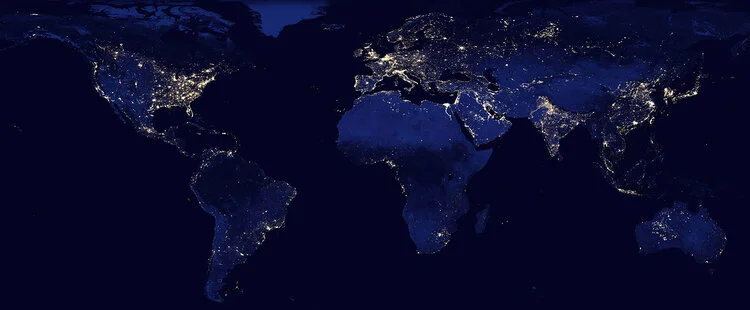
When it came time for me to leave Durango and return to NJ, I was bummed at the idea of not being able to shoot the Milky Way anymore. Afterall, the east coast was known for its high population density, which resulted in large amounts of light pollution. Thankfully, with a little research I realized it would take some effort, but I was only a few hours away from plenty of places to shoot. I was inspired by the idea that leaving Colorado didn’t mean I had to leave behind my new passion for shooting nightscapes. I think that is one of the things that surprised me the most about the east coast skies.. Yes, when you look at a light pollution map, you can see that the bad reputation is well deserved. But there are plenty of places you can see the Milky Way along the eastern coast, and the chances are it's closer than you think.
That realization got me thinking and my project to photograph the Milky Way in every state of the United States was born.
G50, officially launched in the summer of 2016. I’d wanted to take a cross country road trip for a while, and when the opportunity presented itself, I jumped at the chance. What better way could there be to kick off my project? I knew that I needed to photograph the Milky Way in every state of the United States of America. I knew this was not going to be an easy task, and I knew it would take years. My trip across the country would be a great way to get it started and cross off a bunch of states.
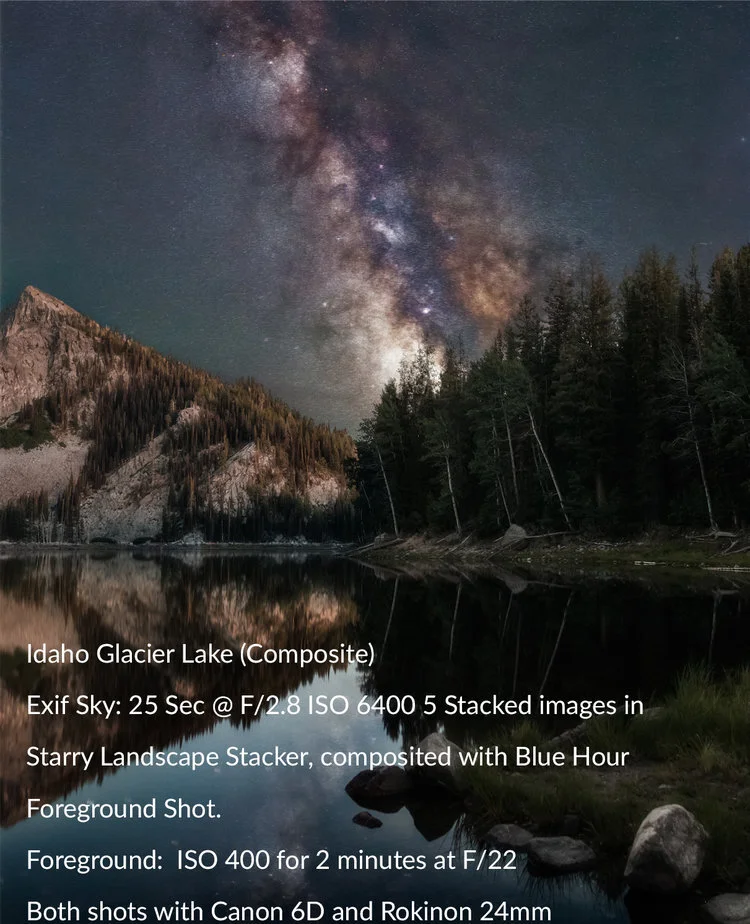
I visited 23 states during my cross country trips. Iowa, Nevada, Colorado, Idaho, Indiana, Minnesota, just to name a few,and traveled over 15,876 miles! The highlights of the trip were a crystal clear night in Michigan, where I was able to photograph the Milky Way over Lake Michigan, an amazing view at Crater Lake in Oregon, and an overnight hike to a glacier lake in Idaho. In the end, I crossed off 12 states for the G50 project and I visited some of the greatest national parks America has to offer. If you would like to read more or see all the photos from this trip you can visit truevisionphotos.com for photos from the trip.
As much as this project was about discovering dark skies and seeing my beautiful country, it was also about growing my skills as a photographer. I like the quote “a minute to learn, a lifetime to master” when it comes to photography. That is extremely true for photographing the Milky Way. The more you learn about photographing the stars, the more you realize how much you didn’t know. Adapt and overcome became my motto for this project and it would never prove more true than in 2017. At the beginning of 2017 I was struggling with my health, constantly being tired with aching joints, and sore muscles. Doctor after doctor told me there was nothing wrong, but thankfully I found someone who was able to crack the code. I was bitten by a tick on my cross country adventure the summer before and I had been infected with Anaplasma. It was a tick borne disease that mimics Lyme Disease. Thankfully, Anaplasma does not carry the same long term effects that Lyme does, so with some treatment I was soon back on my feet. However, during my recovery, I found long nights out in nature, hiking, camping, and photographing to be very draining. But I was determined to keep the project alive, so I planned short trips that were relatively close to home.
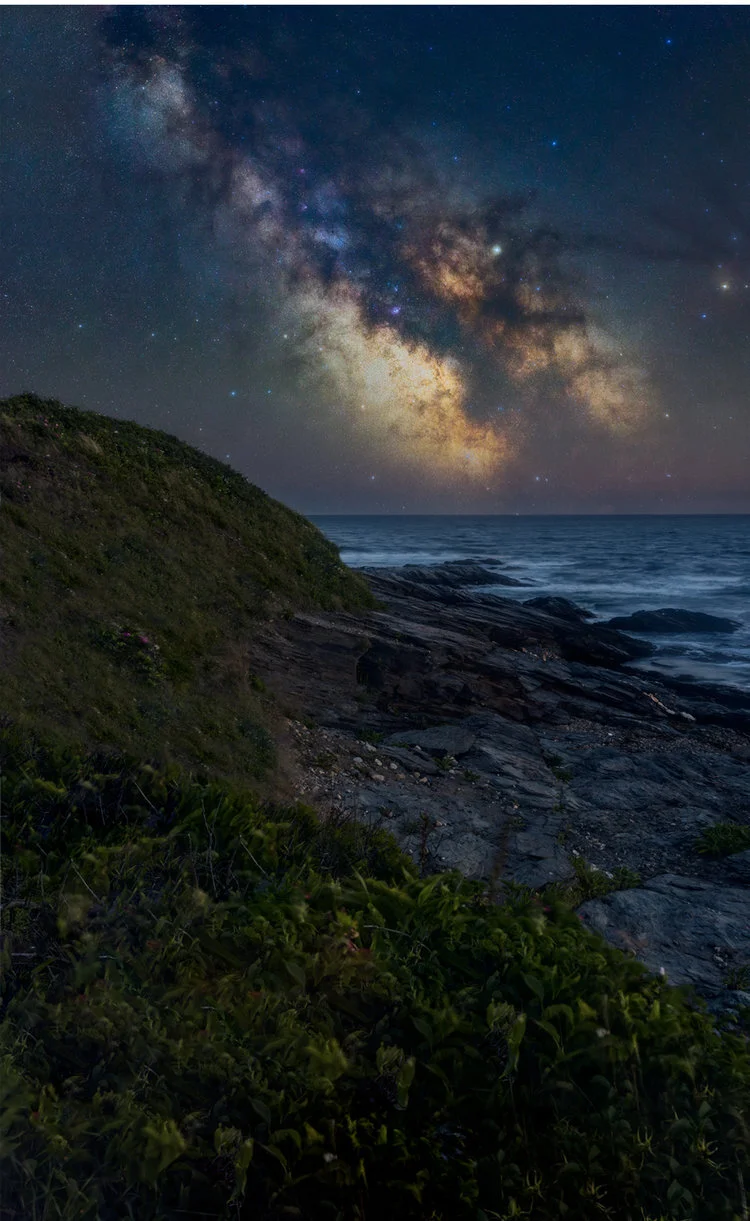
Among those short trips was 3 different stops in Connecticut, a trip down south to photograph the eclipse, and an amazing night on the coast of Rhode Island. Although the stars were beautiful, it was the great people I met and the friends that joined me on so many of my trips that I am most grateful for.
I’ve learned that they enrich the journey for me. For example, a local Connecticut photographer friend of mine coaxed me out of bed after we gave up shooting that night thanks to a rainstorm. On her way home she noticed a clearing in the clouds and convinced me go back out. It was that same friend that joined me for one of the best nights of 2017 at a lighthouse on the coast of Rhode Island. That trip still holds up as one of my best nights photographing the Milky Way. Strangely, my favorite Milky Way adventure of 2017 had nothing to do with the Milky Way. That summer, most of America got to see at least a partial solar eclipse, with a narrow band across the country being able to see a total solar eclipse. Determined to see the eclipse in totality, I met-up with a friend in South Carolina. Of course while there we were able to find some dark skies and get a great Milky Way photo. By the end of the year I added 4 states to my G50 count. While it didn’t touch my 12 states from the year before, it was progress. With how I started the year, it was progress I was happy about.
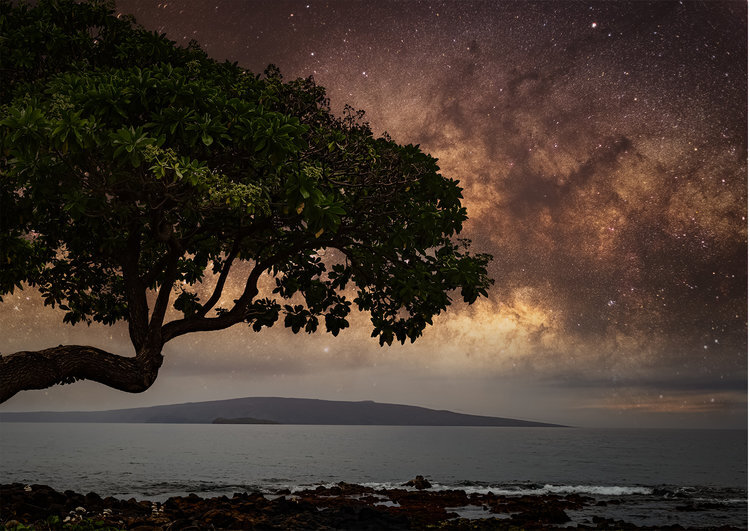
2018 would begin with a bang. A vacation out to Hawaii in February was going to help me get the year started off right. We were going during the new moon, but we were also going during the end of the rainy season and as our trip drew closer, the weather looked like it wasn’t going to cooperate. I might only get one shot at it the whole week I was there and of course, that was our first night there. I’m not sure if the jet lag helped or hurt in this situation, but I was able to drive from Honolulu to the other side of the island for some great shots of the Milky Way. Despite some clouds, I was happy with my results that night and 2018 was off to a great start! Or so I thought. In reality, 2018 would be the most difficult year I’d dealt with so far in regards to weather. It seemed like it would only rain during a new moon and that clouds were now a permanent fixture on the eastern U.S. coast. With my project being mostly self funded, and a lot of the states close to home completed, my trips were getting farther and farther away and it was becoming harder to take a chance on weather. Unfortunately, 2018 ended with me only adding Hawaii and Vermont to the completed list, bringing my total to 18.
With 2018 being so much of a disappointment, I made a promise to myself that 2019 would be different. There were a few times in 2018 when I didn’t go on a trip during the new moon because of the weather forecast and ended up regretting it after seeing or hearing from some friends that the weather cleared up. So in 2019, regardless of the weather forecast, I am planning to go out during every new moon or the weeks surrounding it. I intend to make the best of whatever I encounter, as sometimes, clouds are a welcome addition to nightscapes. As in Connecticut, on my first visit to a western, bortle class 5 region, I wasn’t expecting much but I was able to get an interesting shot with the moving clouds. I returned 3 times to this location and due to light pollution and bad weather I never got anything better than the original image with the clouds in it. However, for this project where I plan on showcasing 50 different photos of the Milky Way a little something different is not bad.
With my new mindset and determination to not let the weather beat me, 2019 started off with a two week road trip down the coast of the eastern seaboard. On the potential hit list were Virginia, North Carolina, Georgia, and Florida. The trip started off great and was highlighted by an amazing two night stay on Jekyll Island, Georgia. As my first trip out in 2019, I was a little rusty and rain in North Carolina and Florida put a little damper on the trip. But my spirits were lifted by a great night out in Georgia. Even though the wind kept me from really getting any usable images, seeing the great big core back in the sky revitalized my desire to get out and shoot the night sky as much as possible in 2019.
With only Massachusetts, Maine, and New Hampshire left in the Northeast, my goal is to finish shooting New England this year. After my road trip down south, I once again met up with some New England photographers in York, Maine. I’ve had a shot from that location on my bucket list ever since I visited the state during the second year of my project. In York, Maine there is a lighthouse that, during the beginning of the Milky Way season, the core arches right over. Although I had previously visited this location 2 times, I never walked away with the photo I envisioned and was seriously hoping the 3rd time would be a charm. Unfortunately, when we showed up at the lighthouse around 2 a.m., we faced two challenges. First, the sky starting to get very cloudy. Second, the lighthouse was lit up a very bright blue for autism awareness month. We quickly called an audible and headed up to a mountain about 20 minutes away in the hopes that we would get a better view from there. Thankfully, that night worked out great and I was able to get a shot I had been longing for.
Now with Maine off the list, I am down to only 2 states left in the Northeast and only a few states away from hitting the halfway mark of this epic project. However, the northeast is not the only target on my list for 2019. I will be taking another 2 week road trip out to Colorado to visit some friends and we plan to go to New Mexico, Arizona, the Animas Forks ghost town where it all began, and even a few nights in Moab. On my way back I will be tracking weather and hoping to hit a few more states. All in all, for 2019 the goal is to reach that halfway point and start planning for next season where I will attack the southern United States.
I started this project for a few different reasons. Aside from my new obsession with night photography, it was a way to keep me out in nature and exploring my country. Being out west, I fell in love with nature. In returning to NJ, I didn’t want to forget about that. But as this project moves along it has taken on so much more. The experience’s, the places, the people and even some struggles have been far greater than I could have ever imagined.
There have been many frustrations along the way, but if it were easy it really wouldn’t be worth doing, in my eyes. Weather has been one of the biggest issues I have faced along this journey, but light pollution has also been a big part of this. Out west, in a true dark sky portion of the country, seeing the Milky Way is a lot easier and can happen for a longer period of time. On the east coast, due to light pollution, that period shrinks. Couple that with the unpredictable east coast weather patterns and the challenge of this project gets kicked up a notch, from what I originally thought. This project has tested my patience, determination, and will, at different times and sometimes all at once. But, I move forward because every night I have a successful clear night under the sky I’m once again reminded why I started it in the first place. Awe is truly the only word that keeps coming to my mind, because no matter how many times I see a sky lit up with stars it takes my breath away.
In 2018, I was washed out almost every trip out and I really started to think the Northeast could be the end of this project. So with a big storm on the way I could have easily cancelled my trip in August to Vermont for the Perseid Meteor Storm.
Instead, I went and was once again reminded that perseverance in life and in photography does payoff. My first night out I just remember sitting there under the clear sky and feeling the entire weight of the project just slip away. At that moment whatever state I was in simply didn’t matter, at that moment all I felt was pure joy. Once again in awe of where I was and the sheer beauty of the universe laid out before me.
To sum up, I never thought it was going to be easy, maybe I didn’t think it was going to be as hard. There were moments I contemplating deleting all traces of the project and just forget about it. However, there is no way after everything I have gone through that I could stop now. I will “adapt and overcome” because the feeling of a clear dark sky is one I never hope to forget. On a final note, I hope you have enjoyed reading about my adventure and that you enjoy the pictures. It should be mentioned, that the majority of my pictures are composites. I do this for a few reasons, but the main reason being is creating a nice clean artistic image that can be printed. Single captures of the Milky Way Core definitely have there place and is where I started in my journey learning to photograph the Milky Way. But as I progressed in this project a few things became clear to me. The first was that in order to get a clear printable foreground, that is up to printable standards, compositing the image with blue hour foregrounds was the best way for me to achieve that. Also, as you probably already know, using a star tracker leaves you with having to composite in a foreground anyway.
Lastly, I wanted my images to be the best possible artistic representation of the state I was in as well as the universe we live in and for me, again, compositing was the best way I could see to do that. So, I set up some guidelines for my project to ensure it would remain legitimate. They are simple and to the point, every night sky must be taken in the state that it is claimed to have been taken from, and my foreground and night sky must match the time I was there. I have a deep respect for the scientific end of photographing our night sky and I completely understand the importance of accuracy in that world. But, I also believe that just saying I’m creating art and not scientific photos is a crutch that some photographers use. So using apps like Photopills, I am able to pinpoint where the Milky Way will be and line up my foreground before it appears. So while I am creating artistic nightscape imagery, I still try and show a true representation of the scene for the time that I am there. In the end I have one purpose, and that is to try and deliver the sense of awe I had the first time I saw the Milky Way.
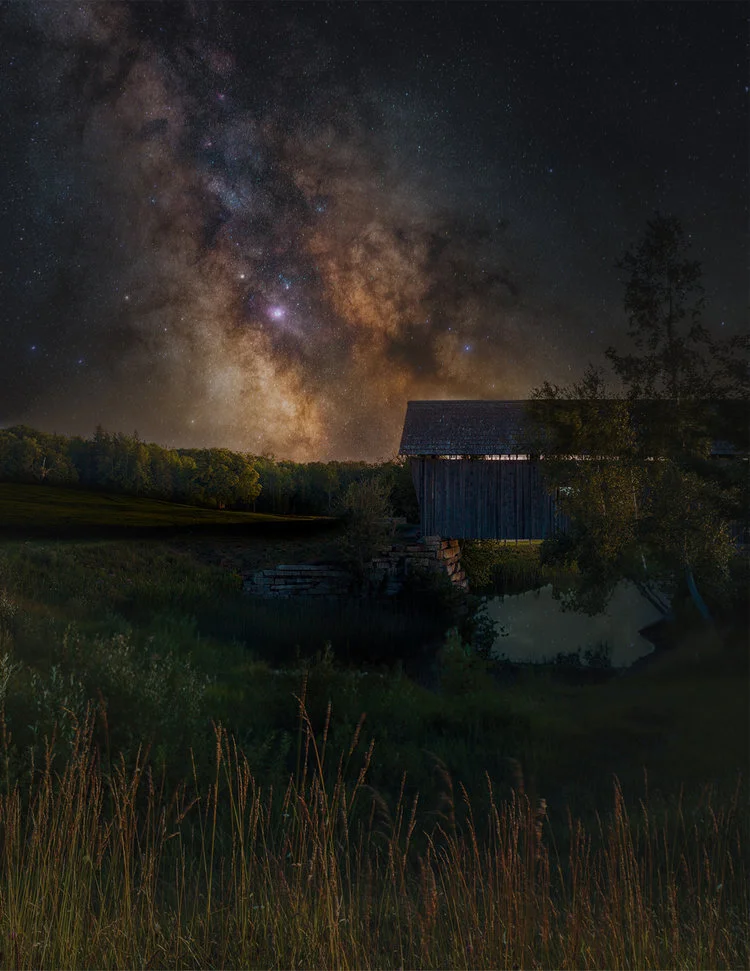
Cabot Covered Bridge (Composite)
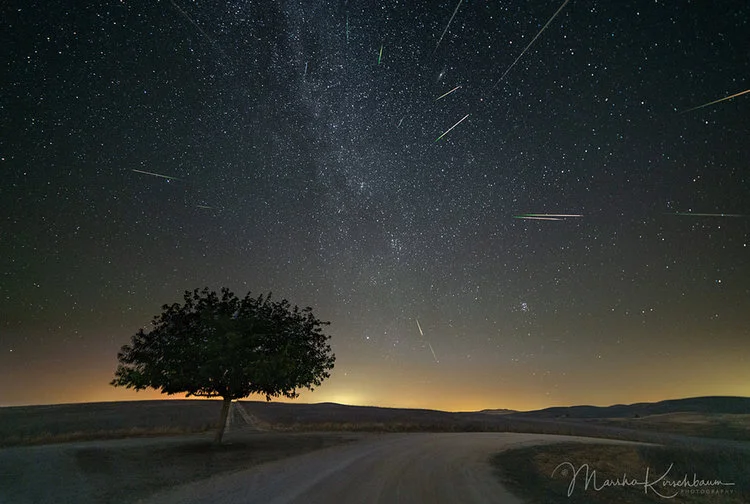
A beautiful night at the peak of the Perseids Meteor Shower didn’t result in any meteors but I did get a beautiful clear night my first night there.
Exif Sky: 180 sec @F/2.8 ISO 800
Foreground: 1 min @F/11 ISO 100
Both shots with Canon 6d and 50mm 1.8
Brian Mc Donald
Studying as a Graphic Designer lead to my love of photography. After first learning camera operation and darkroom processes in college, my passion for digital photography has progressed over the years. I am self-taught from countless hours studying books, practicing online tutorials and learning from the best. Over recent years I have accomplished accreditation with the Irish Photography Federation and gained acceptances and awards for my work in International Photography Salons under patronage from the International Federation of Photographic Art.
Loving nature and the outdoors, I mainly travel towards coastline to capture the majority of my images. I venture further to mountains and other suitable locations when I can but the South East of Ireland, in particular my home County Wexford is my base for my preferred genres of Landscape and Seascape. When the many conditions required are right I also try to capture the sky at night. There is something quite unique and awe inspiring about capturing the night sky and with modern camera sensor improvements, this has become all the easier. Since 2016, I have tried my hand at creating some modern architecture images as I enjoy both the precise nature of the composition and the new styles of experimenting with light and shadow.
“You don’t take a photograph, you make it- Ansel Adams”
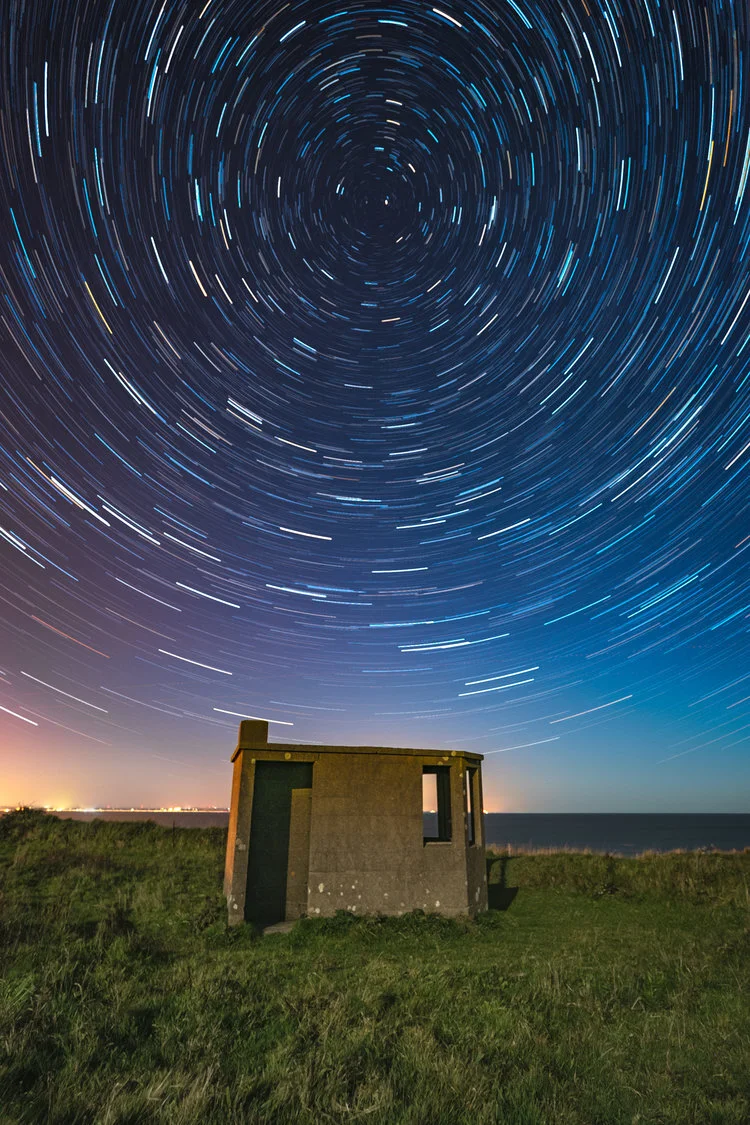
Having practiced with many photographic genres and styles over the years I have come to love the long exposure as my main technique. I am always fascinated by the resulting image from capturing a scene over a period of time.
Whether it be the tides in motion, clouds passing, rivers flowing or stars rotating across the night sky, I endeavor to portray motion and time in a constant Changing Light.
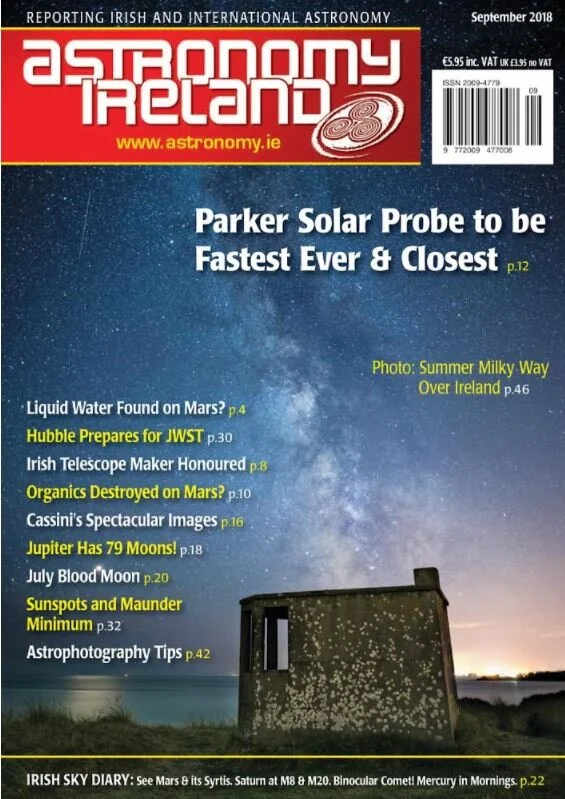
Brian McDonald LIPF AFIAP Cover page of Astronomy Ireland Magazine
An absolute honour to have my Milky Way and Mars image at Kilmichael Point, Gorey, Co. Wexford chosen for the September issue cover page and gallery of the world's most popular astronomy club. The image is titled “Watching the Universe go by” and features the Milky core rising near vertically over one of Ireland’s world war lookout posts which are located at strategic locations around the coast.
Also, the planet Mars shining a bright reflection on the sea. Mars reached it’s closest point (Opposition) to the earth in July 2018. More on Mars here https://mars.nasa.gov/all-about-mars/night-sky/opposition/
And also in the image, a passing satellite which Astronomy ireland’s David Moore identifed as the rocket use to launch military Lacrosse 4 Satellite in 2000.
This cover page feature was my photography highlight of 2018 for sure.
Kerry International Dark Sky Reserve
Enjoy the Kerry Dark Sky Reserve with us
We want you have an enjoyable rewarding experience so we arrange our star gazing experiences at easy accessible locations within the reserve. We can also arrange pick up at your location by our local transport partners at reasonable cost.
As sunset comes later in the summer, we time our tours so that you can enjoy dinner and join us as darkness falls (and still make it back to the pub if you wish!)
Star Gazing Experience
Our Stars experience has been developed to inform, entertain and share our enthusiasm for the Dark Sky with visitors to Kerry. Our guides will explain Moon’s phases and how they affect us on Earth .We will tell you what planets you may see and where. We even alert you to the passage of visible satellites. Most of all we will teach you a little of the stories and legends of the stars and constellations.
We limit the number of people on each experience to ensure that everybody gets to see some special sights through our telescopes. Sessions normally last about an hour however our guides enjoy their stars and are flexible when visitors have more questions. See HERE for more detailed information or book HERE
We offer complete flexibility to clients who wish to arrange a private stargazing experience and are happy to discuss your requirements. We can come to your location and add an extra dimension to your dinner party or barbeque with a post dinner tour of the stars. Call or email tru our Contact page or ask your Hotel or Guest House host to call us.
The Kerry International Dark-Sky Reserve is located in the South West coast of Ireland in what is called an ISTHMUS – a narrow strip of land connecting two larger land areas, usually with water on either side. The Reserve is protected by the Kerry Mountains and Hills on one side and the Atlantic ocean on the other, is approx. 700 sq km in size and offers dark un-lightpolluted skies, inhabited villages, helpful locals, remote wilderness, long sandy beaches, and numerous lakes, islands and rivers.
Protection of the Kerry International Dark-Sky Reserve is about protecting the day-time and nocturnal Wildlife in ALL its forms on land, river, lake and sea. As well as protecting and promoting the Heritage of numerous monuments of pre-historic stone, rock art etc that festoon the region, and protecting the quality of the dark night-time sky to witness them as our ancestors once did.
So, what is a Dark Sky Reserve?
An IDA (www.darksky.org) Dark Sky Reserve has a core/buffer structure, similar to the design of UNESCO Biosphere Reserves. The darkest night skies of such Reserves and Parks are in the Core Zone. The Buffer Zone, which usually includes more populated areas, protects the cores dark skies through the enacting of responsible outdoor light policies by municipal councils and private individuals. In the case of the Kerry International Dark-Sky Reserve there are actually dark-sky areas in the Buffer Zone with equal star-viewing as can be found in the Core Zone.
What is a Core Zone?
The Core Zone is an area in which there is little or no critical light pollution. These are the area’s in which on clear moonless nights one can fully see the sky in all its glory – just as our ancestors did. This region is most suited to astro-photography, research and naked eye star gazing.
What is the Buffer Zone?
The Buffer Zone protects the Core Zone by ensuring that light pollution is kept under control in the Buffer Zone. If the Buffer Zone began to increase its outdoor public street lights (for instance) this would impact on the Core Zone.
The Reserve holds many natural assets including The Skellig Islands UNESCO World Heritage site, tracks of 350 million year old creatures, towering cliffs, sandy blue-flag beaches, windswept hills, rare flora and fauna and traditional wildlife such as foxes, badgers, hares, rabbits as well as endangered species like bats, frogs, toads etc. The Atlantic Ocean bordering one side of the Reserve is also the protected home to many sea creatures and plants. Many island bird sanctuaries surround the reserve with no visitors allowed except under strict guidance and permission. It is not unusual to see Dolphins playing out in the Derrynane, Kells, Ballinskelligs or Waterville Bay area, so keep a sharp eye out for them. The Reserve is unique because is is an inhabited ‘living’ Reserve, there is a school, a playground, a church, a pub even a small chocolate factory in the Core Zone. You can rent a house, stay in a Hostel or book into a B&B in the Core Zone area.
Protection of this Kerry Dark-Sky wonder is very important, hence the application to receive Dark-Sky Reserve recognition from the International Dark-Sky Association. To correctly map our evolution into this more technologically based society we need to remember, cherish and protect the starting-off point in human development, globally agreed to be humankind’s wonder at the heavens providing the first spark into the creation of what we now call science.
The Lough Gur Dark Sky Project
The Dark Sky project is a significant undertaking by the Lough Gur group to secure International Dark Sky Association status for Lough Gur. But more important than being able to claim international status is the import task of preserving, not just the physical sites around Lough Gur, but the night skies overhead which has been available to man, woman and child at Lough Gur for over 6000 years.
As such we have embarked on a scientific measurement of how dark our skies are throughout the year and making that information readily available to you our visitors to Lough Gur.
Lough Gur is home to an array of species from insects, to small mammals, fish, birds and bats. We are acutely aware that changes to our ecosystem will have a significant impact on our broad ecosystems. Equally lighting changes will have a direct impact on the insect population and in turn the fish and bats and so forth. As the grounds are managed by Limerick council we are also fortunate to have access and support of our park ranger.
Dark Skies are our Connection with a 6000 Years of History
While no-one fully understands the purpose of the great stone circle, we can only image how our 6000-year-old ancestors pondered on the night sky and how it impacted their belief systems and annual cycles of life. A culture which we believe had at it heart the seasonal movements of sun, moon and stars. We want future generations to be in a position to look up and appreciate those same skies, it’s one of our few links to the past.
Spirit of Place
Visitors to Lough Gur are not only invited to enjoy its mystical presence but are invited to immerse themselves into human spirit and wellness. As part of our annual calendar, we run a “Spirit of Place” event promoting human wellness.
Increasingly critical to our own well-being is understanding the impact of blue light & light pollution on the human body. There is scientific evidence that suggests that for our own wellbeing, humans can greatly benefit from managed lighting and dark spaces.
A Historical Treasure we are passing to the future
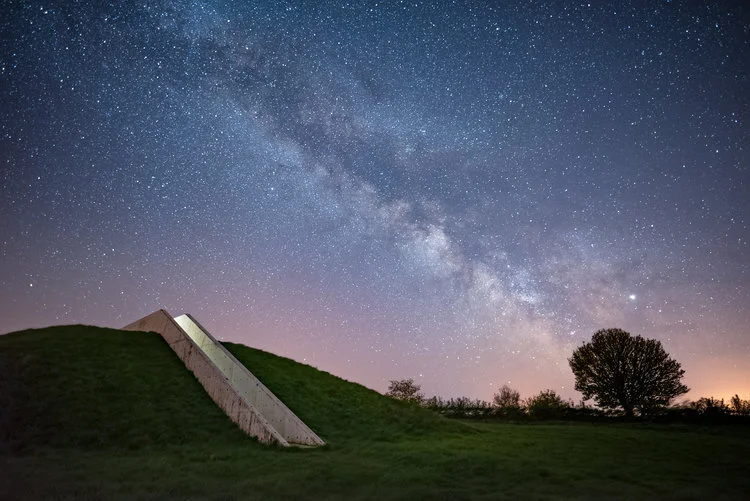
Dark Sky certification for Lough Gur is not a point in time exercise. Our Dark Skies have been observed by generations of people over 6000 years, We want to play our part to ensure the skies remain as an inspiration for others over the coming 6000 years. Lough Gur is fortunate to have the backing of Limerick Council and local community in building sustainable model for dark sky preservation We invite you to explore our Dark Sky image above, clicking through to the various aspects of our Dark Sky project and related areas. Lough Gur Science Group.
DARK SKY & SCIENCE EDUCATION
What can I learn?
The “Dark Sky Project” segment of our website is an educational tool which we are happy to make freely available to everyone, which can be accessed directly by students or as an inspirational teaching guide for the classroom. Our project extends well beyond the stars to numerous disciplines including:
Archaeoastronomy
Understanding Lunar & Solar orbits.
Learning about the seasons
Data Analytics
Ecology and Impact of Light on Flora & Fauna
Astrophotography
Human Wellbeing
Using our Data & Ideas for Students
We welcome you to use our interactive online analytics tools from Tableau Public. Or indeed download our data for your own analysis with your tools of choice. Here are some ideas for class room projects when using our data:
Finding the pattern & impact of Lunar Orbits
Look for the impact of the Earth’s spins and orbit around the sun.
Comparing seasonal numbers by day, month or quarter.
Select a single day and see if you can determine what is happening that day.
Understanding the impact of city lighting, the moon, clouds and sun on our light readings.
How does our data support what we know about our planet?
We encourage you to explore, play and find new answers in our data.
DARK SKY & THE
STONE CIRCLE
ANCIENTS LOOK TO THE SKIES
As our ancestors looked to the sky, it presumably took several generations to identify and map the patterns which existed. We can only speculate that these patterns acted as seasonal indicators to Bronze Age families. 6,000 years ago, in the absence of city lights, our dark sky at Lough Gur would have been even more impressive than it is today, with artefacts like the Milkyway clearly visible.
2017 Archaeoastronomical Report by Dr Frank Prendergast FSCSI FRICS
In July of 2017, the management of Lough Gur commissioned Dr. Prendergast to carry out a review of the Great Stone Cricle (Circle B) at Grange, In the report Dr. Prendergast explores various aspect of how the stone circle would have been of immense social and astronomical significance to the inhabitants of Lough Gur at that time. The following is an extract from that report.
Throughout prehistory, humans would have perpetually gazed at and interpreted the sky – by day and by night – and been acutely aware of their perceived universe. There is little doubt that such practices in the past were an integral part of their cosmology. Mainstream archaeology, with archaeoastronomy, now factors these broader perspectives into understanding ancient societies in terms of everyday life and belief systems in the prehistoric past. Justifiably, an appreciation of the symbolic sky as the natural extension of landscape studies is essential, warranted and rapidly growing in importance. Circle (B) is the logical and appropriate place in which to inspire visitors of all ages by connecting to our distant ancestors. Recognisable astronomical alignments cannot be identified at the site but, nonetheless, it is justifiable to presume that its builders readily understood the passage of time and the seasons and how these were linked to the apparent movement of celestial bodies, planting and harvesting cycles. Additionally, the rituals of death and burial would have been synonymous with the darker months of the year and perhaps marked there. Being located in Circle (B) at the shortest days of the year when the sun’s passage was lowest and shortest would have arguably carried added symbolism as well as deep levels of fear and awe. Modern humans have largely disconnected from their natural world and now exist in a very different environment.
mpact of the Moon on Dark Skies
Even through Lough Gur is fortunate to be located in an area with such wonderful dark skies, the data from our light meter had periodic drops in darkness. Regardless of the weather, seasonal or any other influences these periodic spikes in brightness are attributed to lunar phases – the full moon. On focusing on any given night you do not seem a smooth transition of brightness to dark. On nights of a full moon, cloud cover will darken the skies marginally. Interestingly on a dark night, the overhead cloud has the impact of bouncing ground lighting back to earth and our light meter.
Lunar Cycles
The Moon takes 29.53 days to go from new Moon to new Moon. The Earth travels 72.4 million kilometers around the Sun during the time it takes the moon to orbit the earth. This Nasa Goddard 4K visualization shows the Moon’s phase and libration at hourly intervals throughout 2016, as viewed from the northern hemisphere. Each frame represents one hour. In addition, this visualization shows the Moon’s orbit position, sub-Earth and subsolar points, distance from the Earth at true scale, and labels of craters near the terminator.
5 REASONS TO STARGAZE AT LOUGH GUR
Proximity to Limerick & Surrounding Towns
Ever got in your car to drive for hours to reach a dark sky site, such as the Burren, to discover when you get there the weather has turned and rain/cloud-cover has put an end to your observations? At only 21km from Limerick city, you can glance to the sky and be at Lough Gur in 30 minutes. And if the weather does turn, you can be back in the comfort of your home 30 minutes later.
Still Air Over the Lake
The water volume of the lake acts as a natural temperature control for surrounding air. As such the air is still and your observations are less likely to suffer from the effect of air movement or changing air temperature. The lakefront provides an ideal location to observe the southerly and westerly skies.
Ample Parking & Safe Environment
As a managed park Lough Gur offers ample parking. Ideal for groups or club meetings. Keep an eye on the Shannonside Astronomy Club who use Lough Gur are an observation location.
A Protected Environment
Lough Gur is protected in many ways. At a government level, the area is a restricted zone for planning permission, guaranteeing we protect our dark sky from needless light pollution. The unique of Lough Gur, while at an elevated altitude, it is further protected from light pollution by surrounding hills which act as a natural barrier to city & local town light.
SQM Readings in Excess of 21
Our Sky Quality Meter measures our sky in excess of 21, with a maximum reading of 22.29 during the past year. The data supports the anecdotal evidence from locals that the skies over Lough Gur are truly unique.
Astrophotography
Not many of us will get the opportunity to observe the Milky Way in its full glory. But when the weather conditions are right at Lough Gur you can do just that. The following photo was taken by local photographer Brian Lavelle and featured in the 2017 Lough Gur Calendar. On the night in question, the lake was so still that the stars were reflected in the water. The lake front is open to the public 24x7x365. With accessible parking within walking distance, come along, setup your equipment to capture the wonders of the night sky. When looking at such an amazing sight, it is easy to see what may have inspired our ancestors to build the Great Stone circle.
Peter Zelinka
Peter Zelinka is a nomadic nature photographer originally from Northeast Ohio. As an avid hiker and backpacker, Peter spent most his free time exploring the forests of Ohio and Western Pennsylvania. After spending countless hours hiking with a point-and-shoot camera, Peter eventually became more interested in photography. In June 2014 he purchased his first DSLR - a Nikon D7100. He spent the next few years practicing macro, wildlife, astro, and long exposure photography.
Peter graduated Summa Cum Laude from Youngstown State University in 2014 with a Bachelor’s Degree in Applied Science. After graduation, he began working as an Information Systems Specialist at The Vindicator in Youngstown Ohio.
In June 2016, Peter quit his full-time IT job to pursue photography. He spent the next 4 months living out of his car, traveling across the country on a 15,000-mile roadtrip. Upon returning home, he began teaching photography lessons.
Peter has now spent over 1 year living out of his car! In April 2019 he began his latest adventure - teaching people all across America how to take amazing images of the night sky.
Richard Tatti
My name is Richard Tatti and my passion is Astrophotography, and more specifically creating awe inspiring Nightscape Images. I've spent many years photographing the stars and perfecting the craft of light painting and blending of images. If you're passionate about shooting the milky way and creating unique and inspiring images then I'm here to help you learn how to do that. I am based in Central Victoria in the amazing country of Australia. I spend a lot of the year conducting night photography workshops and never tire of spending time with like minded people out under the amazing milky way.
Making Milky Way Panoramas
by Ekant Veer
We are about to head into the next stargazing season down here in the Southern Hemisphere – I thought this would be a good opportunity to talk about something that many astrophotographers like to do but can seem quite complex – making a panorama of the Milky Way. In this tutorial I’ll go through a couple of my recent panoramas and explain the process used to capture the frames and the software I used to create the final pano. If you haven’t done any astrophotography before then make sure you take a look at this awesome tutorial from Lonely Speck before starting.
The software I’ll be using to make my panoramas is PTGui – it’s not free, but suits what I do – it can also stitch RAW files, which works for me. If you want to try a free option, consider MS ICE – a very powerful tool that works most of the time as well as being quite user friendly. Another option is Hugin, which is immensely powerful, but a little hard to get your head around first time. I honestly haven’t had much success with Lightroom or Photoshop’s panorama stitchers, but you might have more luck! I generally start with PTGui, then move to MS ICE or Hugin if for some reason PTGui isn’t happy – but this is rare.
WHY EVEN DO A MILKY WAY PANORAMA?
First up, why would you want to? There are a number of reasons – firstly, and most commonly, a panorama gives you the opportunity to create a composition that isn’t always possible with a single frame. Composition is a huge part of photography so getting the right feel to your final image may necessitate a pano.
Secondly, you might want to take a panorama to take advantage of a fast lens, which will allow more light to hit your sensor, getting brighter pictures. For example, I have a Samyang 14mm f/2.8 lens – a really nice fast lens. However, I also like the sharpness of my Sony 55mm f/1.8 lens, but this obviously doesn’t capture as much of the landscape, so I need to do a panorama to get the same composition. Also, check out this tutorial on how different focal lengths affect your final astro shot.
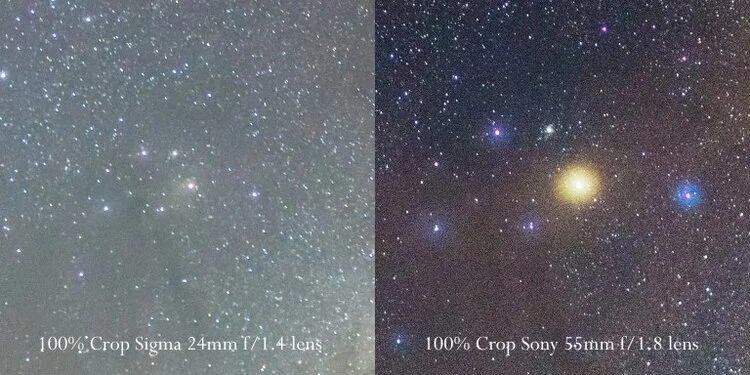
Third, doing a panorama with a longer focal length gives you far more detail in each frame, meaning your final panorama will not only be far bigger (pixel-wise) but also allow you to reduce the size of the panorama, reducing the noise. When trying to capture a large sky with a single frame the noise from taking the shot will need to be reduced in post-production or with layering multiple images (something I’ve not mastered, I must admit!). However, if you take a panorama you can then reduce the overall size of the final image, significantly reducing the noise in the image. To give you an idea of the improvement in detail here is a 100% crop of Antares (the bright yellow star in the centre of Scorpius) with a Sigma 24mm f/1.4 lens and the Sony Sonnar t* 55mm f/1.8 CZ lens.
Two Panorama Styles
There are far more than two types of night time panorama, but I’ll talk about the two most common. The first is where the Milky Way appears flat and rises straight into the sky. The second is where the MW arcs across the sky in a semi-circle. Let me start by saying that BOTH are real. BOTH are taken in the same manner – the only difference is that the arcing panoramas are shot with a much wider view of the sky. What the photographer is doing is capturing the MW all around them and the final stitching software tries to make sense of the images by keeping the land flat (as it should be!) and the stars arcing in a semi-circle. If we had eyes that had a field of view that wide it would be how we see the stars, but we don’t, so we are more used to the ‘straight’ MW style.
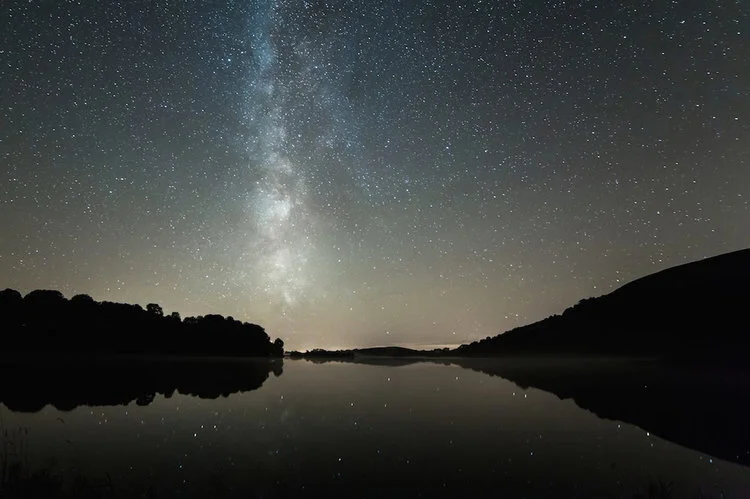
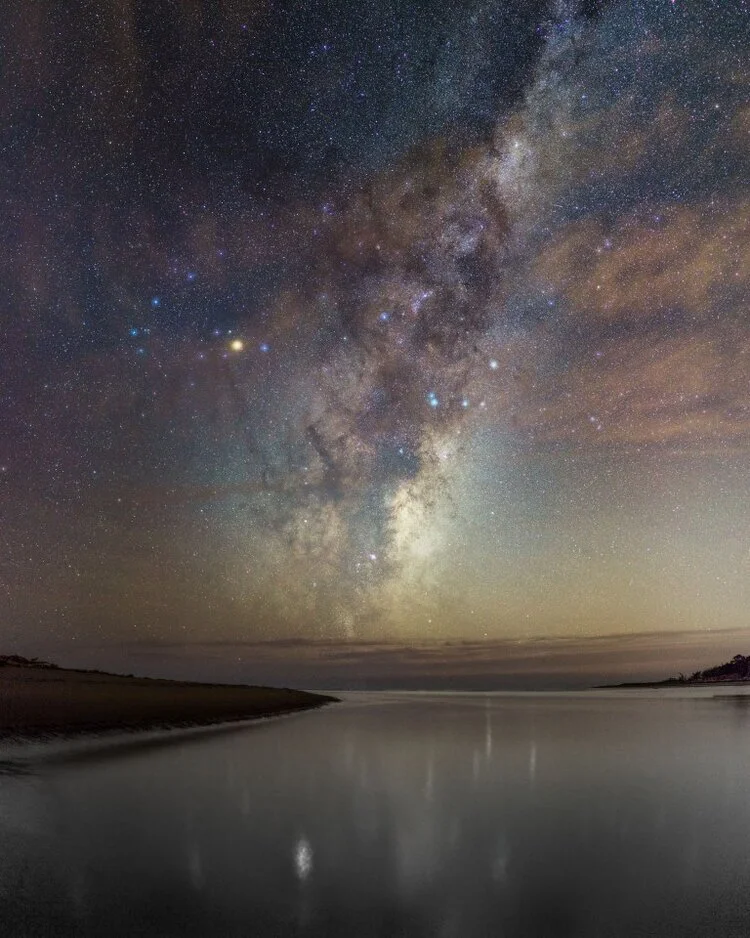
So, here are two styles I’ve taken recently. First, the arcing version across Mt Sunday, Canterbury and the second, the more straight MW shot rising out of the Pacific Ocean. Both of these are after I’ve processed them. I’m not going to cover processing here, but if you want to have a go at processing night shots, take a look at my tutorial here (with a downloadable RAW file).

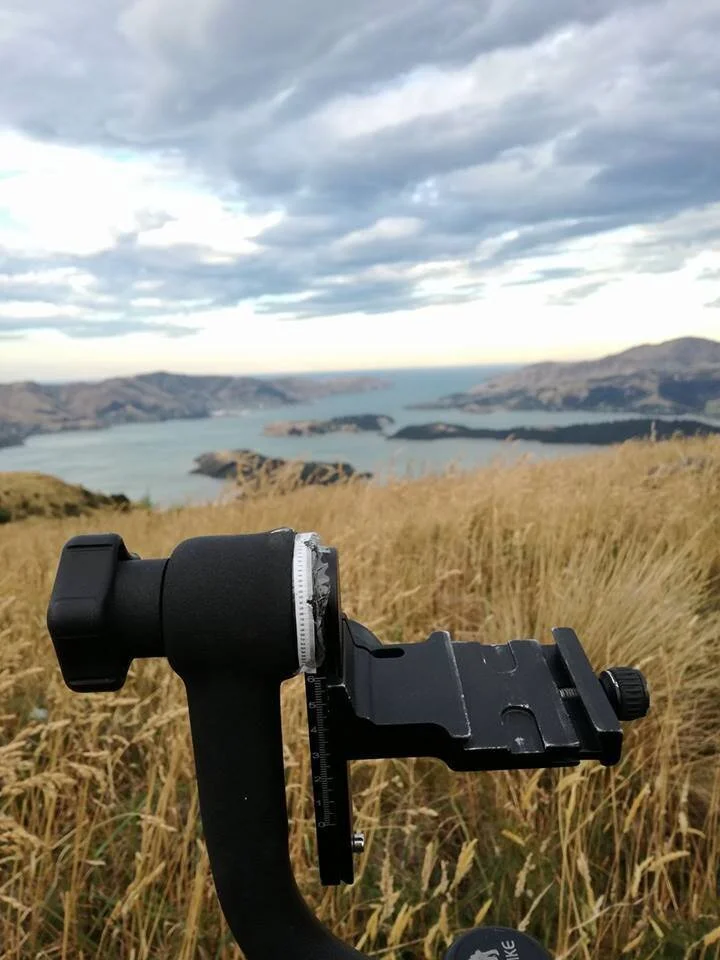
Tripod Discipline
Taking panoramas at night is NOT easy. During the day you have plenty to see and can easily make sure you overlap each frame. At night, it’s much harder to see the landscape in the foreground and, after a while, all the stars look the same through a tiny LCD lens. Can I recommend you get an indexing tripod that will automatically lock to the pan/pitch you need for each frame or, if you’re cheap like me, use a tripod head that has some etchings (or stickers) that let you know how much you should pan/pitch. I use a birdswing tripod head (can’t afford much else right now) and I printed off some degree marks and stuck them on. I know exactly how much I should pan/pitch for the lens I’m using and I keep to that when out at night. Here’s an example of what I have (taken on a hike in the Port Hills when I lugged my huge tripod up and forgot the quick release plate – genius!).
Taking the Individual Frames
Ok, let’s get started with how you take the frames. This gets harder the longer your focal length. I strongly suggest you practice with a nice wide lens to start with. What I generally try to do is capture a panorama as normal but allow for a far greater overlap between frames (at least 33% overlap). So, in the image below, I took the bottom right shot first, then the bottom middle shot, then bottom left. I then raised the pitch of the tripod to take the 4th image and panned right – this technique is called a serpentine mosaic panorama as it snakes backwards and forwards up the image – it works for me because I can focus on just overlapping with the last image I’ve taken, rather than trying to remember where the first image was and pitch upwards from there.
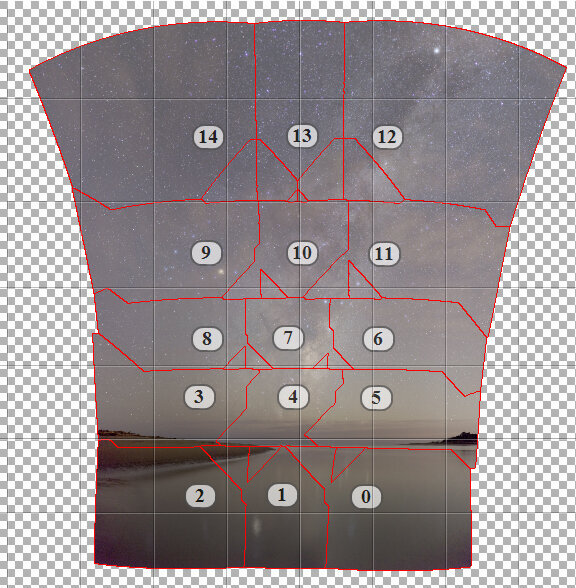
One thing to remember is that the earth is rotating ALL the time. So, even if you’re only out taking photos for 10-15 minutes the whole frame will move. This is why I always start at the bottom and go horizontally first. If you go vertically by the time you get back to the bottom for the next row of frames the earth has rotated and the stars you want to capture have fallen behind the horizon. Definitely shoot horizontally to avoid this. As I said, with a longer lens, this is a really risky technique – one dud frame and the other 14 are wasted – check each frame quickly after shooting to check there hasn’t been any shaking or blur that you don’t anticipate before moving the tripod to take the next frame.
With the arcing style of panorama you need to capture a far greater field of view so I strongly recommend you do this with a wide lens. Again, start at the bottom and pan your tripod across the horizon first, then pitch upwards and take frames of the sky. The Milky Way will dip into the horizon at two points of the sky – I generally start at one end of the Milky Way and pan all the way to the other size of the horizon where the Milky Way has intersected the horizon. I might even get a few frames past where the MW stars and stops to give me more data, just in case I want to crop the image later. You can see I took the ground images first, then went back and got some other extra images of the edges, just to be sure. I was freezing cold by this time, so don’t blame me for not getting it right first time!
Stitching your Panorama
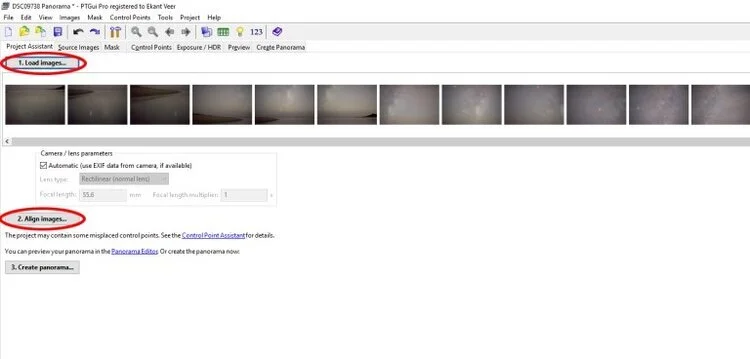
As I mentioned earlier I’m using PTGui for my stitching. I export the frames I want to stitch as DNG files and then load them into PTGui and click ‘Align Images’. 8 times out of 10, this is all I need to do and the image stitches beautifully.
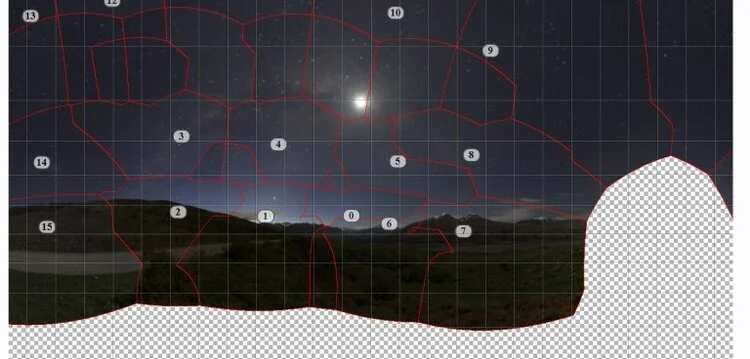
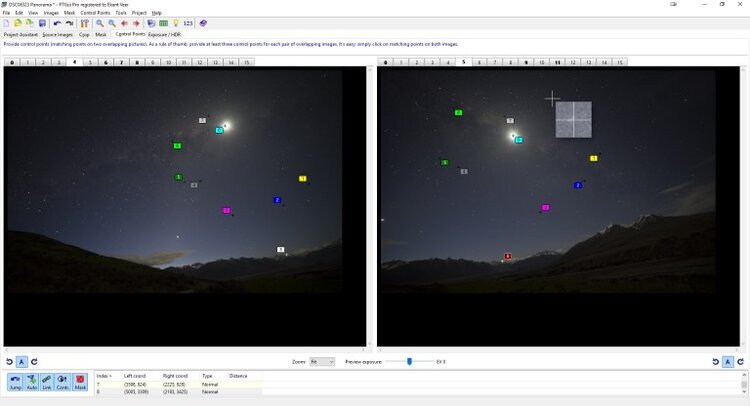
However, occasionally, the software doesn’t work nicely. This happens where there isn’t enough information in the frames for the software to make a match between individual frames. This happens a lot more with Astro images because it’s hard to identify stars/foreground etc, as everything is so dark. PTGui and Hugin both allow you to add in ‘Control Points’ – these are when you manually add links between two different frames. So, if there’s a star that looks the same in both frame 1 and frame 2, you can manually tell the software that they’re the same thing and it’ll try to keep linking the images with your control points as a headstart. This can be a tedious job, but it’ll mean you get a panorama out of your frames rather than throwing it all away. As you can see below, the software didn’t see any overlap between frames 4 & 5, even though we can clearly see there’s heaps of overlap. It’s most likely because the frames aren’t level with each other and there’s a lot of distortion with the lens I’m using, so the software gets confused. Also, the lack of light in the images makes it really hard to spot the ‘right’ things to link – after a while, all mountains and stars look the same to the software!
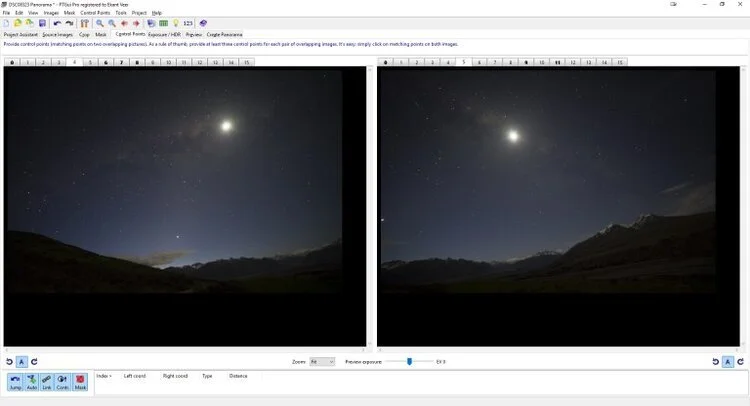
Now, I’ve manually added in 9 control points. You want to have at least 4 control points per linked frame – the more, the better! PTGui gives you a nice magnifying glass to isolate the linked area to make sure you are linking the right things in each frame. Once I’ve added in enough control points I try to have the software fill in the gaps and re-align the images. Usually, this is enough to get a nice panorama. If by this point it still isn’t working then I generally get frustrated and walk away and try again another night – but you can keep adding manual control points until you get it right.
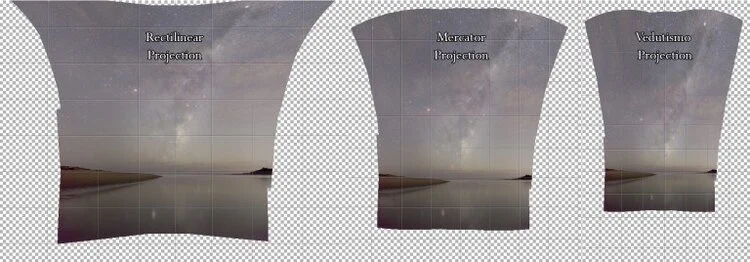
Choosing your Panorama Projection
Once you have enough control points PTGui will spit out a draft ‘projection’ or view of the panorama. This is where you can really play with your panorama to get the feel you like. PTGui will give you what it thinks is the best look based on the data is has, but I always like to choose different projections and use the one I like the look of. You can also move the image around and rotate it to suit your composition. It takes some practice, but play around – I’m sure there are cartographers out there that can help explain what the different projections mean, but I just try them out and go with the one that looks good. Here are 3 different projections – I finally chose the Mercator projection for this image.
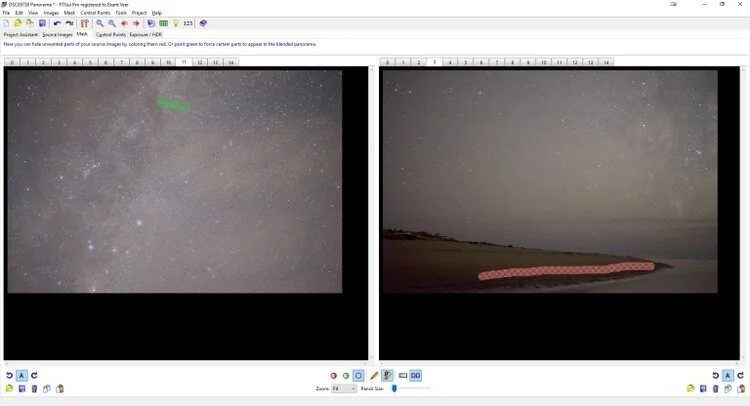
Masking In/Out
PTGui allows you to use a masking .to adapt the stitching. This comes in useful when you want to specifically include or exclude a certain frame. In the example below I spotted a satellite I liked the look of – I’d like to have it in my final image, so I’ve used the ‘Green Paint’ tool to force the software to include it in the final panorama. I could equally use the ‘Red Paint’ tool to force data out. I did this to exclude the beach in this image – it was quite close to the edge of the frame, so was a little noisier and more distorted than other frames – so, let’s make sure it’s not used in the final stitch. Again, pretty simple stuff – make sure you experiment to see what suits you.
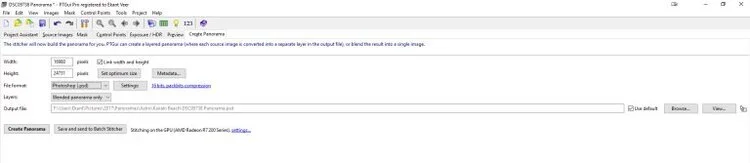
Exporting for Post-Processing
The final step is to export your panorama for any post-processing you want to do. I generally export in a Photoshop format so I can edit it in PS with Nix (my preferred editing tools). Tiff is also a good export format. Don’t edit astro shots with jpg – it’s just not powerful enough for the detailing you want to do. I usually just export the blended image BUT, you can also export the individual layers if you spot something later you want to edit back into the image that PTGui has removed – remember, the more layers, the bigger the file. This file was nearly 2GBs big with just the blended panorama.
Time for you to have a go…
And that’s it! Time to post-process, which is up to you. To help you practice, I’m including 6 smaller tiff files of my image ‘straight’ pano image. Use them, abuse them under Creative Commons BY-NC (you can do whatever you want with them, even manipulate the images, just don’t use it for commercial purposes and credit Ekant Veer and www.EkantTakePhotos.com as the source of the images). The images are SOOC (no editing) so you get to play with the entire process. If you want to do some lens correction and the info isn’t in the EXIF the images were taken on a Sony A7ii with a Sony Sonnar t* 55m f/1.8 lens.
THE GREAT MILKY WAY CHASE!
by Austin Dent
My love for astronomy started my sophomore year at Ohio Dominican. I was in Dr. Young's astronomy class. My most vivid memory was going to the Perkins Observatory. Our class got to look through the telescope and seeing Mars take up the whole frame. Even back home in Ohio, I would love being outside on a clear night to see the stars. I've been fascinated by the stars, simply by the fact we're seeing something millions of miles away. Or, I can be honest, I'm a huge Star Wars nerd.
Then I moved to Colorado. Living way up at 9,280ft above sea level; you can find some of the darkest and clearest skies on the planet. My love for astronomy was in part, a large reason why I got into photography. Now being able to see these skies nightly, I wanted to capture the skies I was seeing.
The very first Milky Way shot I captured was on my Nikon D3400 with a kit 18-55mm f3.5 lens. My settings were; 30' f3.5 and ISO 100. Oh... the noise in the photo is almost unbearable, but I thought it was the coolest thing since sliced bread. I TOOK A PICTURE OF SOMETHING IN SPACE!!! Thought it was so cool, I got it printed on 16x20 metal. It hangs above my bed...
As I am with most things in my life, I wanted to learn more. It's been countless long nights, sometimes till the sun rises for the next day. Lot of coffee and Monster energy drinks destroyed. Photography is something you'll never get better at by sitting in your room watching YouTube videos. You have to take what you learn, and apply it. This is why I'm so attracted to photography; I'm constantly learning and growing. This is why I got that first Milky Way picture printed. I know it's bad; you don't need to convince me. It's for days like today, where I edit all my shots from the night before. I turn and look to see where it all started.
Now, I am armed with a full frame Nikon D610 with the Rokinon 24mm f1.4; and "My Precious" Nikon D500 with the Rokinon 14mm f2.4mm. Gives me the ability to start capturing the Milky Way unlike I've ever done before. Last night was my first time with both cameras, and I'm quite pleased with the results. I look forward to continuing to grow with my new toys!
I hope you enjoy what I captured last night! I have 5 still frames that are all 10 image stacks. Lastly at the bottom, I attempted my first try at a Milky Way time-lapse! Can't wait to get better at these!
Light Pollution, Astroklar & Natural Night Filter Review – Do They Really Work?
by Paul Reiffer
Light pollution: Increasingly a challenge for city dwellers and photographers alike. Those deep, dark skies that I’m lucky enough to see full of stars out in the countryside are becoming an endangered species in their own right as the world’s population continues to rise and urban areas inevitably expand.
The problem is, with all that light bouncing around, our view of the night sky (and ability to capture it) continues to diminish on a daily basis.
As photographers, of course, the tried-and-tested approach to this has always been to head away from the city lights. “Dark Sky Reserves” have been set up all around the world to allow stargazers to enjoy the night-time environment our species seems to determined to destroy. In practical terms, however, this doesn’t always work for everyone – and what about those little towns and villages which look so photogenic underneath the Milky Way? How do we capture them without their own light pollution spoiling the view?
Well, enter the relatively new kids on the block: “Light Pollution Filters”.

“Astroklar” by Rollei, “Natural Night” by Nisi, “Sky-Watcher” by, well, Skywatcher(!) – whatever brand or manufacturer you’re turning to, these slightly pink-blue night pollution filters essentially claim to achieve the same thing:
Cut down light pollution and allow you to focus on the night sky.
So how do they do it?
THE SCIENCE STUFF
Usually when we’re evaluating filters, we’re looking for absolute neutrality in colour – we need to capture exactly what is in front of the camera’s lens, with no colour-cast or distortion of reality. In this case, however, that’s not quite how things need to work…
The challenge with light pollution is that it comes from different wavelengths of light. Typically, most of it comes from the yellow-orange sodium lamps what most of our cities still deploy (although that’s slowly changing to a cooler LED source over time). Likewise, some of that light bouncing around the atmosphere can provide a cyan-green glow in the sky above.
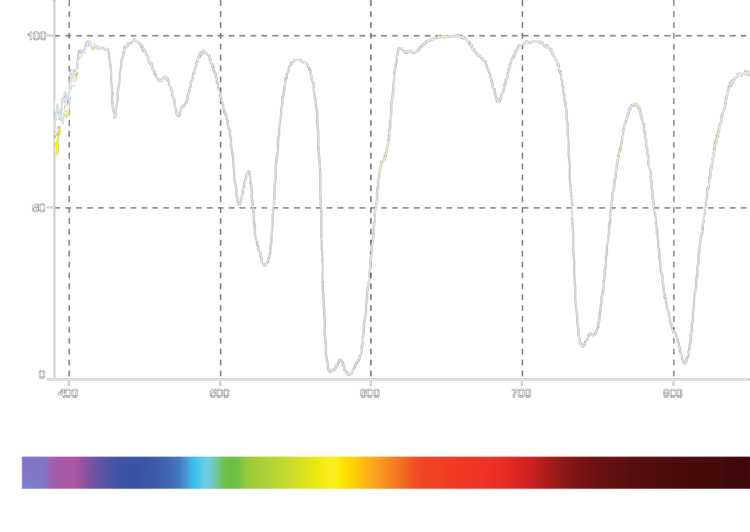
Add in to the mix, all the infra-red light that is a byproduct of lighting our cities at night, and that’s a lot of specific colours we need to “cut” in the filter. And that’s exactly what these do – as shown in the actual filter output graph above.
For reference, a “perfect” neutral density (ND) filter would have an almost flat line between 400nm and 700nm, and then cut everything else. That’s what makes it “neutral” and is what all filter manufacturers are striving for to create near-perfect glass with almost no “colour cast”.
So, what about these “light pollution filters”?
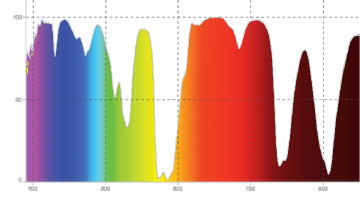
Well, that profile is exactly what they’re designed to do. The graph above, and to the right, is from an actual example of one of these filters, and you can clearly see how much of those unwanted colours of light they’re designed to “cut” as those wavelengths enter your lens.
From allowing almost all blue and red light through (90-100%), but blocking almost half of the green hues and virtually stopping all but 5-10% of the yellow-orange polluting light from our cities, these filters help cut down the impact of our need for illumination on the night sky above.
COMPARISON RESULTS
Do they work? Well, yes and no…
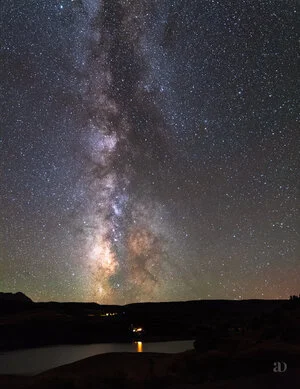
Let’s look at a good example of two raw images from Patagonia (one without the filter and one with). Other than profile corrections for the lens, not much has been done to either of these images to give a real sense of the difference this filter can provide:
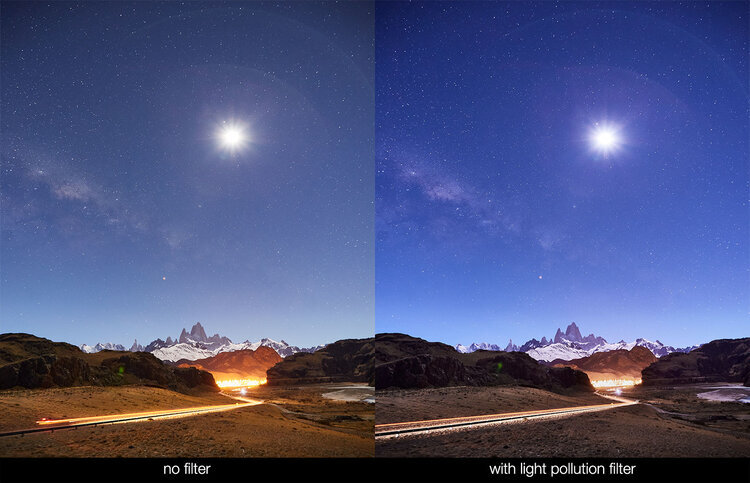
Pretty good, right? I mean, the sky seems to have become clearer, the distracting yellow “glow” has certainly improved, and overall we’re looking at a shot that “pops” more than it would have done, raw, without any filter.
Let’s try another – this time from Lake Wanaka in New Zealand. Again, one straight through the lens, and another with the effect of a light pollution filter:

Again, a pretty good result, right?
The scene has “cooled down” quite a bit – the stars, again seem clearer and pack more “punch” than without, and the city lights are certainly less distracting. (In fact, the only distraction that remains is the annoying lean on the ultra-wide lens that I would otherwise have corrected!)
So let’s push things just a little bit more – how about some Aurora Borealis (Northern Lights) action on-camera? How would the light pollution filter fare in this more challenging scene, where we want to allow as much light to be captured as possible?
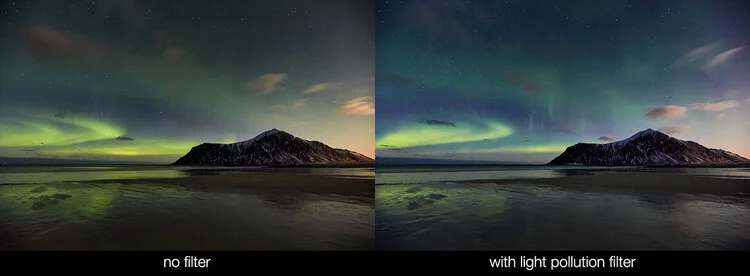
In all honesty, better than I thought it would – after all, it’s still captured the Northern Lights, and while there was very little pollution in the north of Norway to contend with, it did even manage to cool down the moonlight too.
But that, unfortunately, is where my challenges with these filters begin.
THE DOWNSIDES TO THEIR USE
While in theory a great addition to your kit bag, let’s think about exactly what these filters are doing…
They’re cutting light – at the exact time I want to get as much light into the camera as possible. While it may not seem obvious from the small samples above, in some cases, the dimmer stars in the night sky are missing or faded. Mars, for example, is an orange glow – and what does our light pollution filter do to orange light…?
They have a cooling effect on the overall image, meaning I need to set my white balance to between 500K-900K warmer than reality to counteract it in-camera. All well and good for the colours that it’s cut, but that also means I’m warming up the colours I haven’t affected too.
The filters don’t help with the exposure differential between the brightness of the city lights and the need to capture the relatively dim starlight above – you’ll still need something else (like a GND) to counter any overexposed areas.
It’s another thing to worry about keeping clean, whether round or square, in front of the lens at night. Keeping things clear and reflection-free in the daytime is frustrating enough – at night, errgghhh.
However, with all that said, these pieces of glass do deliver on their promise – and they do a good job of it as well.
POST-PROCESSING ALTERNATIVE
While I’m sat thinking I’d rather collect as much raw data as possible in the frame, and “fix” any stray light pollution later, that’s on the back of decades of experience in editing software. What these filters do is make that process a lot simpler, with only minor adjustments being required to achieve a final result that is pretty impressive.
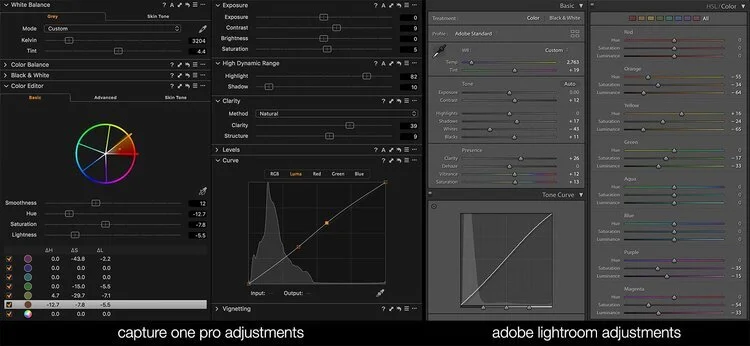
While, of course, we can “dial-back” the specific colours in the image in the same way the filter cuts them, we also then have to introduce some HDR features and clarity enhancements to get close to what the light pollution filters can achieve in-camera.
With that in mind, for general use, while they don’t capture all of the light and do have an impact on the overall colour of the scene being photographed, these filters really can make light work (excuse the pun!) of getting great results at night.
NOT JUST FOR STARS
What if we want to capture the city itself – not just the night sky? Well, they can help boost those shots too.

Not bad for a single piece of glass in front of the lens, right?
Our dirty yellow atmosphere above Downtown Dubai has all but disappeared, the city seems clearer and more “alive”, and the sky has definitely cooled. This filter isn’t just for use on stars and planets – clearly it has a positive effect on the cities it’s trying to combat too.
SUMMARY
Pro’s:
Easy to use, with little post-processing required
Instant clarifying effect on images at night
Clear cut in yellow-orange “polluting” light in the scene
An apparent boost in cooling and contrast for a given image
Con’s:
They cut light you might want, as well as that which you don’t
White balance is negatively affected and needs to be changed in-camera
Personally, I could do a better job in post processing if I needed to
It’s another piece of kit to carry with you to shoot
Overall – a great product, for a very specific use, and a good tool to get the best out of our skies at night if you’re not confident in processing the raw output of all the captured light from your camera.
AN ARTIST IN RESIDENCE AT CAPITOL REEF NATIONAL PARK
by Imma
When I decided to pursue a career in landscape and nature photography I already had in mind to combine my biology background, my conservationist leanings and my passion for photography into this art form. As I delved into all my favorite things to capture in nature, I started to feel more and more interested in night photography as it offered a chance to shoot scenes that few ever see and are truly inspiring.
Most of my astrophotography is taken in New Jersey where I live. However, in 2018 I was fortunate to be selected as a volunteer at the Palms Spring Photo festival. This was an excellent opportunity as I had a chance to network with other professionals and learn about accessing grants and in particular the Artist in Residence Programs run by the US National Park Service. Just after the festival, I visited Joshua Tree National Park and it was there where my long-term project was conceived and initiated. My main goal became to capture and document those inspiring landscapes under the night sky as a way to raise awareness and educate others about light pollution as another form of pollution affecting animals and ecosystems in all sorts of ways.
Capitol Reef National Park is in Utah's south-central desert and the closest town is Torrey, just eight miles west of the park’s visitor center, on Highway 24. The area is named for a
line of white domes and cliffs of Navajo Sandstone where one of them resembles the United States Capitol building and the word Reef refers to the rocky barrier making passage difficult.
The park encompasses the spectacular Waterpocket Fold, a wrinkle in the earth's crust that is 65 million years old and extending almost 100 miles, with layers of white sandstone domes, canyons and striking rock formations. Among the park's geological sights are: Chimney Rock pillar, The Castle, Capitol Dome, Hickman Bridge Arch, Cassidy Arch, The Golden Throne and in the north the towering Entrada Sandstone monoliths of Cathedral Valley. In addition, the area is full of history: from the petroglyphs etched in sandstone by the Fremont people who inhabited the land nearly 1,000 years ago to the small Mormon town of Fruita inside the park with more than 2,500 fruit trees, some of which were originally planted by pioneers. Additionally, Capitol Reef is a Gold Tier International Dark Sky Park with some of the best night sky viewing opportunities of the western national parks and as part of this designation, staff and volunteers perform ongoing monitoring of night sky conditions throughout the area. The park's commitment to reducing light pollution and educating the public about the night skies is also demonstrated by offering one annual Artist In Residence program exclusively dedicated to night photography.
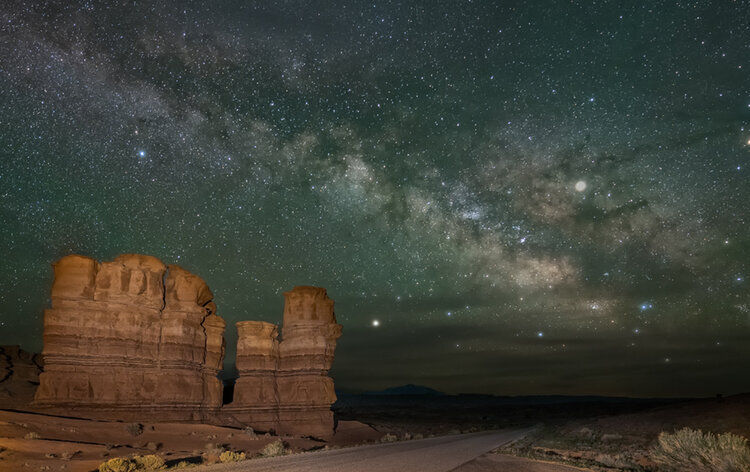
Hoodos are thin spire of rock protruding from the bottom of an arid drainage basin.
Capitol Reef’s program and their goals were exactly what I was looking for to develop my own project so I was delighted to have been selected as the 2019 recipient. During the 20 day period my residency lasted, I was able to explore in-depth the park to identify some spectacular foregrounds from extensive or intimate vistas, to rock formations, to hoodoos and to historic buildings. Cloudy days were dedicated to wildlife observations, in particular, the very cute yellow-bellied marmots, mule deer and birds like the black-chinned hummingbird or the mountain bluebird. I arrived at Capitol Reef during the new moon and as soon as I had unpacked my gear, I headed out to explore the one-room schoolhouse, constructed by Mormon Fruita residents in 1896, which also served as a community center. The weather forecast for the
following night was perfect for the amazing back-country trip to the Cathedral Valley where I spent all night in perfect solitude with the stars admiring the Temple of the Sun and the Temple of the Moon. The third night was dedicated to the popular Chimney Rock, an eroded pillar of red sandstone. Subsequent nights included visits to Pectol’s Pyramid (a sandstone monolith just off the main road) and the Gifford’s barn in Fruita, drives along the Notom-Bullfrog Road, and some star trails captured at Twin Rocks and at the Wingate Sandstone capping The Castle. As the nights passed by, the moon’s presence wasbecoming more noticeable but there were still some opportunities available to photograph the Milky Way
closer to moonset at Goosenecks Overlook or at the orchards by the visitor center. On my one “day-off”, I decided to drive to the nearby Goblin Valley State Park, another jewel within Utah’s dark sky region.
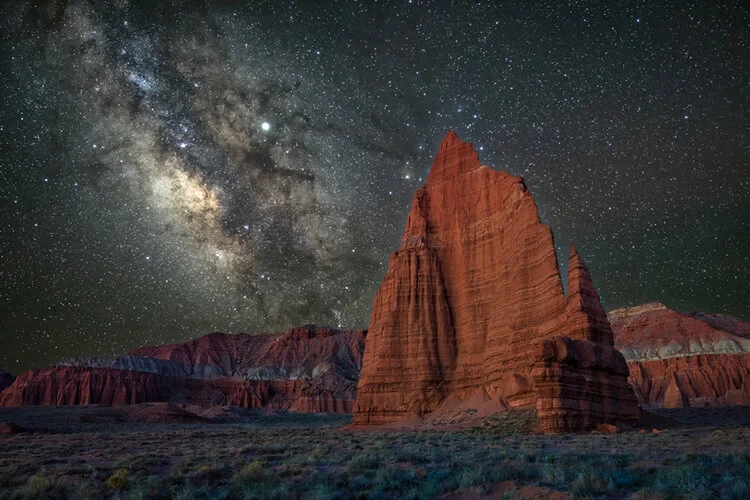
Temple of the Moon, an impressive sandstone monolith found in the back-country Cathedral Valley area
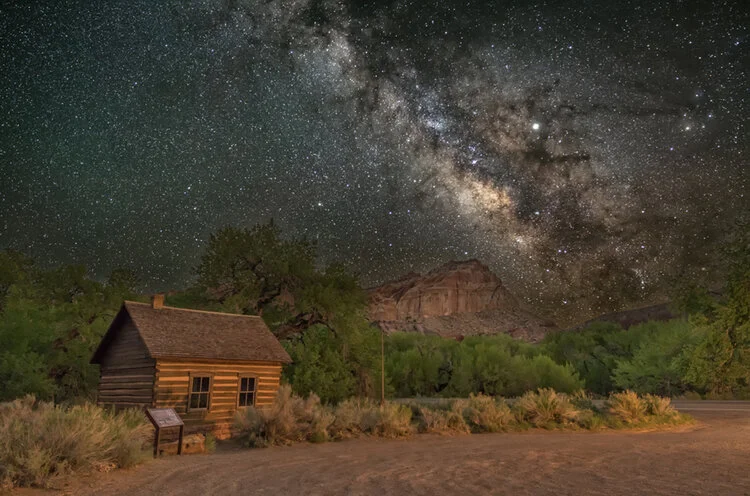
Fruita schoolhouse constructed by Mormon residents in 1896, which also served as a community center.
All Artists in Residence are considered volunteers for the National Park Service and therefore I was able to attend some of the training programs set up to educate the public about all aspects of the park including management, its inhabitants and their history and also about its geological and biological relevance. One of my tasks as a volunteer included a presentation of my work as part of the Evening Program at the camp
ground amphitheater. A second lecture was also hosted by the Entrada Institute, a nonprofit organization dedicated to preserving and celebrating the natural, historical, and cultural heritage of the Colorado Plateau.
Even though my stay was for twenty days and I was able to accomplish my photographic goals, I felt it was over too soon. One could easily spend several months at the park and still find new areas to explore so I am left with no other choice but to go back. And last but not least, my sincere and deepest gratitude goes to all the staff members and volunteers at Capitol Reef National Park who made my stay so unforgettable and to the Entrada Institute for their monetary support.
BIO
Born in Barcelona Imma Barrera is a landscape and nature photographer based in Metuchen NJ. She is a biologist but also a graduate of NY Institute of Photography and has exhibited her photography in a number of galleries worldwide and won several awards. One of her favorite subjects to photograph is the Milky Way and was selected as the 2019 Capitol Reef National Park's Artist-in-Residence for her night sky photography, In addition, she was shortlisted in the Landscape category of the 2019 Sony World Photography Awards’ Professional competition with her series “Under the Night Sky”. She is involved in educational programs about photography and seminars to raise awareness about the need to protect our natural treasures. She has published a photography book about night photography in NJ and NY and is currently working on a book about the night skies at several US national parks. Her work can be seen on
her website www.imma.photo or on instagram @imma.photo.
THE SCIENCE AND ART OF PHOTOGRAPHING METEORS
by Marsha Kirschbaum and Rick Whitacre
INTRODUCTION
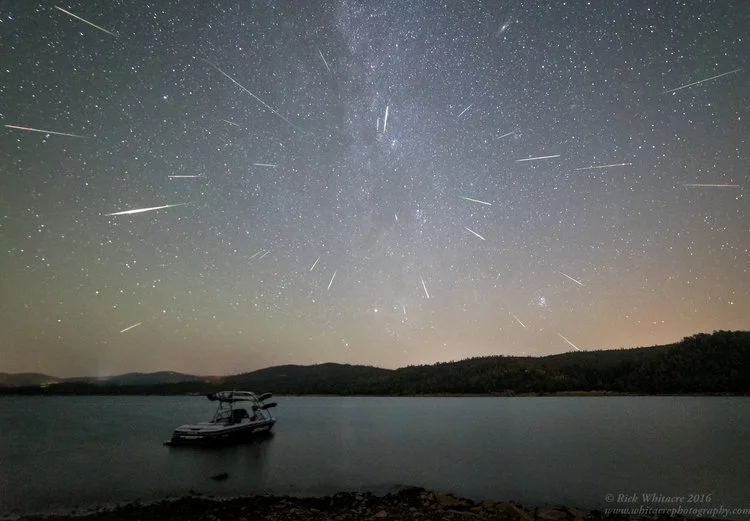
Of all the night sky phenomena to watch and photograph, a meteor shower is among the most exciting. The anticipation and surprise of those tiny bits of cosmic dust streaking
across the sky is thrilling. To capture them in camera is even more amazing. This article gives the photographer, whether beginner or advanced, the tools necessary to take amazing meteor shower images. We will also provide ideas on how to incorporate meteors into compelling compositions.
WHAT IS A METEOR SHOWER?
When earth’s orbit takes it through streams of cosmic debris from a disintegrating comet or asteroid (in case of Geminids or Quadrantids), we have a meteor shower.
These showers occur the same time each year as our earth revolves around the sun. When the earth passes through the greatest debris field of a given shower, it is called the Peak. Some showers are better seen in the Northern hemisphere; others in the Southern hemisphere; and some worldwide.
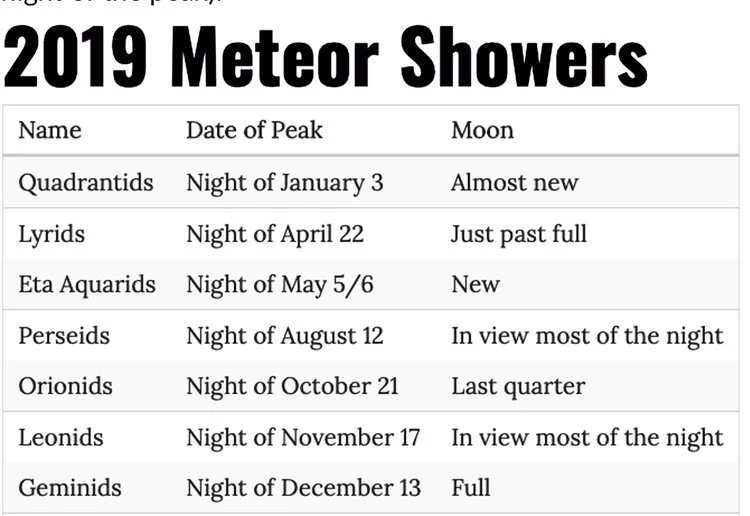
A following table lists the major meteor showers for 2019. Not all meteors come from the annual meteor showers. They can show up randomly at any time. For purposes of this article, we will focus on photographing the major, annual showers.
Meteors often appear to be coming from a single point in the sky, called the radiant point. Meteor showers are generally named after the constellation they appear to come from.
(Perseids from constellation Perseus; Geminids from constellation Gemini, etc.) Most meteors are smaller than a grain of sand, throwing off intense streaks of light as they burn
up in the earth’s atmosphere. Meteors enter the earth’s atmosphere at speeds ranging from 25,000 to 160,000 mph. That’s fast!
HOW DOES A CAMERA CAPTURE A METEOR
In order to capture those flying bits of cosmic dust, the settings in our cameras must be optimized to ensure success. This means the optimum sensitivity to light: Wide enough
aperture (small F-stop) to allow the most light onto the sensor as possible; Enough sensitivity (ISO) to record the meteor streak in its entirety, but not blow it out either; and
sufficient time (shutter/exposure) to capture the complete streak without clipping it.
These settings will be discussed in detail under Camera Settings.
Another factor for success in capturing meteors is to have the meteor pass within the camera’s field of view! That is why using a wide-angle lens is also recommended. It is unfortunately a very common refrain to hear, ’’Oh, if only my camera was pointed in the other direction.“
GEAR
Camera related equipment.
• DSLR or Mirrorless Camera that allows for interchangeable lenses. Since most meteors are fairly faint, ISO settings of 3200-6400 are common. For best results, you need a camera body that can shoot at those ISO values with manageable noise levels. Since you want to cover as much sky as possible to increase your chances of capturing meteors, you also want a wide field of view. Full-frame cameras are often best for both their ISO capabilities as well as their field of view with any given lens, but many fantastic images have been captured with crop-sensors.
• Sturdy tripod – The tripod should be sturdy enough to hold your camera and not shake in a breeze or light wind. If conditions are very windy, a heavy bag – like your camera bag – is useful to weigh it down.
• Wide, fast lens (2.8 or faster) – A 14 mm lens allows for a nice wide field of view, which increases the probability of more meteors in your frame. While one can go wider, know that the meteor streaks will be smaller relative to the
size of the frame. Faster (wider aperture) lenses allow for more light to reach the sensor. If shooting with a longer lens, say a 24mm, then the wider the aperture should be, to allow for more light and pinpoint stars. (see camera settings discussion)
• Intervalometer / Remote Timer – This device will allow for setting the exposure time and to continuously fire one exposure after another at intervals of 1 second (to allow the camera to write to the memory card). This ensures the probability that most meteors that fly in front camera will be captured.
• Large memory card - Meteor showers at Peak can last for more than a couple of hours. In fact, daylight often terminates the ability to see the meteors and that’s when to call it quits. Make sure to start with a cleanly formatted, empty
memory card that will hold several hour’s worth of exposures for your particular camera.
• Spare batteries or battery pack – The colder the temperature is, the quicker the batteries run down. This is particularly true for the Sony cameras. In colder temperatures, keeping batteries in a warm pocket next to your body will extend their life a little more. Even better is a battery pack, which will allow for longer uninterrupted exposures (more meteor capture potential). Speaking from experience, usually the biggest meteors fly past when one is changing the battery.
The battery pack becomes even more important if one is planning to compile images into a timelapse, where gaps are problematic.
• Headlamp / red light – A headlamp is a good way of keeping hands free for camera settings, foreground focus or safely wandering off to the bushes for some private time. A red light is recommended so that night vision is kept intact. However, please, please be courteous with your light so as not to destroy fellow photographers’ night vision or image capture. Try to ask if light is ok before turning it on.
• Planisphere or Apps (TPE, Photopills, Stellarium) These tools are very helpful to guide and familiarize the photographer with the night sky. The Planisphere is a round wheel with the map of the stars in the night sky. It can be adjusted
by month, date and time to show the stars at that time. The beauty of the Planisphere is that it is accurate and does not need batteries. I keep one in my car at all times. That said, there are many apps for desktop and mobile devices that assist in planning for meteor captures or any astro landscape
photography for that matter. These are particularly helpful if one cannot scout the location before hand. The more you learn to recognize the stars and constellations the easier it becomes to make last minute on-site adjustments. This recognition comes the more one looks at the stars.
PLANNING
• Calendar – The most important item on the planning checklist is the Meteor Calendar. When do the major meteor showers occur and when is the peak (when the earth passes through the heaviest part of the debris field). This is when most of the meteors are likely to occur and is measured in meteors/hour. Most meteor showers are best seen after midnight, when the radiant point of the shower is high in the sky. When planning the best night to go out, be aware that some sites give the date as the “night of” the peak, and others show the actual date of the peak, which is typically after midnight: ie. the next morning.
A list of the major meteor events is listed below (showing the night of the peak):
• Moon phase – No matter how dark the skies, if the moon is up, the skies will be too bright to see all but the brightest of the meteors. The light from the moon can be mitigated somewhat by photographing at a site where there is a large hill or mountain between you and the moon.
• Dark skies – The darker the skies are, the better chance your camera has of capturing a meteor. There are mobile device apps and websites that will let you know about light pollution and how dark the skies are at or near the area you wish to photograph (see Handy Links at the end of this article) . Clear Dark Sky (www.cleardarksky.com) is a desktop web page I use all the time for forecasts regarding weather and seeing.
They have maps showing many astronomy sites. I bring up their maps and click on the site closest to where I
want to photograph to obtain information about seeing (how clear the sky is based on moisture, light pollution, etc.) Another mobile app, I just started using is called Astrospheric (www.astrospheric.com), which combines the Clear Dark Sky info with satellite maps showing cloud cover and forecasted
movement of those clouds. Dark Site Finder (www.darksitefinder.com) has good maps showing light pollution.
• Weather – Of all the variables not under our control, the weather can quickly put a stop to all meteor photography. Even after you have chosen your meteor shower, found a dark enough sky site, the weather has to be constantly
monitored right up until you walk out the door to photograph. Anything that obscures the sky (clouds, fog, smoke) makes photographing meteors very difficult.
PRE-VISUALIZATION EXAMPLE
The easiest way to address these subjects is to walk through a real-life scenario in which we collaborated to photograph the 2018 Geminid Meteor Shower. Checking the meteor calendar for the year, the peak of the Geminid Shower was
predicted for the 12/14/2018. Both of us live in the San Francisco Bay Area, which is pretty light polluted. To find darker skies, we would have to travel. A weather system
was incoming and clouds were predicted along the coast during the Peak of the Geminid shower.
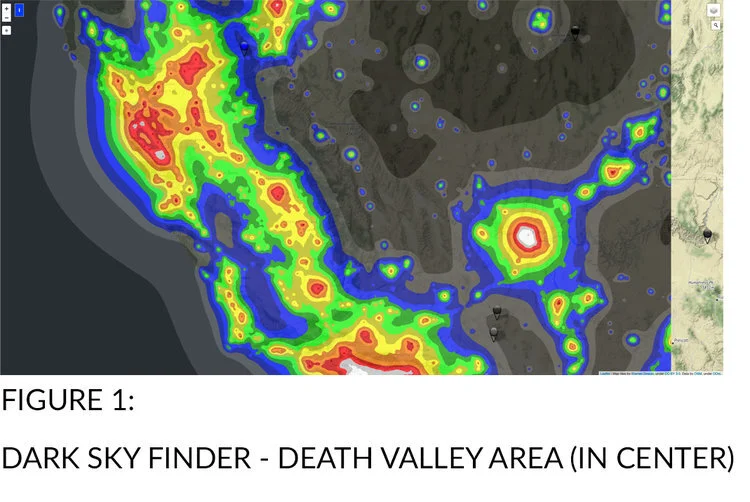
This meant that we would have to turn our dark sky search eastward to try and get ahead of the weather system. According to Dark Sky Finder, Death Valley National
Park, a seven hour drive away seemed like a good spot. (See Figure 1) Checking weather, particularly for cloud cover, there was a window of a couple of hours for mostly clear skies during the time needed. The hourly weather report indicated that later in the morning the percentage of cloud cover would increase. This would have to be closely monitored for changes right up until we got ready to depart.
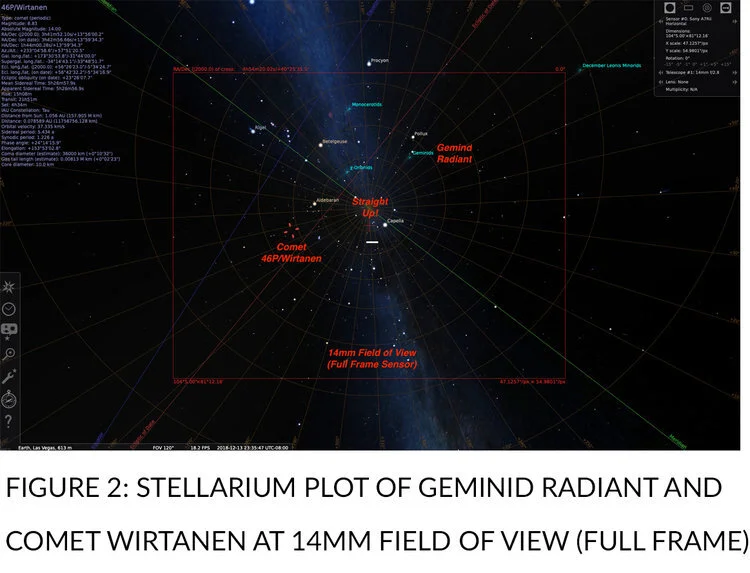
Next, we checked Stellarium for the radiant point or where the meteors would appear to come from. Both of us knew at the time of the peak, the radiant would be high (See Figure 2), nearly overhead. Since we both love astro landscape photography, we wanted a foreground in our images. This would be a challenge with the radiant point so high in the sky. We came up with the idea of using tree canopies as our foreground, similar to what Marsha had done previously with the Milky Way.
As luck would have it, Comet Wirtanen would be visible during the peak as well. Could we get the comet in the same field of view as the radiant point? Stellarium showed us
that we could. Figure 2 below shows the night sky and the field of view with a Rokinon 14 mm 2.8 lens. The Geminid Radiant and Comet Wirtanen, would easily fall within a 14
mm. frame (on a full frame camera). You can also see that the Radiant for the meteors would be nearly straight up at midnight!
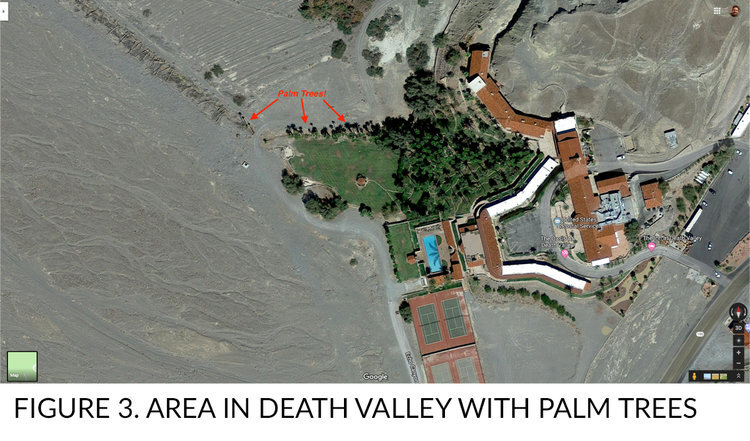
Since the Radiant and Wirtanen were both going to be nearly straight up, we needed to find tall trees to get under to shoot up from. Now, where do you find trees in a desert, like
Death Valley National Park, where we wanted to shoot? The Mesquites are too bushy to see through and the Joshua Trees were too far away to travel to from our base ofoperations in Furnace Creek. Palm Trees would have to do, and they presented a nice silhouette.
This is where Google Maps is a useful tool. We turned on the satellite view and zoomed in looking for likely Palm tree groves. (See Figure 3) These groves, of course, would have to be investigated when we were actually on site.
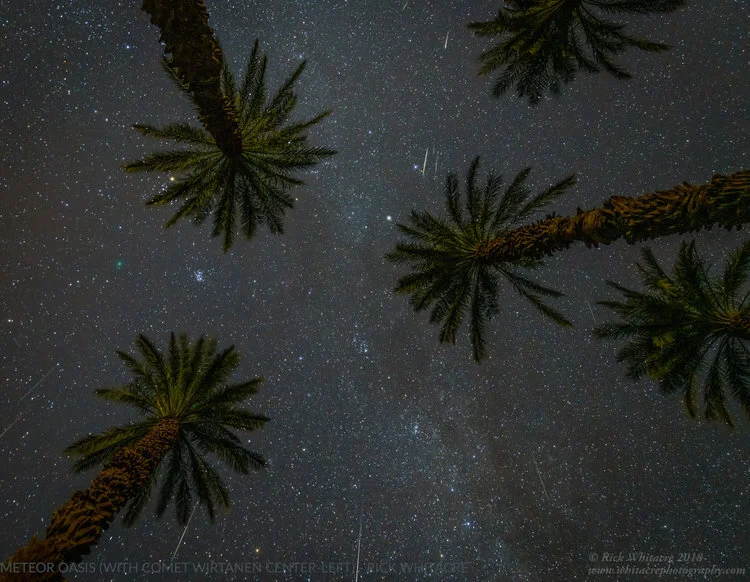
We now had the beginnings of a plan of action for the 2018 Geminid Meteor Shower. I say beginnings, because, once on site, many variables, like fences, No Trespassing signs, dead trees, etc., would make adjustments necessary. If at all possible, it is very important to scout in the day time. In this case, the palm trees at this location were bathed in landscape lights and not ideal. Since we gave ourselves time to scout, however, we did manage to find some trees nearby that worked very well!
CAMERA SET UP RECOMMENDATIONS
A. Set camera to “RAW” for greatest flexibility in post processing.
B. Set ISO to 3200 or 6400 depending on how well your camera handles noise.
For cameras like the Sony A7S, you can even use ISO12,800.
C. Install a large, empty memory card. You need room for 120-180 images for
every hour of shooting.
D. Set the exposure mode to Bulb and connect your intervalometer (remote timer). If your caera has a built in intervalometer that will take back-to-back 20-30 second exposures for many hours, you can use that. Unfortunately, most cameras do not yet have built-in intervalometers capable of doing this. Test it before leaving home!
E. Use a wide angle lens to capture more of the sky. Focal lengths between 14-24mm (full frame equivalent) are recommended.
F. Set the Aperture to its widest setting; ideally f/1.4 - f/2.8 for capturing meteor streaks. You may want to stop down 1-2 stops for a sharper foreground image for blending in later, but shoot wide open for the meteors.
G. Intervalometer settings:
a. Delay: 2-5 seconds to give you time to secure the intervalometer. b. Exposure: 15-30 seconds to avoid clipping any meteors while not streaking the stars too much. We use the 400/Equiv Focal Length rule. Others use the 500/FL rule, which is a little looser: https:// shuttermuse.com/how-to-avoid-star-trails/ c. Interval: 1 second between shots. d. Number: Set to “- -“ which is below 1 and stands for infinity. The timer will continue until you stop it.
e. Beep: Off. Please don’t disturb others with the constant beeping.
H. Set the lens to Manual Focus and focus manually on the stars using Live View.
I. Set White Balance to something between 3500-4000K (or Incandescent) so the images will look natural when viewing on the LCD. When shooting RAW, it really doesn’t matter, but that is what we do.
J. Use the lens hood to reduce dew buildup on the front element and minimize impact from stray lights.
K. Make sure that LENR (Long Exposure Noise Reduction) is off.
L. Remove any lens filters to reduce stray light bouncing around.
M. Turn off Image Stabilization (IS, VR, OSS) since you are on a tripod.
N. If using a DSLR, turn off mirror lockup.
O. Install fresh battery or connect your extended battery pack for all-night shooting. If using batteries, have 1-2 spares warming up in your pocket.
COMPOSITION
As in most photography, composition is the most important aspect. Compose your scene with a strong, interesting foreground with as much sky as possible. While meteors can be
seen in all portions of the sky during a shower, most will originate from the radiant. If you want to create a composite image with several meteors aligned to the radiant (as in
the first image of the 2016 Perseid Meteor Shower), you will want to include the radiant in your composition. Since the radiant will appear to move during the night due to the
earth’s rotation, you will need to visualize where the radiant will arc through your chosen composition and make sure it stays in or near your field of view for most of the night.
There are many desktop and smart phone apps that can help you with this. Additionally, to help with aligning the meteors around the radiant in post-processing, try to include the
North Star (Polaris) in your composition if possible. The North Star will not move significantly during the night in the Northern Hemisphere. Your foreground, movement of
the radiant, and location of the North Star are important considerations when selecting the camera orientation if planning to do a radiant composite(See Time Shift Comparison). If
you plan to collect random meteors, the position of the radiant and the North Star is less important. Both vertical and horizontal orientations can be used.
Since the camera settings for meteors are very similar to those used to capture the Milky Way, you can combine the Milky Way with meteors very effectively. The Perseids, for
example, originate in the northern arm of the summer Milky Way. With a little luck, you might be able to capture a meteor with the Galactic Center of the Milky Way.
TECHNIQUE
Once a composition has been determined, take a test shot at high ISO to confirm. Make sure your camera is level and the tripod stable. Focus on the brightest stars using 10X
LiveView, or set the focus manually on the lens at the pre-determined infinity or hyperfocal locations. Confirm sharp star focus on a test image. Zoom in and use a Hoodman or or magnifier if available.
With composition and focus set, we recommend you take a low-ISO, long exposure shot to have for possible future compositing in Photoshop. The stars will streak, of course, but
this will give you a low-noise, well lit foreground image to composite into your meteor shots in post-processing. This is especially effective if the moon is just setting or just
before twilight begins and the sky is still providing light on the foreground.
Confirm your camera settings for meteor capture (Bulb, high ISO, wide open aperture) and set your intervalometer to take an infinite (or very large) number of shots of 15-30 second duration (400 / FL rule) with 1 second between exposures. Put a fresh, full battery in the camera or hook up an external battery pack for all-night power. Insure that you have a large, empty memory card in your camera.
Start the intervalometer and insure that camera is functioning and taking successive images. Check the lens periodically for dew buildup and gently wipe it off if it appears. Periodically check your battery level and swap in fresh batteries as required. Lay back and enjoy the show!
After your sequence is done, it is always a good idea to take another low-ISO, long exposure image to use for blending in post-processing. This is especially true if your camera may have been bumped or if the moon has risen and provided some light on the foreground.
POST PROCESSING
Post processing your meteor images breaks down into the following steps:
A. Import your images from the meteor shower into your favorite image processor (like Lightroom). Select one of the images from near the middle of the night and process it
like you would a Milky Way or star image (white balance, highlights, shadows, noise reduction, clarity, etc). Copy these settings to all of the other images in the series.
B. Review every image in the series and mark those that contain meteor streaks. You can use the Lightroom “star” system or any other system that allows you to separate the
images with meteors from all the others that do not contain meteors.
C. Export all the images with meteors into Photoshop as Layers. From Lightroom, this is done by selecting all the images that have meteors and going to Photo > Edit In >
Open as Layers in Photoshop...
D. Change the Blend Mode of all the layers to Lighten Mode. This will result in a very messy image, but one that shows all the meteors. This will start to give you an idea of
what your image might look like. The image is messy because the stars from each layer are showing through and since the stars moved from one exposure to the next, they appear over and over again in different spots. We will get rid of all but one of the star fields in the following steps.
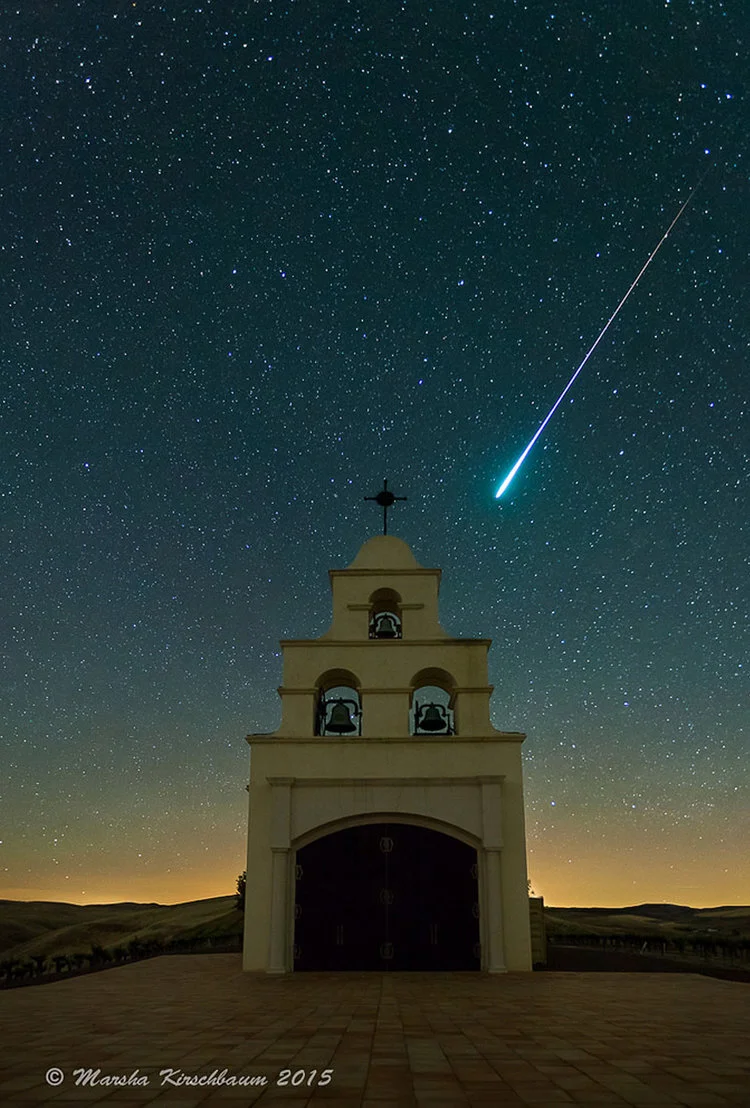
E. Choose one of the layers to be the Base Layer. This can be the layer with the best meteor or a layer where the Radiant is in the best spot, etc. Try to pick a layer that
does not have any airplane trails for your Base Layer. It makes life easier. We recommend picking one from near the middle of the shoot if possible.
F. Change the Blend Mode of the Base Layer to Normal Mode and rename it to “Base Layer” so you don’t get confused. Move it to the bottom of the Layer stack.
G. Decide if you want to composite all the meteors as they occurred during the night or “time-shift” them so all of the meteors point back to the radiant of the Base Layer.
Time-shifting can create a more uniform image, but non time-shifted images will have more meteors (because some will get time-shifted out of the frame). Perform the timeshifting if desired (see section below for instructions).
H. Make all the Layers invisible (turn off the eye ball) except for the Base Layer and the first meteor layer you want to work on. Click the "Add Mask" icon or go to menu
Layer > Layer Mask > Reveal All. Get a small, medium edge brush, and using black "ink" paint over the meteor in this layer mask until it disappears. With the layer mask
still selected, do an Image > Adjustments > Invert (Shortcut Cntr/Cmd-I) to invert the layer mask to reveal only the meteor.
I. Correct for any halo that might show up around the meteor. Depending on what time of night, or what portion of sky the meteor came from, you may need to adjust it to get to blend into the Base Layer properly. The biggest problem is usually a bright halo around the meteor. To fix this, add a Curves Adjustment Layer as a Clipping Mask to the layer (go up to the Layer menu in the Menu Bar and choose New Adjustment Layer, select Curves, and check the box “use Previous Layer to Create Clipping Mask”). Then, adjust the black point on the curve until the halo disappears.
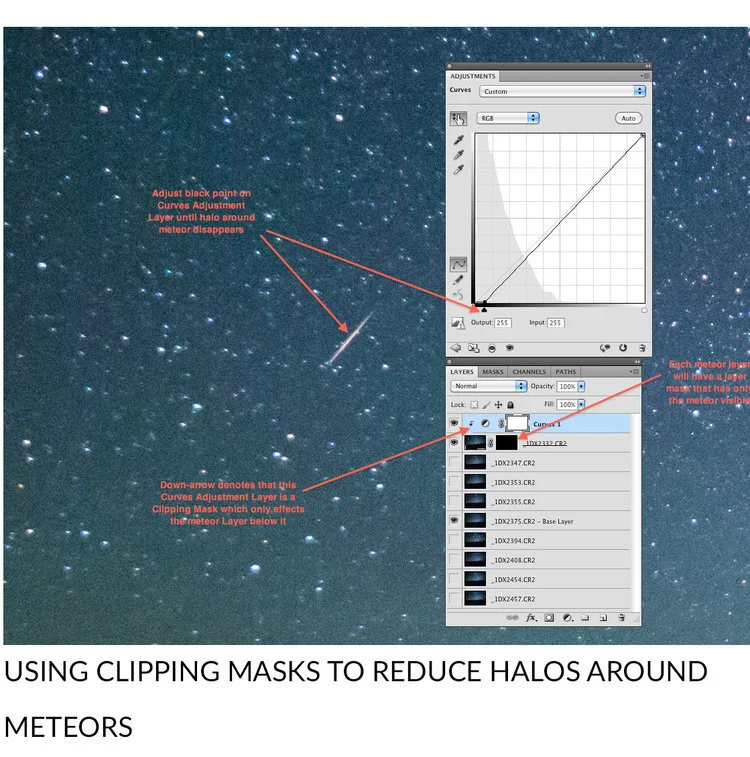
J. Repeat Steps H and I for all the other meteor layers. When complete, you should have only one star field (from the Base Layer) with all the meteors showing up from the
other layers. Take a good look at your image and decide if any of the meteors are distracting (like they cross each other) or are too close to the edge, etc. Try turning their layer visibility on and off to see if your image is helped or hurt by having it.
Leave the eyeball off if you don’t like it.
K. Once you are completely happy with your meteor composite, Flatten the image and Save it. An image with 30-50-meteor layers is too large to save without flattening it.
L. Blend in one of your lower ISO, longer exposure, images for a cleaner, brighter foreground if desired.
M. Finish processing the image by dodging, burning, cloning, and adding clarity, contrast, noise reduction, etc as desired in either Photoshop or Lightroom.
TIME-SHIFTING METEORS
If your composition includes the North Star, locate it. This will be the reference for timeshifting all the other layers to match the Base Layer. If the North Star does not appear in your composition, estimate where it is and use that side or corner as a rough approximation. If you are comfortable with adding more canvas to your image, you can add enough canvas to include a "virtual" north star for reference and use that.
Turn off all of the layers except for the Base Layer and the first layer that you want to time-shift into place. With the first meteor layer highlighted in the Layer Palette, go to
menu Edit / Free Transform (shortcut Ctrl/Cmd-T). In the middle of the layer is a rotation mark. Move that mark to the North Star and drop it there. Now, when you rotate this layer, it will rotate around the North Star, similar to what happened during the meteor shower. Rotate the layer until the star pattern of this layer lines up with the star pattern of the Base Layer. It won't be exact due to lens distortion, but you should be able to get close. Double check by seeing that the meteor on the layer you are rotating points to the same area as the one on the Base Layer. When happy with the alignment, click the checkmark symbol near the top to complete the Transform. Now add a mask to that layer, use a black brush to paint over the meteor (make it disappear) and then invert that layer mask to make the meteor re-appear, but hide everything else from that layer. If there is a halo around the meteor, use a Curves Clipping Mask as detailed above.
Once satisfied with the first meteor, make the next meteor layer visible and repeat the Transform process to time-shift it into place. Mask out the meteor, invert the layer mask so that only the meteor shows, and use a Curves Clipping Mask to blend if necessary. Repeat for all the rest of the meteor layers.
It is not uncommon to have meteors that get time-shifted right off the edge or get placed on top of mountains and trees. Unfortunately, you will have to delete these layers and move on to the next one. If you find that you are throwing too many meteors away, you may want to start over and pick a new Base Layer to align all the other meteors to. This is the reason it usually works best to pick a middle image as your Base Layer if possible.
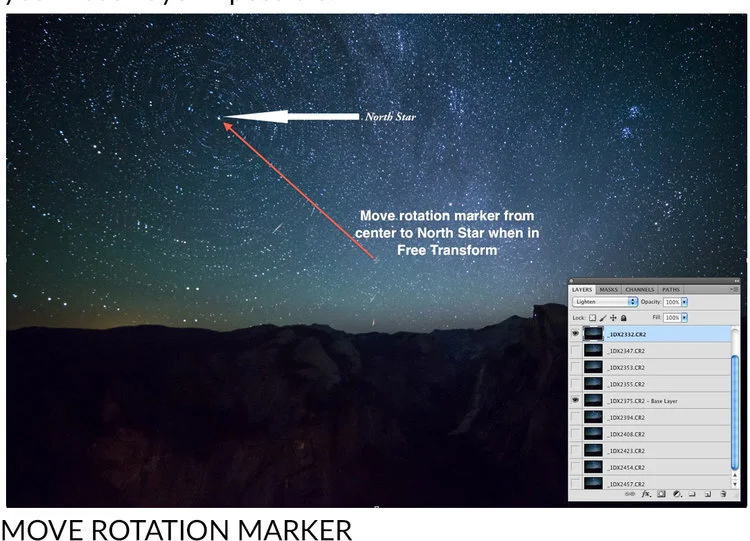
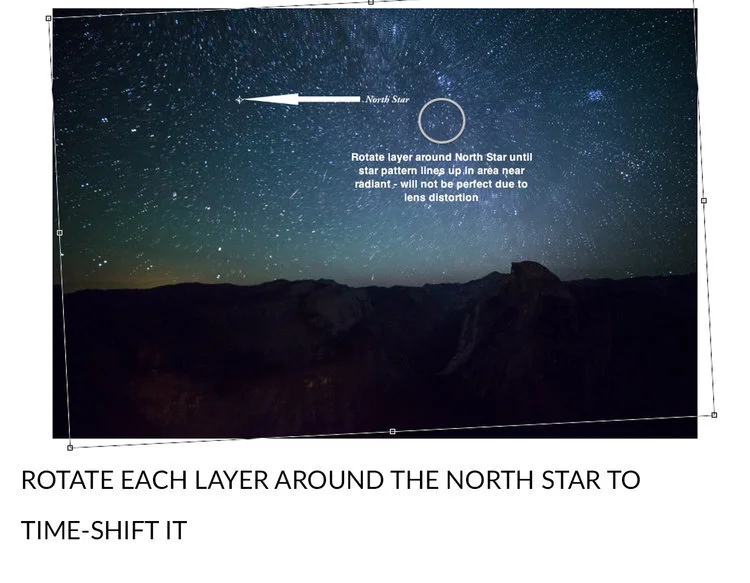

ABOUT THE AUTHORS
Marsha Kirschbaum is a San Francisco Bay Area fine art landscape and astro landscape photographer. She says about her night photography “The mystery and magic of night
photography is especially powerful for me. I would like to awaken the viewer through my night photography to its visual possibilities, the excitement and wonder of a meteor
shower, the joy of the sparkling stars reflecting in a mountain lake or the quiet serenity the night’s dark silence can bring. The natural world and its connection to the universe at
large fills me with wonder and gratitude. We have been given the gift of this amazing planet and through my photography, I hope to share its beauty, inspire a hike, or entice a relaxing moment gazing skyward at the stars.”
Marsha’s photography can be found at:
Lighting a Milky Way Scene with a Drone: Abducted By Aliens
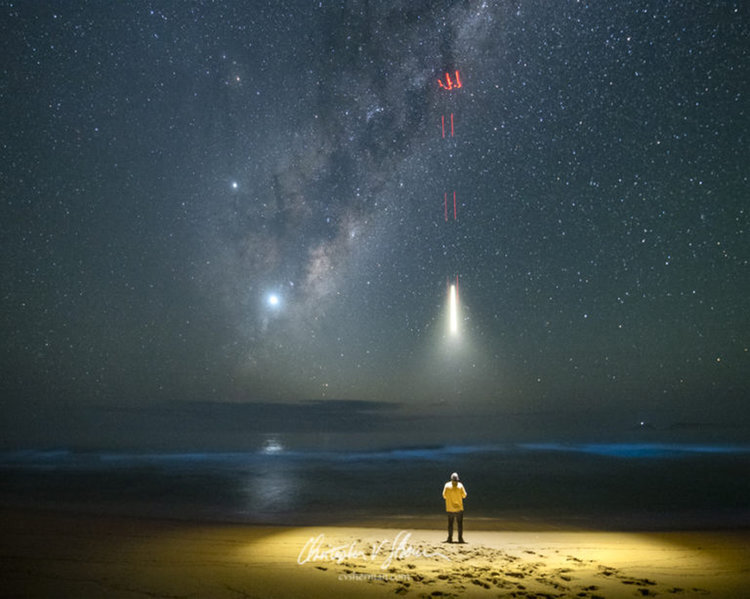
Alien Abduction. D850. 10 second exposure. f/2.8. 10000 ISO. Lit with the Mavic Pro 2 landing light for just a fraction of a
second as the drone flew straight up. Photo by Christopher V. Sherman
Christopher V Sherman is a commercial and fine arts photographer. In February 2018 he put 99% of his belongings in storage in Austin, Texas in order to travel. He tries to post a photo a day on Twitter, Instagram and Facebook. And when he has something more in depth to share you can find it here. More about Chris can be found on the about page.
Early one morning, while gazing at our amazing Milky Way galaxy, on a beach, on the shore the Tasman Sea in eastern Australia, I was swiftly and briefly beamed up and then returned. It was caught on camera in this epic photo. No, that’s not a drone with a light under it. And no, no alien probes were used during my brief captivity. That’s my story and I’m sticking to it.
…. Okay, yes, that is that is a drone. This was my first attempt at lighting a scene with a drone.
The image was shot with a Nikon D850 on a tripod with a Tamron 15-30mm lens.
The drone used was the DJI Mavic 2 Pro. The red lights are the Mavic’s rear lights. They’re red because I had less than 30% battery remaining at the time. Usually they’re green. The main beam is the Mavic’s landing/takeoff light.
I kept this simple, using the Mavic 2 Pro’s built-in landing/takoff light. The light goes on automatically in dusk or night situations, during takeoff and landing.
A light sea fog stretched along the beach, creating less than desirable astro shooting conditions. It wasn’t thick, but it was enough to significantly reduce sharpness in the stars. At the same time it gave off an interesting hazy glow with the white drone light on.
Since I wanted to capture this in a single image with the Milky Way in the background, I had to time the shutter with the drone so that the drone light was only lit for a fraction of a second while the shutter was open otherwise I’d blowout the entire beach.
At the time I didn’t know if these lights were controllable by the pilot or if they were automatic only. I’ve since discovered that they can indeed be turned on and off by the pilot in the DJI app.
Not knowing this at the time, I had to rely on the Mavic lights being automatically activated by the bottom sensors when it was near landing or take off. And with that in mind I had to time the drone’s climb or decent with the Mavic controls in one hand and the D850’s remote shutter trigger with the other. Not knowing exactly when the landing light would come on meant this took several takes before I got the timing right and an even exposure.
I would have liked to have taken the drone higher to light more of the beach but it would automatically shut off on it’s own at it’s predetermined altitude. Now that I know that the pilot can control these lights in the app, I look forward to additional experimenting as time permits.
DODGE Astrophotography
by Murray Fox
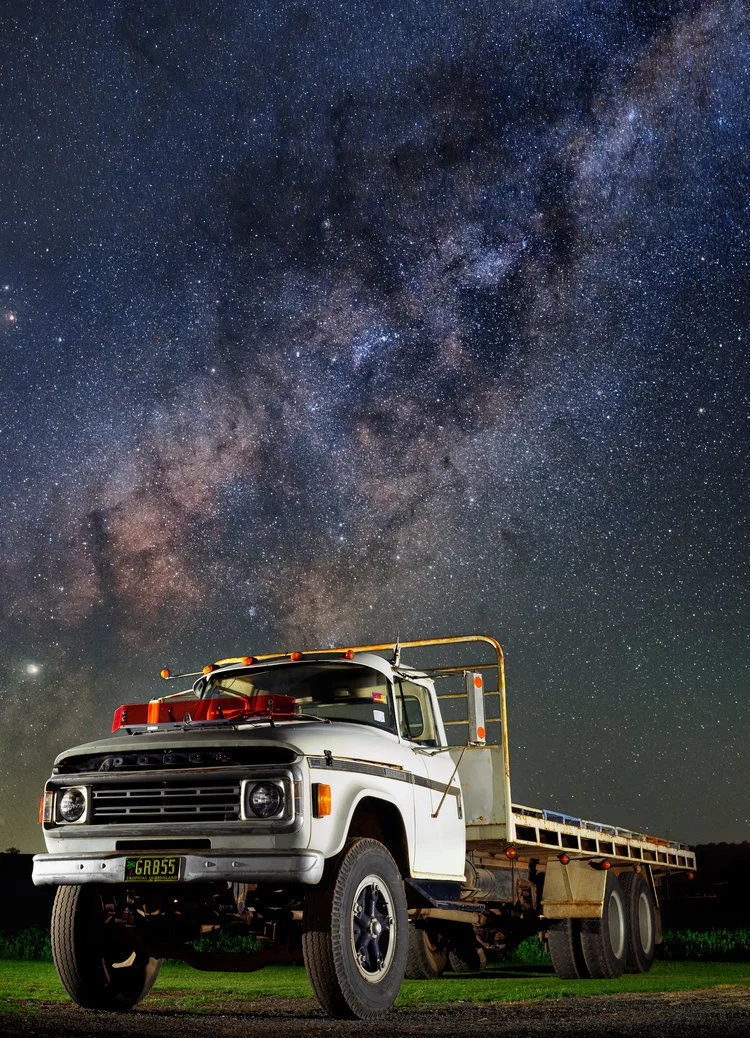
The astro photography season is back for Australia! Actually it's been back for a while now but we simply haven't had any clear nights around home.
Finally, the predictions were looking good for a clear window. I met up with a very good friend Craig Bachmann and we had a hit list of subjects to photograph. The first subject for the night was an absolute ripper as well! This stunning 1978 Dodge D5N 600 series V8 Petrol truck. Over the years it has been used to cart various produce from spuds and onions to the Rocklea Markets in Brisbane, to watermelons and lucerne for local supply in the Lockyer Valley. You don't get fresher than that, and I couldn't think of a cooler way to transport the goods!
We had the truck perfectly positioned in front of the farmers current lucerne crop and starting out, we spent our time light painting the truck with our torches as we waited for the core of the milkyway rising behind to be in perfect position.
Finally after an hour of painting and tweaking the composition it was time to photograph the core, and OMG the result was simply amazing! Not a single puff of cloud in the night sky, the temperature was absolutely perfect, just at the point of chilly, but not cold enough for fog, mist or warm enough for haze. The clarity was the best I can remember ever seeing to be honest. When I finished editing this, I immediately sent this to Craig and said "SHOW YOUR DAD!!". Honestly, I was gob smacked myself.
This is without a doubt, the best astro photograph I've captured to date. Everything I wanted to achieve in this photograph I did. From the complete lack of noise, to amazing sharpness, detail and colour, absolutely perfect to me. I've never seen the dust lanes of the core like that! Blown away. However, the night was only just getting started and our second target was a beauty as well. This is a 270hp Case Optum. With 4 massive rear wheels on this sucker, it has no issues getting through the fields. The farmer grows Cauliflowers, sugerloaf, and red & green cabbage.
It was a little tricky to get the right framing on this. Ideally I wanted the tractor a little more front on but that wasn't to be this night. I ended up with my camera on top of pallets next to the shed, and had to be extremely careful not to bump anything, always fun when your doing long exposures. I do want to shoot this beast from head on as well, really emphasise those rear wheels, so we'll be back one night soon to go again.
A lot of work has gone into these photograph. There was the initial planning, going over google maps, checking the direction and timing of the milky way using apps like Photopills and the photographers ephemeris. Constant watching of weather apps to see what the clouds were doing. At home when I left to head out, it was cloudy, but on location, it was perfect, so don't trust what is out your window, do the wider research and checking and take the shot. Post processing time was lengthy as well. Blending the light panting photographs with the sky took time and then working through my finishing steps was the final step.
It's funny when I take a photograph like this. I work and learn my techniques. I visualise what result I can get. I shoot on location with that visualisation and my technical knowledge to ensure I have the best chance of getting a good result. But during post processing, it's not about editing to get that result. Instead I let the photograph take me on a journey. This photograph really led me along, each step was just bringing out the best of each part, making sure things were technically correct (for me) but not knowing where I was going to end up.
When I finally stopped and sat back, not a word of a lie, my jaw dropped. I couldn't quite believe I created this photograph. It's on the printer now, it's going on the wall, I don't care whether it gets a bazillion or no likes, this was about my art, my photography. I had a vision, and I exceeded it, and I'm simply ecstatic.
The gear used for these photographs, if purchased today, is is by no means expensive. Camera used is a Sony A7, easy to pick up for under $800 used these days. The lens is an old Minolta 45mm F2.8 medium format film lens (for the 645 series of film cameras) that can be picked up used on Ebay for around $200. With a cheap $20 adapter. This lens has an equivalent focal length of 28mm on a full frame camera like the A7. Not exactly super wide, but with a full frame camera, and the amazing sharpness of this lens, it really works for this kind of photograph.
Both photos are a panorama. Shot horizontally starting at the bottom I initially take a light painted exposure, focused on subject, settings around ISO 500, F5 (for depth of field) and 20 seconds. We run around with torches during the exposure painting the subject with light. Then I adjust my settings being very careful not to move the camera. Increased ISO to 6400, Shutter to 8 seconds (at 28mm this is as long as you can go without stars starting to blur from movement), aperture at F2.8 (wide open) and refocused on the stars. I take a photo, then move the camera up, taking 2 more photos panning the camera up each time. Total of 3 images to create the panorama. In post processing I blend the bottom two photos (stars and subject) together then stitch with the other star photos and begin my final post processing.
I get a lot of enjoyment out of seeing what comes out the end of all of this process. I grew up in the city, never really saw the stars much less farm equipment. Now, I actively seek out these subjects and locations, as they are truly amazing.
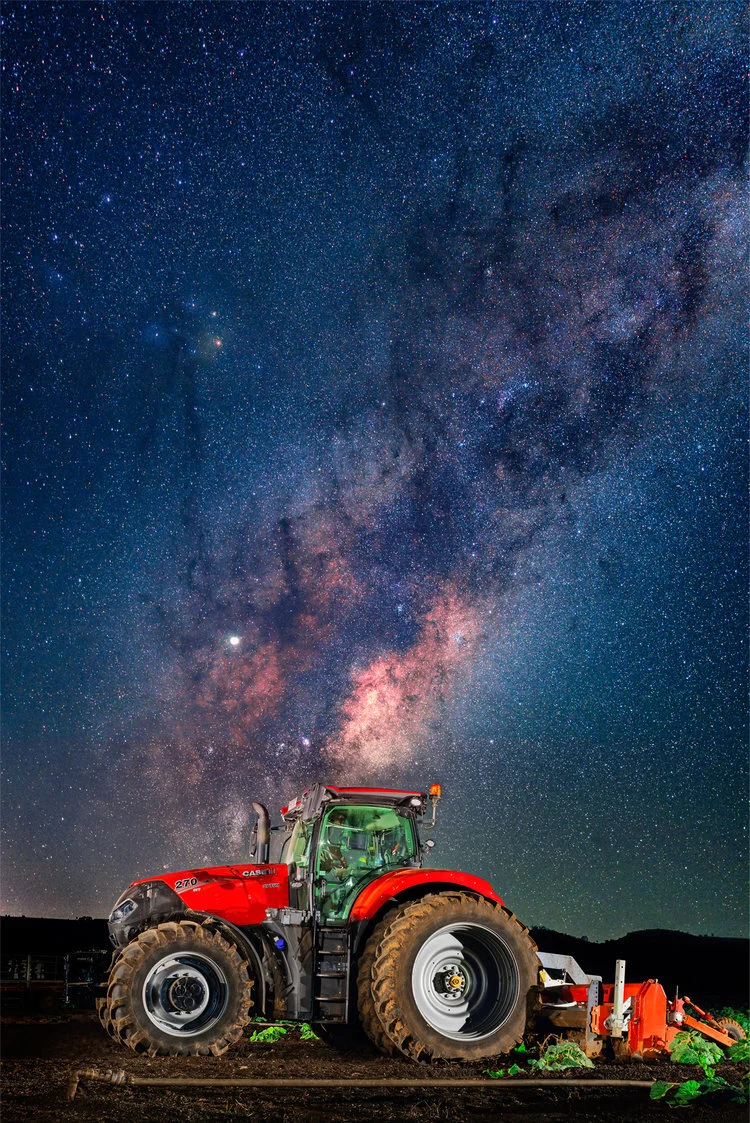
Nightscapes using AstroTrac Tracking Mount
by Steve Perry
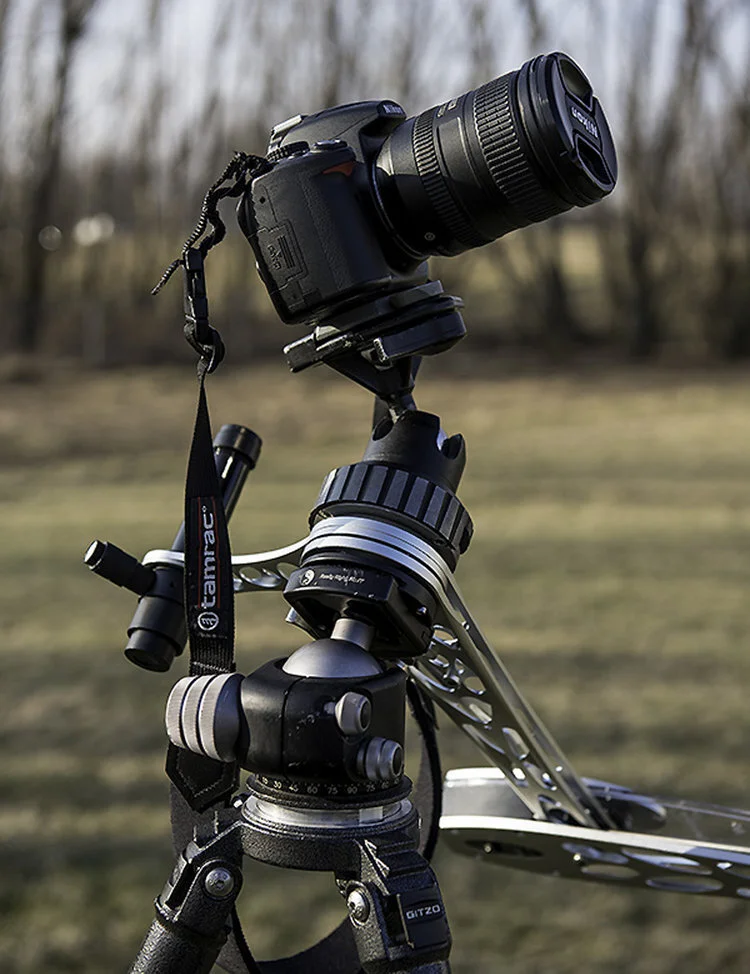
Like most landscape photographers, I look forward to amazing clouds at sunset. There’s just nothing quite like a dramatic sky and a successful image to close out the day. On the other hand, there’s nothing quite as discouraging as facing a bland, barren sky as the sun slides towards the horizon. Or at least that’s the way I used to think… Everything changed one crystal clear night in the backcountry of Northern Michigan. I had been plagued by a week of cloudless sunsets and out of sheer frustration to get something on the memory card, I finally decided to attempt some star trails. That did it – I was hooked. Little did I know star trails were the gateway drug for nighttime landscape photography! However, it didn’t take long to figure out that star trails can get tedious if they are the centerpiece of EVERY nighttime shot you make. (A conclusion arrived at, in part, by my family grumbling, “Seriously, star trails AGAIN??”)
I came to a point where I wanted to capture the night sky the way I saw it – without trails and maybe with the long arm of the Milky Way reaching through the frame. I started without the aid of a tracking device but quickly discovered the stars would trail ruthlessly on my 24MP Nikon D3x – and the high ISO wasn’t so hot either. I soon graduated to a D800, but its tightly packed pixels happily showed trails for any exposure over 20 seconds – even with wider lenses.
On top of that, I really wanted to keep the ISO to 1600 or less. Many of my clients purchase large prints, and heavy noise just wasn’t an option. Even more importantly, I also wanted to gather more luminance from the night sky. I envisioned crisp stars normally invisible to the naked eye making appearances in my frame, as well as galaxies and even an occasional nebula from time to time. Sure, some stellar phenomena might be tiny in the final photo, but I wanted the viewer to “discover” them when they were viewing a large print.
So, I did a little research and decided I needed a tracking device of some sort. Options varied wildly from expensive mounts for telescopes to DIY kits that could (allegedly) be put together for lunch money. Then I stumbled upon the AstroTrac TT320X-AG Kit. While it isn’t cheap, (coming in at just over $700) it seemed easy to setup and it was designed specifically for photography.
Before long, I was the proud owner of the following kit:
AstroTrac TT320X-AG
AstroTrac Illuminated Polar Scope
AstroTrac 12v car adapter
AstroTrac 12v “AA” Battery Pack
If you decide to purchase one of these for yourself be sure to get all the accessories listed above. I discovered some companies sell them separately and you really need everything listed to pull this off (except for maybe the 12v car adapter which, ironically, was the only accessory that was included with my AstroTrac.)
The unit itself is built really well and much more robust than I expected. When I ordered it I anticipated a frail device that would need significant cushioning every step of the way. And though I’d hesitate to let it bounce around in my truck and I certainly wouldn’t want to drop it, I’m very impressed with the overall build quality.
Using the AstroTrac was surprisingly easy. Initially I was intimated by all the talk of proper polar alignment, adjusting azimuth and altitude, but it’s actually pretty simple as long as you have a rudimentary knowledge of the night sky. The first challenge was mounting the thing to my tripod – Here’s that setup in detail. First, keep in mind that with the entire rig put together and a camera perched on top, it’s not exactly a featherweight. I highly recommend starting with a very solid tripod paired with a very sturdy ball head (if your ball head “drifts” under load this will NOT work). I use a Gitzo 3 series and a Really Right Stuff BH-55 Ball Head.
(Note on the ball head – I think if you happen to have a dedicated tripod for this, mounting the AstroTrac to a pan head or geared head would make alignment a much easier proposition. I just don’t want to carry yet another tripod when I travel!)
I also wanted the ability to quickly mount the AstroTrac to my tripod head, so I needed some sort of quick release that would fit the 3/8” socket on the unit. The folks at RRS had a solution – a TH-DVTL-55 quick release plate. That’s when I came across the first problem. The AstroTrac is a narrow device and the screw that comes with the RRS plate is just a bit too long, bottoming out before the plate is tight. A large washer was all it took to save the day.
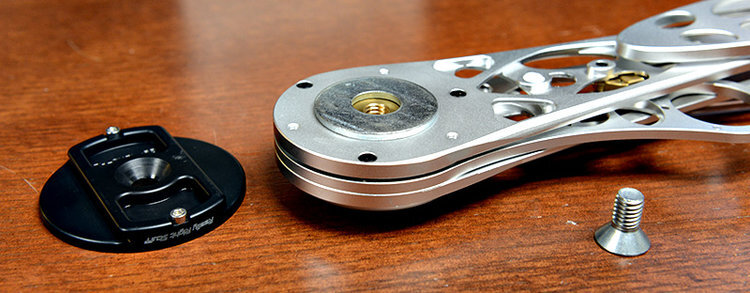
Astro-Trac-Quick-Release-Washer-Mt
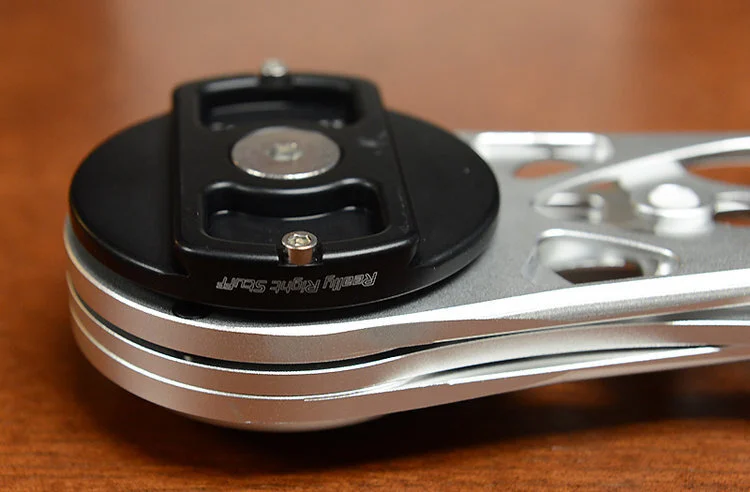
The next glaring problem is that you actually need a way to mount the camera to the rig, now that your tripod head is being used to support the AstroTrac.
My solution was a retired – but good quality – ball head that had been collecting dust in my closet. I mounted this to the AstroTrac then the quick release to the camera so my setup looks like this:
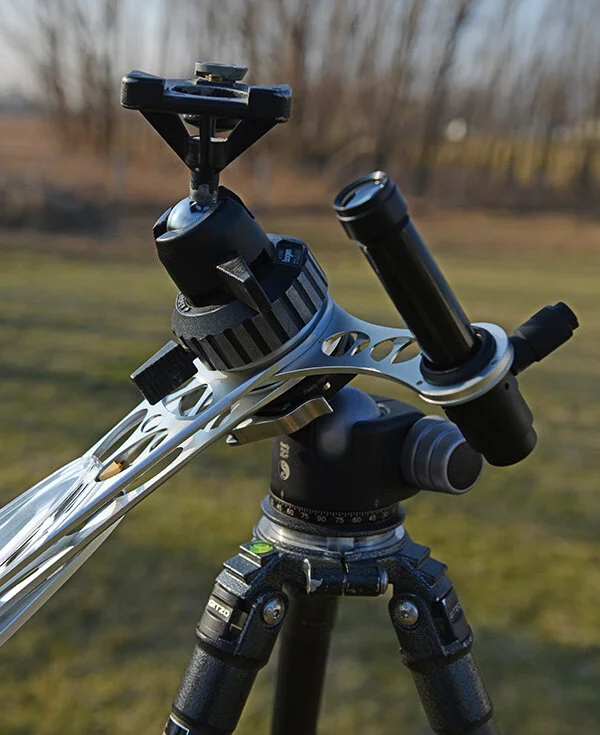
Once you’re to this point, it's time to get ready to shoot!
I recommend waiting until at least an hour and a half after sunset before you begin. I quickly discovered when I first started doing stars that just because you can see them doesn’t mean it’s dark enough for long exposures. I’ve had the sky blow out to completely white on some “impatient” evenings when I thought it was dark enough.
Next, you need to do a polar alignment. In the simplest terms, this just means pointing the AstroTrac squarely at Polaris, the North Star. The instructions go into great detail about the procedure, so I’ll just note some highlights and pitfalls below.
To get started I recommend sort of “squaring up” the AstroTrac so it’s pointing roughly north and angled toward Polaris. I also suggest doing your alignment without the extra weight of the camera on the rig.
Mount the scope to the AstroTrac, noting that it comes in from the bottom, and that it’s VERY susceptible to falling out. The magnetic base is just enough to hold it, but no more. Mine has already hit the ground a time or two, so now I remove it after I get everything aligned. It’s just too easy to bump it unintentionally in the dark. (I might assemble some sort of “safety line” for it down the road.)
At one point in the procedure you’ll need to get Polaris into a little “notch” in the scope. I found that it helps to start by spotting along the top of the scope to make sure you’re in the astronomical ballpark. Also, I found it helpful to turn down the illumination a bit once I start using the scope to actually align the unit (can’t see the stars with it turned all the way up). The closer you get Polaris to that notch, the better the tracking.
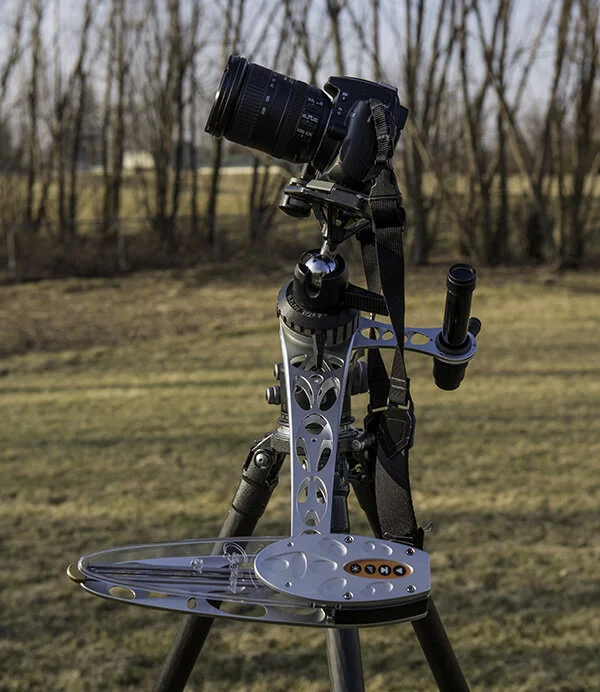
In my experience (shooting wide angle with 4 – 8 minute exposures) as long as I was close to the notch I was getting acceptable tracking. The longer your exposure and focal length, the more accurate you need to be with your placement. There’s a “fine tuning” section in the instruction manual to help.
Once everything is set, carefully mount the camera to the rig (if you bump the tripod, you get to start over – a lesson I learned the hard way one 20 degree below zero night at Bryce Canyon!)
From there, it’s time to experiment. I like to start with a high ISO shot (6400) for 30 seconds just to make sure the stars are sharp and I’m getting what I want in the frame (one of the first things you learn with astrophotography is that composition at night can be a bit tricky when your viewfinder is pitch black).
Once I’m happy with my test shot, I lower the ISO to 1600 and shoot for about 4 minutes at F/2.8. Of course, you can experiment with different combos until you get the look you’re after. Some areas of the sky seem to need longer exposures than others. Keep in mind that your exposure can render a fairly bright image, so be sure you aren’t actually blowing out areas of the night sky (like nebulas). The horizon can be especially troublesome if you’re near a populated area.
Oh, and get ready to grin. When you glance at your LCD and see the sheer volume of stars and celestial detail this rig can capture it will literally blow you away! I remember just standing there with my jaw gaping over the first image – I couldn’t believe what I was seeing! Crisp stars, nebulas, and even galaxies were all right there. Pretty amazing.
Here are a couple samples from my first night experimenting with the AstroTrac (the second one had better Polar alignment than the first). These are just quickly processed in Lightroom with not much adjustment beyond a blackpoint and a little contrast. Note that I have not done any real color correction or noise reduction in these images. Both at ISO 1600, F/2.8. The first is around 4 minutes, the second a half stop longer at 6 minutes.
Once back on the computer, I pull the exposure back and / or set a black point. This gives a more realistic version of the sky plus lowers the noise level quite a bit.
While out in the field you might also consider shooting a “dark frame” or two while you’re there to help reduce noise. I've not done a lot of dark frame subtraction, so I’ll let you Google that one. (Hint – a free program called “Deep Sky Stacker” can help a lot.)
That said, even at ISO 1600 once I pulled the exposure down I was very happy with the noise level - no dark frames required. (Note: I’ve also been shooting in winter where noise from excess heat isn’t a big problem, your warm summer shootin’ mileage may vary.)
As a final caution, keep in mind that the camera is moving during the exposure, so the ground and anything anchored to it is going to end up blurry. If you’re trying to include a landscape with the stars you’ll have to shoot it separately.
AstroTrac TT320X-AG
Introduction:
Like most landscape photographers, I look forward to amazing clouds at sunset. There’s just nothing quite like a dramatic sky and a successful image to close out the day. On the other hand, there’s nothing quite as discouraging as facing a bland, barren sky as the sun slides towards the horizon. Or at least that’s the way I used to think… Everything changed one crystal clear night in the backcountry of Northern Michigan. I had been plagued by a week of cloudless sunsets and out of sheer frustration to get something on the memory card, I finally decided to attempt some star trails. That did it – I was hooked. Little did I know star trails were the gateway drug for nighttime landscape photography! However, it didn’t take long to figure out that star trails can get tedious if they are the centerpiece of EVERY nighttime shot you make. (A conclusion arrived at, in part, by my family grumbling, “Seriously, star trails AGAIN??”)
I came to a point where I wanted to capture the night sky the way I saw it – without trails and maybe with the long arm of the Milky Way reaching through the frame. I started without the aid of a tracking device but quickly discovered the stars would trail ruthlessly on my 24MP Nikon D3x – and the high ISO wasn’t so hot either. I soon graduated to a D800, but its tightly packed pixels happily showed trails for any exposure over 20 seconds – even with wider lenses.
On top of that, I really wanted to keep the ISO to 1600 or less. Many of my clients purchase large prints, and heavy noise just wasn’t an option. Even more importantly, I also wanted to gather more luminance from the night sky. I envisioned crisp stars normally invisible to the naked eye making appearances in my frame, as well as galaxies and even an occasional nebula from time to time. Sure, some stellar phenomena might be tiny in the final photo, but I wanted the viewer to “discover” them when they were viewing a large print.
So, I did a little research and decided I needed a tracking device of some sort. Options varied wildly from expensive mounts for telescopes to DIY kits that could (allegedly) be put together for lunch money. Then I stumbled upon the AstroTrac TT320X-AG Kit. While it isn’t cheap, (coming in at just over $700) it seemed easy to setup and it was designed specifically for photography.
Before long, I was the proud owner of the following kit:
AstroTrac TT320X-AG
AstroTrac Illuminated Polar Scope
AstroTrac 12v car adapter
AstroTrac 12v “AA” Battery Pack
If you decide to purchase one of these for yourself be sure to get all the accessories listed above. I discovered some companies sell them separately and you really need everything listed to pull this off (except for maybe the 12v car adapter which, ironically, was the only accessory that was included with my AstroTrac.)
The unit itself is built really well and much more robust than I expected. When I ordered it I anticipated a frail device that would need significant cushioning every step of the way. And though I’d hesitate to let it bounce around in my truck and I certainly wouldn’t want to drop it, I’m very impressed with the overall build quality.
Using the AstroTrac was surprisingly easy. Initially I was intimated by all the talk of proper polar alignment, adjusting azimuth and altitude, but it’s actually pretty simple as long as you have a rudimentary knowledge of the night sky. The first challenge was mounting the thing to my tripod – Here’s that setup in detail. First, keep in mind that with the entire rig put together and a camera perched on top, it’s not exactly a featherweight. I highly recommend starting with a very solid tripod paired with a very sturdy ball head (if your ball head “drifts” under load this will NOT work). I use a Gitzo 3 series and a Really Right Stuff BH-55 Ball Head.
(Note on the ball head – I think if you happen to have a dedicated tripod for this, mounting the AstroTrac to a pan head or geared head would make alignment a much easier proposition. I just don’t want to carry yet another tripod when I travel!)
I also wanted the ability to quickly mount the AstroTrac to my tripod head, so I needed some sort of quick release that would fit the 3/8” socket on the unit. The folks at RRS had a solution – a TH-DVTL-55 quick release plate. That’s when I came across the first problem. The AstroTrac is a narrow device and the screw that comes with the RRS plate is just a bit too long, bottoming out before the plate is tight. A large washer was all it took to save the day.
The next glaring problem is that you actually need a way to mount the camera to the rig, now that your tripod head is being used to support the AstroTrac.
My solution was a retired – but good quality – ball head that had been collecting dust in my closet. I mounted this to the AstroTrac then the quick release to the camera so my setup looks like this:
Once you’re to this point, it's time to get ready to shoot!
I recommend waiting until at least an hour and a half after sunset before you begin. I quickly discovered when I first started doing stars that just because you can see them doesn’t mean it’s dark enough for long exposures. I’ve had the sky blow out to completely white on some “impatient” evenings when I thought it was dark enough.
Next, you need to do a polar alignment. In the simplest terms, this just means pointing the AstroTrac squarely at Polaris, the North Star. The instructions go into great detail about the procedure, so I’ll just note some highlights and pitfalls below.
To get started I recommend sort of “squaring up” the AstroTrac so it’s pointing roughly north and angled toward Polaris. I also suggest doing your alignment without the extra weight of the camera on the rig.
Mount the scope to the AstroTrac, noting that it comes in from the bottom, and that it’s VERY susceptible to falling out. The magnetic base is just enough to hold it, but no more. Mine has already hit the ground a time or two, so now I remove it after I get everything aligned. It’s just too easy to bump it unintentionally in the dark. (I might assemble some sort of “safety line” for it down the road.)
At one point in the procedure you’ll need to get Polaris into a little “notch” in the scope. I found that it helps to start by spotting along the top of the scope to make sure you’re in the astronomical ballpark. Also, I found it helpful to turn down the illumination a bit once I start using the scope to actually align the unit (can’t see the stars with it turned all the way up). The closer you get Polaris to that notch, the better the tracking.
In my experience (shooting wide angle with 4 – 8 minute exposures) as long as I was close to the notch I was getting acceptable tracking. The longer your exposure and focal length, the more accurate you need to be with your placement. There’s a “fine tuning” section in the instruction manual to help.
Once everything is set, carefully mount the camera to the rig (if you bump the tripod, you get to start over – a lesson I learned the hard way one 20 degree below zero night at Bryce Canyon!)
From there, it’s time to experiment. I like to start with a high ISO shot (6400) for 30 seconds just to make sure the stars are sharp and I’m getting what I want in the frame (one of the first things you learn with astrophotography is that composition at night can be a bit tricky when your viewfinder is pitch black).
Once I’m happy with my test shot, I lower the ISO to 1600 and shoot for about 4 minutes at F/2.8. Of course, you can experiment with different combos until you get the look you’re after. Some areas of the sky seem to need longer exposures than others. Keep in mind that your exposure can render a fairly bright image, so be sure you aren’t actually blowing out areas of the night sky (like nebulas). The horizon can be especially troublesome if you’re near a populated area.
Oh, and get ready to grin. When you glance at your LCD and see the sheer volume of stars and celestial detail this rig can capture it will literally blow you away! I remember just standing there with my jaw gaping over the first image – I couldn’t believe what I was seeing! Crisp stars, nebulas, and even galaxies were all right there. Pretty amazing.
Here are a couple samples from my first night experimenting with the AstroTrac (the second one had better Polar alignment than the first). These are just quickly processed in Lightroom with not much adjustment beyond a blackpoint and a little contrast. Note that I have not done any real color correction or noise reduction in these images. Both at ISO 1600, F/2.8. The first is around 4 minutes, the second a half stop longer at 6 minutes.
Once back on the computer, I pull the exposure back and / or set a black point. This gives a more realistic version of the sky plus lowers the noise level quite a bit.
While out in the field you might also consider shooting a “dark frame” or two while you’re there to help reduce noise. I've not done a lot of dark frame subtraction, so I’ll let you Google that one. (Hint – a free program called “Deep Sky Stacker” can help a lot.)
That said, even at ISO 1600 once I pulled the exposure down I was very happy with the noise level - no dark frames required. (Note: I’ve also been shooting in winter where noise from excess heat isn’t a big problem, your warm summer shootin’ mileage may vary.)
As a final caution, keep in mind that the camera is moving during the exposure, so the ground and anything anchored to it is going to end up blurry. If you’re trying to include a landscape with the stars you’ll have to shoot it separately.
I personally use twilight or moonlight (or both) for the “landscape” portion of the shot, and then blend the stars and the land together in Photoshop. That's what I did for my first "real" photo using the AstroTrac:
Overall, I’m thoroughly enjoying the AstroTrac setup and I’m anxious to get out and use it at more locations. In fact, I think it’s safe to say that a clear sky at sunset is a welcome site for me now!
Milky Way Lens Shootout: Nikon, Zeiss, Sigma, and Rokinon compared
by Greg Benz
Capturing sharp stars and the Milky Way is one of the few genres in photography where special lenses are really a make or break deal. If your lens can’t shoot at f/2.8 or wider, you’re at a huge disadvantage (though you can always shoot log exposure star trails with such a lens). Those wide apertures are required to shoot with shutter speeds fast enough to keep the moving stars sharp.
I’ve used a Nikon 14-24mm for years with great results, including 40×60″ prints. But I’ve always had a nagging feeling that I could get better nighttime image quality with another lens. So I borrowed a few well-regarded lens and put them in a head to head test. Below, see how the Nikon 14-24mm f/2.8, Zeiss Milvus 15mm f/2.8, Rokinon SP 14mm f/2.4, and Sigma Art 14mm f/1.8 compare in a field test shooting the Milky Way and night sky.
But first, I’d like to thank Brent of BrentRentsLenses.com for loaning the Sigma lens used in this test, and B&H for loaning the Zeiss and Rokinon lenses. Brent runs a super-convenient rental business where he ships the lens directly to you along with a return shipping label. The process really couldn’t be simpler. And I’ve bought the majority of my camera equipment from B&H for years, and always been happy with their prices and service.
I’m posting a quick summary and some 100% crops from the top-right corner of each lens below. For a much more thorough comparison of image quality, be sure to see the video. There’s much more to the story than this single group of images can tell, including: performance across the full width of the image, color quality, vignetting, and focus performance.
This test is designed to reflect real-world image quality based on performance in the field. My conclusions below are based on shooting each of the lenses under the most comparable settings I could. I shot each at the exact same settings at f/2.8 in the same lighting conditions, and additionally shot the Sigma and Rokinon at their maximum apertures to test their unique capabilities. All lenses were manually focused on bright stars via the LCD on a Nikon D810, which is the method I most use in the field. As manual focus is an imperfect method, I took several shots (refocusing several times) to help minimize the risk that focusing technique would skew the results. But ultimately, that’s the best gauge of the results I can truly expect with this lens.
Nikon 14-24mm f/2.8
This has been my go-to lens for years. It’s great, and I’m definitely keeping it. But for wide-angle night skies, it can’t achieve the excellent stars that the other lenses can.
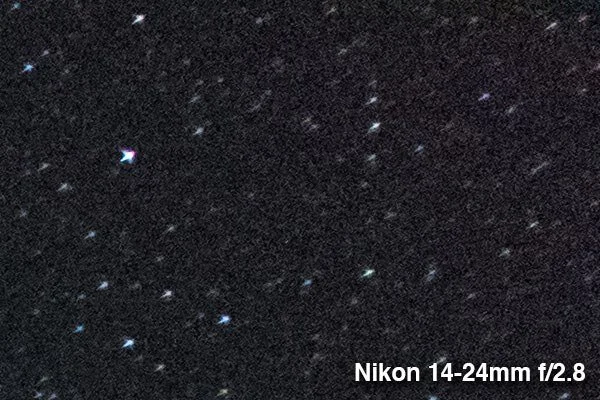
pros:
Autofocus for daylight shooting
Can zoom to 24mm
Quality/Durability: Rubber weather seal between lens and camera and some seals inside for better dust and moisture protection.
Cons:
The most difficult to manually focus at night. Manual focus extends well beyond infinity, making it hard to even find bright stars to start focusing. And the f/2.8 maximum aperture does not offer as good a live view as the Sigma and Rokinon. There’s also a bit of slack in the focusing ring, which can make precision adjustments a little more tricky. Focusing on stars manually is always difficult via live view, but I found the Nikon was most difficult. That’s a real detriment to image quality, as some images will likely be focused imperfectly. Reviewing the images carefully on the LCD is important with this lens to make sure you got the shot in the field. Thankfully focusing is easier with the new Nikon D850 (due to lower LCD noise), but I felt much more confident focusing the other lenses in this test.
Image quality is good across a broad range of conditions. But lack of sharpness and coma in the corners puts it behind the rest of the lenses in this group for astrophotography. On overall image quality, I would say that all three of the other lenses outperformed in this test.
Weight: 2.26lb. Fairly bulky, but then you are shooting with the capabilities of an autofocus zoom lens, and it is lighter than the Sigma.
Available for Nikon only.
Price in US: ~$1897. Aperture range: f/2.8-22.
Rokinon SP 14mm f/2.4
This is the lens to get if you want to save money or weight. I would shoot this lens at f/2.8 for best image quality, unless you need a little more speed for the Aurora.
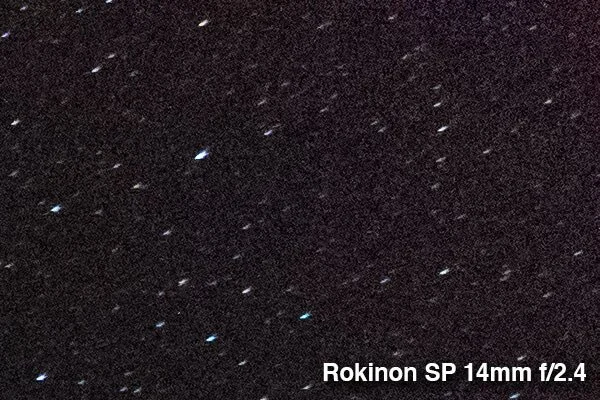
Pros:
Excellent value for the money and the cheapest of the group.
Weight: 1.73lb. The lightest of the group, and it feels quite nice.
Image quality is generally excellent, but the vignetting is a bit heavy.
Manual focus stop just past infinity helps quickly find stars. The focusing ring is fluid, which helps manually focus precisely. The f/2.4 aperture provides a slightly improved ability to evaluate focus on the LCD.
Cons:
No lens profile support in Lightroom or Photoshop. Third party profiles are available for Canon, but I have yet to find one for Nikon. Given this lens has noticeable distortion, it’s an import consideration, especially if you also wish to shoot architecture or other clearly straight lines.
Significant vignetting, but not as bad as the Zeiss.
Manual focus only.
There is no weather sealing, but this lens feels solidly built (and you aren’t going to run into a lot of water on most Milky Ways shoots).
No 16-24mm coverage.
Aperture range: f/2.4-22.
Price in US: ~ $999 for Nikon or $799 for Canon mount. (While I didn’t test it, the non-SP version of this lens is generally well-reviewed and outright cheap).
Available for Nikon and Canon.
Sigma 14mm f/1.8 DG HSM Art Lens
I love everything about this lens, except the weight. I found the image quality was the best of the bunch, if you shoot at f/2.8 for best image quality. It also offers the ability to shoot at f/1.8 for faster shutter speeds, which would be beneficial for shooting the Aurora Borealis. Note that the Sigma showed a slightly smaller angle of view than the Nikon or Rokinon, even though they are all 14mm lenses
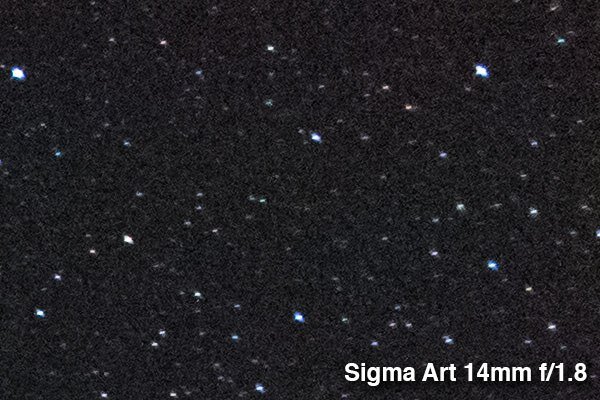
Pros:
Excellent image quality, the best of this group at f/2.8. (However, image quality suffers at f/1.8, and shooting wide open should be reserved for situations where shutter speed or image noise is a high priority.)
Minimal vignetting.
Manual focusing at night is relatively very easy with the wide f/1.8 aperture.
The f/1.8 aperture is a huge advantage for shooting the Aurora, which requires faster shutter speeds than stars.
Autofocus is very responsive and accurate for daylight shooting.
Cons:
Weight: 2.53lb. The heftiest of the group, you really feel it.
No 16-24mm coverage.
Price in US: ~$1599. Aperture range: f/1.8-16. Available for Nikon, Canon, and Sigma.
Zeiss Milvus 15mm f/2.8
This is a great lens, but I see no compelling reason to buy it at this price. It just doesn’t stand out for astrophotography, and the vignetting was disappointing.
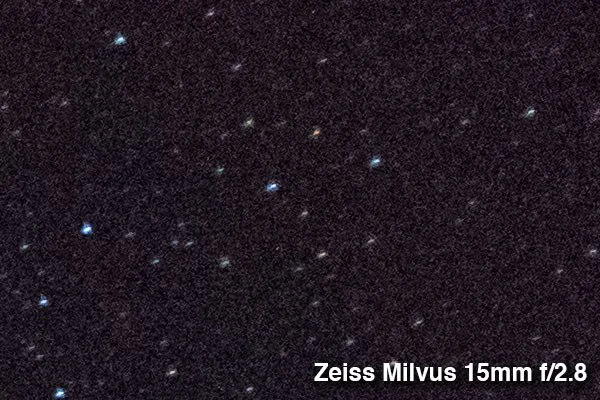
Pros:
Image Quality is very good to excellent, but there is significant vignetting in the corners.
Manual focus “lock” makes it easy to initially find stars for focusing. Zeiss is known for the “lock” at infinity focus. Zeiss even warns in the instruction manual that the focus is designed to allow over-travel (beyond infinity focus) to allow for temperature camera flange distance variations. In other words, there is no single lens that could guarantee proper infinity focus on all cameras in a variety of temperatures. However, the tighter range of over-travel is still useful, as it gives you an easy way to quickly get close to proper focus – so that you can at least see the stars well enough to manually focus.
Weather sealed.
Offer threads for filters (95mm). However, given existing vignetting without a filter, I have some reservations about how useful this feature may be.
Cons
Expensive
Significant vignetting at f/2.8. Deep enough to cause color issues with the Nikon D810 (the D850 should perform better, and the color cast can be corrected). If you are shooting with this lens, be sure to capture an extra frame for the foreground. That’s generally a good idea anyhow, but noisy corners could be problematic with this lens under night sky conditions if you don’t blend images.
Manual focus only.
No 16-24mm coverage.
Price in US: ~$2699. Aperture range: f/2.8 to f/22. Available for Nikon and Canon.
Conclusions:
All of these lenses were great for astrophotography, and I’d happily shoot with any of them. They all feel high quality and offer very good to excellent image quality. While I have some strong preferences when pixel peeping the results side by side, I would be proud to print images from any of them – including my Nikon, which was ultimately showed the least impressive results. Looking back on things, I wish I had also tested the Tamron 15-30mm f/2.8, as that lens is likely also a good choice. However, I’d be shocked if it beat that zoom lens could beat the image quality of the prime Sigma Art lens, and I prefer its wider 14mm field of view. But it’s definitely an option to consider if you’re leaning towards a zoom like the Nikon.
It’s important to note that test focused specifically on shooting the night sky. I did not get a chance to shoot the Zeiss and Rokinon in sunrise/sunset conditions, so I can’t say how they might hold up for flare. I assume the Zeiss is excellent in that regard, and I wish I’d had an opportunity to test the Rokinon for flare. I found the Sigma was consistent with the level of flaring from direct sun that I see with the Nikon (or better). I captured a beautiful sunrise image with the Sigma that has me impressed that this is an excellent all around lens for landscape photography.
I would recommend the Sigma if you’re looking for the best wide-angle night image quality, the Nikon if you want the flexibility to shoot up to 24mm, and the Rokinon if you’re on a budget or want a lightweight lens for hiking. I really can’t think of any reason to choose the Zeiss – its image quality did not outperform the Sigma, and the price is substantially higher.
Personally, I ended up buying the Sigma after this test. I love it. The image quality was my favorite of the group, the wide aperture gives me lots of options for shooting auroras, the wide aperture helps get manual focus at night, the autofocus makes it easier for daytime shooting, and the price was reasonable. I’ll definitely be keeping the Nikon for for situations where I expect to zoom to 24mm. And I’ll always be a little envious of the light weight of the Rokinon.
Note: All weights listed above were measured on a postal scale and may not match official manufacturer specifications.
Disclosure: This article contains affiliate links. See my ethics statement for more information.
Expectations and Preparations
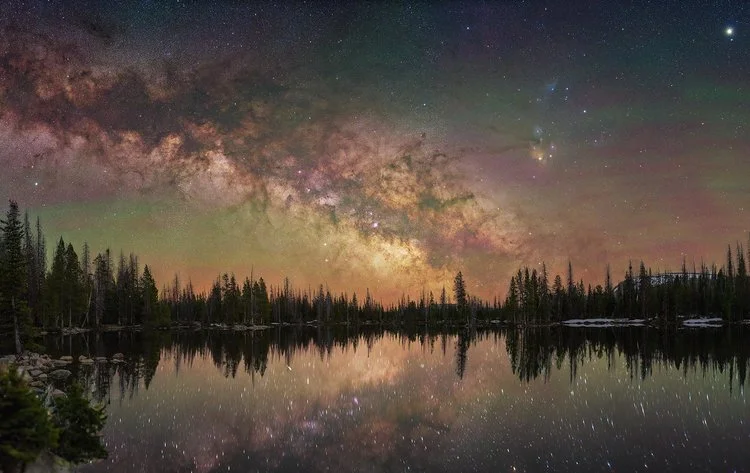
Sweet, you’ve spent $1,000, pictures will be flowing from your Ethernet cord onto the world wide web tomorrow, right?! Settle down tiger, it’ll come, if there’s one thing I’ve learned over the years of doing this it’s….be patient. And read/learn as much as you possibly can. And when you think you’ve read and learned everything there is to read and learn….go find more to read and learn (hint: there’s always more).
Before we delve into making super awesome amazing pictures, let’s talk about what astrophotography is and is not. It is a rabbit hole and you are Alice, what you get out of this will depend on how far you chase the rabbit. If you are expecting amazing results out of the gate and being an awesome astrophotographer from day one you are going to be disappointed, sticking your face up to the rabbit hole will only yield mediocre returns. Astrophotography is NOT a simple or easy endeavor. You will spend long nights out in the dark, stumbling around, making stupid mistakes because you’re tired/cold/distracted, you’ll spend even longer hours reading tons and tons of articles/tutorials online and trying different editing techniques with your own photos. It IS addicting, it really really is. You’ll snap your first picture, a preview will pop up on your camera screen, and you’ll be addicted, I guarantee it. And when you finish your picture you’ll look at it and think “damn, I made that and THAT is awesome”. In my lightroom catalog I have about 20,000 pictures listed in the last 20 months, that’s not even including the thousands of shots I’ve taken for timelapse purposes. To this day, every single time I’m standing out in the dark and I’m looking at the star filled sky or at my camera screen after an exposure is done, my mind is blown. I love it, I’m addicted, I don’t think I’ll ever give it up (nor would I ever want to). It IS challenging, every single time you go out you will be presented with a different challenge, I promise you. Eventually you will figure out the recurring things that create those challenges and when you get good you will overcome those challenges faster, but they will always be there. One thing I’ve discovered is that other types of photography don’t interest me as much anymore, in fact I’d say many are borderline boring now, and I believe it’s because astrophotography (from taking the shot on location through editing the final image) presents such a unique challenge that once you figure it out the “challenge” of other types of photography isn’t as rewarding. But that’s also what makes astrophotography so addicting and why I keep going out at night to do it.
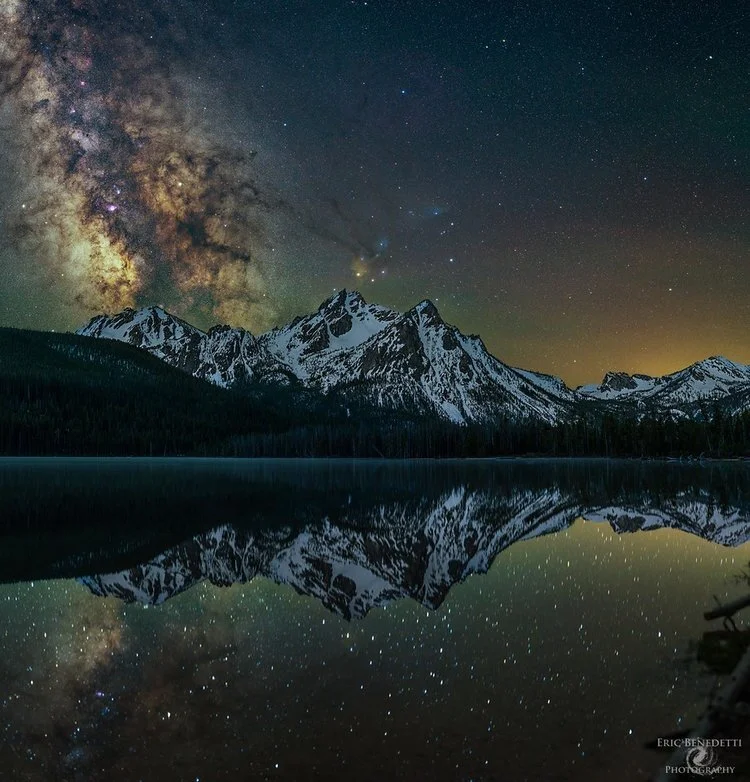
Before you ever push the shutter release button and take your first astrophotograph you should do your homework, prepare yourself for the unexpected. Be aware of the phase of the moon, each month presents a roughly 14-17 day window of shooting the Milky Way based on the moon phase, and the time of the year, the Milky Way core is visible in the Northern Hemisphere from March to October. You will be going out at night, first and foremost buy yourself a headlamp (especially one with a red-light), I bought a $20 headlamp, broke the battery cover the first night I used it, taped it up and I’m still using it….2 years later. Don’t use a regular flashlight, you’ll want both hands free at all times, especially if you’re hiking around in the dark. Before you head out do some scouting, at a bare minimum you should be using something like Google Maps to find an area to shoot. Also, understand light pollution, use this website to find locations to shoot at to limit the impact of light pollution on your shots: http://darksitefinder.com/maps/world.html I find that you CAN get images of the Milky Way in orange zones (Bortle 6, Google the Bortle scale), but no worse. Also, pick a location where you are shooting away from light pollution, even if you are 60+ miles away if you are shooting into major sources of light pollution it will be readily apparent in your images and challenging to deal with while editing.
Ok, you’ve got a location picked, it looks good on google maps (use the earth feature and pull up the images while hovering over a spot to get a sense of the geography), what are some of the other things to take with you? Warm and some waterproof clothes, even if it is summer, ESPECIALLY if you are going to the mountains. In Salt Lake City it will be 100 degrees in the summer, 70-80 at night, when I go up into the mountains it will be 40-50 at night. Wool socks, thermal base layers, a nice pair of gloves that allow you to use your fingers for fine movements, a light rain jacket, a beanie/warm hat…these are things that you should take just in case. Even in places like Arches, Zion, and desert places throughout Utah I’ve found myself putting on long sleeve shirts at night, temps can fall 40+ degrees from the day and you’ll want to do everything to stay comfortable during a long night of shooting. Wear good boots or comfortable shoes, you’ll often find yourself perched in awkward positions on uneven ground not sure if the drop off in front/behind you is 6 inches or 60 feet. Comfort is important, if your feet are cold, or your legs are tired, or your ears are frozen, you’ll be distracted and not thinking about composing your shot or even just taking in the beauty of the stars. In the mountains of Utah the weather can change in an instant, it’ll be clear skies and 10 minutes later a downpour, a rain jacket is usually a safety must.
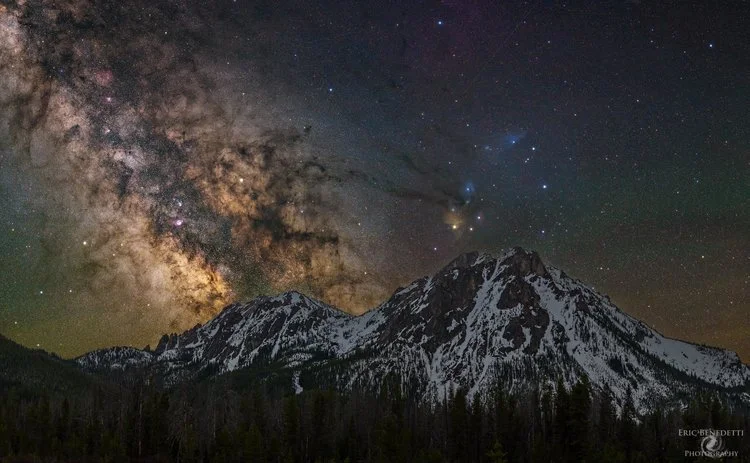
Water and snacks, pack plenty of water and don’t pack crappy snacks (fruit snacks and junk food, things that will give you a sugar rush and terrible crash later). Nothing worse than packing in a bunch of camera gear and getting that energy crash at 3am when you have to pack it all out. I find things like granola bars and mixed nuts to be invaluable for long lasting energy. As for energy drinks, I’m a coffee drinker and I’ll drink a cup before heading out, I’ll also take a total zero red bull (or any energy drink with zero sugar and zero carbs) so if I’m getting sleepy late I can keep my eyes open until the end of my shooting. If you don’t like coffee/energy drinks, don’t take them, stick to what makes you feel alert and awake. And don’t forget to drink water, water, water while you’re out there, you’ll be burning a fair amount of energy and you need to stay hydrated.
Take extra batteries (double A and triple A) for things like flashlights and your intervalometer, make sure your cell phone battery is charged (you’ll need it for aligning the polar scope on the tracking mount, even if you are out of cell range), make sure your car is in good running condition and that you have basic car things like jumper cables (I have had to get jump starts no less than 3 times…ya, it sucks). If you’re camping make sure you have all your gear and what-not. Buy yourself some hand/toe warmers (I’ll explain why later, not just for keeping your fingers/toes warm).
Ok, you’ve got all your stuff packed and ready to go, one thing I’ve found that makes my life 100 times easier is scouting the location during the day. When I first got into this hobby I’d just rely on photos/google maps posted online for scouting, I’d think about my perfect shot all day long, go out once it got dark, stumble around to find the spot I imagined, and ultimately have to settle for something less than ideal. Now I have a process, I go to my location in the early afternoon, scout my angles (there are also apps to help with this like PhotoPills for iOS and The Photographers Ephemeris for Android) at my spot(s), then go back and take a good nap. I try to sleep for 1-2 hours before I shoot, this allows me to unwind from the day and clear my mind for a long night of shooting, plus give my body a break if I’ve been hiking a bit. I wake up, eat some food, drink my coffee and then go to my location and setup my equipment during astronomical twilight. Then I’m ready to start shooting after astronomical twilight or I can make changes if my angles/location or something just isn’t right.
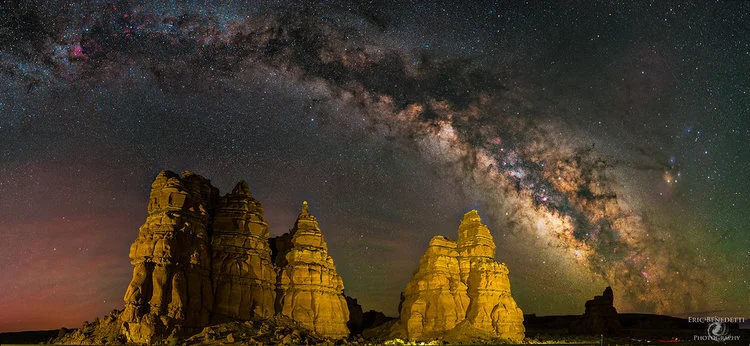
The last thing I want to discuss in this section is the weather and provide you with some resources. You obviously can’t shoot the stars if there is cloud cover, you should prepare your plans for shooting based on what the skies look like now and what you think they’ll look like overnight. I use this website to get regional views of the current cloud cover and trends of the clouds over the last 12-96 hours in the United States: http://www.aviationweather.gov/satellite?gis=off on the little map you can select one of the 3 digit names and it’ll pull up the current satellite image of the area. You can select Visible, Infrared (IR) either black and white or color, and water vapor. I mostly use Visible and IR, I use color IR in the summer to get more cloud contrast and B/W IR during the winter. Select a long timeframe in the drop down box and watch how the clouds move, try to get an idea of where the cloud breaks are now and where they could be in hours from now. Also, in places like the desert southwest we get monsoonal moisture, this means afternoons during the summer thunderstorms will pop up and the sky will fill with clouds. Usually by night the clouds dissipate though, so look for patterns of cloud development, don’t just see a single image full of clouds and think “oh I can’t shoot tonight, it’s cloudy now.” In 2015 I mostly operated with that mindset and only went out shooting maybe a dozen times, in 2016 I told myself I’d go out no matter what and probably 90% of the time I end up being able to shoot at least some shots. Some of my best shots this year have come after I’ve decided to head to my shooting location while the sky is completely cloud covered, only for the clouds to clear at night and be full of bright stars.
A few other things you’ll need, especially for the tracking mount, you’ll need an app to give you the precise location of Polaris (the north star) in order to align your tracking mount to the earth’s axis. I use “PolarFinder”, it gives you options for tracking mounts which will display where you need to put Polaris in your polar scope. Once downloaded, make sure you have the mount set to iOptron, and take a look through your scope to get an idea of what it looks like. I also recommend downloading Stellarium, either to your computer or your smartphone, it’s a fantastic app which will show you exactly what is in the sky at a given time and date at your location. You’ll need your GPS location for the polar finder and Stellarium (if it doesn’t set automatically), there are free apps that easily give you that, once you have your GPS coordinates you can enter that info into those apps.
Nightfall Conference & BORG 107FL with Fuji GFX 100
The Borrego Springs’s night sky was great! It was too bad I didn’t prepare for my imaging gear. This was my 1st appearance. So I didn’t know about that. Definitely I will take my personal equipment next year.
Fuji’s sale rep showed up and was demonstrating most of their cameras and lenses. Here are pictures with GFX 100 (= 100MP 55mm diagonal sensor)
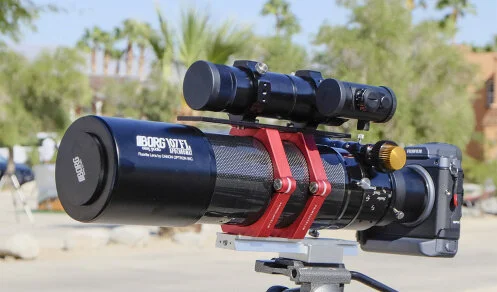
As far as I know, this should be 1st attempt in the world to attach GFX 100 with a telescope in fully completed mode. Simon did before. But it was without a camera rotator. So this is completely ready to use.
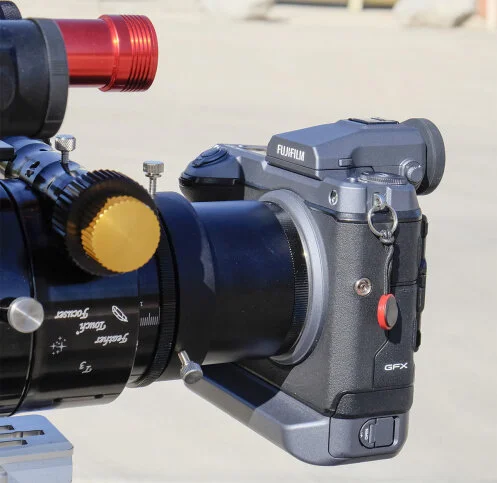
GFX 100 with 3″ rotator and GFX adapter
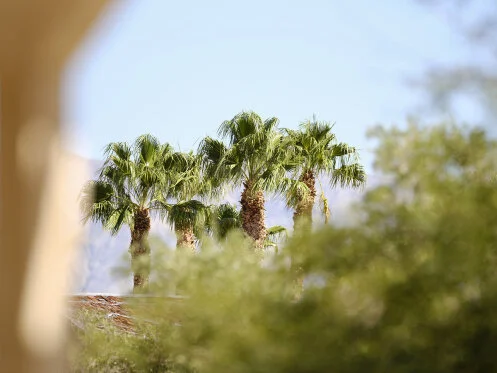
Original JPEG file was 291MB!!
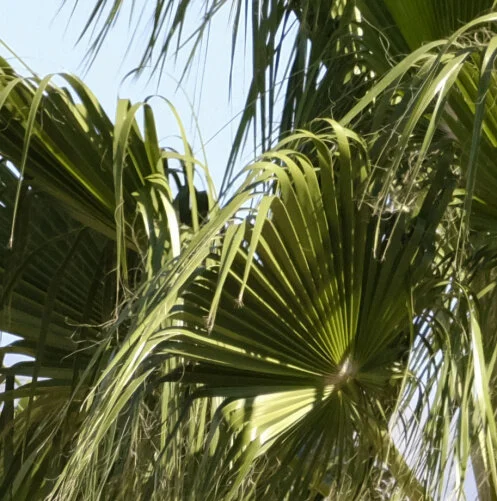
This is a cropped 100% resolution. I just focused thru a viewfinder. So I wasn’t sure it was completely in focus. Also leaves were moving around by the wind. But looks in focus and shutter speed was high enough. At least no false color at the edge of the leaves.
BTW, Fuji was free(I think) loaner program during the event. If someone are interested in testing around Fuji X-mount or GFX-mount cameras and lenses, this should be the best time to go. I’m not sure Fuji’s sale rep will come next year though. I hope they will do. Definitely I will take my gear and wish to play around GFX 100 nighttime.
Simon at Woodland Hills took some astro shots by BORG 107FL and his own GFX 100(!). Wow! he bought it himself. As soon as I get the result from him, I will share with you here. Each corner shows star distortions when we looked into in 100% res mode. But that was what anticipated and wasn’t major issue in my personal opinion. At least I’m sure we can fully enjoy astro imaging entire 645 sensor at F3.9 speed.
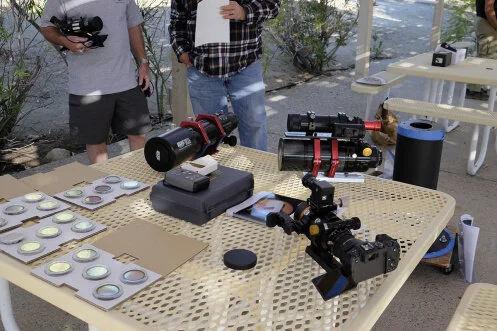
I will arrange more items next year
Gemini Telescope Design:- PULSAR GoTo Controllers
http://www.geminitelescope.comhttp://www.geminitelescope.comgeminitelescope.com
The natural evolution of Pulsar1 is the Pulsar2 GoTo Controller. From November 2009 Gemini Telescope Design is offering this new version that retains all the key features of its predecessor but adds a host of new valuable functions making it especially suitable for remote control.
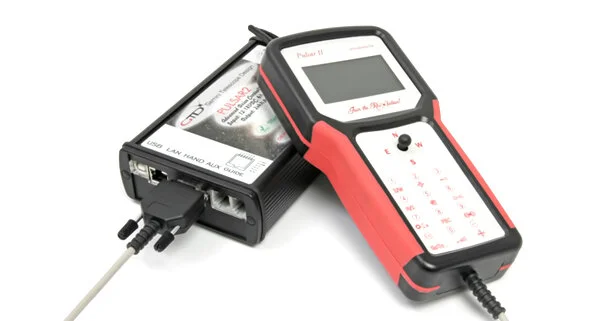
What is new in Pulsar2 ?
Pulsar2 accepts servos or steppers
Input 12-18VDC, output 2×4 A
Independent incremental encoders can be added
Connects to the PC via USB, Serial or LAN ports, ASCOM and INDI (Linux) compatible
Allows direct access from the internet (Internal web server)
Has much more memory for databases
Steppers are driven in 2 speed dependent modes, ensuring silent and silky smooth tracking AND high goto speeds. Uses 8bit microstepping
AAG Cloud watcher compatible direct parking via the AUX port
It has a foolproof initializing menu to help setting DEC motor rotation and finding the reference star.
The C2A planetarium program offers embedded support for Pulsar2 and a precise polar alignment tool also. All solar system objects can be precisely tracked with C2A and Pulsar2.
Supports friction drives, calculates the total reduction automatically
Upgrading the firmware takes 20 seconds and all user settings in the menu are protected.
The NEW Hand Controller
Features an internal GPS, large display and graphic aid for initializing the mount. Information like the active speed (goto, guide or other), tracking mode (sideral, lunar, planet, custom, etc), low voltage are always visible. Date and time are also shown. Time and latitude and longitude are updated every time Pulsar2 is switched on. The joystick works fast and reliably. The red maplight function has migrated to button 7. This hand controller works with (hw2.2) Pulsar2 only.
You find a WIFI virtual hand controller for Android devices on Play Store (Pulsar Hand).
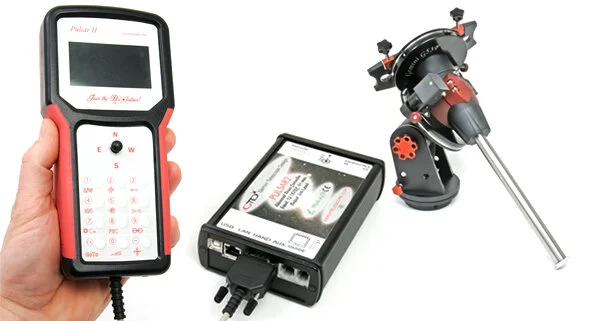
Price list for PULSAR2 GoTo Controllers
Complete unit (driver and hand controller w 2m cable): 990,00 EUR
Driver only (for PC use, virtual hand controller): 800,00 EUR
Hand unit (replacement): 220,00 EUR
Shipping and tax is not included. You will pay 22% sales tax (EU orders only) that you can deduct and pay the rate applicable in your country. We provide 5 years of warranty for mechanical parts and 1 year for all electronic parts.
GoTo Controllers for German and Fork mounts? Can I use PULSAR2?
Besides our mounts, Pulsar2 can drive your EQ6, GPDX, EM200, G11, and more, with the suitable (stepper)motor kits. Pulsar2’s unique feature, the 8 bit microstep allows you to use very low total gear ratios (down to 180) which result in very smooth periodic error. It will also drive your DIY mount, Fork or German.
Space Station at Sunrise
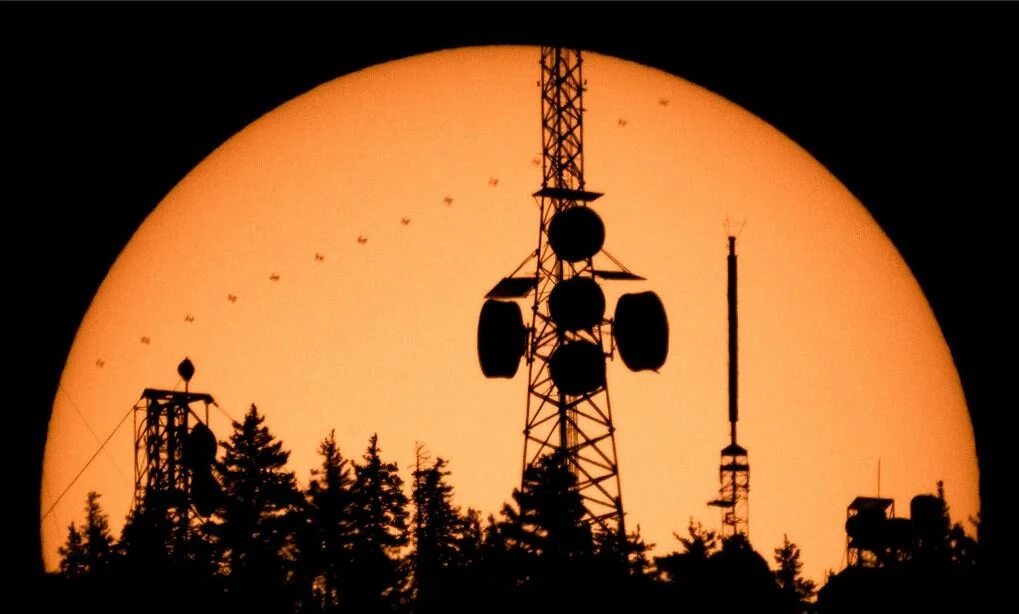
by Paul Schmit
This shot was hard...*very hard.* I nearly missed it, despite weeks of planning, a full-scale dry run yesterday morning, and some 11th-hour reactions this morning with only seconds to spare. And, I'm reasonably confident this image is breaking a small bit of new ground in astrophotography. Now, the full story:
I’m pretty sure this is a first. This morning, I captured the most difficult and technical astrolandscape shot I've ever planned and executed. For over a year, I've been waiting for an opportunity to capture the International Space Station moving across the face of the sun as it rises over a landscape. This turns out to be an immensely challenging task, requiring that the ISS cross in front of the sun far enough from my vantage point so that its apparent elevation is relatively low in the sky (then allowing for a landscape element); plus, the ISS shadow can't just be low in the sky, it also must pass over
a suitable, well-positioned landscape element; plus, there must be a way to get to the exact location that will afford a simultaneous view of sunrise over that landscape element (~2 minute event) and the ISS transit (~1 second event).
A few weeks ago, an opportunity finally appeared near my home in Albuquerque, where the ISS would transit the sun in the morning while the sun was ~16 degrees above the horizon, low enough in the sky to capture the transit as the sun rose over the 10k-foot mountains west of town. Furthermore, a network of hiking trails cutting through the northern foothills region seemed to offer perfect access to an area that aligned this event with some prominent radio towers at the mountain peak. A previous attempt to capture a similar transit at moonset earlier this year revealed that planning a shot like this pushes typical astrolandscape planning software (TPE, PlanIt!, etc.) to its limits, where tiny errors in perspective (~0.1 degrees) caused by inaccuracies in the topographical mapping software could make or break a shot.
Determined to capture this scene and aware of the shortcomings of my planning software, I did a full-scale dry run yesterday morning, with my dad and I hiking out to my shooting location and capturing the sun rising behind the radio towers at nearly the same time as today's transit. Once again, very small errors in the software's landscape rendering led to the sun rising ~1 minute later than expected, signifying a mere 0.2-degree error in simulated perspective, but enough of an error that I would have missed the transit while waiting for the sun to rise. After the dry run, I adjusted my location for this morning's shoot both to account for the slightly different position of the sun a day later, and attempting to build in margin knowing that the landscape rendering in this area was producing a slight delay in predicted sunrise.

The culmination of this significant effort ended in pretty spectacular fashion. My dad/trusty photography partner and I arrived on location this morning with an hour or so to spare and set up my rig on a hillside with the camera/telescope oriented toward the radio tower. However, as the moment approached, I quickly found that I slightly overcompensated with my repositioning as I watched the sun appear from behind the mountain peak about a minute earlier than expected. In this intense moment, I reasoned that from this spot, I'd be lucky to catch the tops of the radio towers at the very bottom edge of the sun's disk at the time of the ISS transit. With not even 2 minutes to go before the transit, I quickly slid my telescope/camera off its sturdy mount, tucked it under my arm, and ran 40 feet down the hillside, chasing the shadow of the mountain as it crept downhill. With only 45 seconds to go, my dad shouting out the times to me, I laid on my back, propped the telescope on my knees, and frantically scanned back and forth trying to find the sun in my LCD screen (tough to do when the solar filter prevents you from seeing anything but direct illumination from the sun, and when your field of view is only about 1 degree). Somehow, at the last second, the sun's disk jittered into view, and I ripped away 10 frames per second as the sun bounced around on the back of my screen due to extreme camera shake. By the time I snapped the first image, the ISS had just begun its 1.4-second transit across the sun (usually I add 4-5 seconds of buffer time to avoid missing these fleeting events), and somehow, I caught the entire transit. Sure, there is some minute pixel-level blurring due to handholding a telescope at ~2000mm FF-equivalent focal length after sprinting downhill, and yes, I risked missing the event completely had the sun not suddenly appeared on my LCD screen at just the right moment. But, with that in mind, I think the final image is much more dramatic with individual trees and branches appearing below the radio towers, captured from over 3 miles away by a photographer fearing he just ruined countless hours of preparation and missed the shot.
Oh, and within two minutes of capturing this sequence, the sun disappeared behind a bank of high clouds.
Optolong L-eNhance Filter for Astrophotography
by Shawn Nielsen of visibledark.ca
The Optolong L-eNhance filter is fast becoming the talk of the astro town. It’s affordable for even the tightest astro budgets but also delivers exceptional performance for imaging emission nebula and super nova remnant from light polluted cities.
What is this filter though and how does it work? Why do you need it?
If you’re part of the growing number of astrophotographers that are imaging from their own astro backyard, then you’ll be dealing with city street lights and neighbour outdoor lights in addition to cloudy nights! So for those few clear nights we get, we want to make the most of it and the Optolong L-eNhance filter can help tremendously.
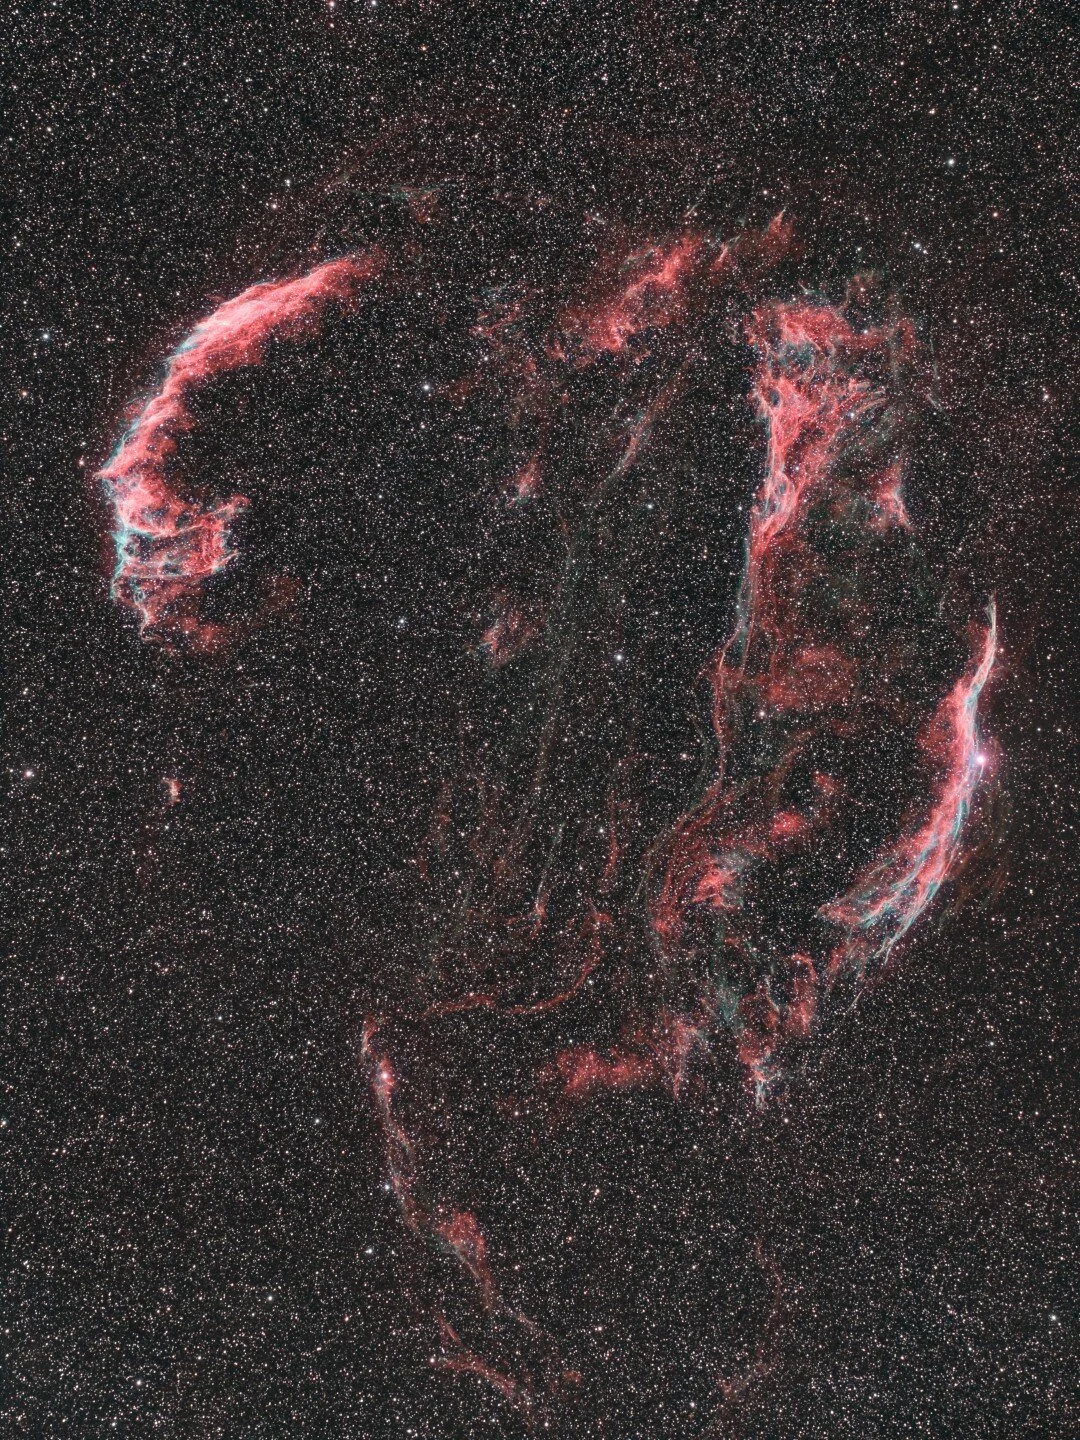
Veil super nova remnant captured by Ron Brecher (astrodoc.ca) using an Optolong L-eNhance filter

The Optolong L-eNhance filter is designed for use with one shot colour cameras (OSC) , such as a DSLR or cooled cmos camera dedicated for astrophotography. As example, I use a QHY168C.
This filter acts like an FM radio, tuning in specific channels. In this case specific light channels. It isolates the H-alpha, H-beta and OIII light transmission line while blocking the rest making it ideal for imaging with in light polluted areas.
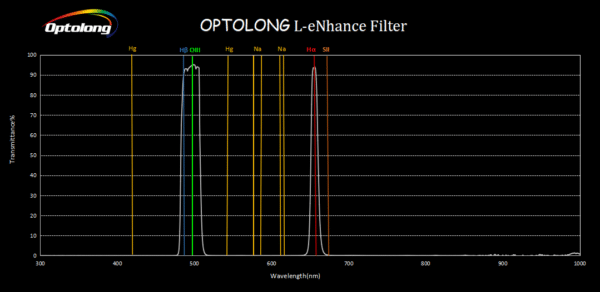
This graph shows the light transmission lines the Optlong L-eNhance fitler isolates.
Transmission lines the filter allows through:
H-alpha: 656nm
H-beta: 486.1nm
OIII: 501nm
By isolating these wavelengths of light, the filter can achieve some stunning results when imaging emission nebula and super nova remnants. It can also be used during nights of moonlight to image. There’s many great images of deep sky objects taken by astrophotographers using this filter during clear nights that the Moon was up. That’s definitely a bonus. Did I also mention it’s a very affordable!
If you’d like to know more about the Optlong L-eNhance filter, watch my video below. In it I talk with Dr. Ron Brecher (AstroDoc.ca) about this filter and look at what his results have been with it.