

NEW SOLAR PRODUCT REVIEW: DAYSTAR FILTERS FLAT CAP
I’ve been shooting solar images for about a decade now and have used many methods of capturing flats including the saran wrap method, the T-shirt method and lately the Sharpcap defocusing method. While all these methods work great for high resolution captures, they are pretty much useless for capturing full disk flat images of our nearest star. Unfortunately, this meant using software editing programs to attempt to clean up dust bunnies & vignetting & other detriments from my full disk images.
So, when I heard that DAYSTAR Filters was going to be releasing a device to aid in capturing flats f or solar image calibration I began to get excited. At the time I was using Sharp Cap’s Defocusing algorithm as my main method of shooting solar flatfiles but I never was successful at capturing flats for use with Full Disk images of the sun. Not being able to shoot FDI images of the sun without flats was a real pain, so when DAYSTAR announced that their new device would actually work with FDI’s I contacted Tiffany DAYSTER and asked her to put me on the waiting list for a DAYSTAR FILTERS “Flat Cap”.

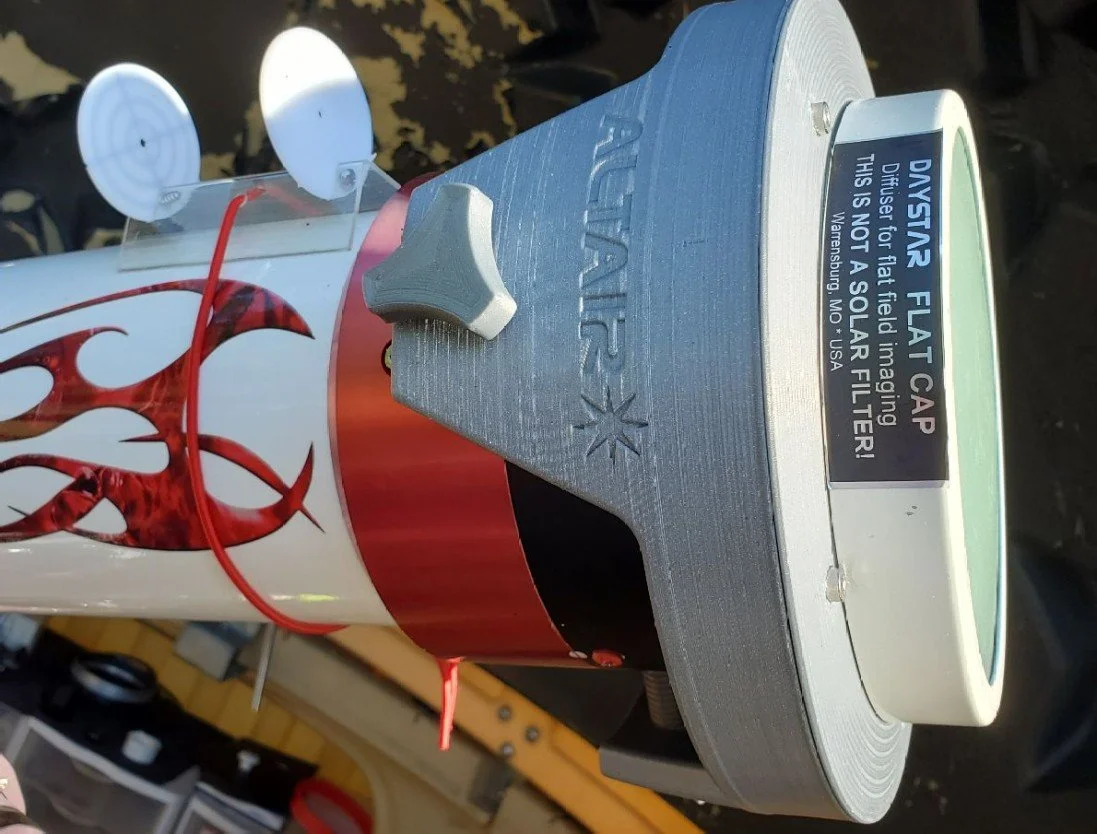
Shortly thereafter my Flat Cap arrived and I did the unboxing posthaste. This new high tech FLAT FILTER, appropriately dubbed the FLAT CAP is designed for taking flat calibration frames and is NOT to be confused as a solar filter. The Flat Cap is the brainchild of Fred Bruenges and Jen Dudley Winter of DAYSTAR FILTERS. I have it on good authority that Fred spent a lot of time trying different materials and coatings and application methods and followed up with a lot of field tests before determining the optimal configuration for the Flat Cap and releasing this exciting new calibration tool to the astronomy community.
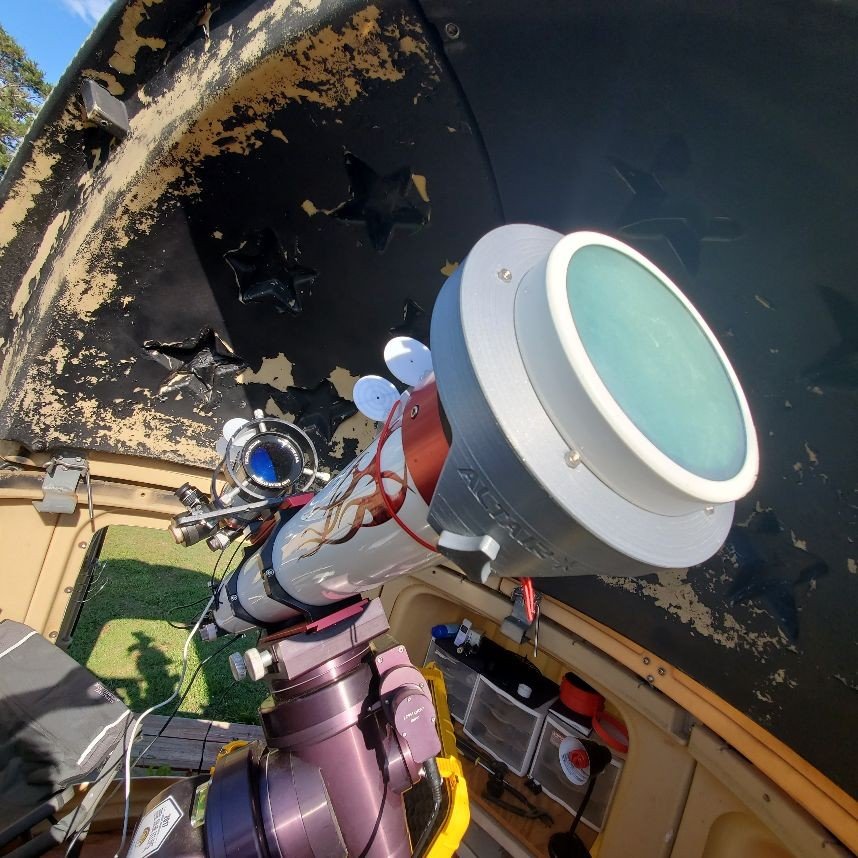
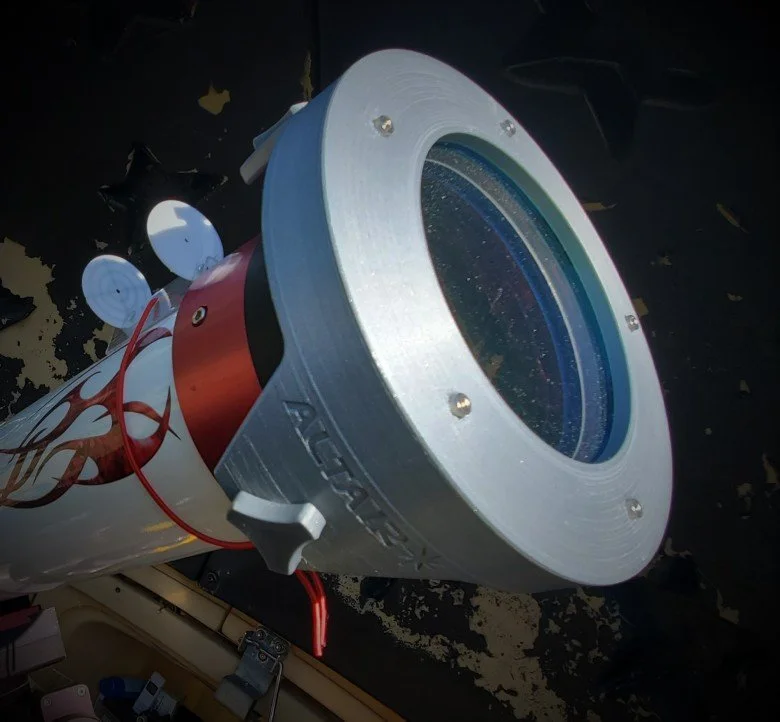
My homemade BIG RED SOLAR TELESCOPE, a 5' f/9.5 at 1,200mm with the
Altair Astro Triband D-erf with the DAYSTAR Filters Flat-Cap in place.
As we all know, solar gear (and accessories) is a highly specialized niche market and as a result can sometimes be quite expensive. Not so with the Flat Cap. I was very pleased to learn the Flat Cap for my 5 inch telescope would cost me less than a hundred dollars. And, as an added bonus I could also use the 5 inch version on my 4 inch and 80mm scopes, too. I always appreciate versatility in my gear, so the ability to utilize the Flat Cap on multiple scopes really pushed the right button for me.
Here's a link showing price points for the Flat Cap: http://www.icstars.com/Store/
So, how does the FLAT CAP WORK?
As you know, we take flat frames to capture undesirable image attributes like dust motes, (dust bunnies!) pollen, condensation spots, etc on our lenses, camera sensors, solar filters, focal reducers, barlows and/or any other glass components in our optical systems. All of these nasty detriments, including vignetting and uneven field illumination can be removed from our images by capturing flat frames and subtracting our flatframe images from our light images. Many of the new Astro cameras have an ap glass protective window in front of the chip to prevent foreign bodies from gaining access to and adhering to the chip. These glass optical windows are great at keeping the chip clean but often act as a birefringement filter and as a result yield Newton’s Rings on our images. The Flat Cap, used in conjunction with an Interference Eliminator, will go a long way towards totally removing this detriment forever from our solar images.
Because the Flat Cap works by creating a Gaussian Blur or Light Intensity Distribution it can be used for capturing flats with no need for bunched up tee shirts or saran wrap or even defocusing the image. And not defocusing is a HUGE selling point for me. I have always felt frustrated having to defocus every single time I change out a filter or change a region (ROI) of interest. And then going through the painstaking task of refocusing again after shooting my flat frames. With the Flat Cap, taking flat frames becomes as easy as set it & forget it. My first impression is that Fred is a genius. I did not expect the results I got. The Flat Cap works far better than I expected and I will explain why. But first, let’s take a look at how to capture flats with the Flat Cap…
As I mentioned earlier, up until this point I have always used defocusing methods for solar flats, and as you know, when you defocus a full disk image the ring of light grows in diameter. Then, when you shoot your lightframe, the Sun is not the same diameter as the ring of light you shot the flat at. As a result, you are left with a solar disk surrounded by a bright white ring surrounded by dark sky. That's why we can't shoot flats on the solar disk using conventional flat taking processes.
Fortunately, the Flat Cap works differently. It evenly diffuses the entirety of the light coming in and creates a flat even field of homogeneous light covering the entirety of the chip. By creating a Gaussian Blur or Light Intensity Distribution we don’t see the usual ring of light when shooting flats with the flat cap, we see a pure white evenly distributed field of light across the field. Any detriments appear as dark spots, bands or dark regions interspersed across the white field…
Did I mention how easy the Flat-Cap is to use?
Simply order the size you need, lay it over your objective, shoot your flats and you are ready to shoot...
AND IT WORKS!!! EVEN ON FULL DISK IMAGES!!! As illustrated below, we see a series of full disk image shot with BIG RED in White Light, Hydrogen alpha and Calcium K wavelengths utilizing the DAYSTAR Flat-Cap. There is no uneven illumination, Newton’s Rings or Dust Bunnies on any of the images
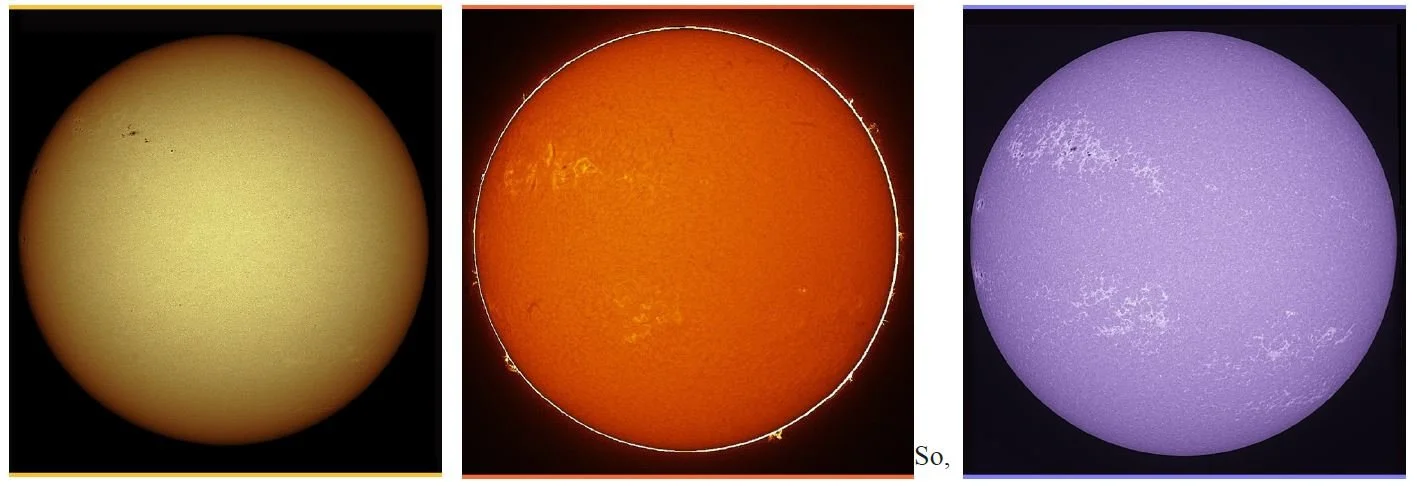
So what does this mean?
Using the Flat Cap, you can really capture flats for full disk solar images. And, as an added bonus, you can also capture flats for full disk lunar images. You can even capture flats for night sky images using an external light source, such as an electro-luminescent panel.. With the Flat Cap. You can capture flats on the full disk and use them for shooting prominences. You can change gamma and brightness levels (to a degree) on the solar disk and still use the same flats. The only time you need to shoot new flats is if you rotate the camera or change the ROI.
My images have been pristine since using the flat cap. It’s ability to clean up an image is truly incredible
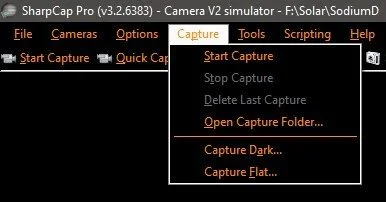
Another really nice feature of the Flat Cap is that it plays well with the Sharpcap image acquisition software that many of us solar imagers use to capture our solar images. And using Sharpcap’s built in “CAPTURE FLATS” routine is simple and easy with the Flat Cap. To begin, simply OPEN Sharpcap, center the Sun, focus and setup your exposure time and gain to your liking. Then, place the Flat Cap over your objective.
As soon as you position the Flat Cap you will notice that your image has gone black… Increase your exposure to yield about a 60% histogram, then follow the menu path, CAPTURE>CAPTURE FLAT and the menu popup shown below left will appear. Click the Capture Flat selection and the Sharpcap popup below right will appear. Adjust the image intensity until you can see the uneven field illumination and dust bunnies in the image window. My experience found that about a 60% histogram reading worked best for my gear.
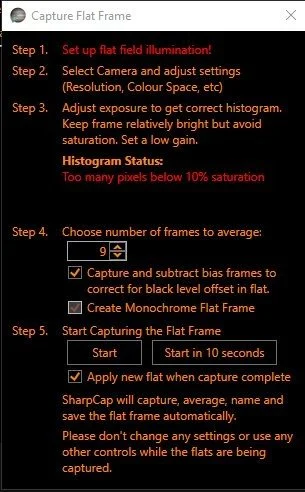
Follow the five steps in the popup window.
I used the following settings with good results. In Step 4 I selected an average of 9 frames and I selected the Capture and subtract bias frames checkbox. In step 5 I selected to immediately apply the flat frames to captured light frames. Of course you can play with these settings to determine which work best for you. And once you are ready, click START and the process will begin. For me it takes about 4 seconds to complete. When it finishes, you will see a clear white window with no dust bunnies or uneven field illumination.
At this point the process is complete. Click the Capture Flat “X” to close the capture window.
Then, remove the Flat Cap, (don’t forget to remove it like I did!) reduce the brightness settings back to your original numbers and if all goes well you can start shooting nice clean images sans defects.
The only problem you might encounter with the Flat Cap is a light leak in your optical system. The manual refers to this and provides instructions to check your system for leaks. When I checked my imaging train for light leaks, I checked it with my Calcium H QUARK, because it provides the shortest brightest exposure time of all my filters, so I just assumed that the brightest settings would show light leaks the best. But I did not have a light leak when using the Ca K filter, the Sodium D filter or the Baader Wedge. BUT…..I DID have a light leak with my H-Alpha QUARK, so I immediately called Customer Service @ DAYSTAR. Jen told me to send her some pictures to ascertain the problem. I sent her a series of images and she responded almost immediately and said that I had a light leak somewhere. As it turned out the H-a QUARK is so much dimmer than the Na-D, Ca-H and Baader Wedge that I needed to increase the light level to 5 times what I did with these other filters. At that increased intensity, a leak appeared that was not evident at the lower intensities. I taped up every joint in my system and the leak went away. Then I started removing tape until I found where light was entering the system It was in my Interference Eliminator! So, I put the tape back around it and am now getting great results.
So, let me show you some images to illustrate what you can expect to see when using the NEW DAYSTAR Filters Flat Cap. The first of the four images below is a picture of the sun I took without using a flat frame. Notice the dust donuts and the uneven illumination in the image. As you can see in the illustration, my chip is quite dirty and there is some uneven field illumination in the image. So much so, that it really detracts from the detail in the image. Then, (in the second image) I took a flat frame using the DAYSTAR Filters Flat Cap with the settings I mentioned earlier in the article. Notice that the Flat Cap has completely blurred out the sun, but left the defects on my sensor window which can then be subtracted from your light frames.

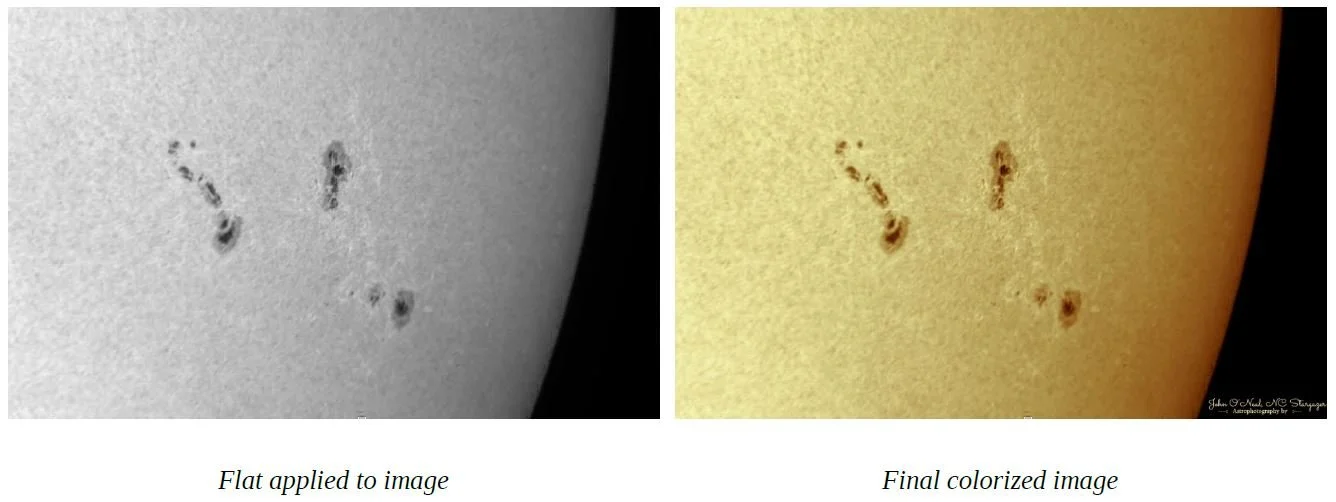
Then I captured another image of the sun and applied the flat frame to it. All the defects in my image were totally gone. There is nothing in this image except what actually exists on the surface of the Sun. And the last frame is the final colorized image, ready for posting. As you can see the flat cap yielded a really nice image in spite of the deplorable condition of my camera's sensor window. The flat cap flats are WAY better than my old defocused flats captured with the old methods, because it works without defocusing…
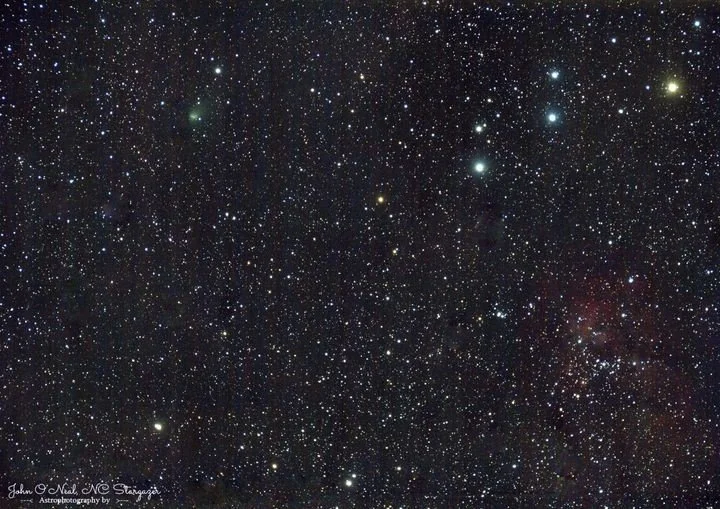
I am very happy with the results of my tests with DAYSTAR Filters new Flat Cap. I also determined that, the Flat Cap works quite well for night time astrophotography, which is a real bonus feature since I purchased mine exclusively for solar imaging. I recently used it for capturing some moon shots and for imaging M33 in Triangulum with excellent results So, in conclusion, I hitherto announce today, IMHO, that the DAYSTAR Flat Cap is an important and essential tool that every single solar imager and astrophotographer must have in their go bag. Place your Flat Cap right next to your Bahtinov Mask. It's that important a tool.
And, having seen how well it works, I will never go back to the old methods of acquiring flats. If you still have questions about the Flat Cap and how it works, or how to use it, I highly recommend you go online and look up the Flat Cap Manual and read it entirely. I did and I’m glad because I ran into issues that I easily resolved because I had read the manual and knew what to expect. I’d also advise potential buyers to watch Fred Breunges instructional video explaining how to optimize your solar images with the revutionary new DAYSTAR FILTERS Flat Cap. Check it out on the Flat Cap Page at
http://www.icstars.com/Store/