
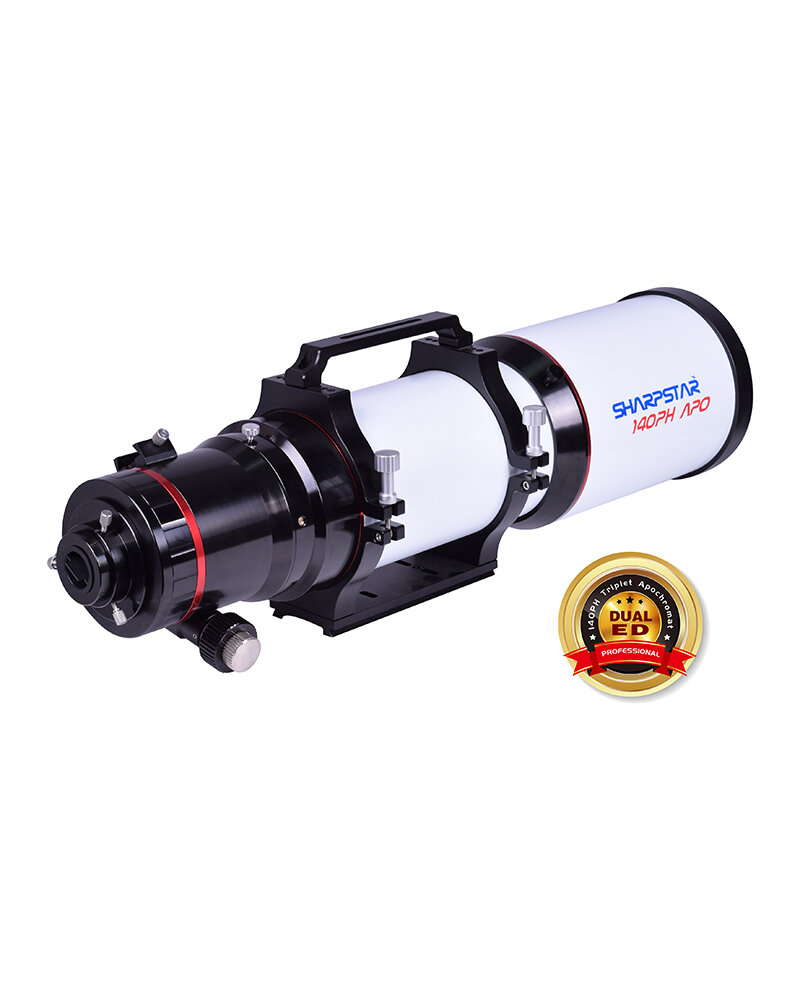
SHARPSTAR 140 PH APO
First Impressions
PART 1
Article by Tim Cowell
Illogical Progression
Hands up, who started out their astronomy journey with a large aperture telescope? A sea of hands waves back with mine among them because I began with a 'home made Schmidt' that never failed to disappoint, a factory SCT on mount made more from hope than glory and then a 'Big Bertha' double fork that had clearly eaten all the pies, the puddings and polished off the snacks. During this time I had one of those light-bulb moments, which involved holding an early model smart phone from Orange (the venerable 'spiv mobile' SPV 500) at the eyepiece during a moon session. The wows and woos around my office when showing the blurry, crater filled mini-screen had me hooked on the concept of astro imaging and the seed was sown in the fertile soil of a cash rich and knowledge poor mind.
Throwing money at my fork-mounted, Alt-Azimuth tracked reflector seemed the way forward and the parts list grew as quickly as my interest. Better camera, solid focus unit, a filter or two and a focal reducer to speed things up. It was now beginning to dawn on me, as sure as night becomes day that this was fun but going to become a dead end if I wanted to achieve my goal of great images, like the people were submitting to magazines and in the new-fangled Social Media. I just had to get in on that kind of action and so, with a heavy heart and an even heavier package wrapped for the courier, I sold the lot and began again with a little refractor and a German equatorial motorised mount. In one night of pure unbridled, unguided and utterly delightful joy I crossed over from wannabe capturing to nebulae harvesting. I even shot some galaxies and not one, but two comets. The results of that session were committed to a flaky YouTube video for posterity. There was no turning back, Frac Man had arrived.
1st Class Imaging Train
Those small refractors are fun and make the process of learning the Dark Art much easier by way of their size and weight, their upfront cost and the additional accessories you are likely to find yourself buying or considering. Just setting up without needing chiropractic adjustments has a lot to be said for it. I've often wondered why being bruised by hefting tripods, mount heads and cumbersome kit is supposed to be therapeutic and relaxing fun, yet, here I am signing off on a box almost the size of my albeit vertically challenged body. On the cardboard carton outer box I can see a picture of a large refractor, so I know this is the correct consignment. With discretion and noting the courier is strongly built and I have recently had heart surgery, I ask if he can carry it to my back step. For a healthy specimen it doesn't appear unmanageable.
Having dragged it inside, removed the outer and inner boxing and lifted the impressive flight case out, I took a moment to reflect on how I'd got here and why I wanted to find out what a large aperture apochromatic refractor might do for me. Yes indeed, those sweet, small refractors are jewels. Bundles of fun that produce wide, sharp, sweeping vistas that imagers will enjoy for generations to come, I now wanted something that would take me further out. Something with reach and for that, focal length is crucial. Also, I thought about how many of the objects that I'd seen posted and produced had almost been 'done to death' (not true for me as I find beauty in every image of the old favourites) but I wanted to explore some fresh fields and find near earth objects too, maybe get a little lunar and planetary back under my belt. I wanted about 1000 mm FL, about 5 inches (130 to 150mm) of aperture, something with good colour correction and already fitted with a strong, smooth focuser. It would be nice if it was adequately fast too, about F7, but, without costing elitist money. A tall order and one suitably filled by my purchase from our friends at 365Astronomy of the Sharpstar 140 PH APO, plus dedicated focal reducer. It had arrived and the breathtaking moment of seeing a telescope this size, first hand, was upon me. Oh my goodness!
Unboxing the focal reducer first, it felt about as heavy as a small refractor, so by the time you add your camera and maybe a filter drawer or wheel (2” filters or so, most likely, as the '140' is a full frame imaging circle with flat field) hopefully you already thought about how to mount this roughly 12 Kg monster. We are talking '6 class' as a minimum for imaging and you need to be sure to balance it properly. I was going to be using an '8' so no real dramas about weight management other than being careful lifting it on and off.
From the front, the Sharpstar 140 PH has a large, imposing dew shield held by 2 big thumb screws which work well. A metal dust cap protects the beautiful looking objective lens arrangement. Here, things appeared spotless and unmarked so I quickly replaced the cap and continued to look things over. The dovetail, rings and carry handle are all substantially made and very strong. I wondered if the approximately 200mm long Losmandy type dovetail would be a little short, but in practice the telescope balances well with imaging gear fitted and dew shield extended. The tail end is massively built and finished in a high-gloss, piano black coating that is easily polished free of finger marks. The entire focus unit can be smoothly rotated and locked, or just the imaging train end by way of a solid rotator that I find very useful indeed. With a good 4 inches of travel, the focus tube is graduated clearly, lockable with a thumbscrew and showed no signs of slip or slop during my sessions. Smooth, dual speed knobs are as you would expect, along with a tri-screw 2” visual back, which is easily removed to fit the massive focal reducer (see the specifications box for details).
The finish is so much better than the adverts can convey. Sat on my desk for dressing, the white, pimply coatings of the main OTA look deep and tough. This is offset against the smart lettering in a blue and red NASA type font on the 'dewy', the three bright red metal bezel rings along its length and that gloss black. With my ZWO 294 and Primaluce Lab Eagle3 in place, the colour coordination that usually leaves me cold is pleasant and appealing. Hefted onto the EQ8 R Pro this telescope looks every inch a purposeful and properly big machine, which you will see, is very much up to the job it was made to do.
Light Bucket List
For a feast of colour and a great test of the raw character of a new telescope, where else would one choose in the Northern hemisphere but Orion. The mighty hunter and the massive M42 seemed a good choice for first-light despite it being very late in the season and low in altitude. I decided to leave the filters off for these tests to see how the glass performed and get a feel for the field of view, before moving on to more suitably positioned targets. The biggest refractor I had owned to date had been a 115mm apochromatic of traditional design, a clone of many other telescopes, it had served me well during the short period of my usage. Until the 140 PH had arrived it seemed a chunky and solid instrument, this though, was a giant leap up in every aspect. The first picture resolved on my monitor. It looked blown away, a sea of cloud and froth. Clicking on the auto stretch function, Orion's M42 snapped into focus and filled the screen perfectly from the fringes of the gas tendrils to the Running Man. I was shocked at how much detail had been gathered in such a short exposure.
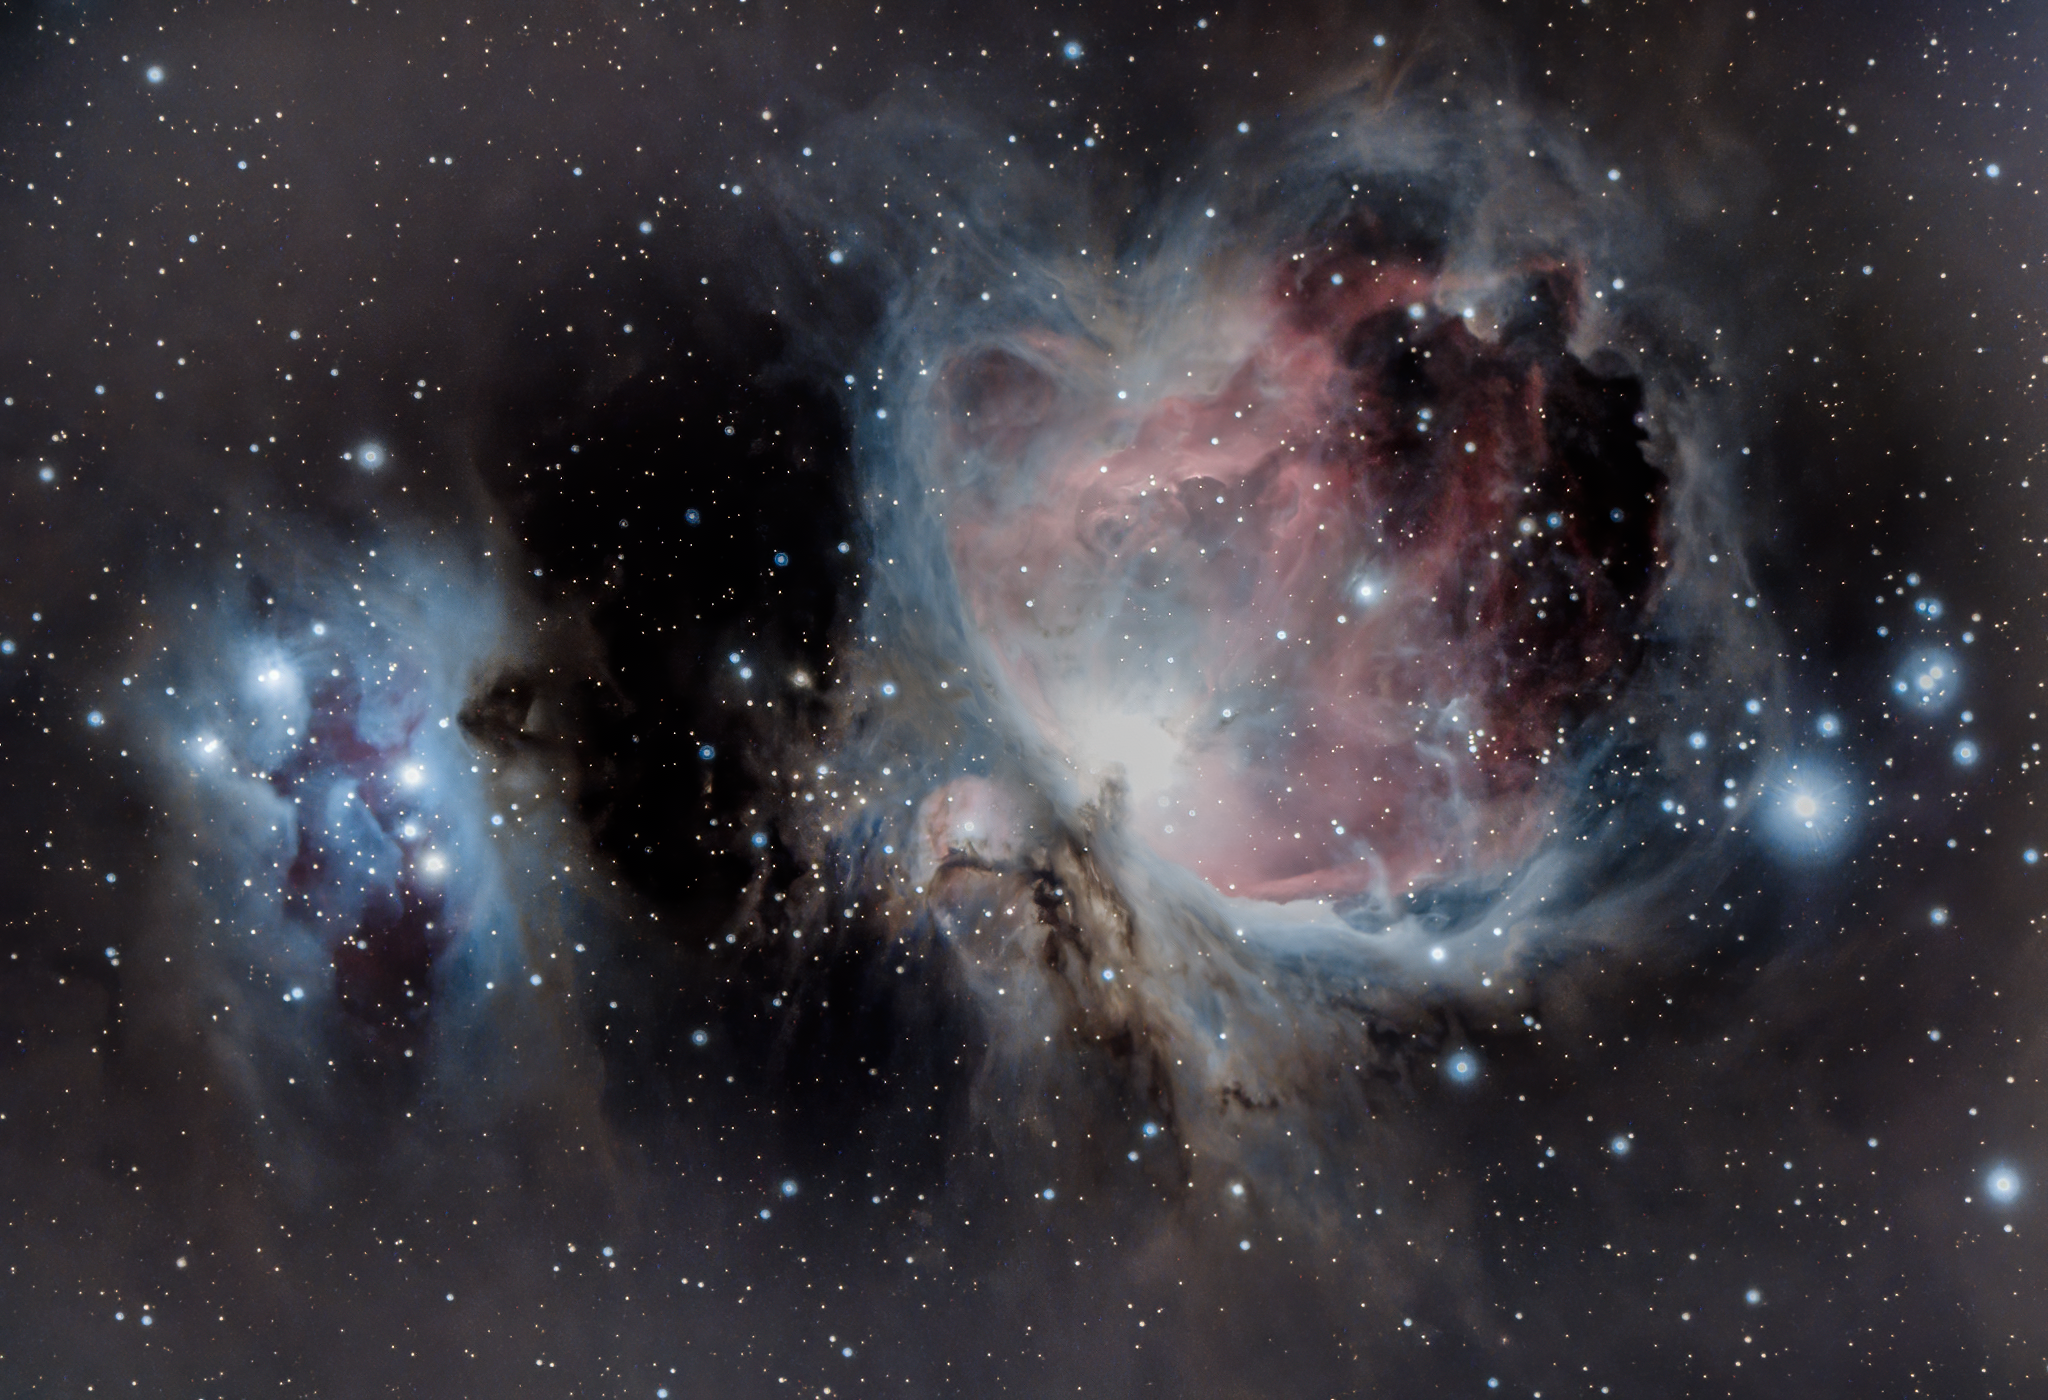
Image by Tim Cowell
The combination of the 140mm objective and the big focal reducer resulted in a sharp and fast capture. This telescope definitely deserved the name Sharpstar and it looked as though someone had taken a bucket and scooped Orion down and emptied it out for me. Thirty minutes later, at three minute exposures, there was enough data to produce an image so colourful, so deep and texture filled you might think it was an all night affair. This size of glass and this speed of 'scope does make for a special experience on brighter objects, but what of galaxies? A later session on a much better positioned Triangulum M33 would answer that question and with the data stored and uploaded to my Facebook group's Club Cloud for everyone to see and test it's obvious this is a good product at a very keen price point. The resulting stack was processed by several other Club Members and shows the tightly knotted swirls that are out of reach of smaller 'scopes, the rich Hydrogen Alpha regions (though no filter was used) and a real sense that you can almost touch what is being produced because of the light gathering ability. No central obstruction, generous objective dimensions, quality glass selection all contribute to a satisfying experience. You probably won't feel the need for any upgrades because the build quality is mighty good. I found the finder shoe so robust and solid that I mounted my William Optics slide shoe guide scope in it to good effect.

Image by Tim Cowell
The Eyes Have It
I'm not one for visual observation usually and with the smaller refractors I'd mentioned it never seemed worth bothering. Slipping my one remaining eyepiece, a cheap and cheerful Celestron Zoom affair, into the visual back one evening when the Moon was fairly placed I have become somewhat addicted again. The reach of 910mm of focal length is considerable and with the very sharp views produced by the ED glass (2 ED pieces in this triplet) and a well positioned chair I'm eager to be out for eyeballing Lunar again. This extra reach has had me asteroid spotting, planet peeping and when reserves allow I will join the ranks of Solar specialists.
I've felt rather rekindled about astronomy as a whole. Imaging is very engaging and produces wonderful work that can be shared, nothing wrong with that. Maybe it was the brush with death last year that made me re-think the simpler activity of spending ten or twenty minutes gazing and blinking at a galaxy with my own eyes and wondering if somebody is gazing back too but I doubt I'd have bothered with the smaller apertures even though I know they must be fun.
This big refractor is engaging in a multitude of ways that I am very grateful for. I didn't think it would be much better than the 115 clone but it has proved astonishingly powerful, easy to use and operate with a character that has grown on me so much I began to seriously study astronomy again. I've made better images and seen an asteroid with my own tired eyes. What wonders await my next session with the Sharpstar 140 PH APO? Time well spent.
In the next part I go deeper into imaging deep-sky and near-earth objects with the Sharpstar 140 PH
Technical Specifications
Type:Sharpstar 140PH
Aperture size:140mm
Limiting visual magnitude:12.5
Focal ratio:f/6.5
Resolution:0.83 arc seconds
Objective lens:triplet air-spaced APO(including two ED glass)
Tube length:738.6mm(with the dew shield contracted)
Accessories:a pair of tube rings, a wide dovetail plate and a handle
Tube outer diameter:148mm
Net weight:10.1kg
Gross weight:11.7kg(including tube rings, dovetail plate and handle)