
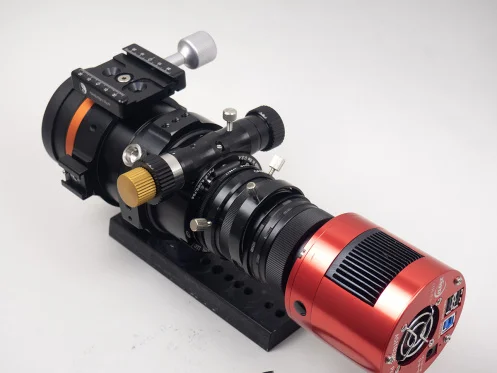
Filter Box for DSLR by Astro Hutech / Borg
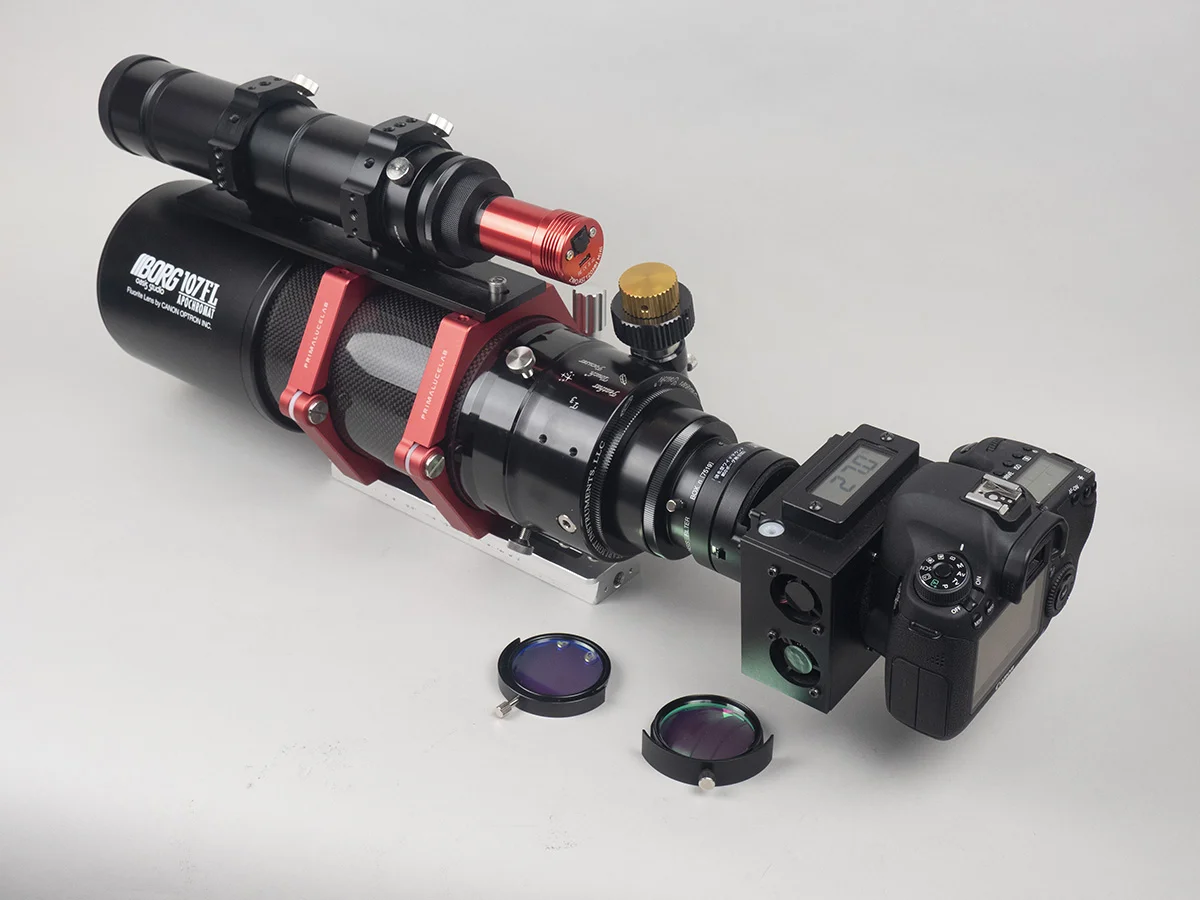
This is to share with DSLR users who are seeking for the solution with new F3.9 scope systems along with a filter box.
I wished to use my lovely noise-free cooled 6D with IDAS NB2 and NB3 last time. But no room to add one more filter box in front of a camera. So I was forced to use a mirrorless camera like SONY A7.
Now I tried to figure out the solution for coming new moon opportunity. Here is my answer for DSLR users.
Remove M57 rotator (7352)
Replace 7000 with 7923
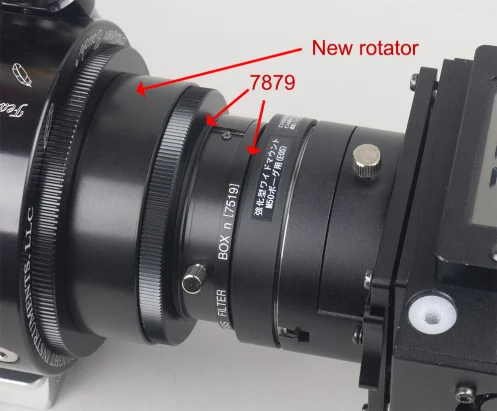
This gives us 18mm new room. Yes, unfortunately we lose a camera rotator. So inconvenient for the time being. But just temporary. Don’t worry, I start preparing the large rotator indicated the above.
BTW, new rotator is large enough for 55mm diagonal sensor such as GFX or Pentax 645 camera.
As described yesterday, IDAS filter makes light path 0.85mm shorter. To meet the correct back focus requirement of BORG, we need to “mechanically extend” 0.85mm to “offset”.
2 x 7879(2mm) is the answer. I’m glad it was much simpler than what I expected.
BORG BF is 80.00mm as designed. 80.85mm with IDAS filter(=80.00mm light path thru a filter)
80.85 – 55(44 as Canon + 11=5005) – 15(7519) – 7(7507) – 4(2×7879) = – 0.15mm
0.15mm is too long. But I’m sure it should be within the tolerance. And from the viewpoint of general BORG optical behavior I experienced before, longer looks relatively better than shorter.
And once a new rotator will come up, you can simply replace a current rear unit with it without changing other parts configuration. Then, you can orient a camera body while using a filter box.
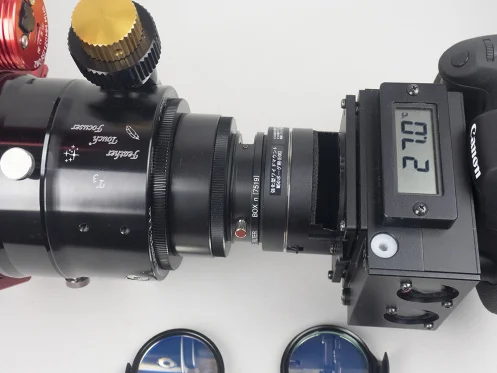
Nikon DSLR is same thing. Just replace above 5005 with 5003. That’s it.
If your camera has IR blocker inside body, you can use NB2 and 3 alone. No extra filter needed. My 6D has a clear filter inside body. So I need to have 2 filters. I hope not to be confused.
For more info, please click here.
Observatory Scopedome 3M V3 Manual from Skypoint Astronomy
In its widest point it has a diameter of three meters, laterally presents a practical entrance door, and has been placed on a base made specifically.
Amateurs ask us often what is the proper way to place an astronomical dome in garden. This pic show you a 3M Scome Dome observatory mounted and photographed by one of our customers. It's been placed on a homemade base.
€6 442,00
For more information click here.
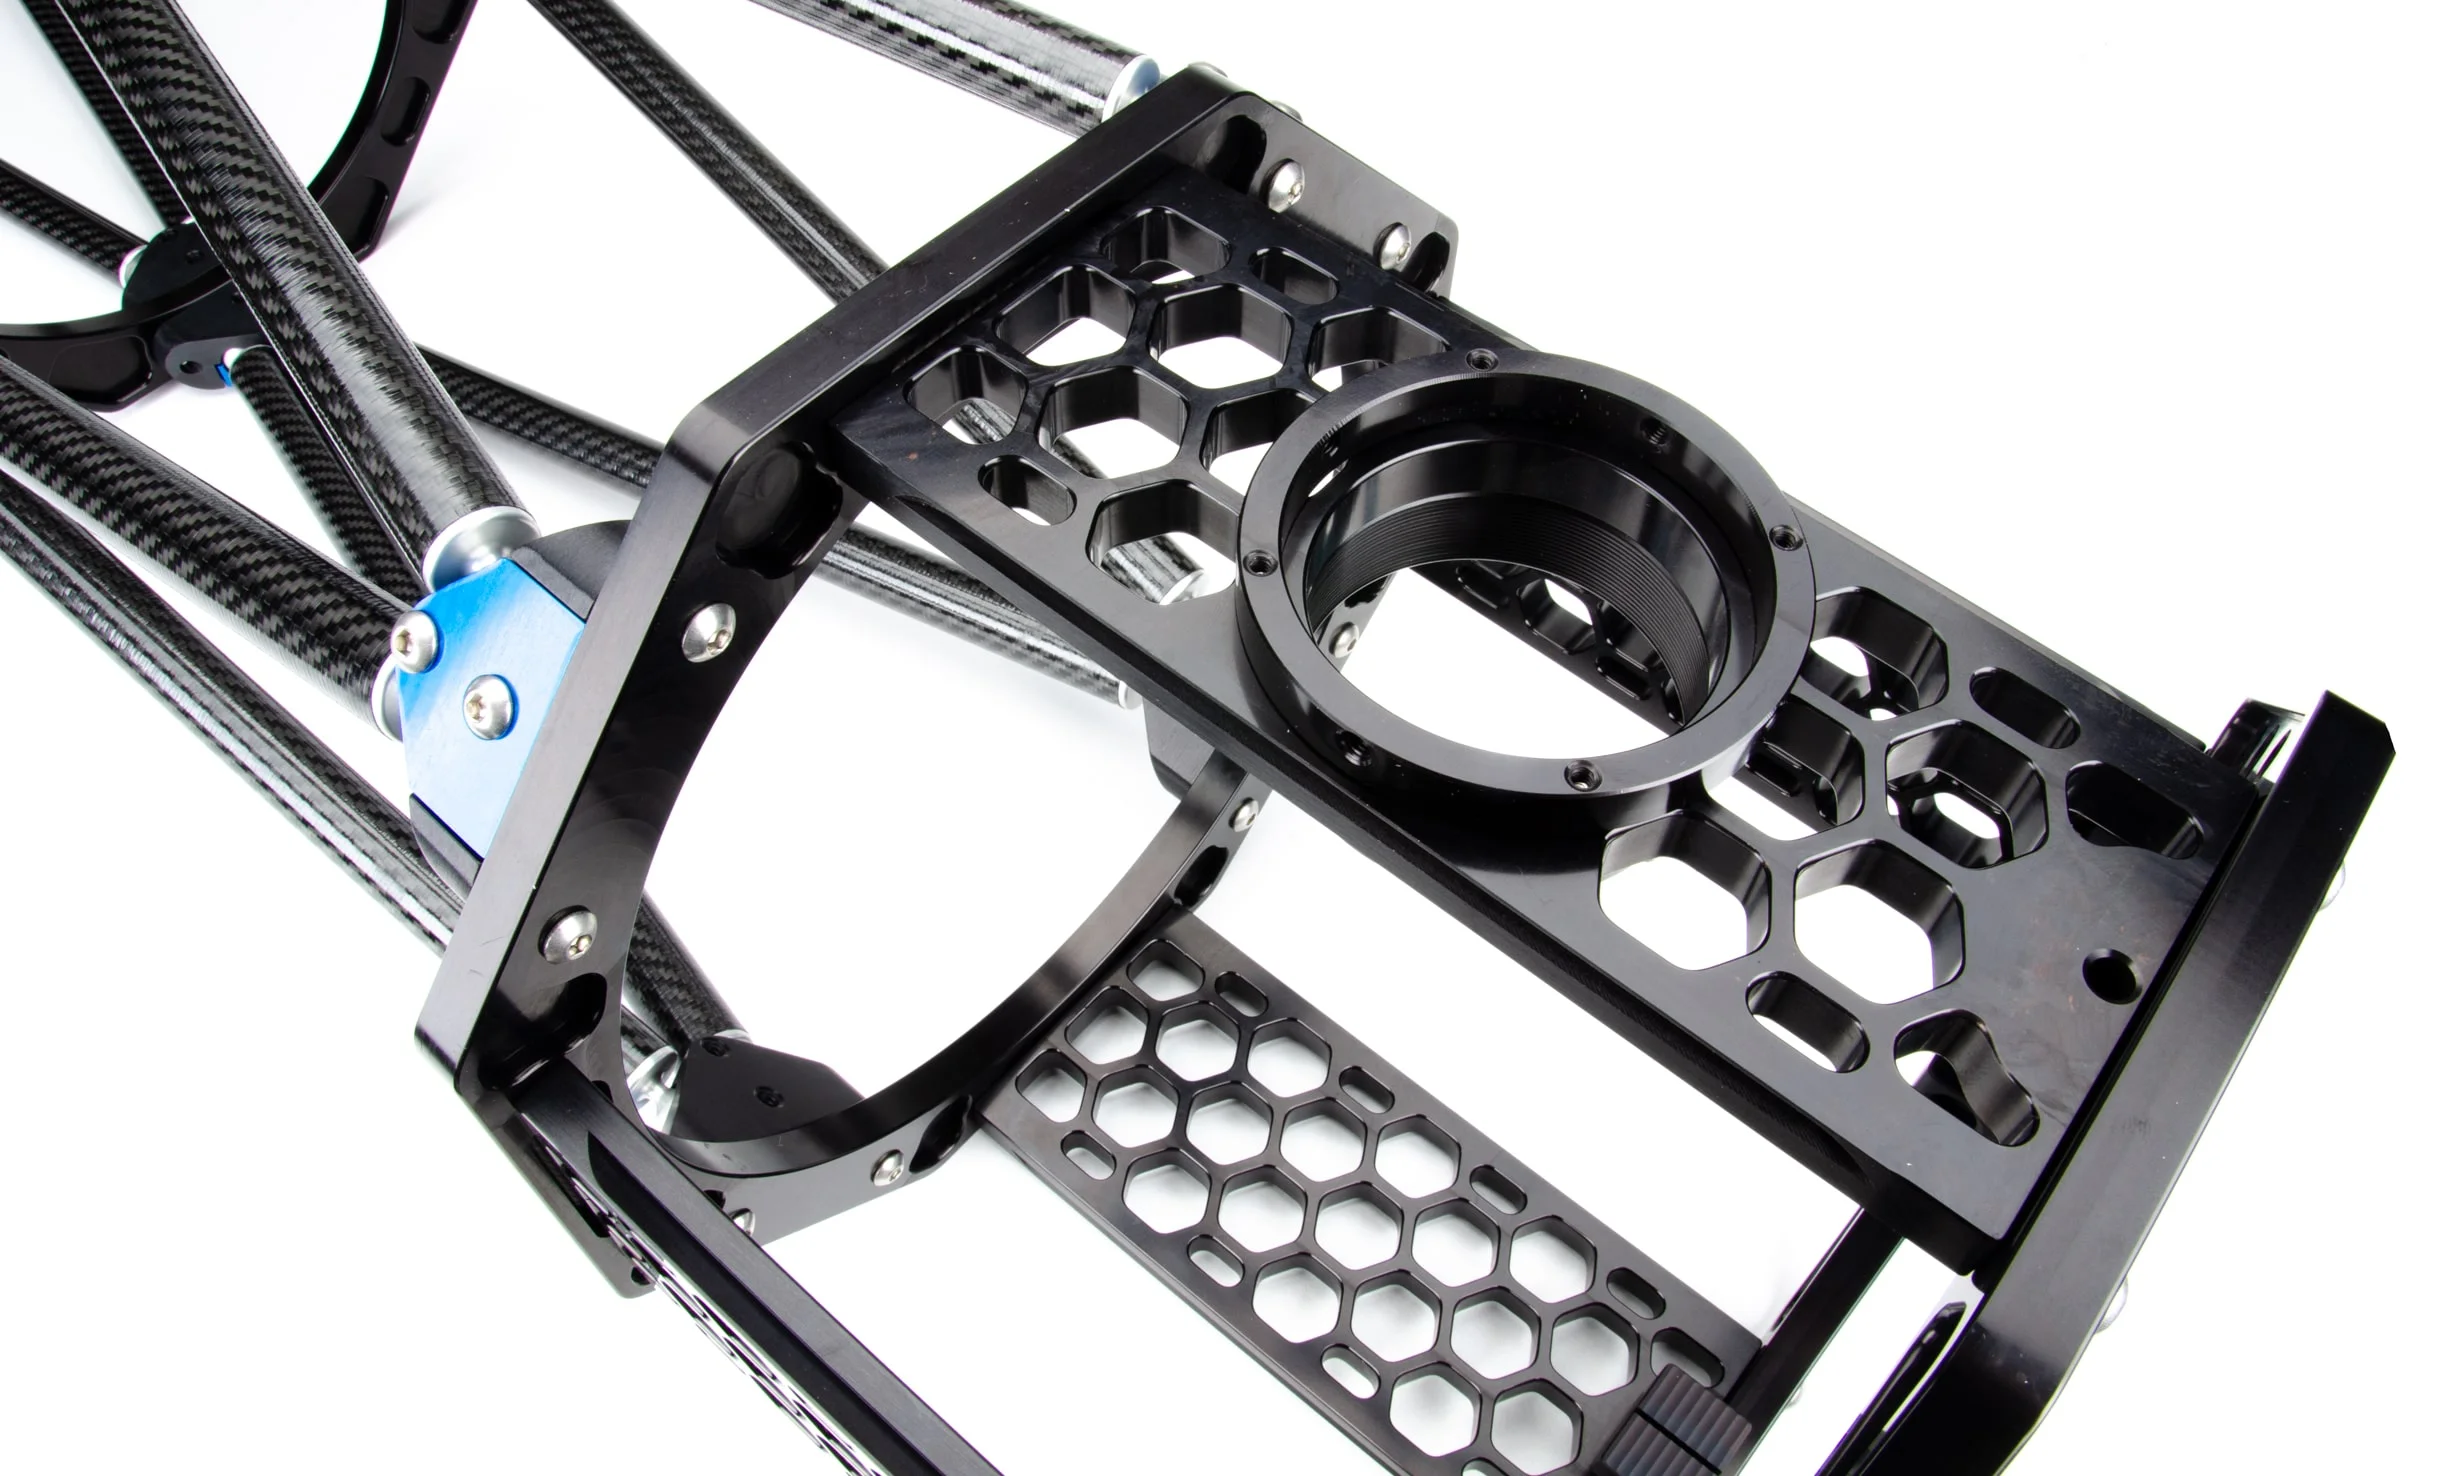
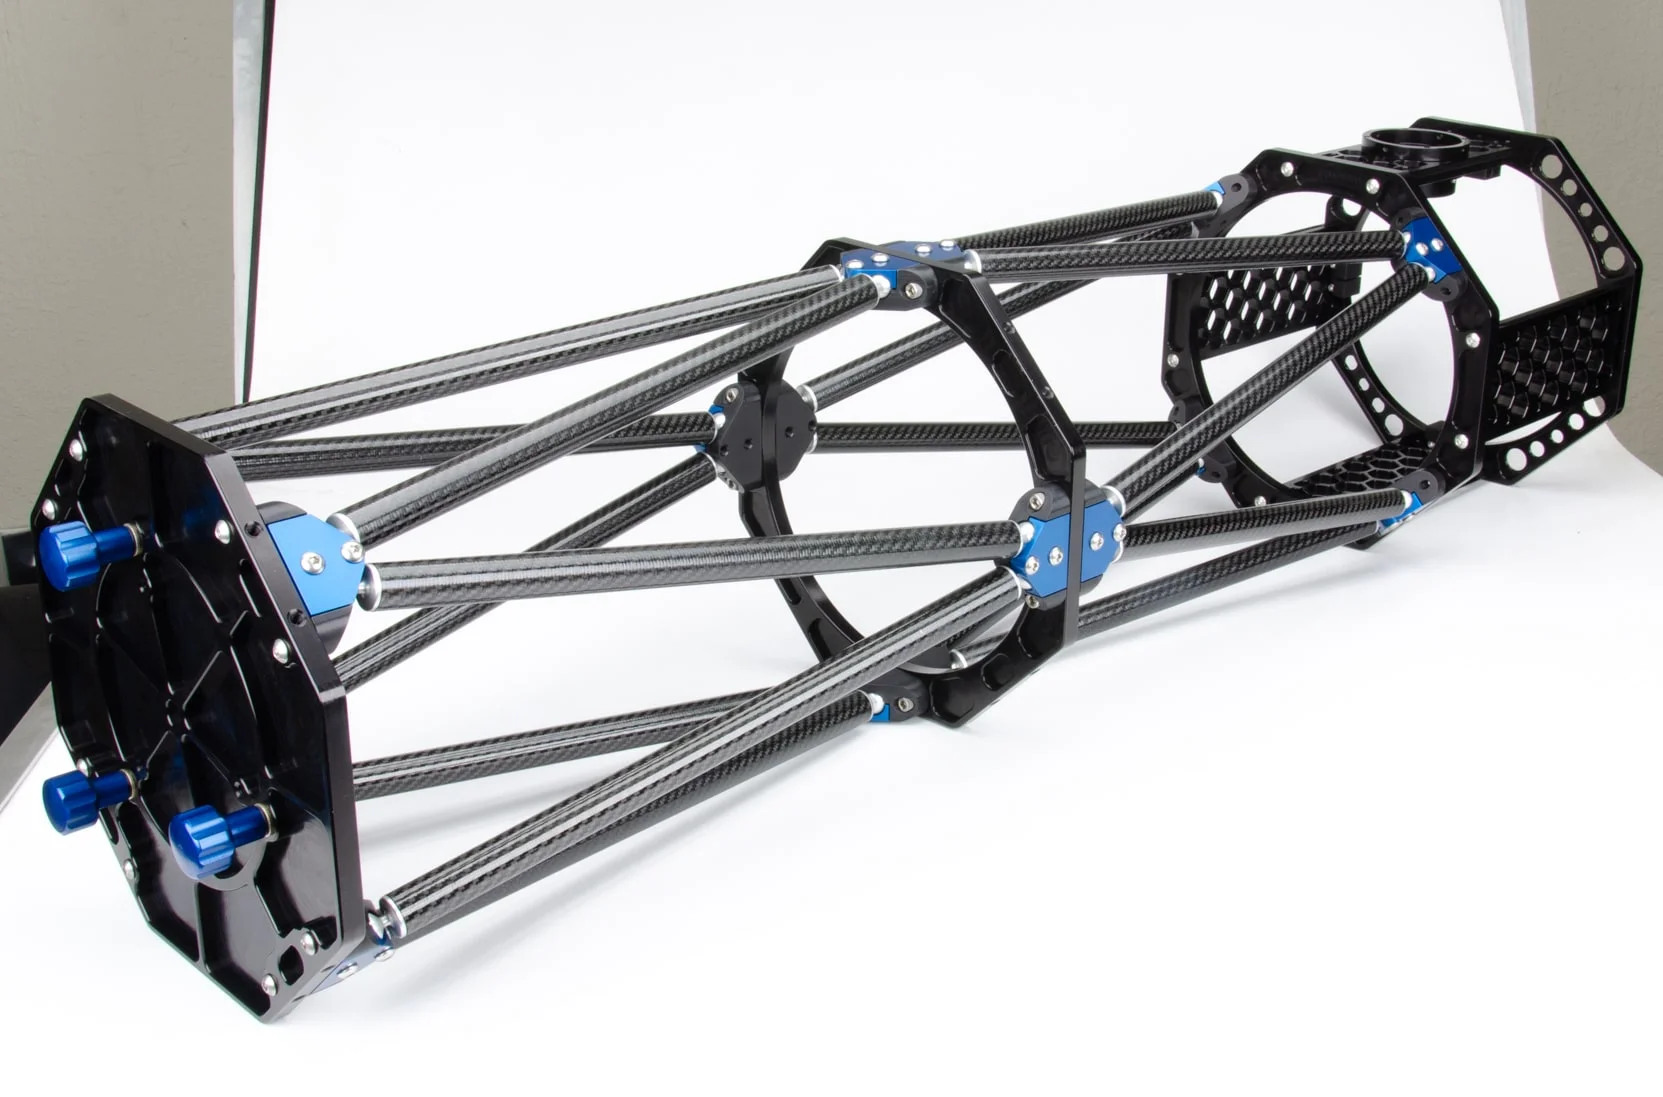
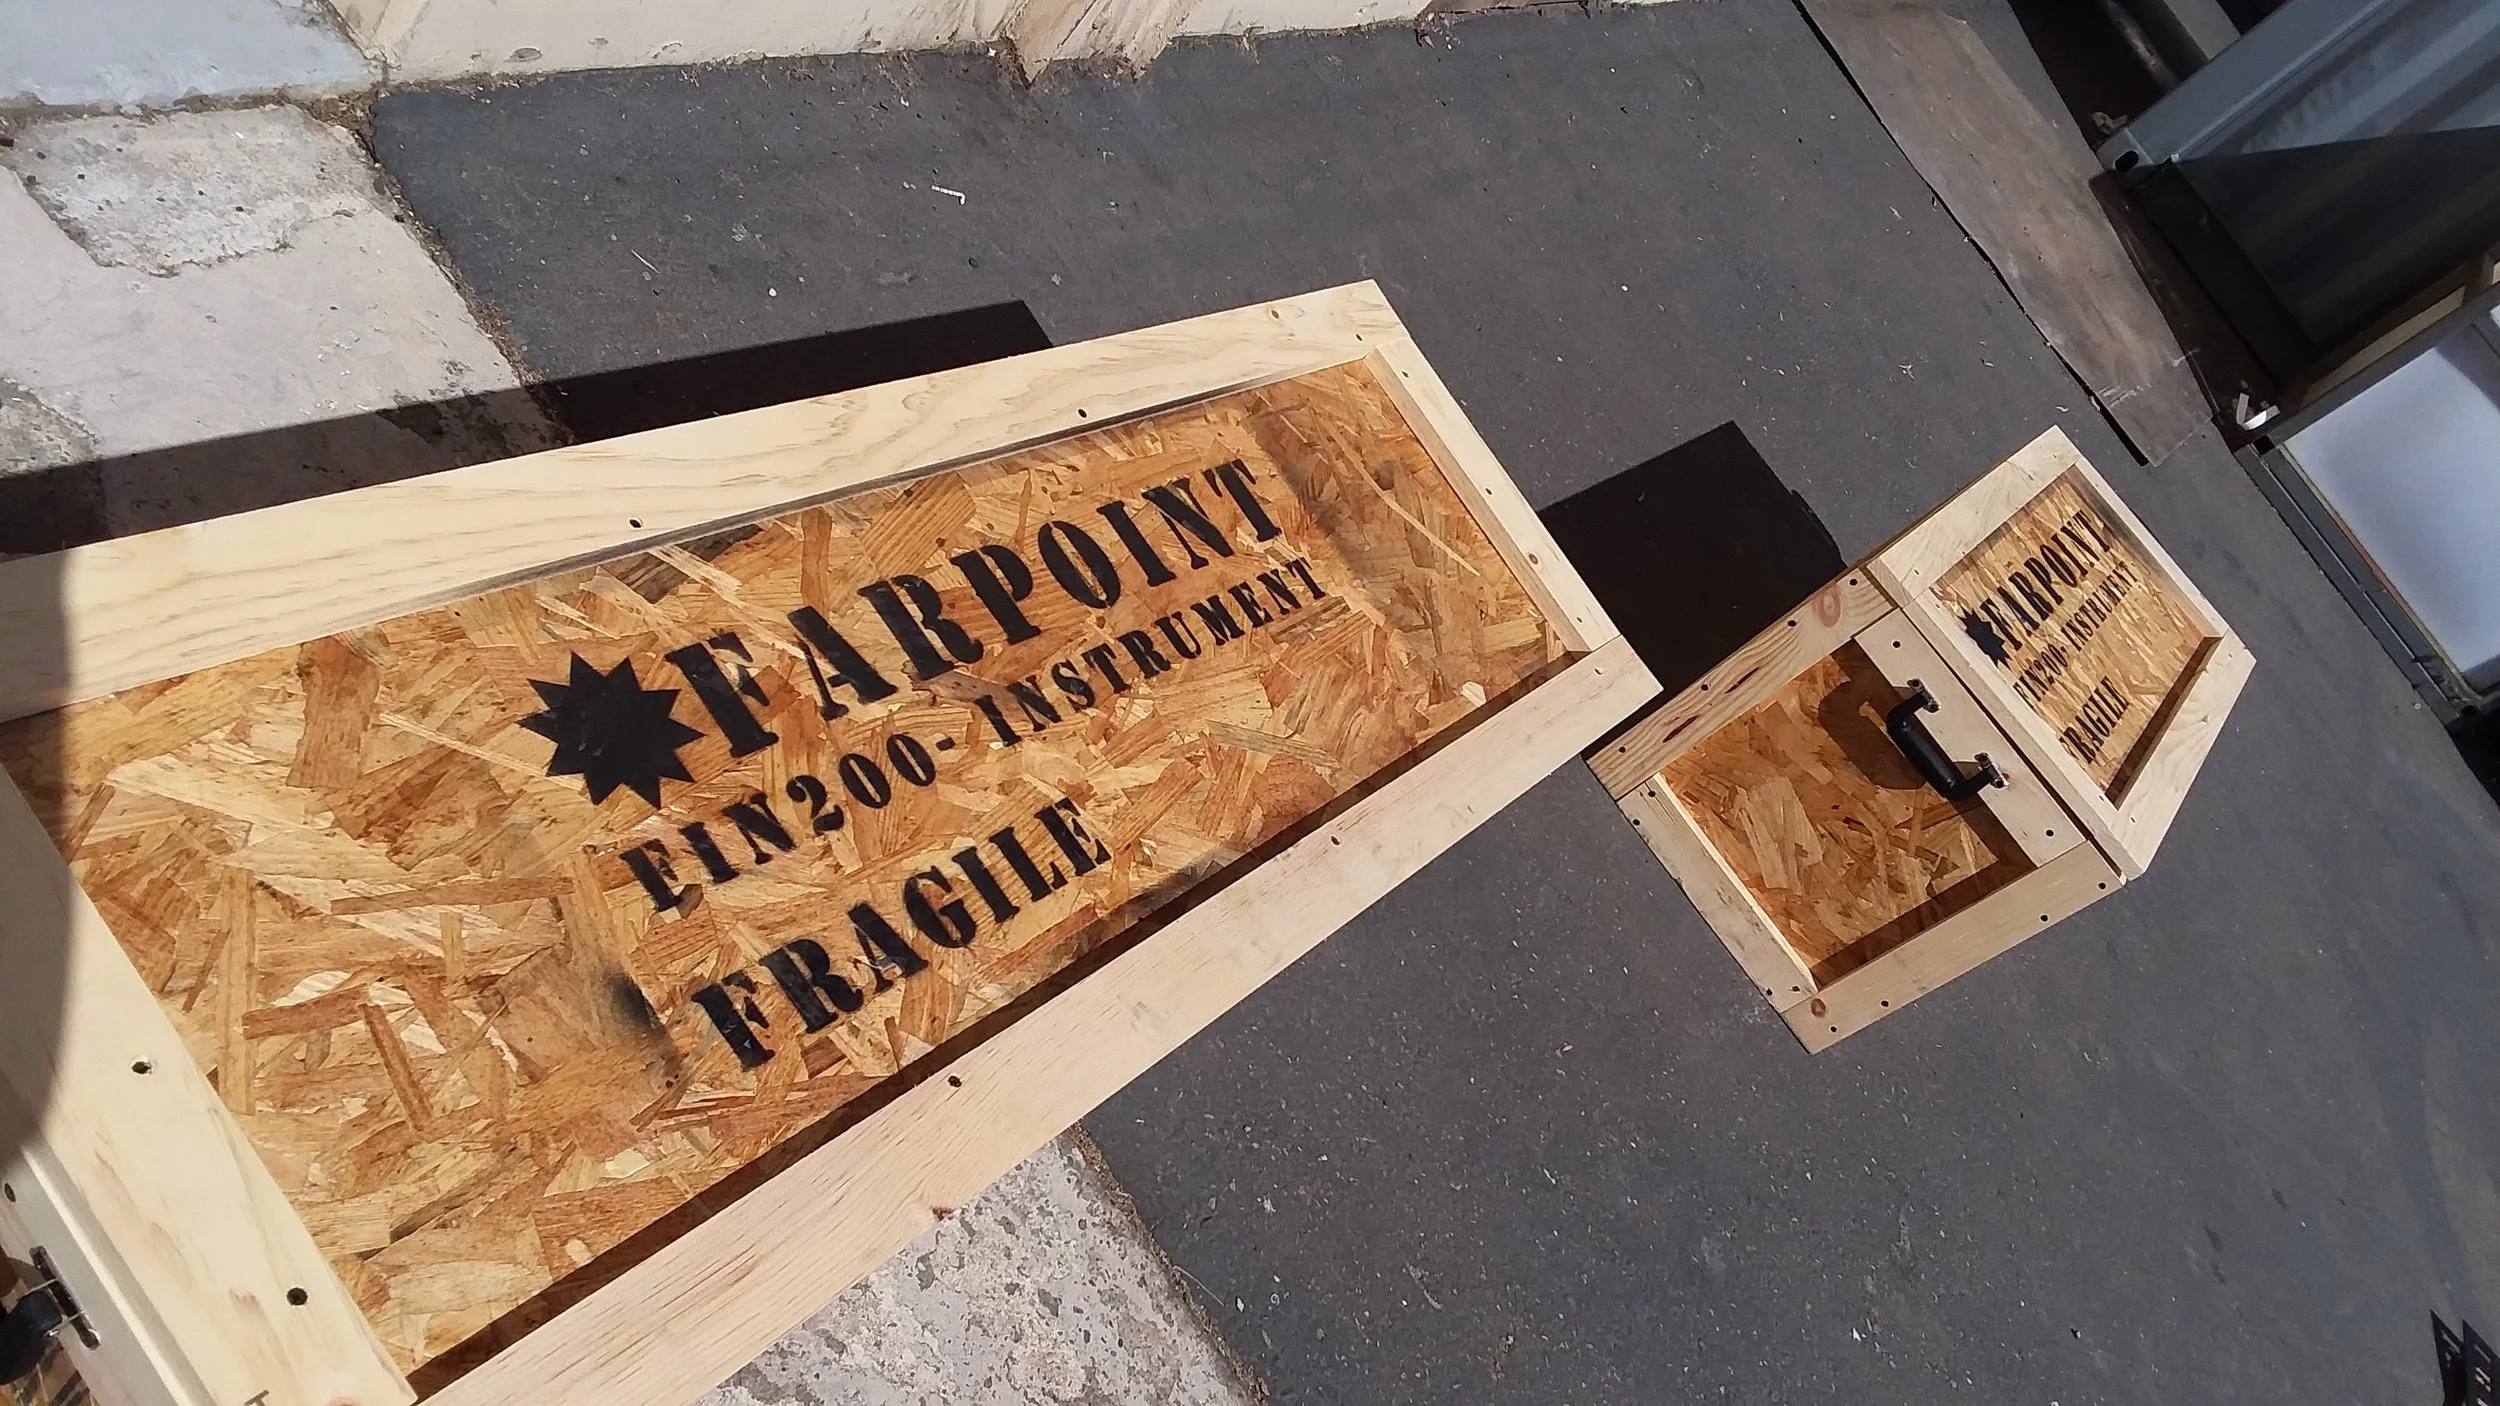
Farpoint FIN200
Astrophotography by Cary Chleborad
Telescope: Farpoint FIN200
(8" f/6" Carbon Truss Imaging Newtonian)
GuideScope: Orion 80mm short tube
Camera: ZWO ASI 071 MC Pro One Shot Color
Guide Camera: ZWO ASI174 Mini
Mount: Celestron CGE
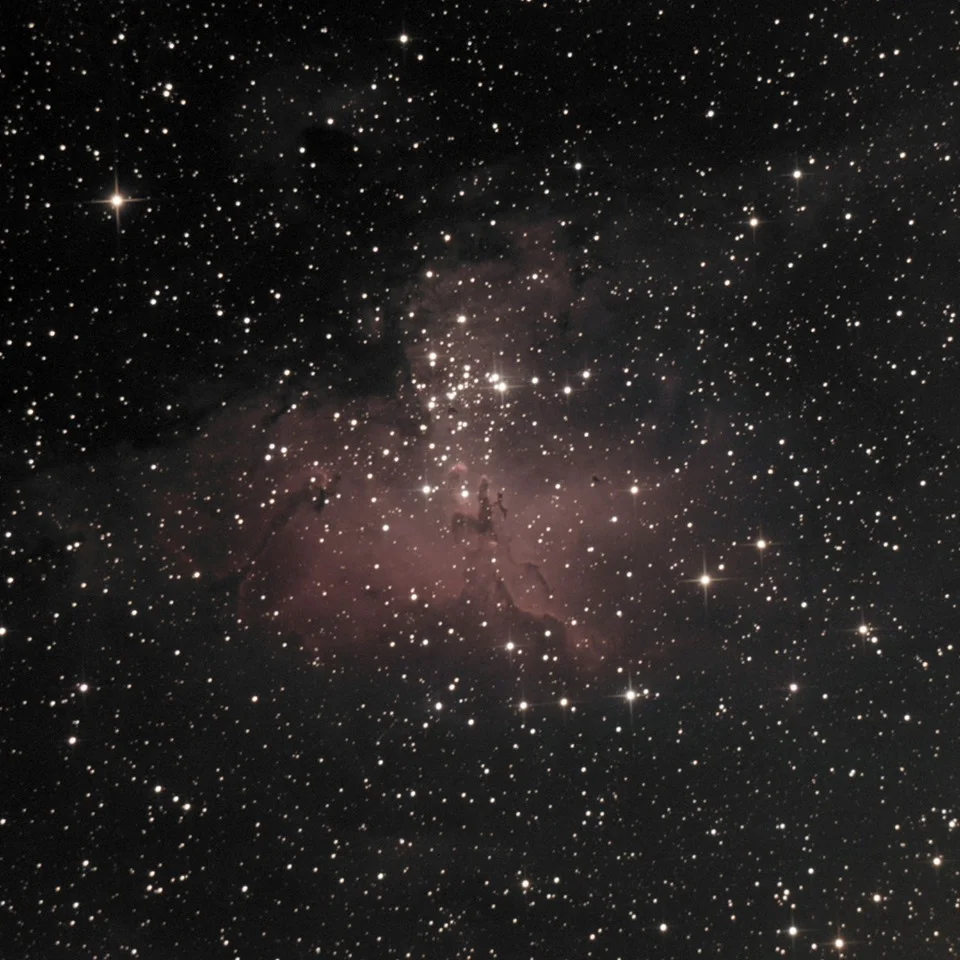
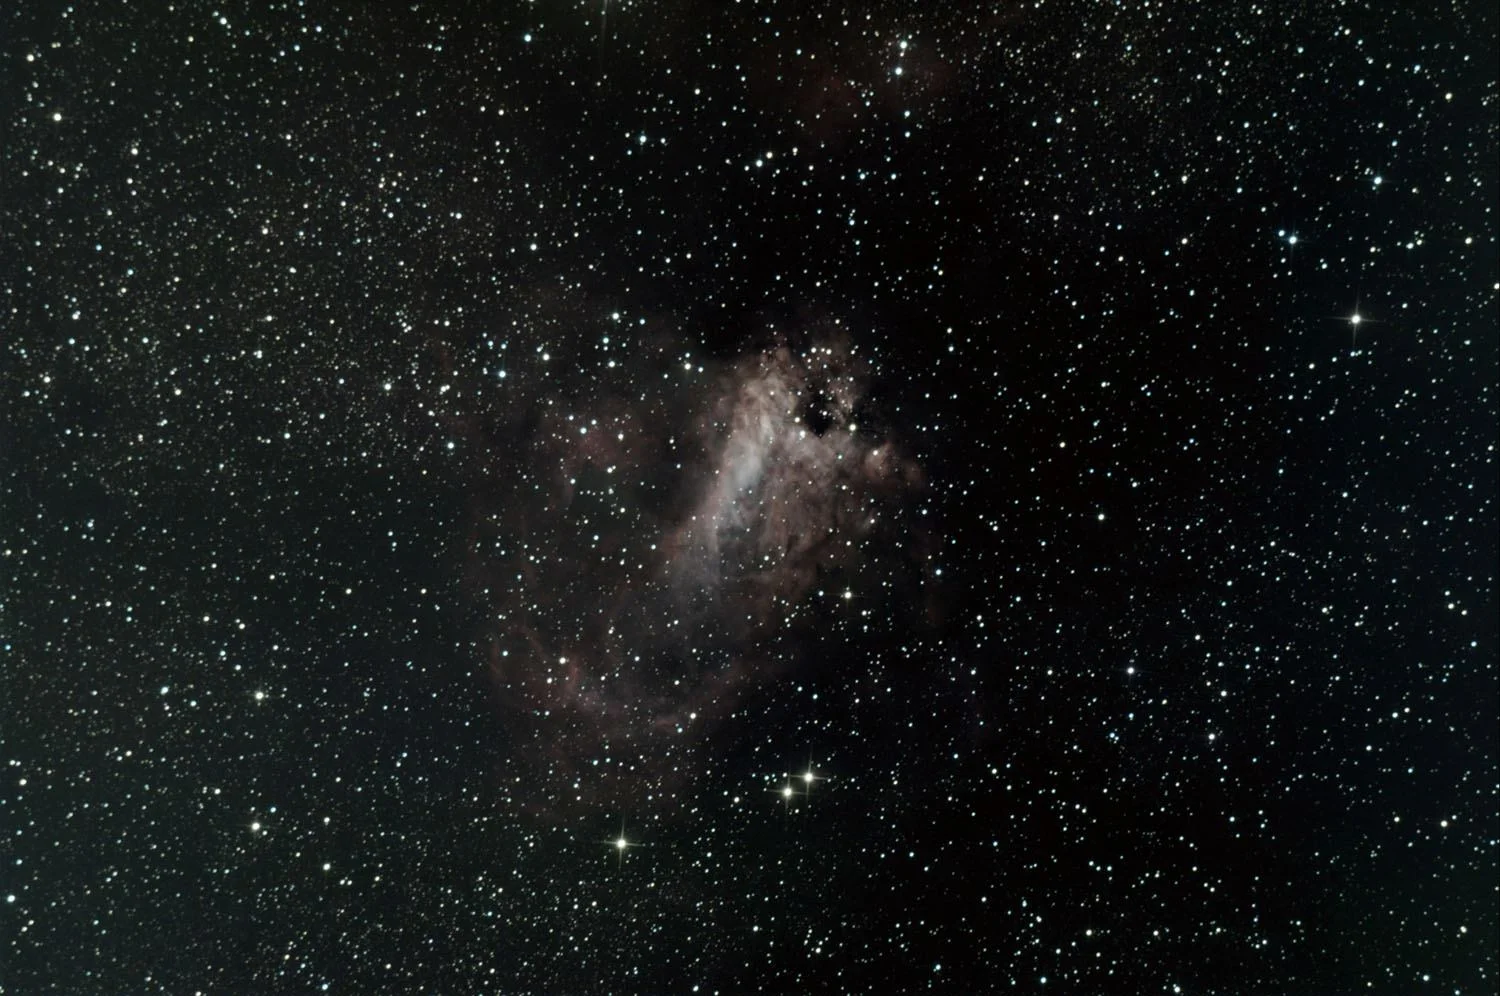
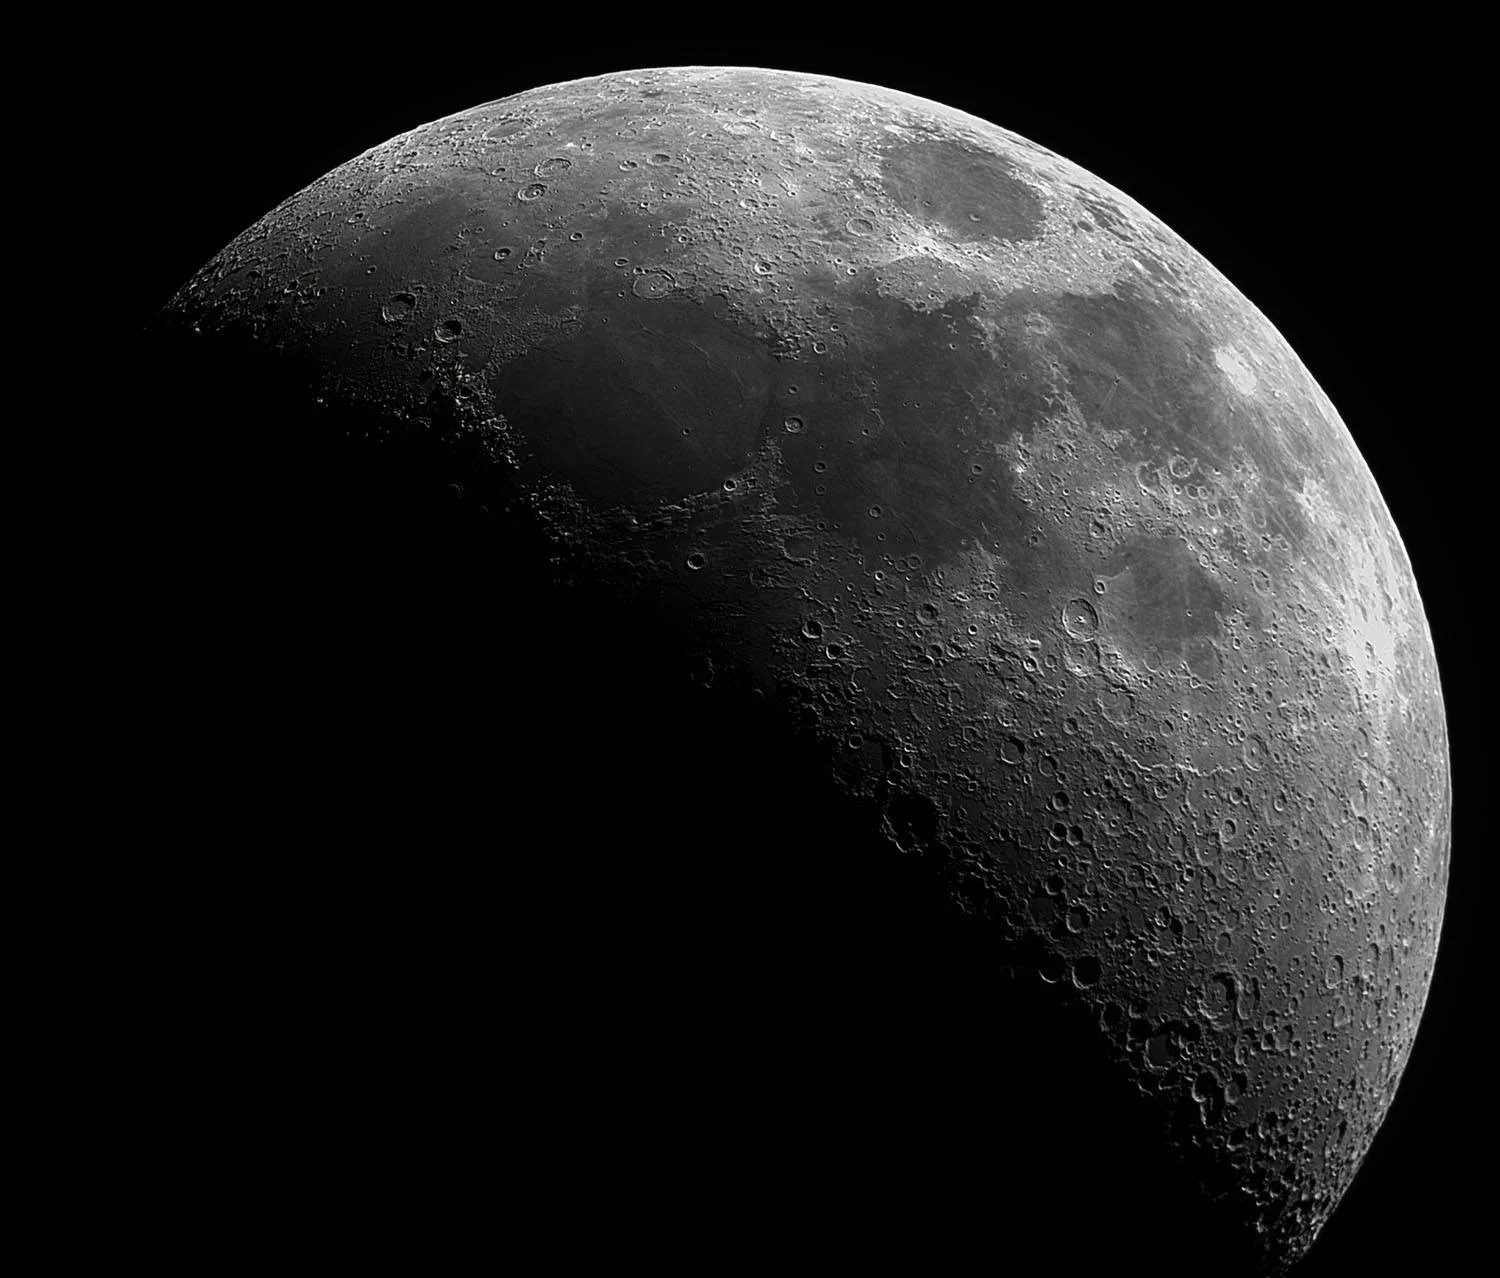
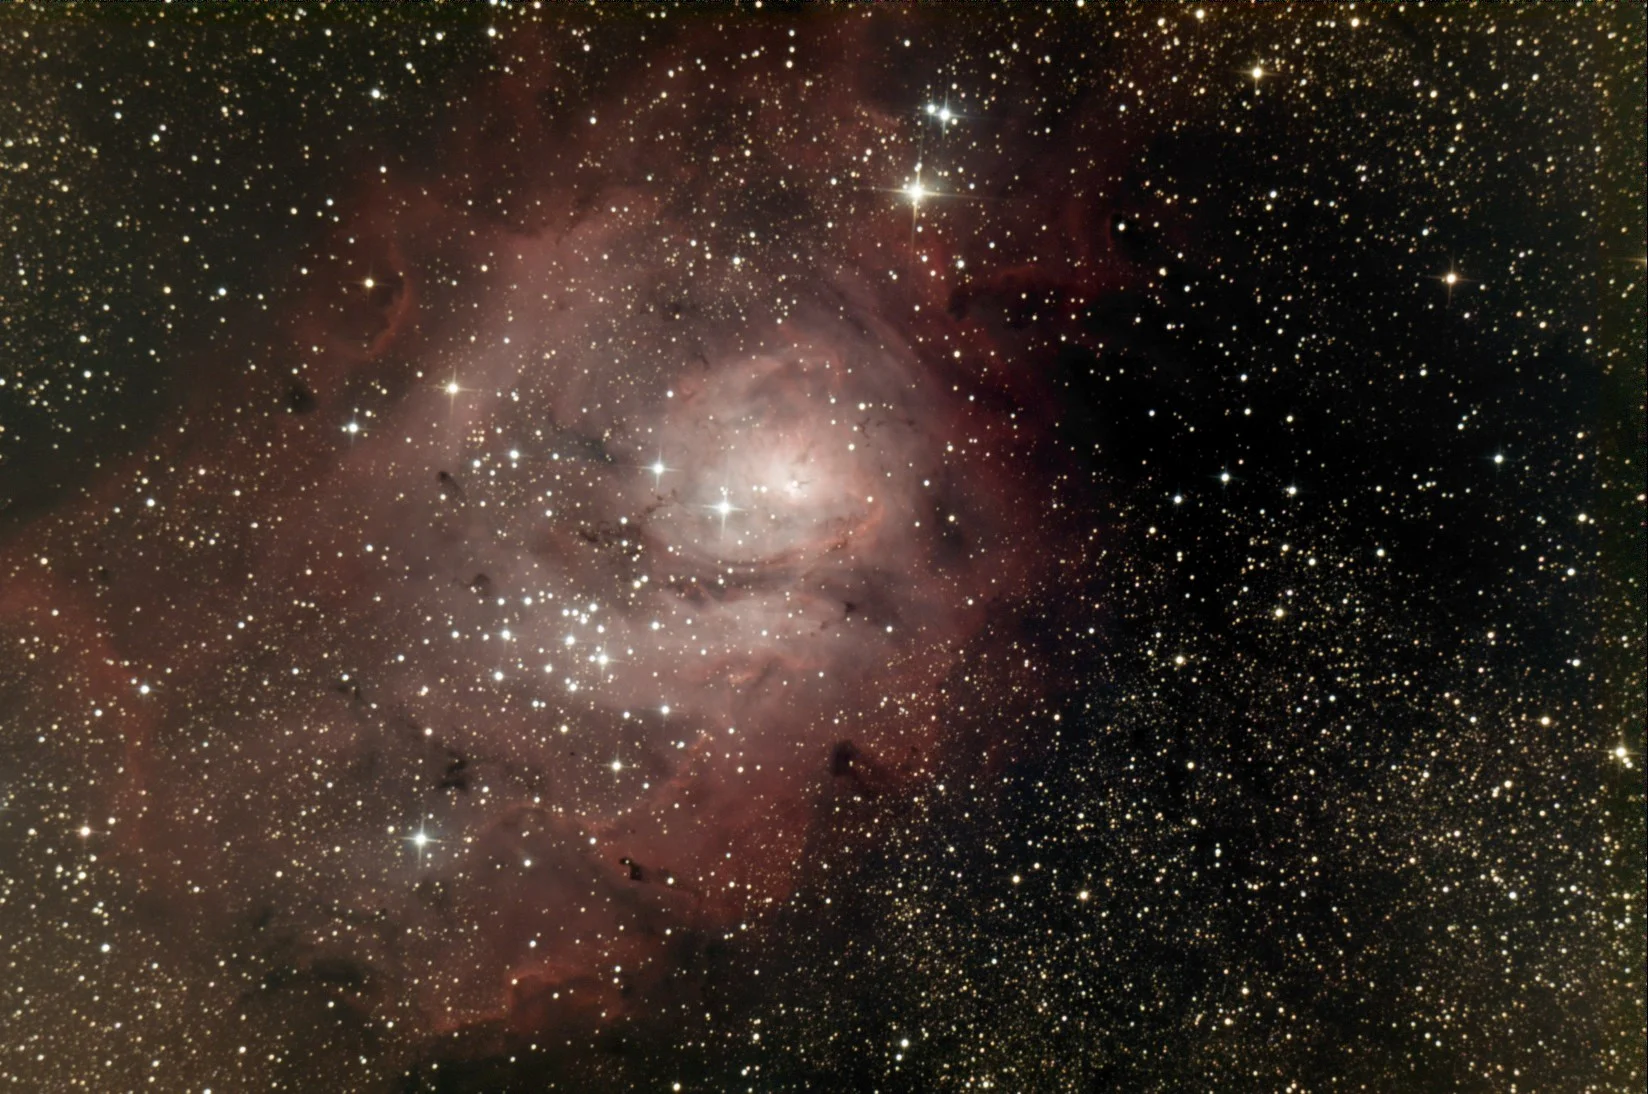
M8, M17, M16 & Moon
Farpoint Imaging Newtonian Telescope, 203mm, f/4
Description
Farpoint Imaging Newtonian Reflecting Telescope, 203mm, f/4
Highly Robust Design
Rigid and LightweightCarbon Fiber Truss
Ultra-Low Thermal Expansion
CNC Machined & Laser-Cut Fabrication
Easy to Collimate
Complete Collimaton Lockdown
ZERO Collimation Shift
Integral Accessory Dovetail Mounts on Secondary Cage
Crayford Focuser
ASCOM Compliant Computer Controlled Focusing Option
For more information, please visit the Farpoint Astro website.
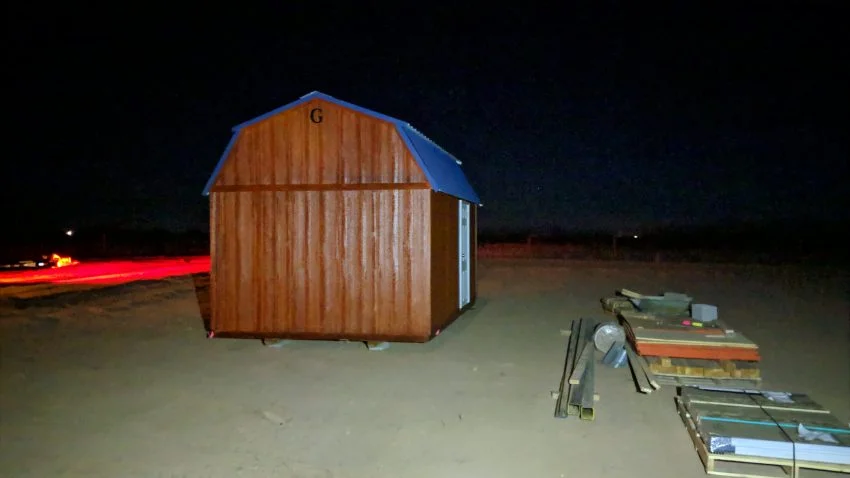
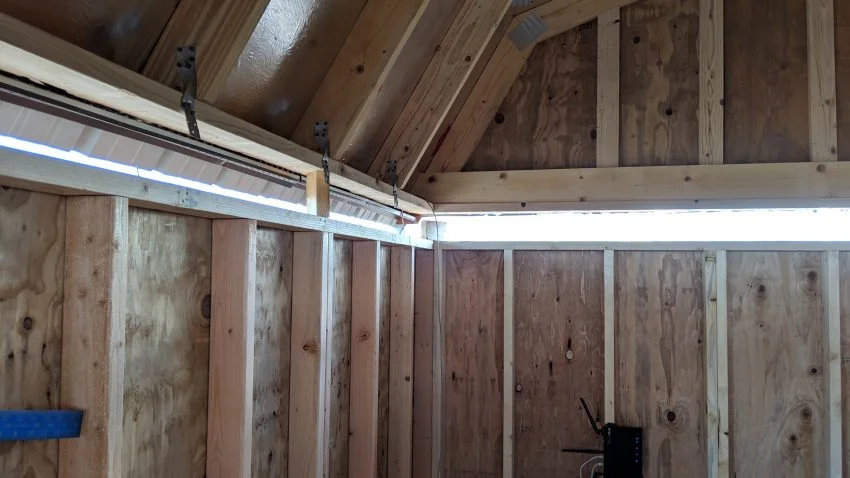
Astronomy Shed Build
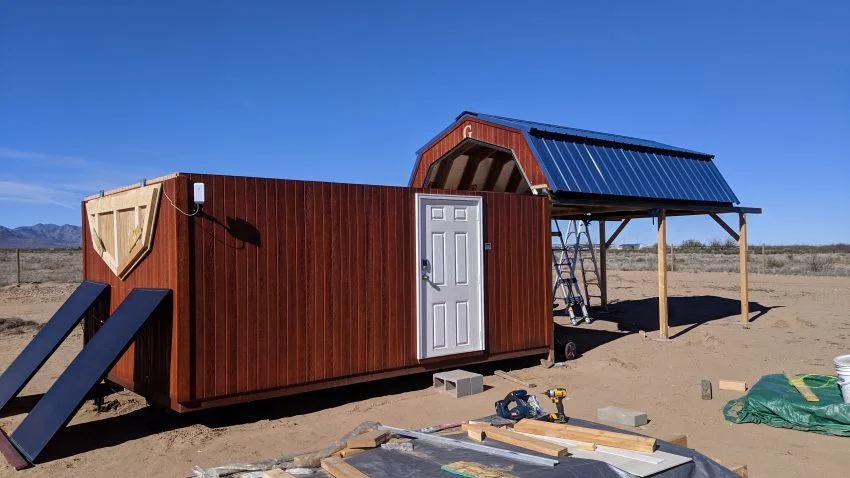
This past winter, we had planned on staying a month at Rusty’s RV Ranch in Rodeo, NM, then head back into Arizona for a few months. After three days in Rodeo, we canceled our Arizona plans and extended to 3 months, but that too would prove not to be enough.
Rodeo, NM is not a highly populated area nor a resort destination for most. However, because of this, it is a VERY dark sky site. Some of the darkest skies in the US. It was so dark that during the night on a new moon, I could walk around and not trip over anything with nothing but the light cast off of the Milky Way and other star’s light. We were… in awe.
One of our reasons for visiting Rodeo was to scout the area and consider building a remotely operable observatory. I’m a bit of an amateur astronomer, but because we’re generally in cities and have to concern ourselves with light pollution and personal property security that tends to outweigh the desire to break out all my gear (only to tear it back down a few hours later).
The TurtleHerding AstroShed
Rusty’s RV Ranch is a prize find for astronomy and birding buffs alike. Rusty, the owner, is very serious about preserving the night sky. Exterior RV lighting is prohibited, and you must use red lights when walking around after dark. For vehicles, parking lights only should be used after dark when driving through the ranch.
Early in our stay, I mentioned the scouting efforts to Rusty, that we were looking for a suitable location for a remote observatory. Rusty let me know that she and Tim have plots of land which are available to lease for just this purpose! Further, I was introduced to someone with an observatory just down the road from Rusty’s and got to see a lot of his great solutions to issues which I’d been struggling to work through thus far ( like, how to secure the rolling roof once closed so that high winds would not blow the roof off ). Within a week or two, I had signed a lease and ordered the building which would become my remote observatory!
Special Thanks:
Before continuing, I’d like to extend a massive ‘THANK YOU’ to a fellow astronomer that I met at Rusty’s. Mark, whom you’ll see in just a few photos, was a huge help. He introduced me to Don, who’s own astronomy shed was the inspiration for mine. He provided loads of hands-on assistance, including digging holes, swingin’ hammers, holding things while I was sawing, hammering, drilling. Mark put in countless hours and is the reason my first astronomy shed turned out so well.
There were also many others who extended a helping hand or tool along the way. Dennis, Jason, Eric, Chris, Tim, Bob, Rusty, among others. Thank you all for your part in making this dream a reality.
And, of course, to my darling wife. She gave me the OK for this endeavor and tolerated my obsessive toiling, planning, talking about this project as well as me being out of the RV working on it for weeks on end. Thank you, my sweet. I love you.
Work began immediately.
(NOTE: This post is very long, relatively detailed and full of pictures.)
Here’s a quick breakdown of the items tackled:
Clearing the land and a driveway back to the corner lot that I’d picked ( northwest corner ).
Cleared Astronomy plot
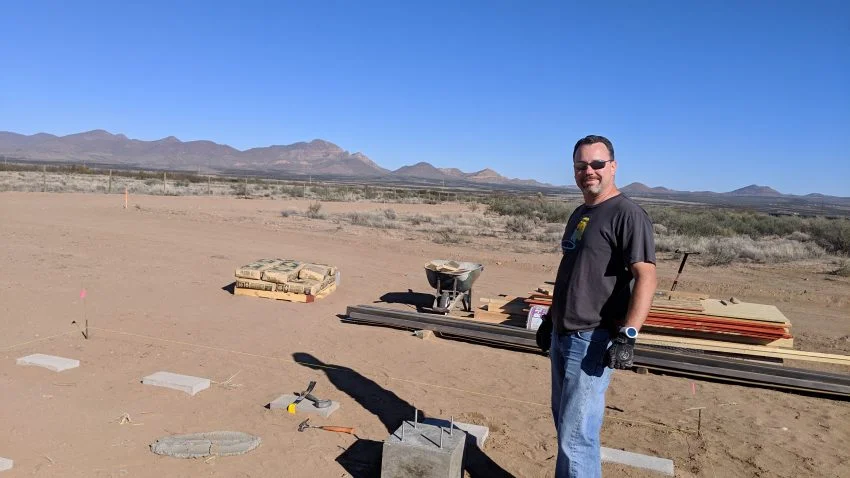
Planning for all the materials required for the build and getting them delivered.
I mentioned that Rusty’s RV Ranch is remote, right?
Luckily, Valley Mercantile is about 20 minutes drive away in Animas, NM.
The Mercantile had a surprisingly good selection of materials and even coordinated ordering in some of the less common items ( 20′ long 1/4″ x 4″ plate steel for example ).
They were able to deliver practically all of the major building supplies right to my build site!
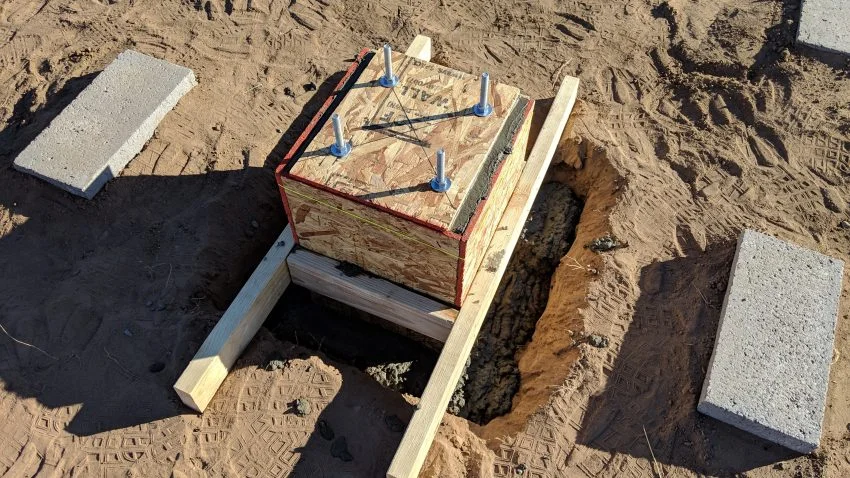
Measuring and setting up a foundation for the shed.
I decided to dig holes and bury concrete blocks. I wanted the foundation to be deep enough not to wash away or settle in the monsoon season of the desert southwest, but high enough to keep the building above the ground to prevent water washing up onto/into the shed.
Were I to do this again, I’d pour concrete footers instead. Getting the blocks even remotely level and at the same height as each other proved nearly impossible. I ended up shimming quite a bit to ensure the building was itself level and evenly supported.
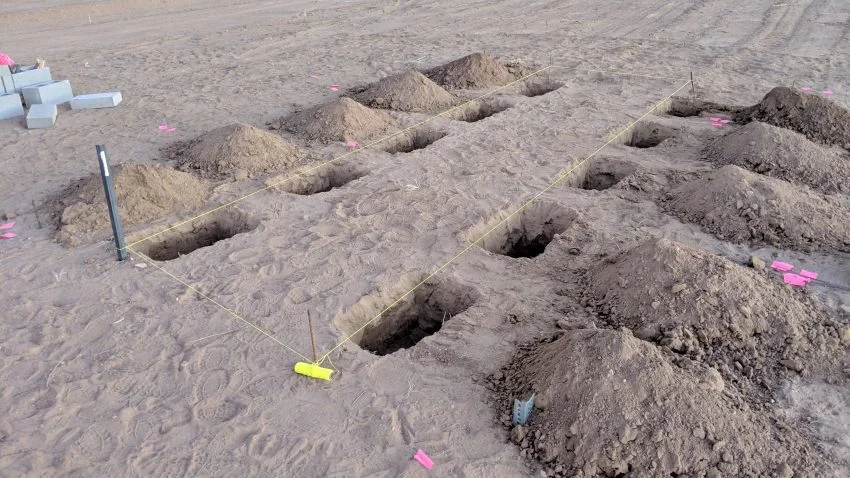
not a pet cemetery…
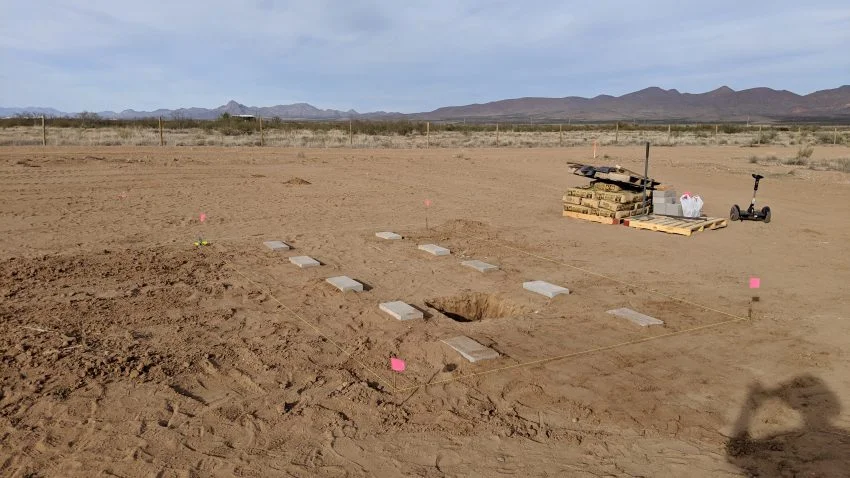
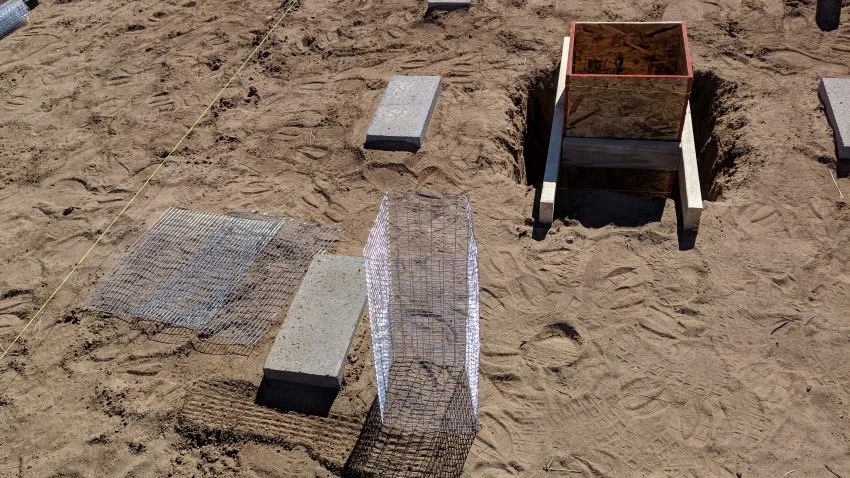
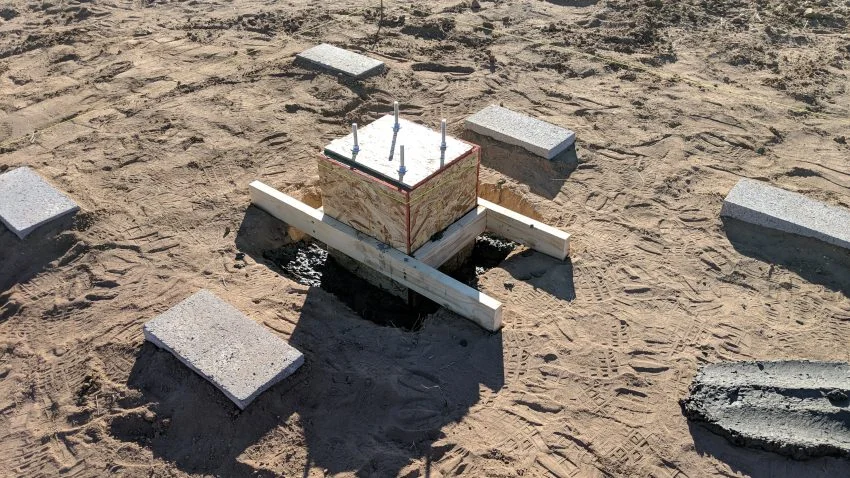
4. Carefully measure and pour the concrete footer for the telescope pier.
I wanted the concrete to stop just below the subfloor of the Astro-shed. This configuration would permit me to cut only small holes for 1/2″ all-thread to stick up into the shed and mount the telescope pier onto those all-thread rods.
Thus, meticulous measuring was required since the square shape of the footer would need to fit between two-floor joists of the shed. This ultimately worked out very well, much to the surprise of the shed delivery team.
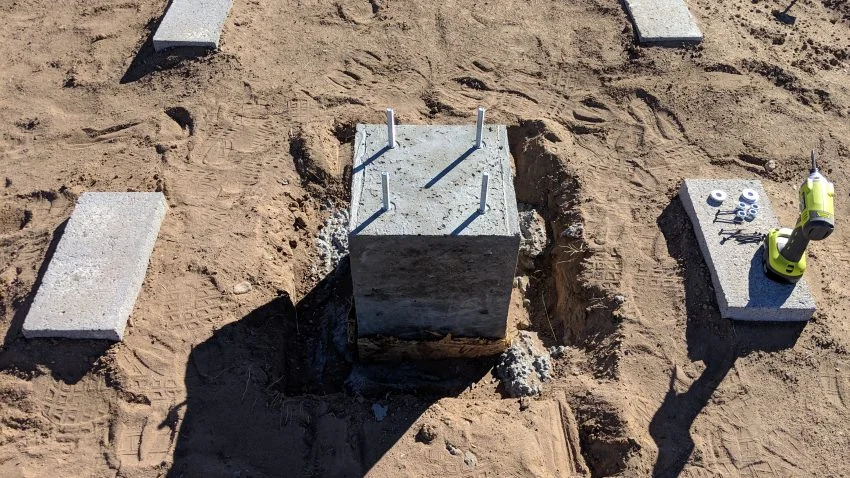
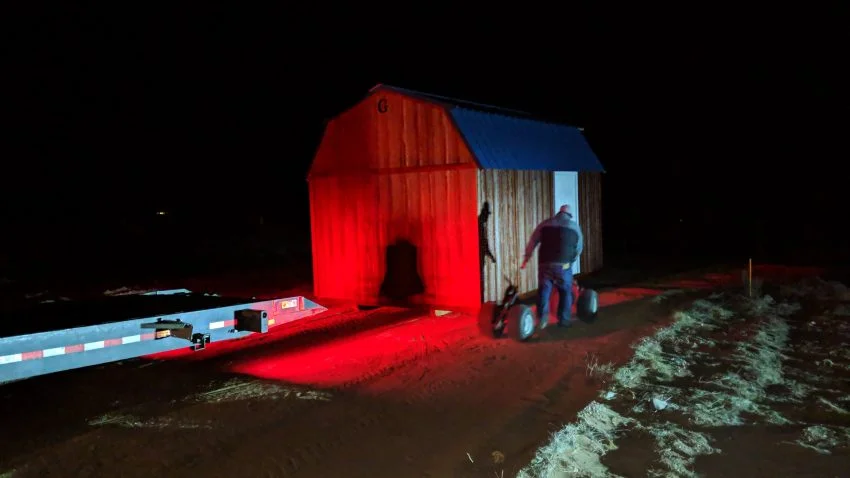
5. Getting the building delivered and set over the concrete footer for the pier.
It was dark by the time the building arrived, which made things a bit more tense getting it set into the proper position.
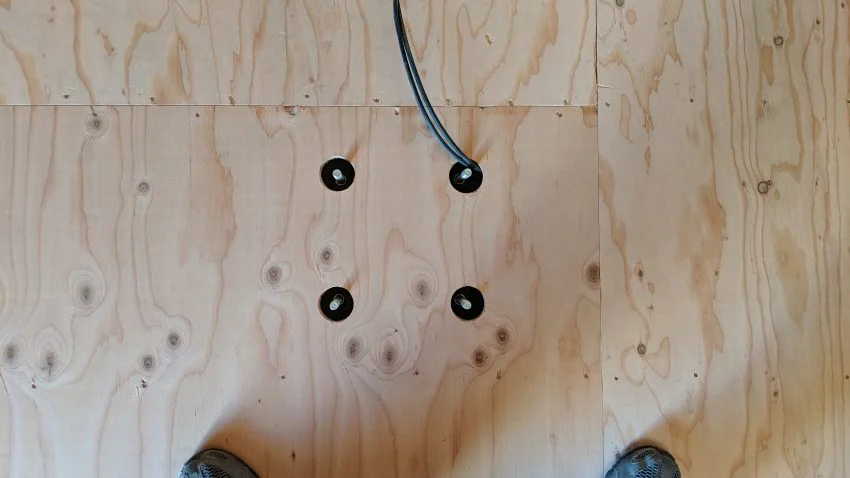
Further, I had to drill four holes through the floor for my all-thread rods to poke through.
The delivery team did not think this would work. I re-measured everything one last time and confirmed that the concrete would be just 2″ below the floor, nestled right between the floor joists with only 3/4″ clearance to the joists themselves.
6. Shim the runners under the building to ensure it was level and evenly supported, as well as positioned so that the all-thread was centered in the four holes I’d drilled.
7. Get initial power setup at the shed.
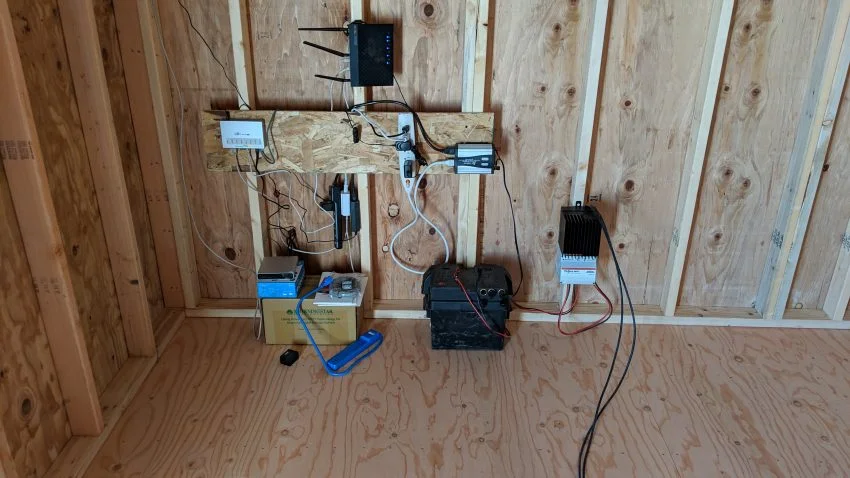
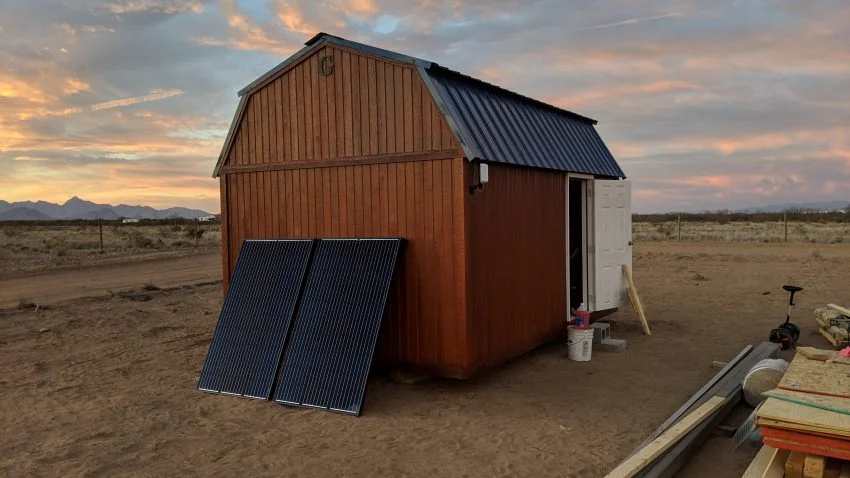
I started with 2 x 300-watt solar panels and a ~100Ah deep cycle battery. This setup was temporary, just waiting for other power items to arrive and allowed me to run some network gear.
Once my primary power storage arrived ( a 5.2kWh Tesla battery module ), I converted over to it and added a 1000 watt inverter. This power system permitted me to run any AC load I needed, which mostly consisted of recharging the batteries for my various tools.
8.Splitting the roof!
One key aspect leading to the choice of the Graceland Portable Building’s Side Lofted Barn was that its roof to wall interface was the same height around the building ( no staggered height between end and side walls ) and had two 2×4’s at the top as the wall plate.
This meant I could separate the two 2×4’s, leaving one attached to the roof segment, and one attached to the top of the wall, then reinforce where necessary.
I could also lift the roof and install my track, plate steel and rollers with relative ease (although this was tougher to execute than I’d expected initially).
8in Collapsing Scope

4″ F8 Newtonian
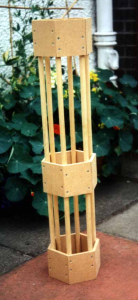
My first ever incarnation was a scope with a 100mm mirror and a 25 mm secondary. Construction was pretty basic: 12mm wooden dowels held in 9mm MDF hexagonal sections. The primary mirror was held onto a sprung cell using double sided sticky tabs. The secondary was glued to the pole with epoxy ( I thought astigmatism was something that got stuck in your eye!). Collimation was achieved………no actually collimation was not achieved. The focuser would have been more at home on a victorian microscope. All this criticism, but in actual fact I still managed to see 2 belts on jupiter, 1 galaxy and the moon. I hasten to add this was in heavy light pollution on top of my parents’ garage tar roof which was still hot from the days’ sun. I “finished” this telescope in 1995. It was accidentally mistaken for a gardening implement and had a baby oak tree planted in it. (only joking).
8.75 F7.2 Dobsonian
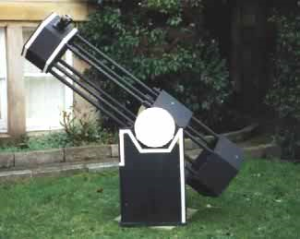
My second scope used the same format as the last, as the design didn’t have any major problems. The main difference however was the fact that the upper assembly, being smaller, collapsed into the lower assembly. This was so that I could get the tube into a smaller
storage place and cars easily. The two parts were held together
with bolts and wing nuts through th 25mm wooden dowels which
formed the skeleton of the frame.Other than that the rest of the scope was pretty bog standard. However at around 30Kg the scope was way too heavy, although it was rock solid and didn’t budge in a strong wind. Actually that was also a problem…….
The mirror cell was made from two sprung plates. Notice that the position of the collimation and support bolts were at about 75% radius. These were of course pre Plop days. I’m still not entirely convinced that 3 point cells should have supports at 40% radius however. Only expertimentation will prove this point. The cell is held to the mirror box via 3 steel shelf brackets. I’m actually ashamed to admit that when I first built this scope, the primary was epoxied to the disc of wood!!!! The diffraction images I got out of focus were distorted beyond recognition and I couldn’t understand why, until I read ‘How to make a Telescope’ by Jean Texereau a year later. It took me a while to get the mirror safely off the disk of wood and put in place proper supports.
All parts on the rocker box and tube are 18mm MDF. Yes very heavy! The bearings were actually quite poor performers. The reason was I used a smooth laminate for the bearing surface against teflon. This led to a sticky start in movement when tracking and slewing. Once it was started though it was buttery smooth (I actually tried vegetable oil aswell).The Spider had 3 vanes. I like three vanes for some reason. In fact Most of my scope designs use
60 and 120 degree angles. It somehow seems asthetically pleasing.
When completed the telescope was varnished on the outside surfaces to give a nice deep black look. The white trim was painted on the extremities to make the outline of the scope obvious in the dark.
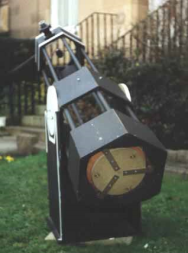
This is me. Marco. The telescope was finished in late 98′. It was actually quite a feeling too have achieved this. I just wish that I had had more use out of the scope. I had no car at the time and live in the centre of Edinburgh. On the street however on excellent nights
I was able to push te scope to x340 with very crisp images in
moments of good seeing. Cassisni division was starkly obvious
and the moon was jaw dropping. The limiting magnitude in the city is about 4.5 – 5. On very cold nights in february though, the orion nebula would show a surprising amount of detail.
The scope was later put to a better use as I sold it to a cub scout leader for the cubs, who would use it in much darker skies. If you
are reading this, how is the scope doing?
Dark Frame
by Dark Frame
This a previously 'tuned' EQ6 mount lacking one DEC axis bearing. You know, the tiny one. Can't miss it. 68mm diameter, 15mm thick. With a 40mm hole. Useful.
No wonder the new owner noted a wobbly DEC Axis which wouldn't calibrate in PHD, with his 10" scope and counterweights on it.
Always check what was done if someone has claimed to have rebuilt their mount, and you're looking to buy it. Not all builds are equal.
Get a demo if you can.
Veil Nebula with IDAS and BORG
by hutech
Followings are the cropped close-up versions in full resolution mode.
All light frames were simply stacked. More experienced users should split into RGB individually and create AOO or Hubble Pallet or something else. I will learn that from now on.
I feel the image sharpness might be affected by seeing or the temperature change during the imaging session. Even my 75mm guide scope showed poor seeing.
I wish to use my lovely cooled 6D. But so far, there is no room for one more filter box at this moment. This is why I shot the above with A7. I need the special arrangement for that.
$1,000 off first ten early adopters!
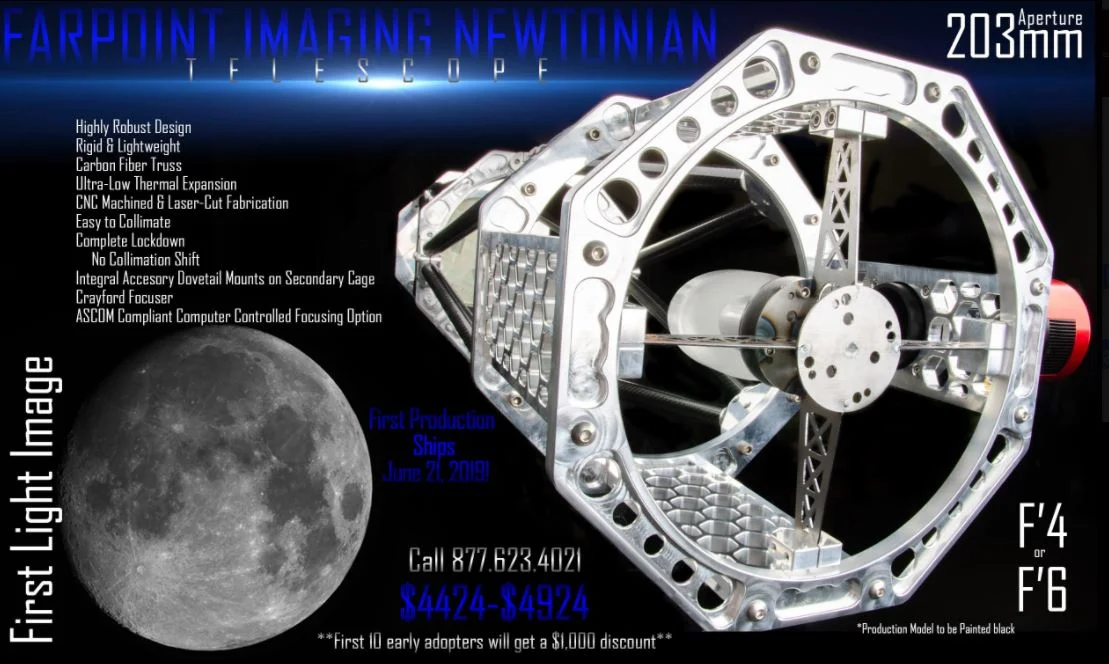
Farpoint Imaging Newtonian Telescope, 203mm, f/6
$3,424.00
Available on backorder
Farpoint Imaging Newtonian Reflecting Telescope, 203mm (8 inch) f/6 (also available in f/4)
First 10 early adopters will get a $1,000 discount
Production time 90 days, 1st delivery June 21, 2019, customers will be notified with updated delivery date and product details.
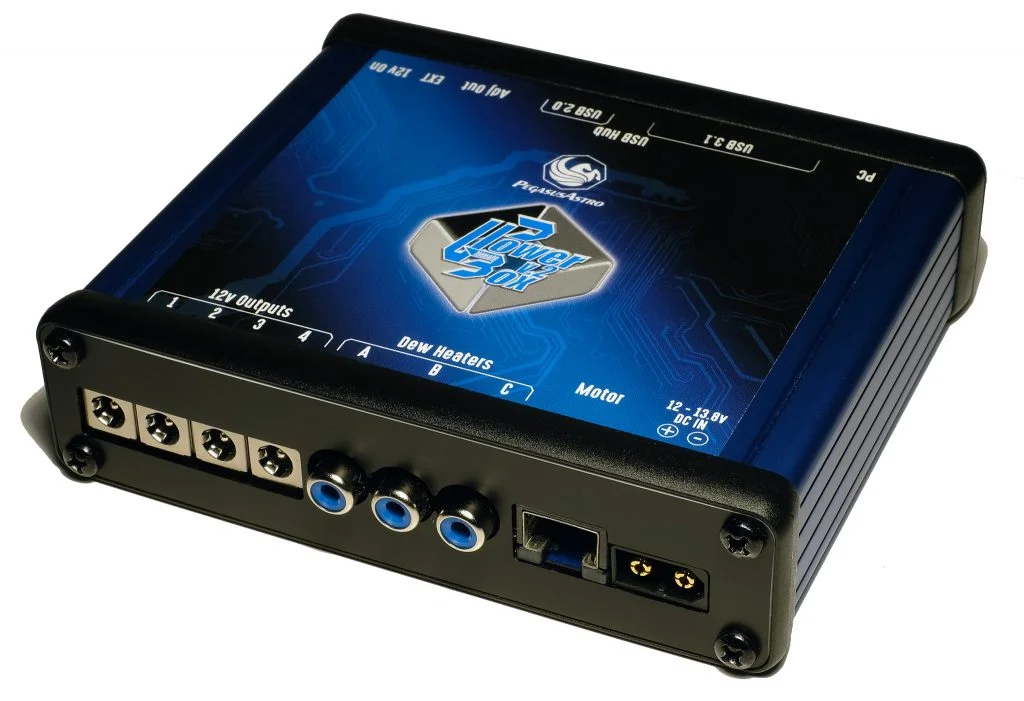
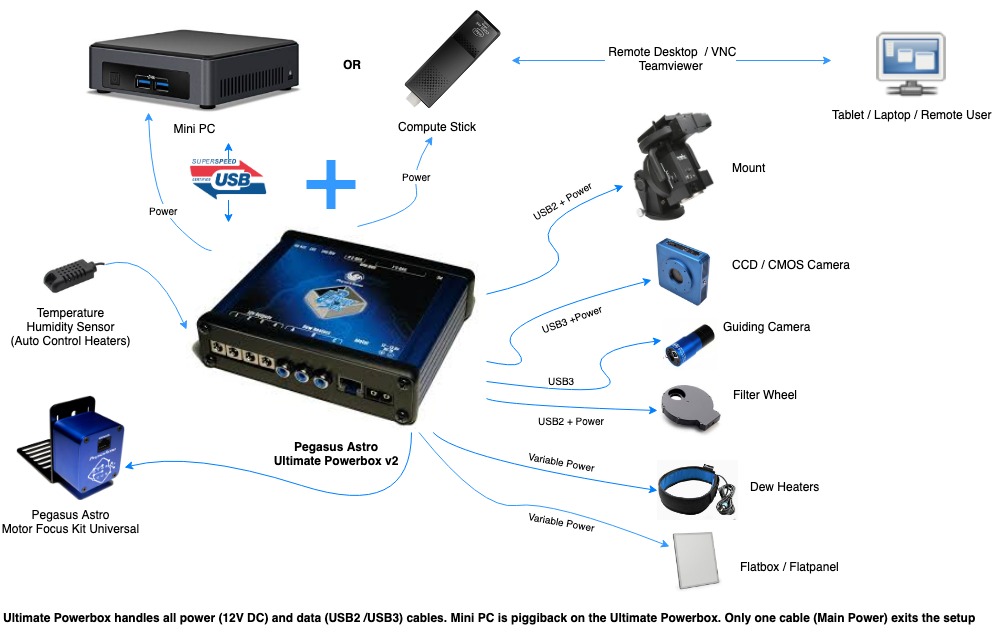
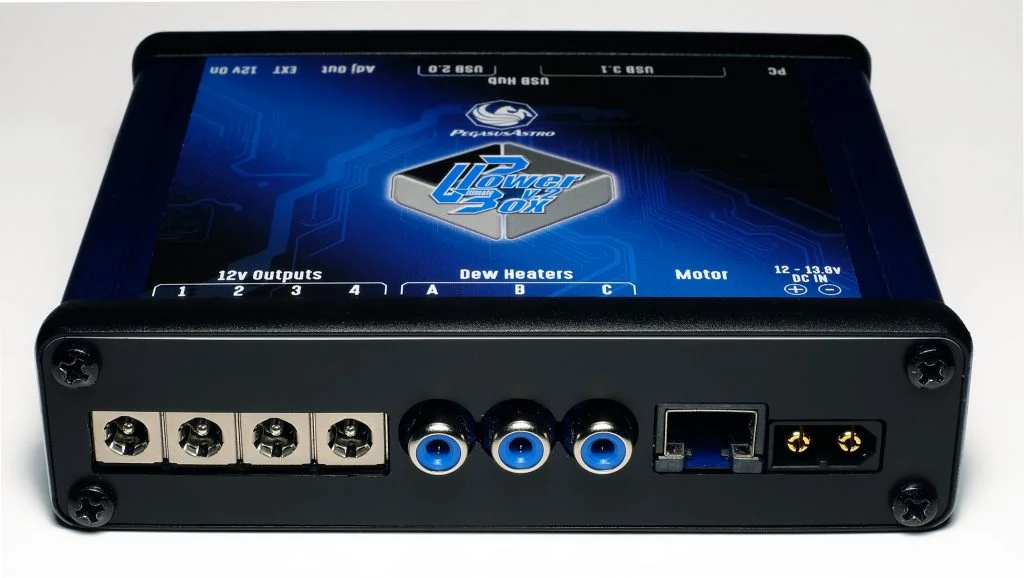
Ultimate Powerbox v2
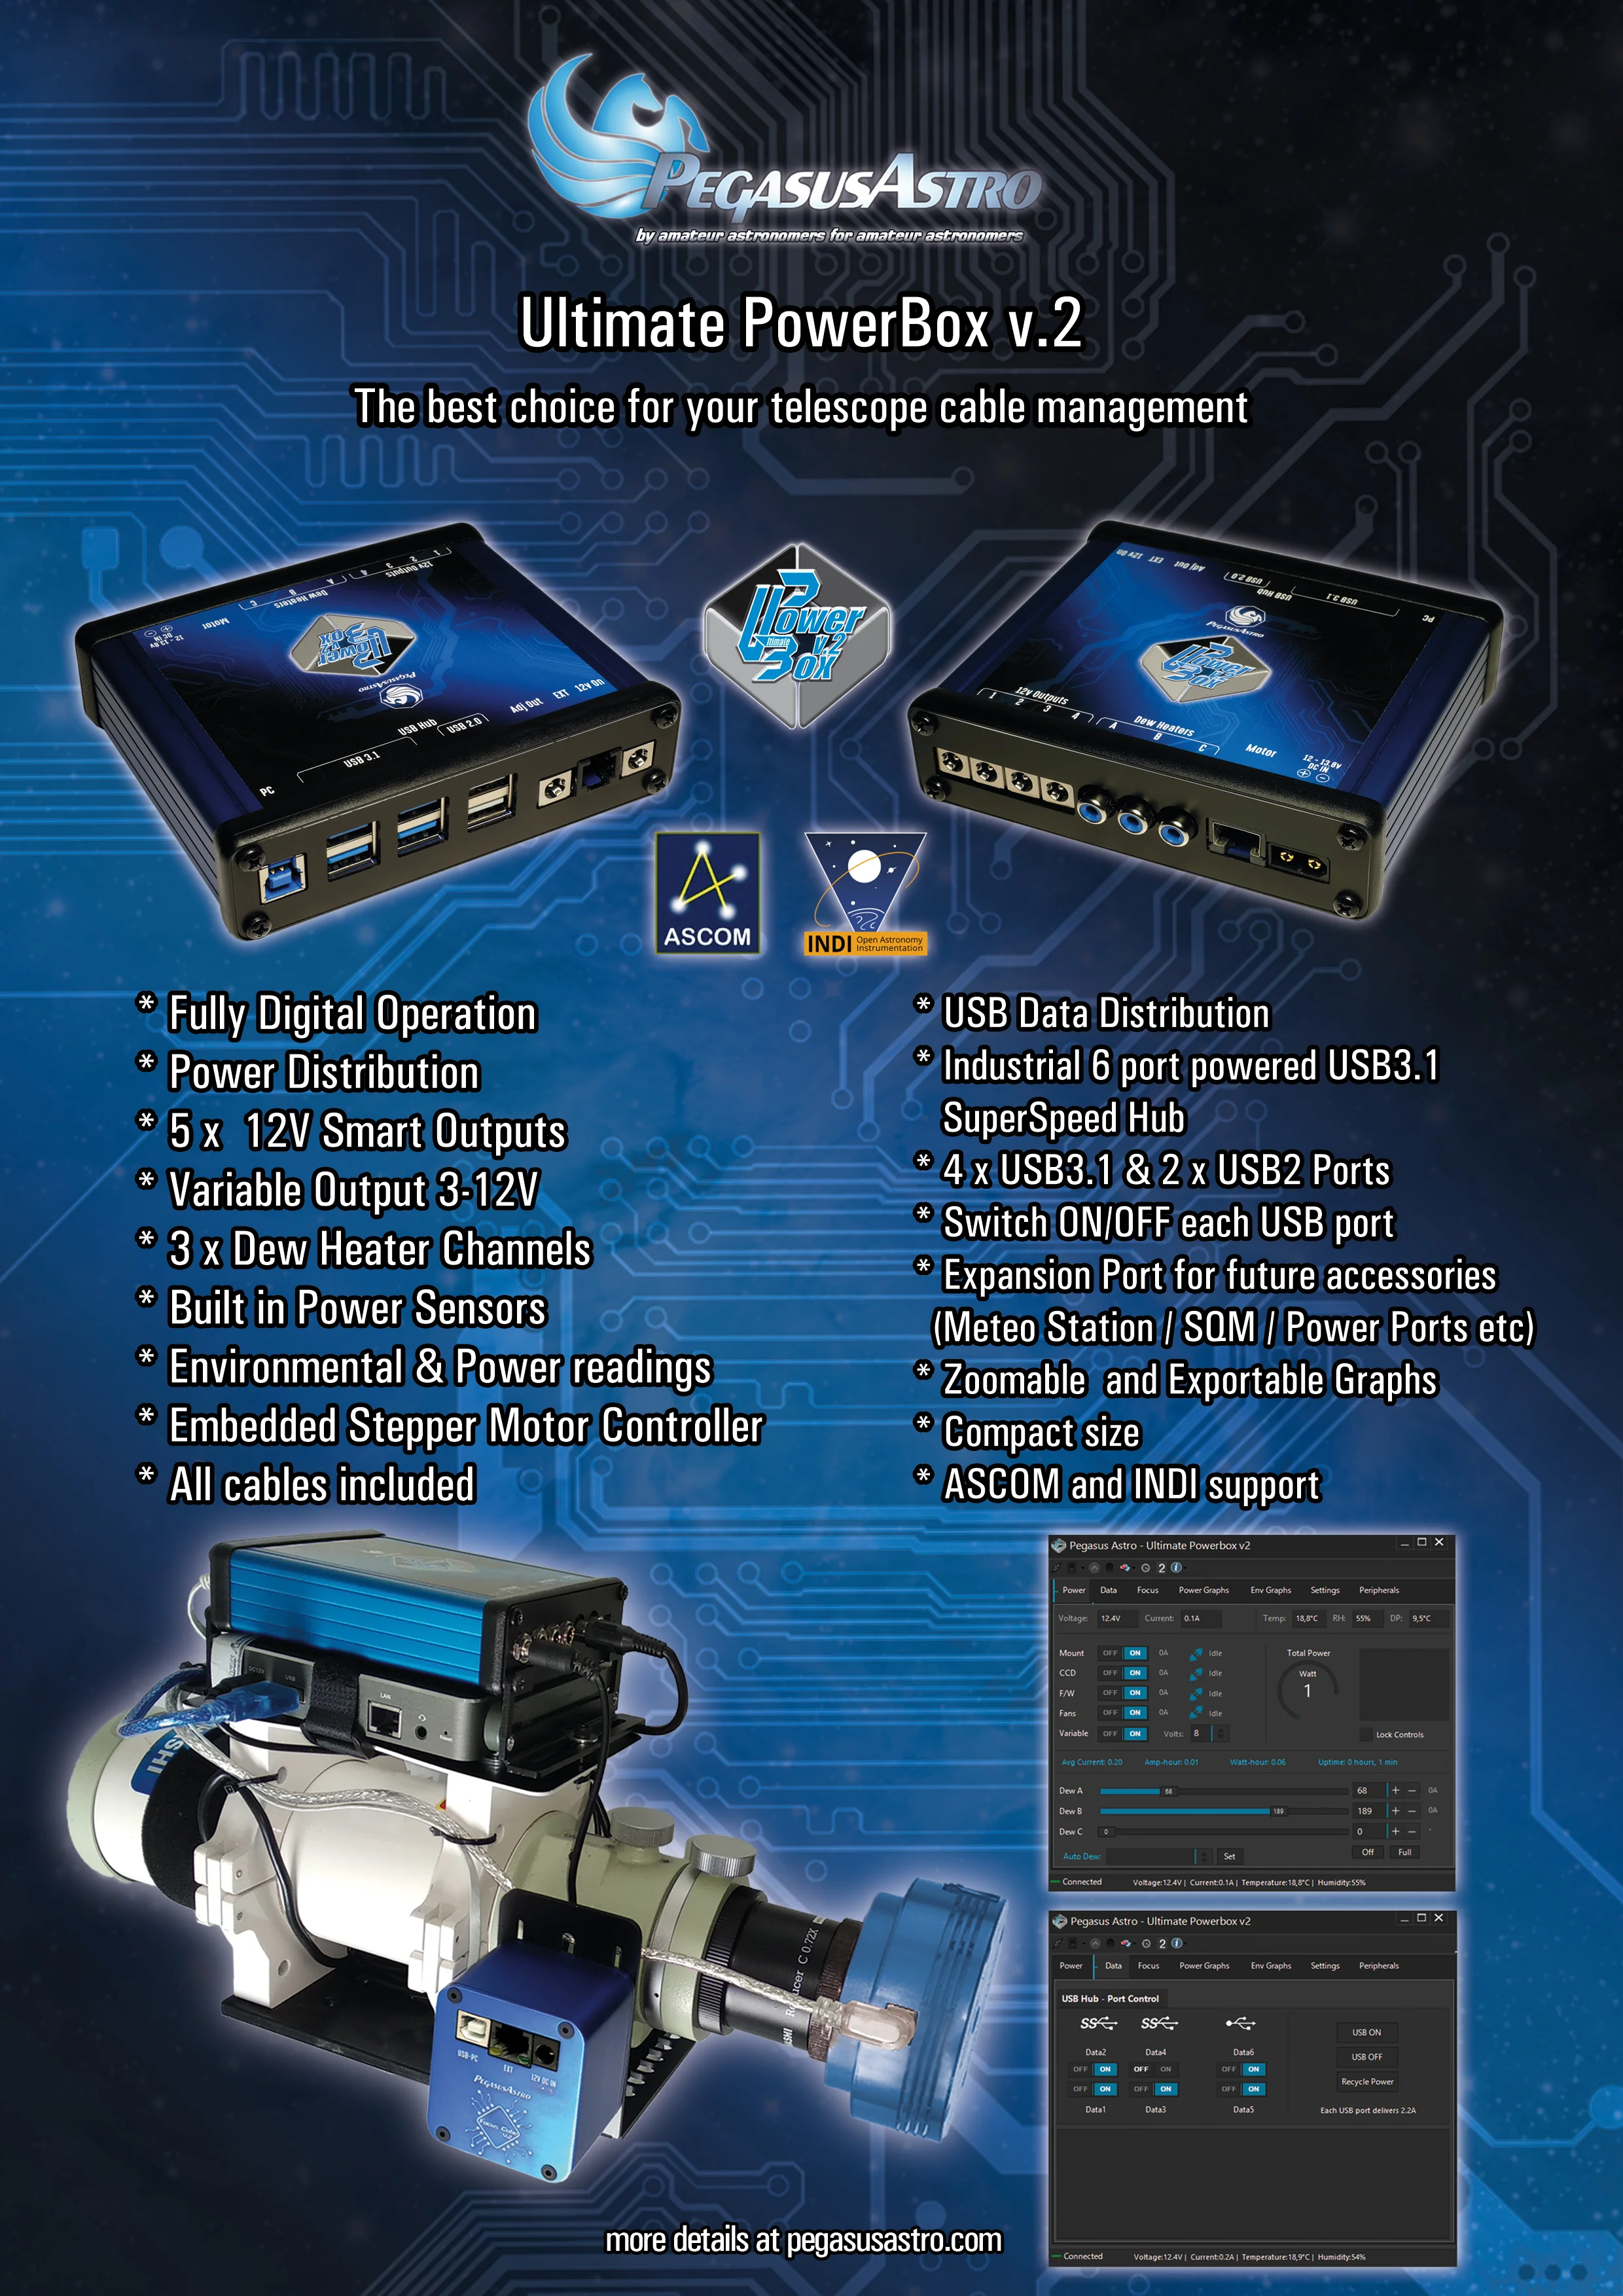
Ultimate Powerbox v2 (UPBv2 in short) is the successor of our renowned Ultimate Powerbox. You asked for more features, we kept our promise:
A USB3.1 Hub has been added -you can switch on/off each USB port –, more power outputs, more dew heaters, α new stepper controller that can drive any stepper motor in the astronomy market as well as an expansion ports for future devices that will communicate with the UPBv2 Controller!
Fully available from all of our dealers by end of June 2019
(Due to production delays device will be available very soon!)
If you are tired of carrying multiple power packs and dealing with a mess of power and data cables, our Ultimate Powerbox v2, a sophisticated power control unit, is the “Ultimate” solution. Our idea is an enclosure that makes a sufficient number of amperes available.
No cables disturb the movements of the mount and the instrument, only the main power cord and one USB data cord is attached to the Ultimate Powerbox from which branch off the other cables powering all devices.
Ultimate Powerbox v2 quick glance:
4 x 12V Smart Outputs,
3 x PWM duty cycle channels for your Dew Heaters or Flatpanel / Fans
a USB3.1 SuperSpeed, 5 Gbit/s Industrial Grade Powered Hub that includes 4 x USB3.1 and 2 x USB2 available ports (6 USB ports in total)
a Unipolar / Bipolar Stepper Motor Controller
a Variable / Regulated Output of 3Amps
a 12V / always ON Output
Environmental & Power readings
In a compact size with plenty of features!
We strongly believe that if you own a remote observatory or you do advanced imaging you are going to love this device.
DETAILS
Solid Input Socket
A large and solid DC input socket ensures that power cable is always secured in place. Socket is selected to provide all the power you need without voltage drops
DC power cable is included in the package
More than 20A of total power
Controller has been designed to support up to 20 Amps of total input current.
* Please notice that Ultimate Powerbox v2 is not a powerbank. It requires an external power source (battery or PSU) to receive its power.
4 x 12V DC Power outlets for your equipment
Four powerful Smart Mosfet transistors provide “electric juice” to your precious equipment. Sophisticated short circuit and overload per port protections cut the power and report the incident into our software. Every Mosfet is capable to provide up to 7Amps of current.
Metal & good quality output sockets ensure that will provide all the juice you need and can secure in place your extension power cables
Built in Power Sensors
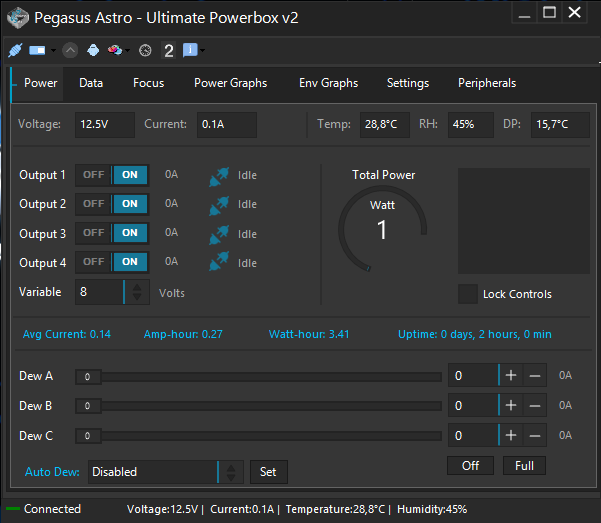
A precise voltmeter and an ampmeter (can measure up to 30A) measure and display in real time your power input. If the input is more than 14.5V the power is instantly cut off to protect your equipment.
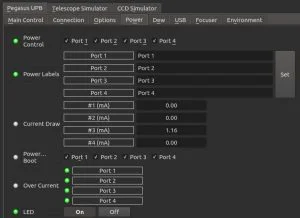
Individual Current Meter per 12V port and Dew Heaters
Every 12V output and every Dew Heater Channel has an internal and independent digital current meter. You can view each port power consumption in the software.
Stand Alone Software
Our modern standalone software has a neat dark skin! Control all Ultimate Powerbox v2 features from this software. Receive metrics, View and zoom into graphs, name your outputs, tune every setting of your Ultimate Powerbox v2 quickly and easily.
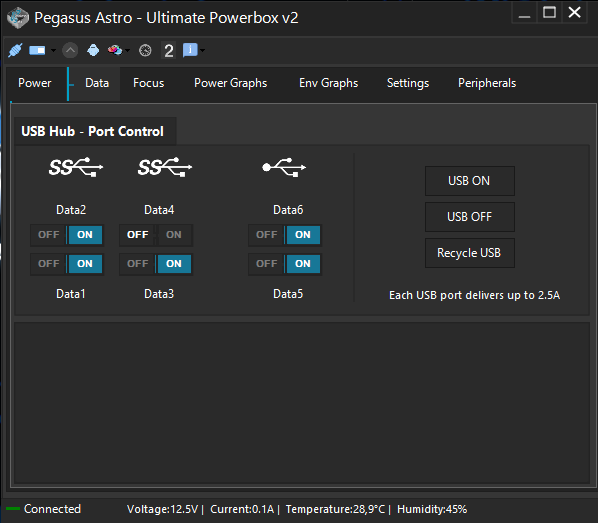
Industrial 6 port powered USB3.1 SuperSpeed Hub
An industrial grade USB3.1 Hub controller ensures that this USB hub will work flawlessly from temperatures of -40°C to +80°C.
A neat feature is that each USB port can be switched ON/OFF individually by the software. A device was stuck and you had to replug the socket in the middle of a cold night? No problem! Just locate the port, click the ON /OFF switch in our software and you recycle the USB port . Simple as that!
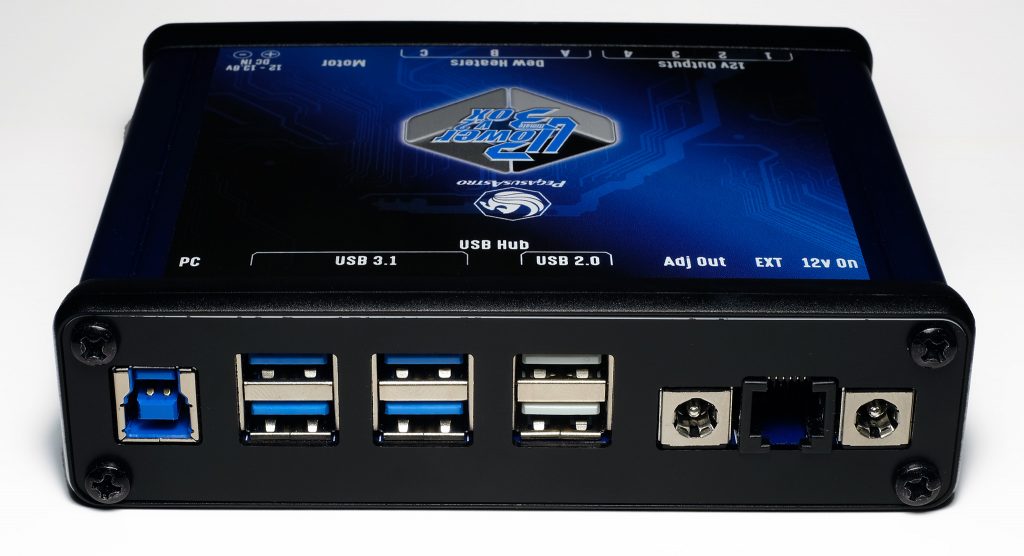
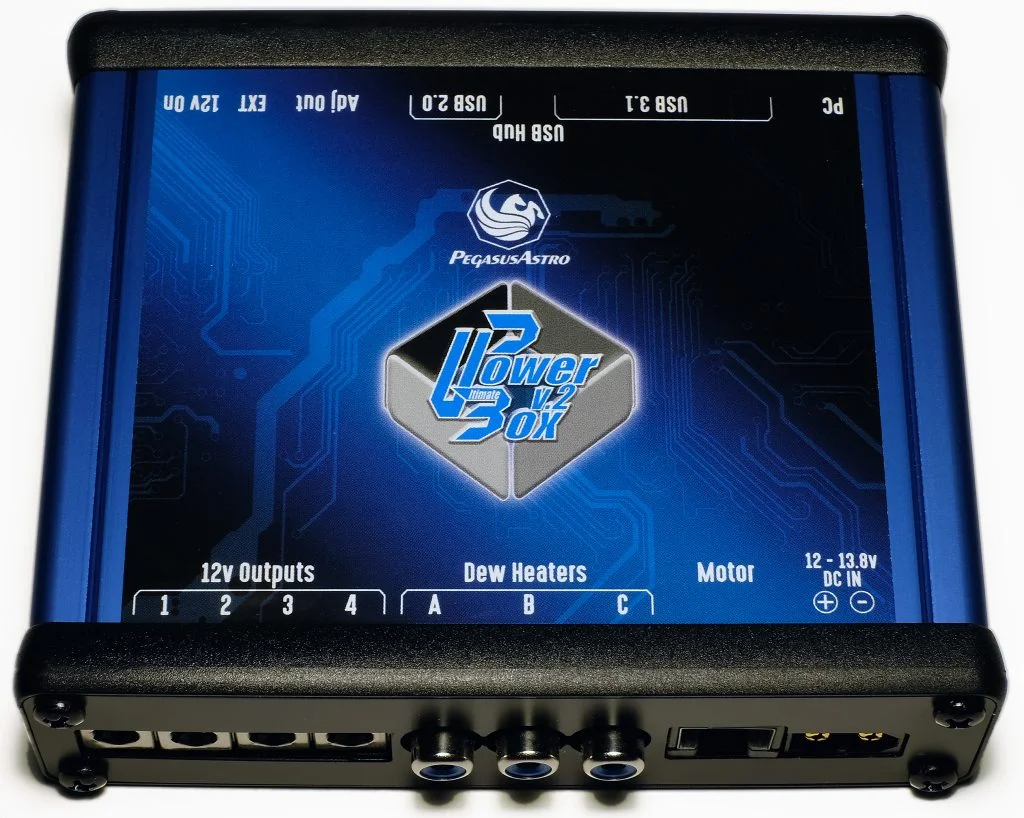
At the back of the UPBv2 you can locate:
4 x USB 3.1 Super Speed ports
2 x USB 2 High Speed ports
Each USB port provides up to 2.5Amps. All USB ports include an electronic short circuit and overload electronic protection.
If you own an Intel M3/5 PC Stick which has a USB-C socket you will need a USB A -> USB-C “fast charging” cable that can provide 3Amps. Normal USB-C cables have an internal resistor which limits current to 2.2Amps and leads to PC Stick shutdown.
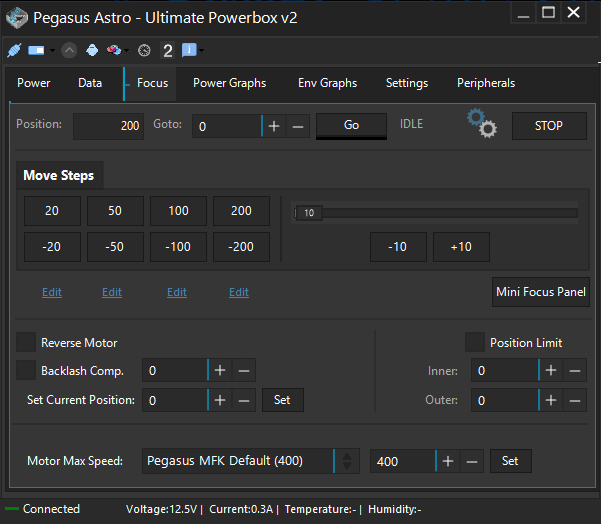
Embedded Stepper Motor Controller
A stepper motor controller will precisely move your focuser. The controller drives a Pegasus Motor or any other stepper motor in the market (Unipolar or Bipolar) e.g. Rigel, Robofocus, Moonlight Motor.
Make sure you have the correct cable for your motor. Every manufacturer uses its own pinout. Contact us if you have any question for the type of your motor.
Backlash compensation is already implemented in the firmware and can be enabled, tuned and disabled from the software. A fully ASCOM6 focuser driver is already available.
Three channel duty cycle PWM outputs
Three Pulse width modulation (PWM) outlets are capable to provide power to your “thirsty” Dew Heaters / Flatpanels or Telescope Fans. Eliminate the moisture that is fuzzing your equipment and destroying your clear nights. These outlets can be remotely tuned from your laptop using the supplied software.
A Variable & Voltage Regulated Output
One regulated output that can provide up to 3Amps of current is available. You can tune the output from 3 Volt to 12Volt and save this setting in controller’s memory. Every time UPBv2 boots the port will be tuned to the stored voltage setting,
Always ON – 12V Output
One unregulated 12V output can provide up to 8Amps. So, In addition with the Smart 4 x 12V outputs you have one more to connect additional equipment. This 12V output port stays always ON!
Expansion Port (EXT)
An RJ12 expansion port is available for future devices. Expansion Port allows the connectivity of current and future Pegasus Astro Products. Plugged devices can be controlled from UPB software (ASCOM /INDI / Standalone)

Auto Adjustment of PWM (Dew Outputs)
Firmware can auto adjust the PWM Outputs by consulting the environmental sensor Dew Point reading. Just click “Auto” and leave to Ultimate Powerbox v2 decide if it is time to switch on your dew heaters.
Notice: You can select which Dew Heater output is controller by the “Auto Dew” function.
ASCOM 6.4 fully supported
Ultimate powerbox fully supports ASCOM6. In combination with our main program which acts as a server you can use our latest ASCOM 6.4 supplied drivers to:
Control Stepper Motor (ASCOM Focuser)
Pass environmental settings to supported software (e.g Sequence Generator Pro / MaximDL ) (ASCOM ObservingConditions)
Switch ON or OFF all 12V outputs. (ASCOM Switches)
Above screenshot shows ASCOM Observing Conditions and Focus Driver in combination with Sequencer Generator Pro
INDI support (in progress)
Ultimate Powerbox v2 supports INDI. There are some functions that do not work yet but we’ll support them as soon as possible.
There are two different implementations that support Linux/OSX
External brackets support Losmandy / Vixen Plate attachment
We provide an optional pair of brackets to grab the Ultimate Powerbox device onto a Losmandy 3” or Vixen plate. Both brackets can be screwed on the side of the controller and grab on your telescope.
Led Indications for power and failure states
Led can blink in patterns to warn you regarding important power issues (e.g over or under voltage). Moreover light can be turned off using the software. Our led is very dim but in case you don’t like it on you can switch it off via the software.
Power Cables are included in the package
Four (4) power cable of DC 2.1mm to 2.1mm male (1m) are included in the package. Cables are thick enough to support up to 6Amps of current.
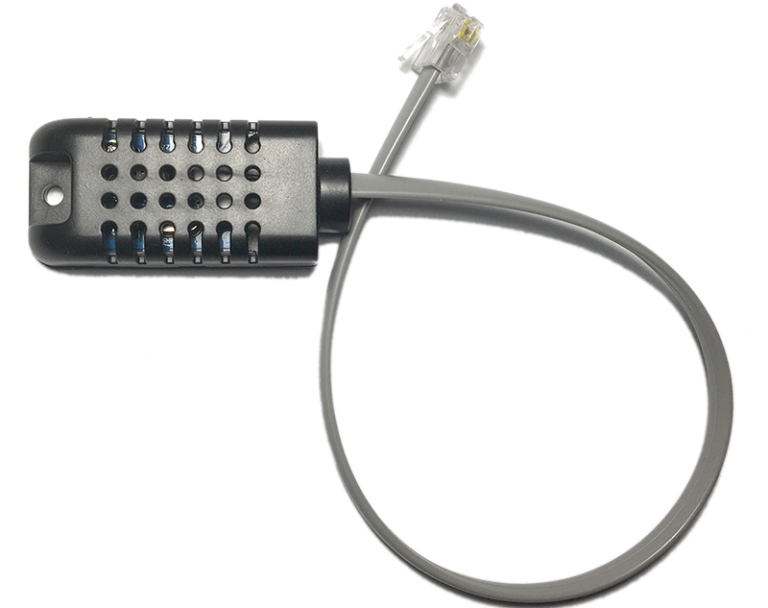
External Environmental Sensor
External temperature & relative humidity sensor is included in the package. Know exactly the environment conditions in your location. Temperature, humidity and dew point measurements are displayed in the software.
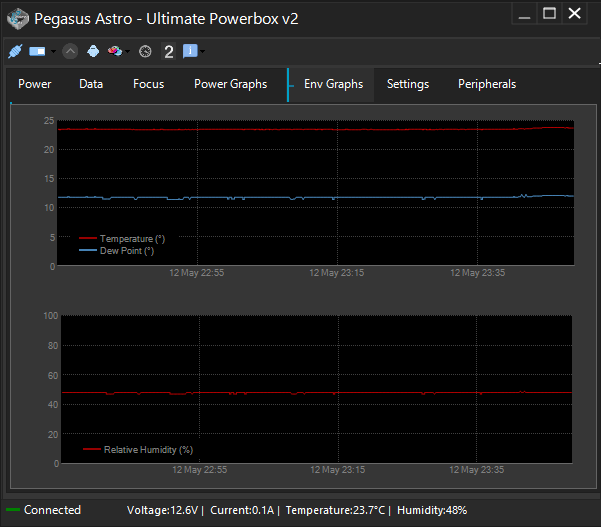
Zoomable and Exportable Graphs for Power and Environment values
Software logs all voltage, current, temperature and relative humidity readings. All these plots are zoomable and easily exportable in PNG image & CSV text format. Keep a full record of your night conditions.
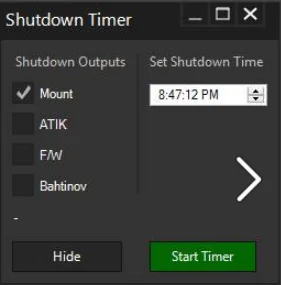
Timer to shutdown outputs
Choose the time and start timer to shutdown output ports when you schedule it.
Memory persistence outputs on startup
You can easily define which output should turn ON during startup. The setting is stored in system’s EEPROM memory. A neat feature in case of a power failure.

USB3.1 Connectivity
Controller is always connected to the USB Hub (7th internal USB port). No extra cable needed. Just connect the USB Hub to your laptop and you are ready to go.
Reverse Polarity Protection
Ultimate Powerbox has been design with a reverse voltage polarity protection. It will definitely save your night if you accidentally connect the main power supply in reverse polarity!
Watchdog
A hardware watchdog resets the device if for any reason there is no response from the controller for two seconds. A neat feature in the unlikely event of a controller freeze – when you have a remote observatory and you need to be certain that everything works as expected.
Upgradable Firmware
Device is firmware upgradable to support future features and bug fixes.
Warranty
Device and included sensor is covered by two years warranty
Compact Size and Lightweight
A blue anodised aluminium compact sized box enclose the controller board. Size is 12cm x 10cm x 3cm (4.72 inch x 4.06 inch x 1.2 inch). Weight is 400 grams (14.1 ounces).
Guiding and Dumbbells
It’s been about 6 weeks since the last post. Clouds have been prevalent most nights, and the brief moments of clarity are short lived. Nights are getting longer however, so on a good night, I’m able to start earlier and get more image integration time.
The full moon really does has a negative effect on trying to capture fainter objects, as I learnt whilst trying to capture the Heart Nebula. I’m considering buying a multiband filter to block out unwanted light sources.
I’m now the owner of a Guide Cam!
Guide cam is the red component, screwed into the guide scope.
I learnt how to use PHD2 software and was soon reaping the benefits of exposures longer than 60 seconds.
The guide cam screws into the guide scope, and monitors the positions of a star. If the star shifts position slightly, the software sends a signal to the mount to make an adjustment, allowing for theoretically unlimited single exposure time.
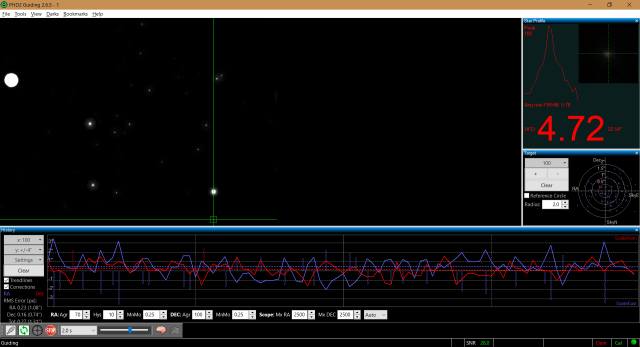
View through the guidescope, and tiny movement fluctuations in declination and right ascension are graphed in blue and red.
My first test with this new ungodly power was to point the telescope to the center of the constellation of Cygnus. The Star Sadr, and it’s surrounding nebulosity.
4th October – Gamma Cygni Nebula

Just 4 stacked images. Each 600 seconds (10 minutes). (40 minutes total).
There was barely any moon out, so there was fantastic contrast in the image.
i learnt that a 600 second image will produce a flair around a very bright star like Sadr however, so may dial this back slightly in the future.
9th Oct – Triangulum Galaxy
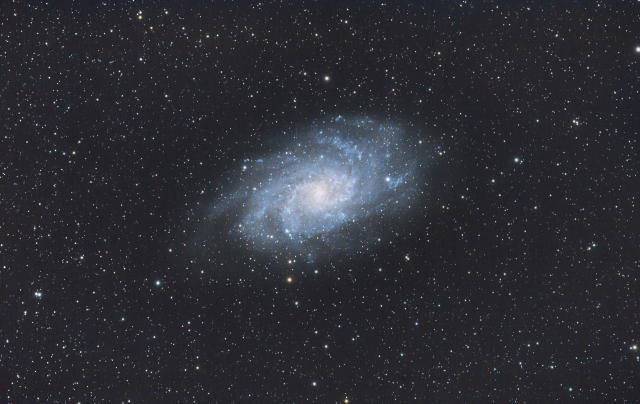
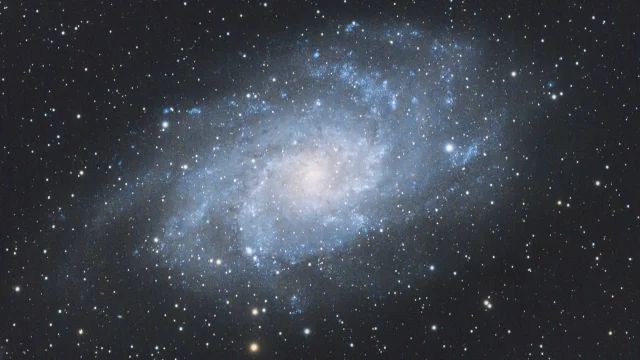
9 x 600″ + 195 x 60″ sub frames
This was shot during the working week. I decided to make use of my software to automate all the shots I would need. possibly around 40 600″ shots.
The galaxy was due to cross the meridian at around 2am, so I set my alarm to come down and flip the telescope. I found that the guide scope had fogged up, and tracking was all messed up, resulting in a few hours of wasted imaging time. For some reason i never thought about needing a dew heater for the guide scope, but have since rectified this oversight! With guiding out of action, I decided to set the images going again, but this time only at 60 seconds – the longest I can image without seeing star trails. I gathered a further 195 images at 60 seconds, and combined them with the 9 usable 600 seconds shots.
Very happy with this one, as It’s a fairly faint object, despite it’s large size.
11th Nov – M27. Dumbbell Nebula
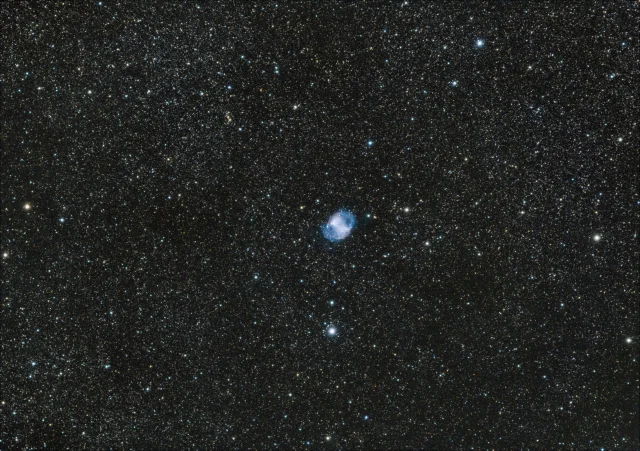
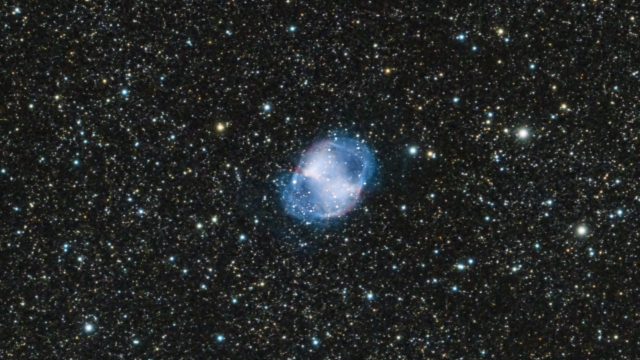
11 x 500 second images.
Making use of the longer nights, this one was taken from around 6 to 8pm before work the next day.
This is a planetary nebula. – A bit of a misnomer, as it’s just a well defined nebula formed after a star dies. They are pretty short lived. This one is around 9,800 years old.
I’ve tried to shoot Pleiades (the seven sisters) a couple of times in the past few weeks, however, it only comes into view from around 11, and cloud has started to creep in every time. The sky changes throughout the year however, and Pleiades will soon be in view earlier in the evening.
Orion is then my next target, but I expect it to be January before I’m able to get a good shot. Unfortunately, it’s all in the direction of a street light that washes out the image somewhat. I’m hoping an Optolong L-pro 2″ filter will help! But that’s a purchase for future me. There’s always something new to buy in this hobby…
Farpoint 2 Inch Autocollimator
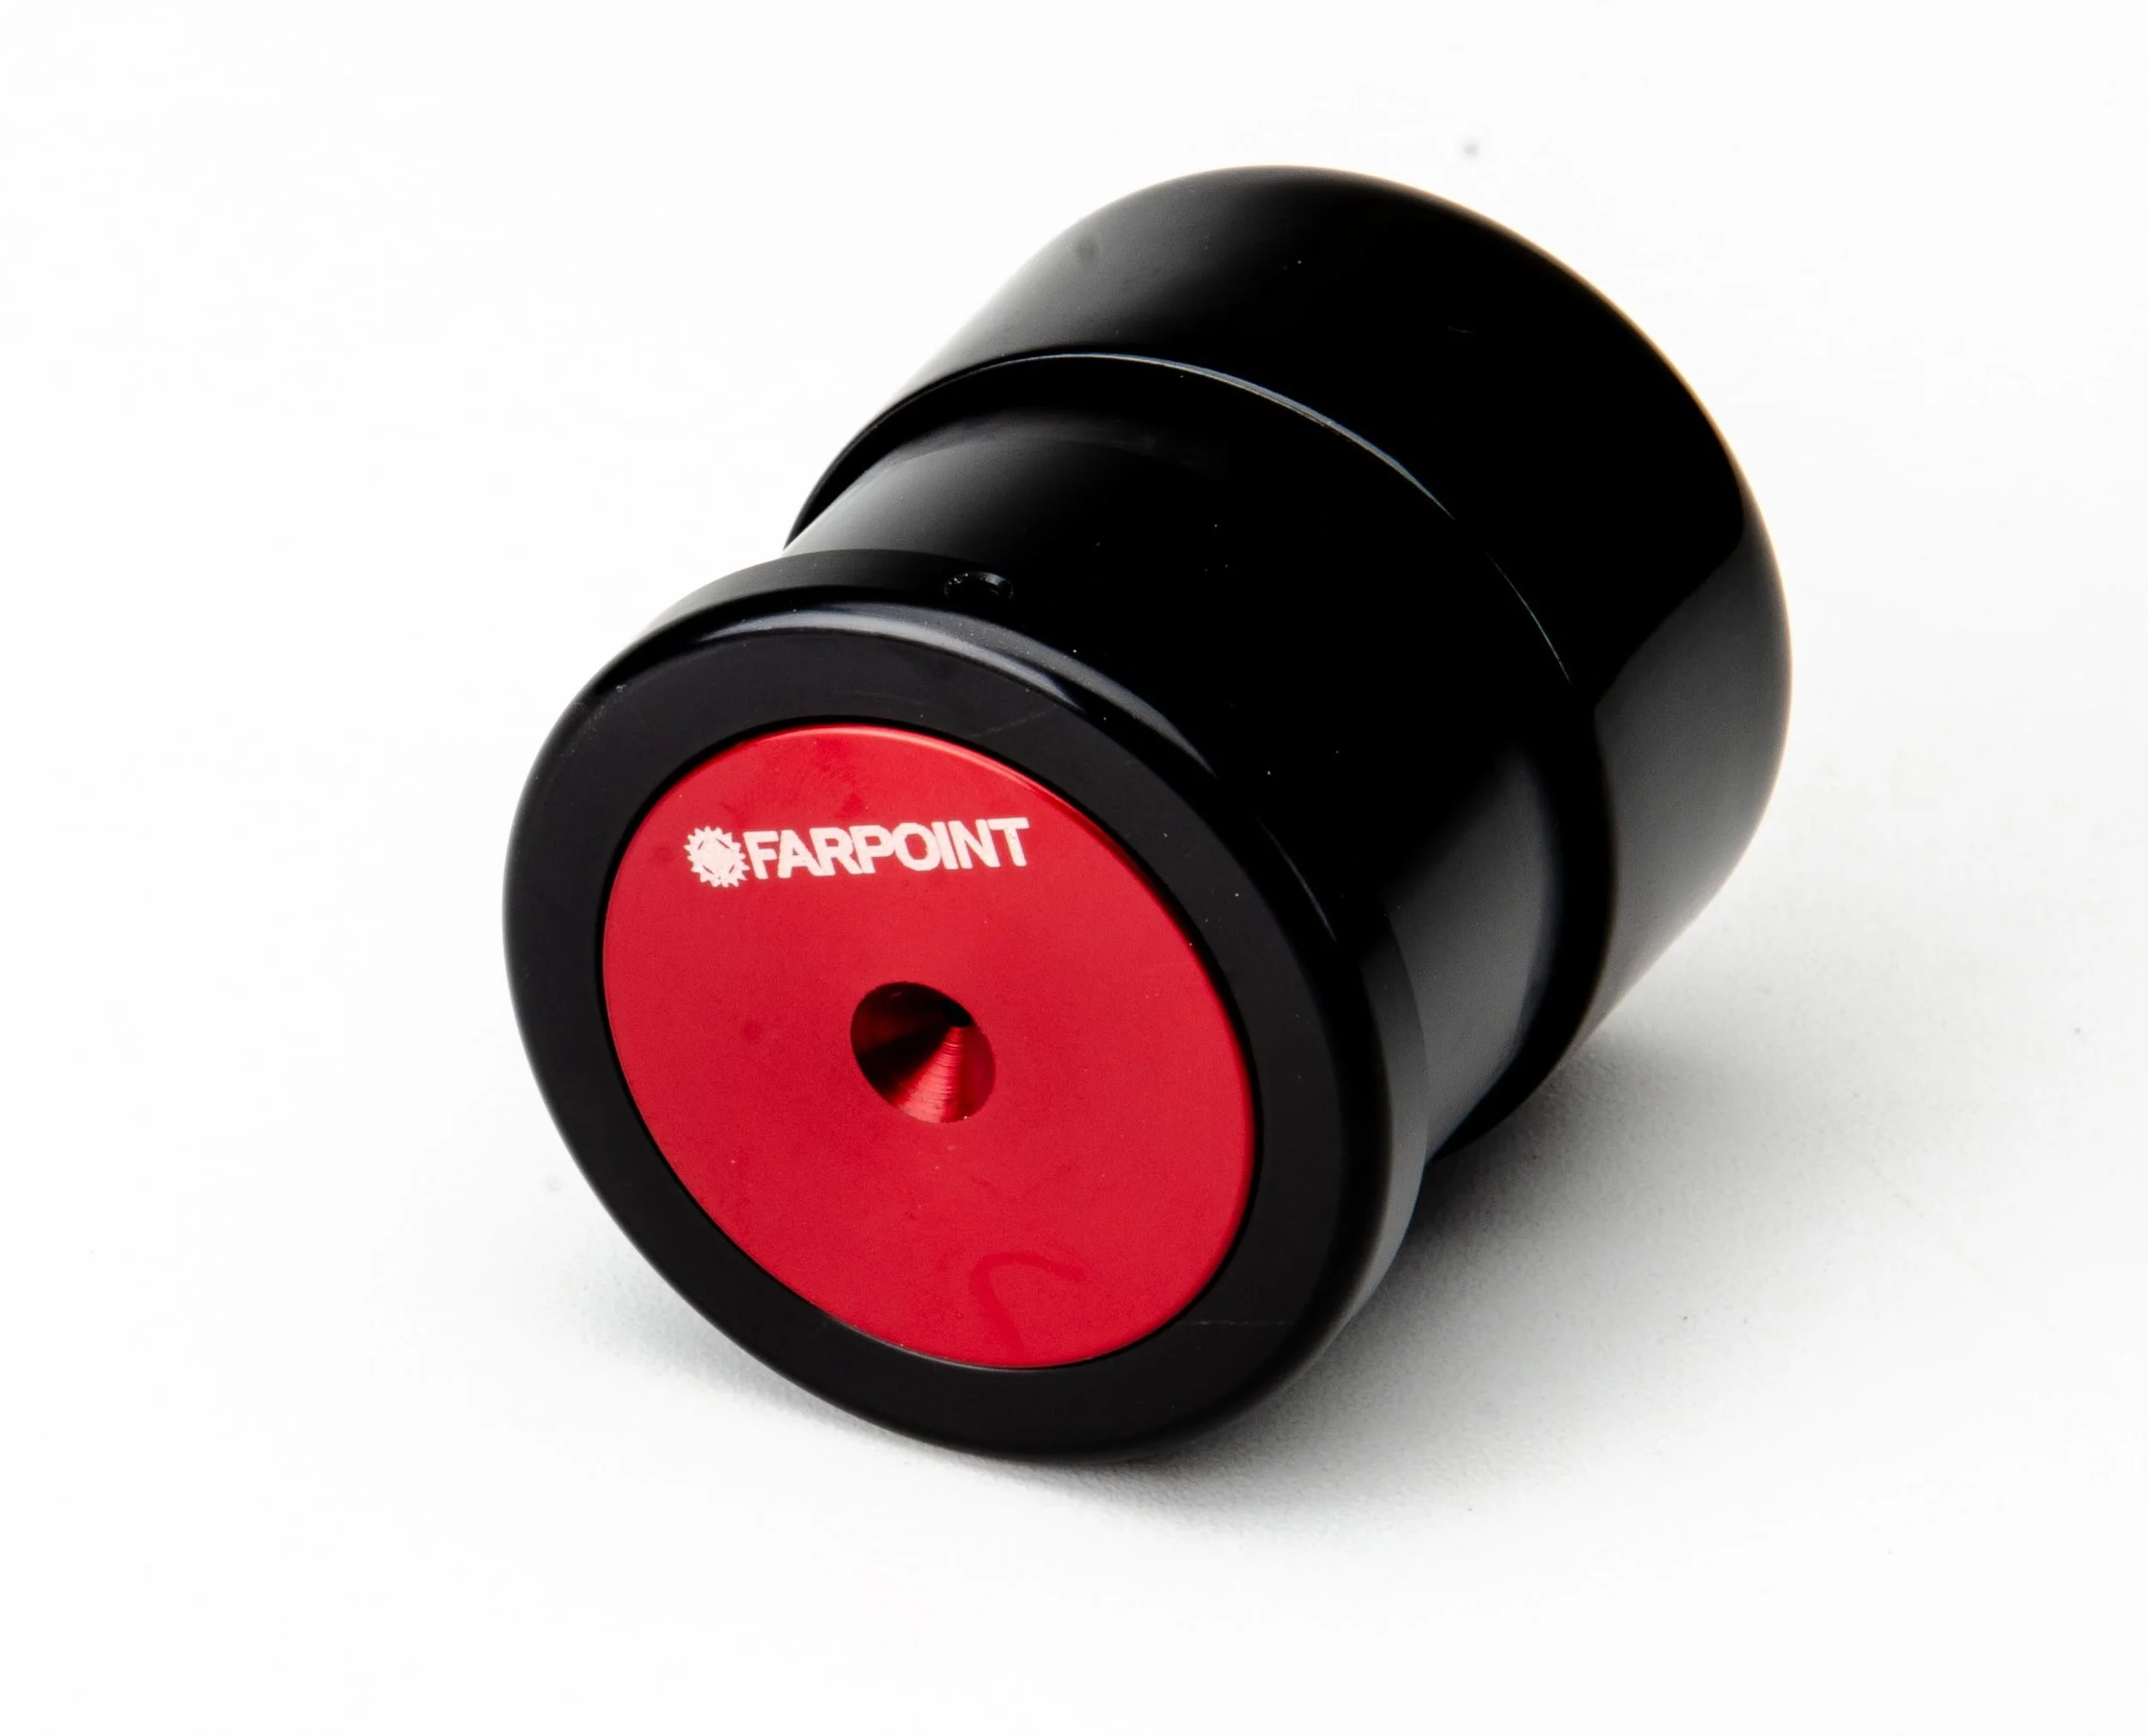
Farpoint 2 Inch Autocollimator
$80.00
In Stock
Farpoint 2″Autocollimator is our newly redesigned model and absolutely the finest Autocollimator on the market! Made from sturdy machined, anodized aluminum, creating the perfect tool for the final precision telescope alignment adjustment step. Click here for the ultimate resource in collimation utilizing autocollimators on the Cloudy Nights Community thread.
Rainbow Astro RST-135 Weightless Mount

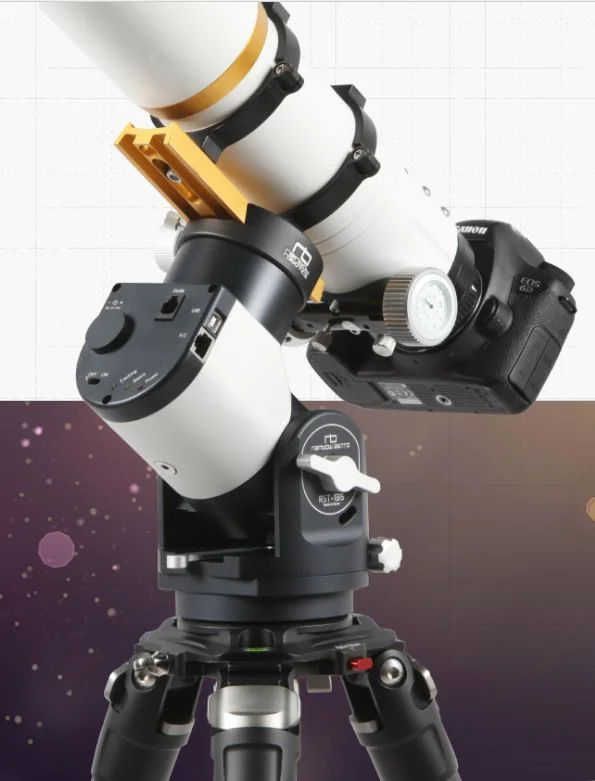
You don’t need counterweights anymore.
You will take your dream shot anywhere if you have RST-135.
SPECIFICATION
Mount TypeEquatorial / Alt-Az Dual Mount
Type of GearStrain Wave Gear
Payload13.5kg (30lbs) - No need counterweight
18kg (40lbs) – Use counterweight
Slew Speed6º / Second
Latitude Range0º to 90º
Power Input12 to 16V DC
Power Consumption0.2A - Tracking, 16V
3A - Slewing, 16V
Weight3.3kg (7.3lbs)
Size(mm)130 x 120 x 190
MaterialsAL 6061, Steel, Brass
ASCOMSupport ASCOM Driver
Hand ControllerIncluded
Additional FunctionBuilt-in WiFi
Built-in GPS Receiver
Built-in Home Sensor
OVERVIEW
The RST-135 uses a new type of gear, strain wave gear. Due to the strong force of the strain wave gear and the motor, counterweight is not needed. The mount weights only 3.3kg, but you can use a 13.5kg telescope. We call this breakthrough mount a Weightless Mount. The volume and weight of the mount is no longer a problem in a trip for astrophotography.
FEATURES

Compact and light
Mount weighs only 3.3kg. You do not need a separate bag for Mount. Just put it in your backpack.
Equatorial / Alt-Az dual Mount
You can easily change to Equatorial mode and Alt-Azi mode. Show your family a star easily in Alt-Azi mode.
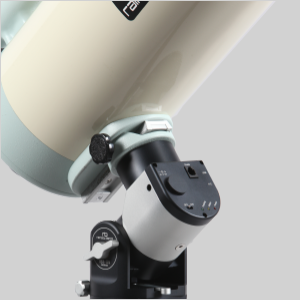
No need counterweight
You do not need a counterweight to use a 13.5kg telescope.
Beauty of machined product
Feel the beauty of machined product. All parts of RST-135 are made by machining solid block. The RST-135 is the perfect premium mount.
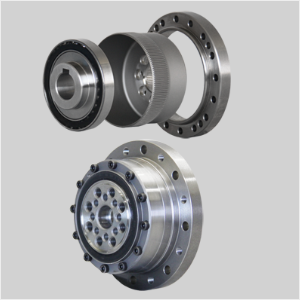
Strain wave gear
It is a new type of gear which is widely used in industrial robots. There is no backlash.

Built-in WiFi
This Mount has built-in WiFi. You can control and auto-guide the mount without cable.

Built-in GPS receiver
Built-in GPS receiver eliminates the need to enter the location of the observer.
Built-in Home sensor
Home sensor finds the mechanical origin by itself. This is useful for remote observation.
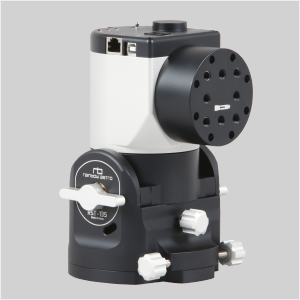
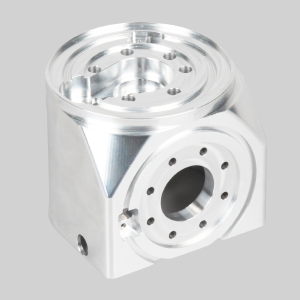
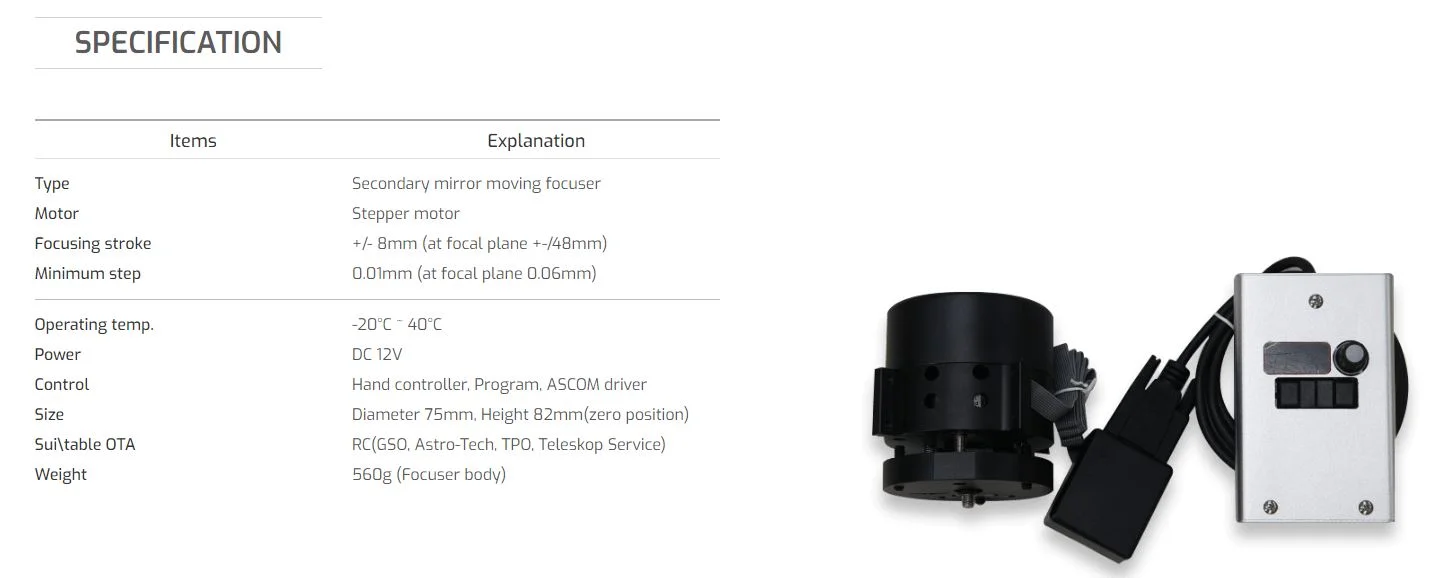
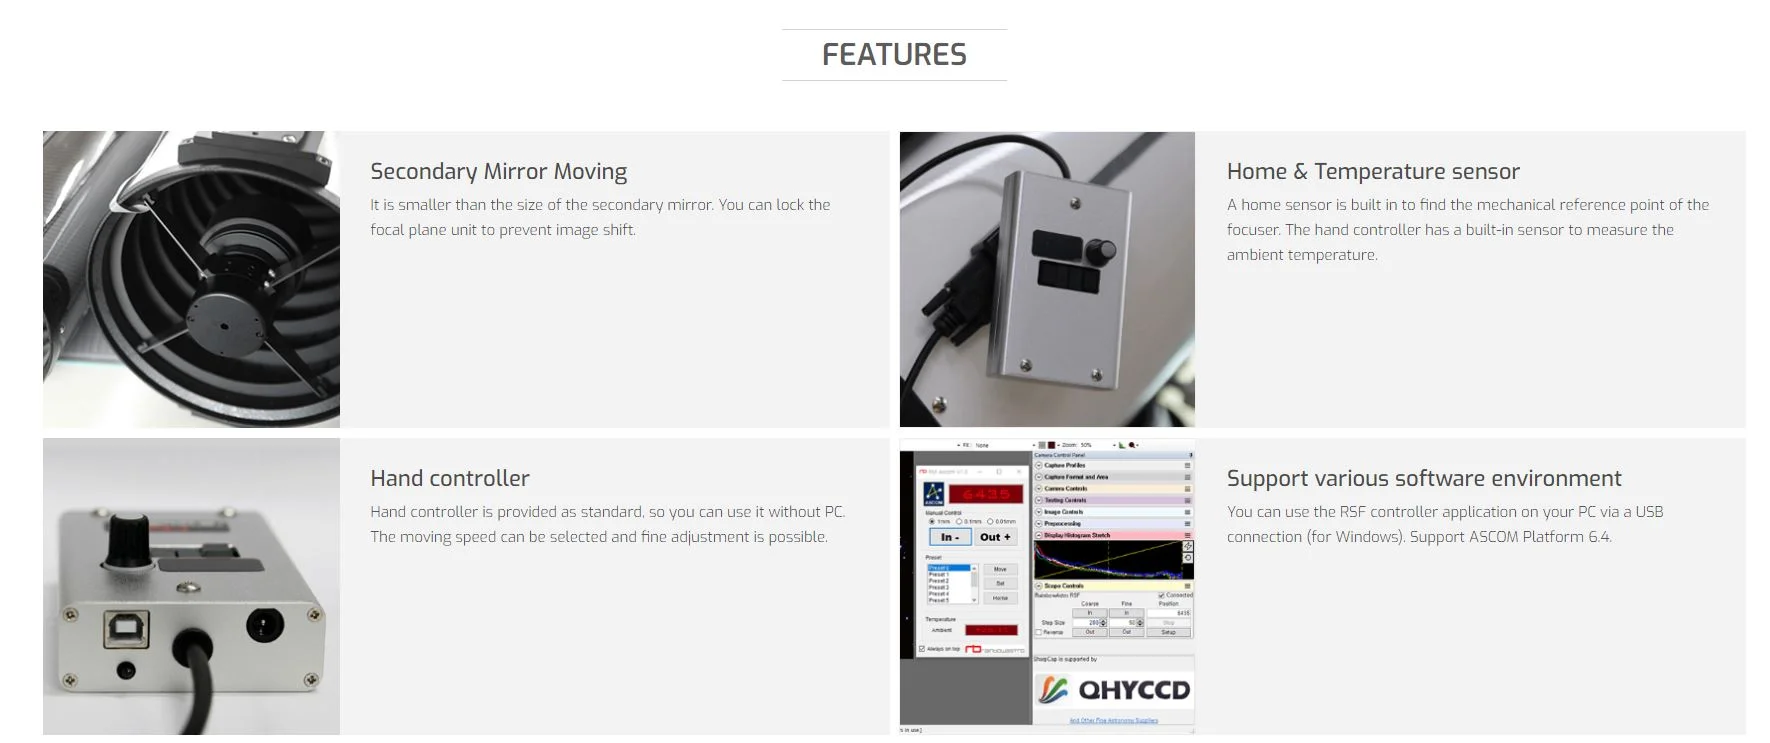
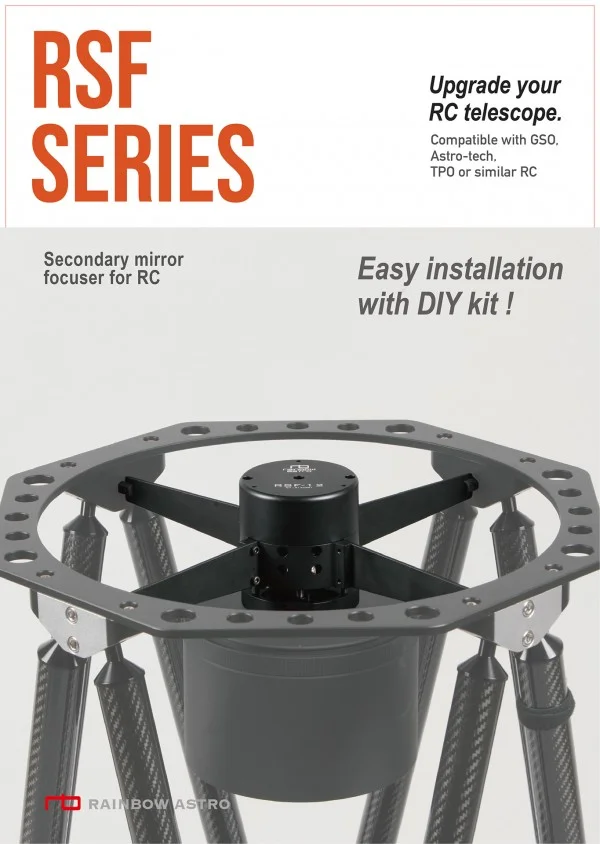
RSF motor focuser for RC RSF-8, RSF-10, RSF-12

Power up your astronomy
Professional grade high performance mount with large worm wheels.
OVERVIEW
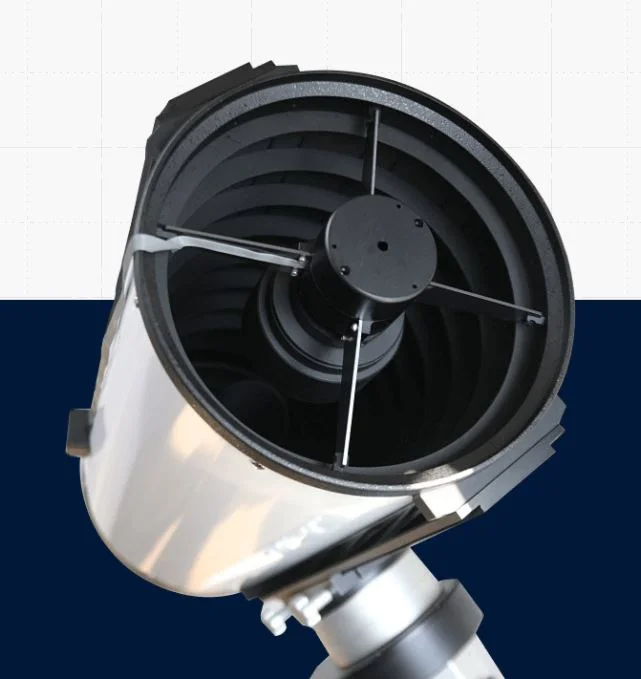
Here is a secondary mirror moving motor focuser for RC telescopes.
But disappointed with Focuser!
This product is equipped with a crayford focuser, but many users are investing a lot of money to replace it with a more accurate focuser.
It is already in use for large RC telescopes.
All custom-made large RC telescopes use secondary mirror motor focusers.
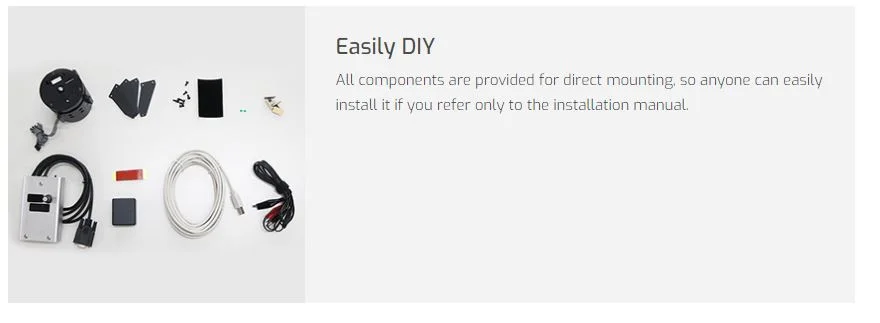
" The RSF series is provided as a DIY kit and can be easily installed by anyone.“
Perfect compatible
The RSF Series can be easily and completely mounted without damaging your telescope. The location of the secondary mirror is the same as before. In addition, the optical axis can be readjusted easily after mounting the motor focuser.
ASCOM Driver
The RSF series supports ASCOM Driver, convenient and precise control is possible by connecting to PC via USB. You can also create an autofocusing environment through programming based on your abilities. (this is not supported by Rainbow)
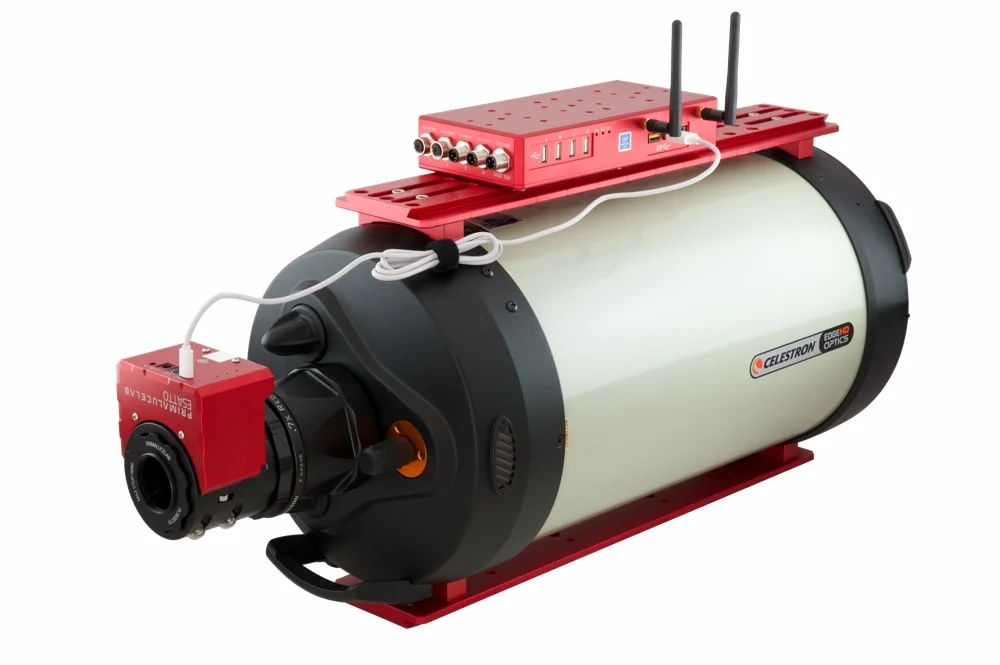
EAGLE3, control unit for telescopes and astrophotography
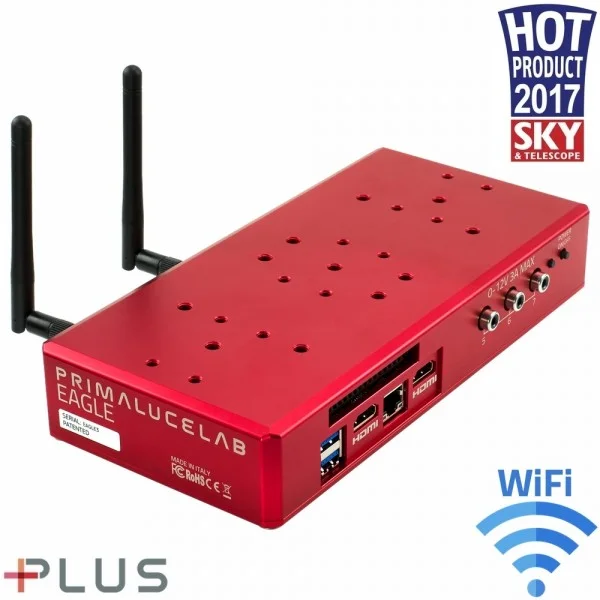
Forget having to connect your telescope to a laptop or desktop computer with lengthy cables, and big batteries. With the EAGLE3 you will spend less time setting up your equipment and more time imaging! In a single control unit you have a powerful Windows 10 Enterprise computer (faster and more stable than standard computers), quick SSD storage, an 8 port USB hub (4 high speed USB 3.0 ports plus 4 USB 2.0 ports that can be remotely turned on/off), an advanced power distribution system for all of your imaging accessories with 7 power out ports (4 x 12V out plus 3x variable 0-12V ports for dew heaters control) and a special WiFi system to remotely control the telescope from any smartphone, tablet or external computer (including Mac). Everything is controlled via the included EAGLE Manager software and housed in a beautiful rigid aluminum case designed with our flexible PLUS mounting system, allowing you to perfectly connect the EAGLE to any telescope.
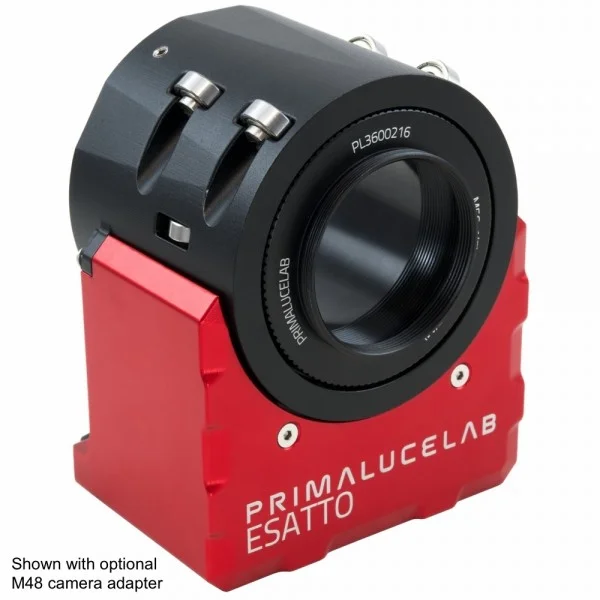
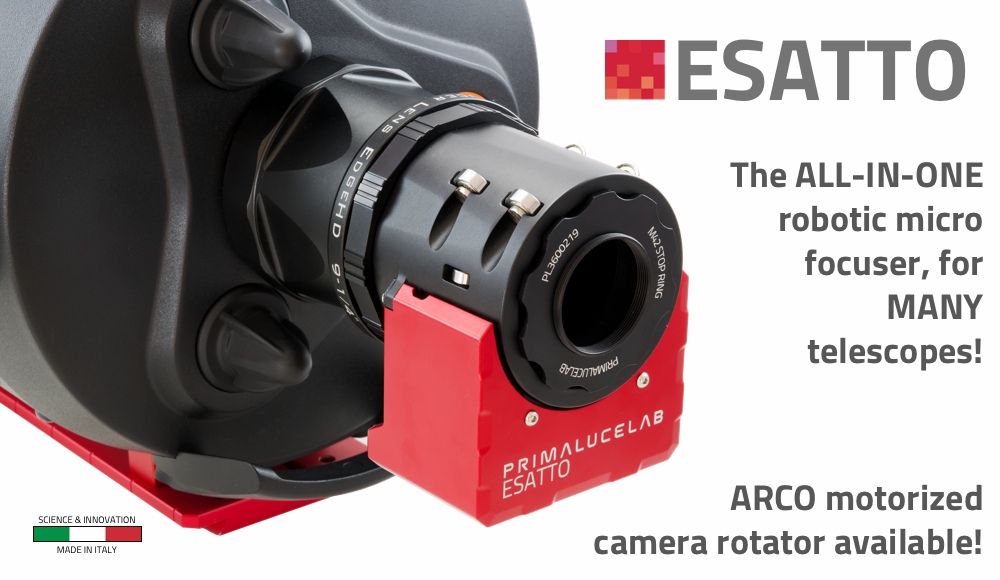
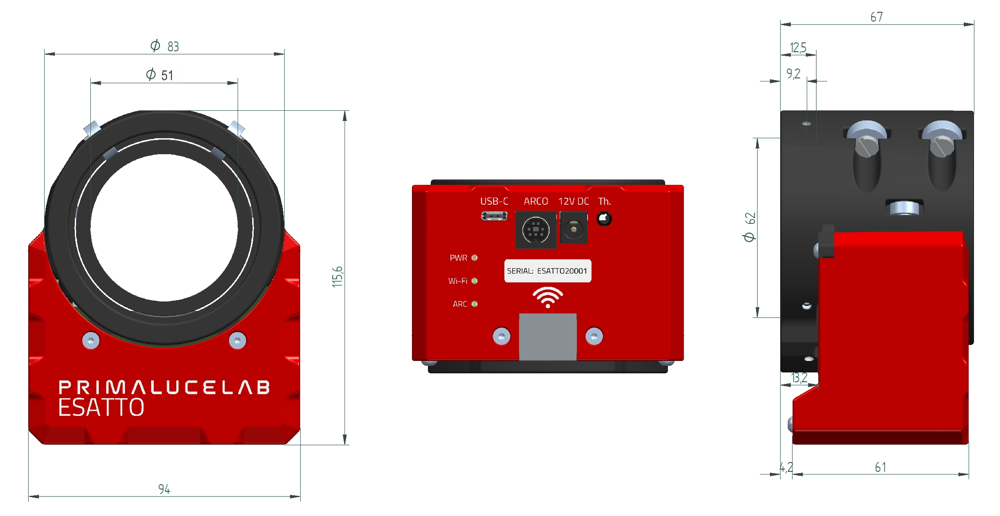
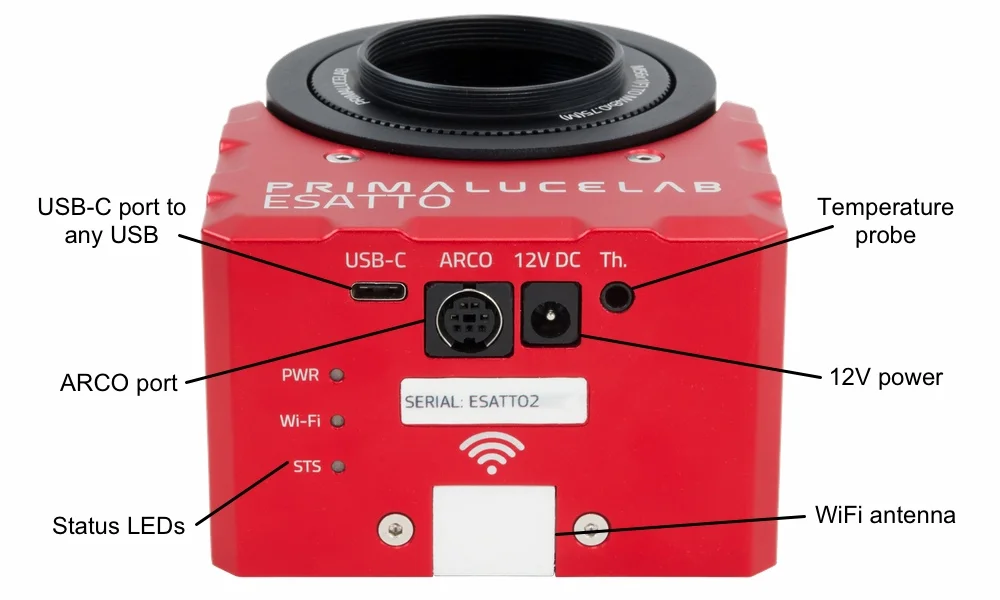
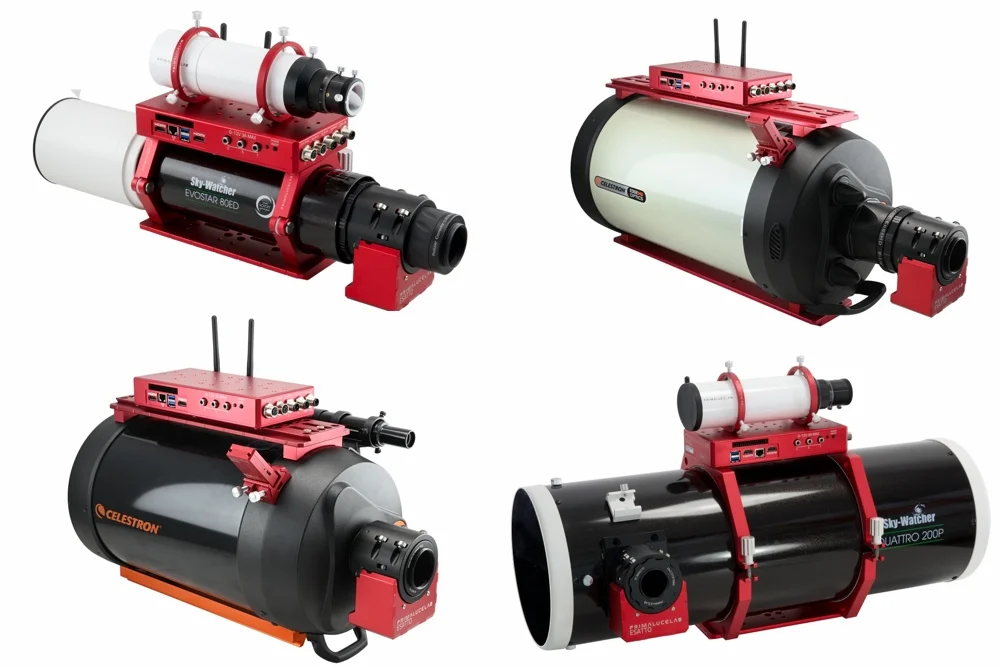
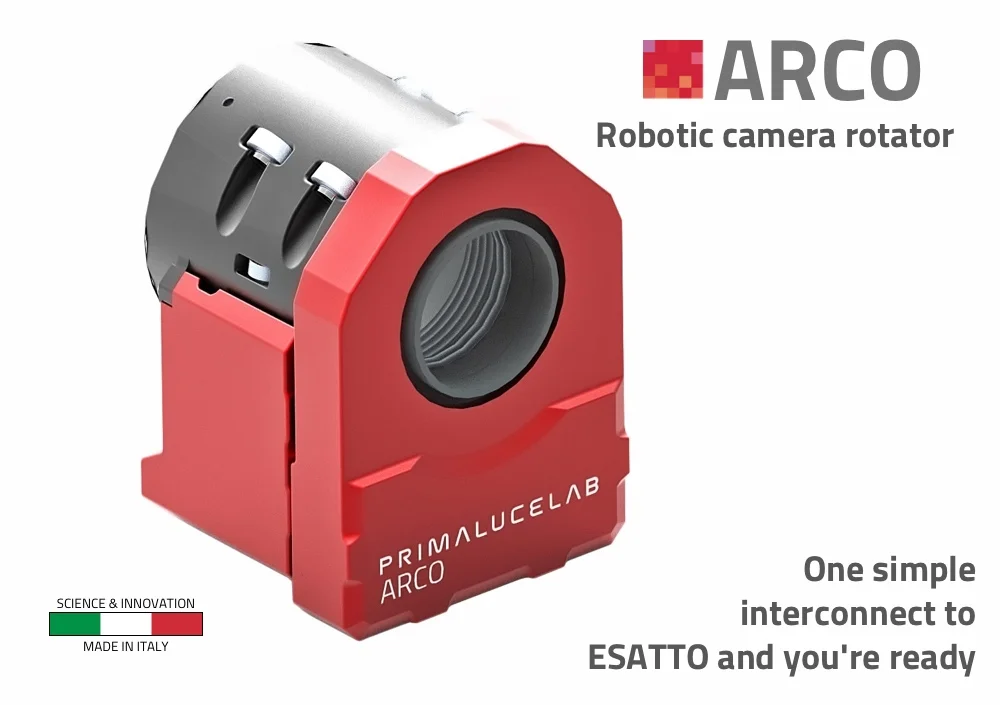
ESATTO 2" robotic microfocuser
ESATTO is the new generation robotic focuser that you control by any Windows computer by connecting it to a USB port, or via WiFi by using ESATTO app on your smartphone or tablet with the Virtual HandPad! On the camera side, ESATTO has a M56x0,75 male thread to connect and manually rotate many cameras and accessories by adding the optional adapters with stop rings. The 2” version of the ESATTO 2" has a depth of 67mm, it has 15mm of focuser tube travel, a 5kg payload capacity and an incredible resolution of 0,04 micron per step (and this is why we call it ESATTO)! And you can also expand ESATTO features by adding the ARCO robotic camera rotator! First deliveries in July 2019, order today ESATTO 2" at € 595,00 instead of € 645,00!
Availability: Order
€645.00 €595.00
22% tax incl
if you pay by bank transfer €577.15
Wanting to change your stock focuser because it isn’t sturdy enough and lacks precision? Do you want to improve the internal focuser of your SCT telescope? ESATTO is the next generation robotic focuser for telescopes, specifically designed for astrophotography but, thanks to specific technologies developed by PrimaLuceLab, also works extremely well for visual use. Forget about external controllers and cumbersome hand pads - ESATTO is the ALL-IN-ONE focuser that has all the features you’ve dreamed of in a compact, sturdy focuser design.
ESATTO 2” robotic microfocuser - main features:
- Crayford style focuser with 18 ball bearings, specially designed for very high load capacity (up to 5 kgs) with no flexure
- Low profile design with only 67mm thickness.
- 15mm focuser travel with an incredible resolution of 0.04 microns per step!
- Special adapters to easily connect to many different telescopes.
- Remotely controlled from EAGLE or any Windows computer, with dedicated control software or ASCOM drivers.
- USB-C connector offering greater reliability and can be connected to any USB type port thanks to the included cable.
- Remote control with WiFi from any smartphone, tablet or computer and ESATTO Virtual HandPad app also for visual use!
- Many camera threaded adapters with stop ring on the camera side to rotate and keep the camera in the optical axis.
- ARCO port to easily connect the ARCO camera rotator to the ESATTO without the need for additional data or power cables.
- Weight: 835 gr.
The best focuser mechanics and electronics in a compact body
The new ESATTO robotic microfocuser was born from our extensive experience in astrophotography and engineered with the uncompromising quality of PrimaLuceLab. We wanted to create the best motorized focuser in the world, with all the latest technical features, resulting in a compact and beautiful design only 67mm of thick.
Designed to give your telescopes the best performances for astrophotography
The special Crayford design with 18 ball bearings allows ESATTO 2” to have an impressive 5 kgs (11 lb) payload capacity with the focusing smoothness that is required by modern astrophotography techniques (eg. autofocusing with V-curve). ESATTO 2” has a draw tube with 51mm of free aperture, and 15mm of travel, offering to an incredible read resolution of 0.04 microns per step!
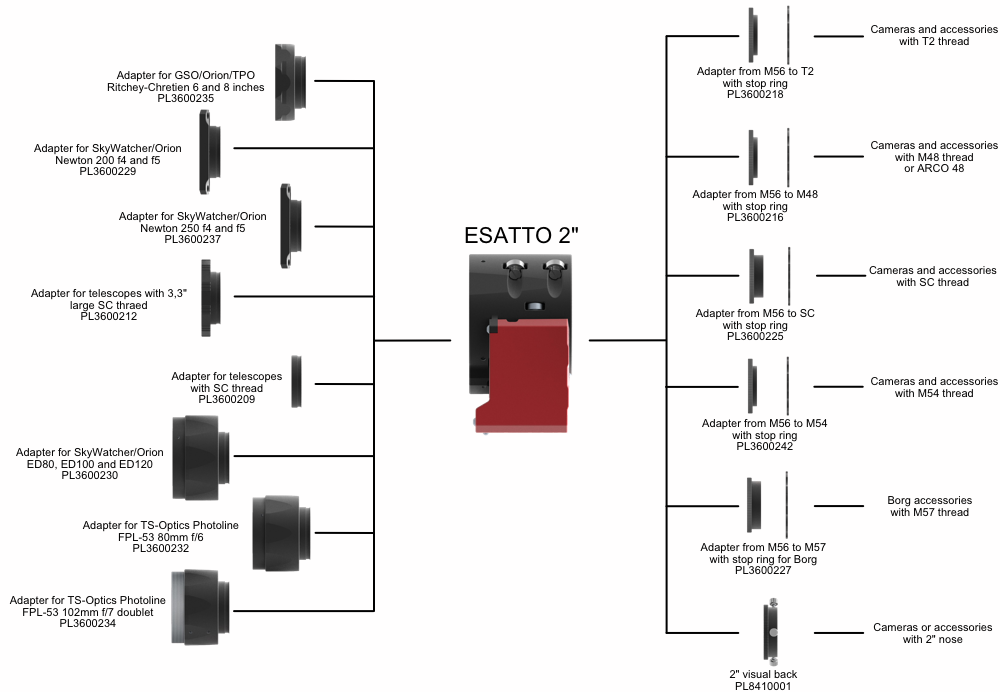
Many adapters available to connect to many telescopes
You don’t need to worry on how to connect ESATTO to your telescope - You can choose among the many models and adapters available! You can easily connect ESATTO 2” to telescopes like Schmidt-Cassegrains, Aplanatic Schmidt-Cassegrains, refractors, Cassegrains, Newtonians, and more! ESATTO truly is the universal focuser and if you can’t find an adapter for your telescope, just contact us!
Designed for remote control via a USB-C port from the EAGLE or from any Windows computer with a standard USB port
ESATTO has been specifically designed for easy remote operation in order to let your telescope take advantage of all the latest technology in astrophotography. ESATTO comes with a sturdy USB-C port (which you can connect to any USB type port thanks to the cable included in the box) to connect to EAGLE or any Windows computer, and control it via the provided ESATTO software or ASCOM driver. When connected to one of the USB3.0 ports on the EAGLE (or USB 3.0 ports of Windows computers capable of at least 1A), the ESATTO can be powered and controlled via the one cable!
Designed for remote control via WiFi, from any smartphone, tablet or computer via the ESATTO Virtual HandPad app
ESATTO has built-in WiFi remote control capability so you can control it from any smartphone, tablet or computer! Just connect your device to the WiFi network of ESATTO and start the app - You will be able to control the focuser by using the dedicated ESATTO Virtual HandPad app. Thanks to convenient preset settings, you can easily record and move the focuser to specific predetermined positions - Great for visual use!

Focuser draw tube with M56x0.75 thread and stop ring for a perfect camera connection
We know that a perfect focuser is nothing without a solid connection to the camera. That's why, instead of using a normal 2" visual back, ESATTO 2" offers a M56x0.75 male thread (to let you attach SkyWatcher/Orion reducers for ED 80, 100 and 120 refractors) and, through a complete series of optional camera adapters with stop ring, it allows you to directly connect the most common DSLR, mirrorless and CCD or CMOS cooled cameras directly at the focuser. The stop ring allows you to lock the camera at a precise angle to better frame the object to be photographed. The stop ring adapters are available in many different sizes: this way you can connect, with maximum rigidity and comfort, any camera or accessory.
Connect with a single cable to ARCO to remotely control also your robotic camera rotator
ESATTO includes a special port allowing ARCO, the robotic camera rotator, to be directly connected. With ARCO, you can remotely control the rotation angle of your camera in order to achieve perfect framing of the object you want to record. ESATTO and ARCO are designed to work together - You will need only one short interconnect between the two!
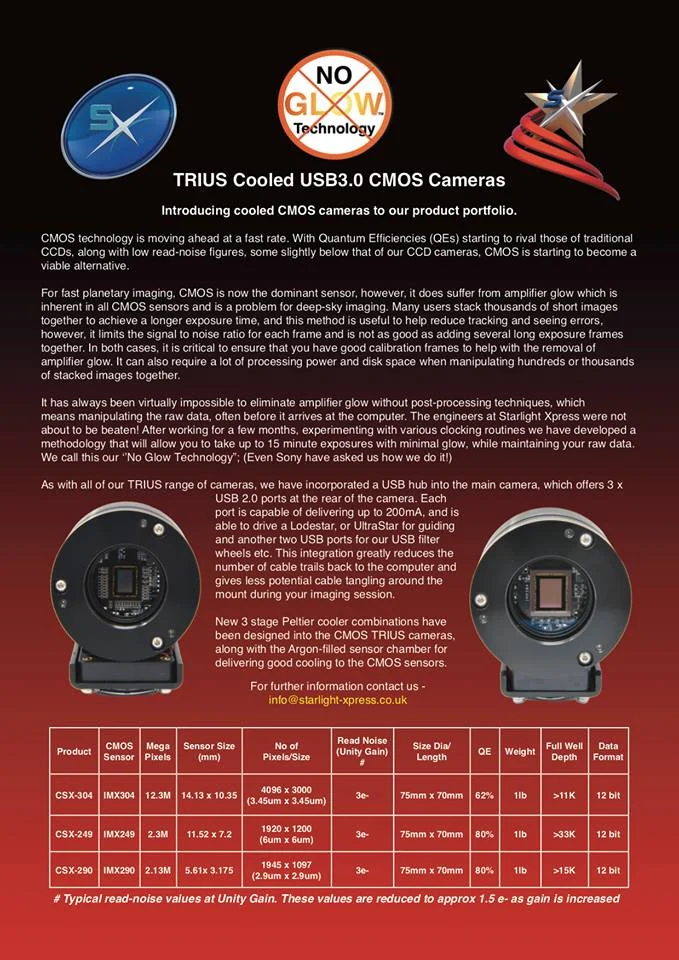
Starlight Xpress Ltd
Our long-awaited cooled CMOS cameras are finally here! Starlight Xpress has created special "No-Glow" Technology - Suppressing amplifier glow without suppressing your data. #astronomy #TRIUS #starlightxpressltd#CMOS #astroimaging
Hubo-i ASCOM Driver V1.4.8
- Explanation
It is the integrated ASCOM driver of MorningCalm series and RST mount series mount.
It operates with firmware version V190402 or later.
- install
You can download and run the attached file.
If a previous version is installed, delete it first and install the new version.
- delete
You can delete the program from Control Panel - Add / Remove Programs.
- Version Information
V1.4.8
- Installable OS
MS Windows series
- Installable ASCOM platform
6.4 or higher
- Verified compatibility
MaximDL 5
TheSky 6
TheSky X
StarryNight 6
StellaNavigator10
PHD Guiding 2
FocusMax
CCDAutoPilot
Stellarium
Cartes du Ciel
- Fixes
Added RST-135
Support Wifi connection
Improved compatibility
Download
HUBO-i_ASCOM_V1.4.8.exe (1.5M)
IDAS Nebula Booster #2 and #3
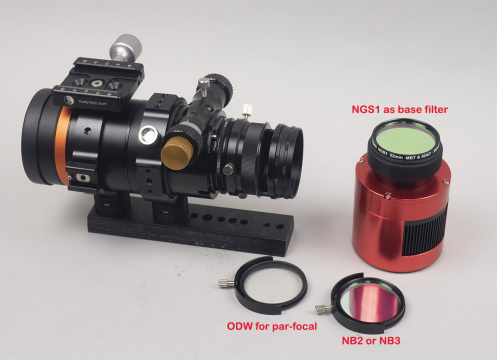
IDAS NB2 and ODW filters are expected to come in stock next week. (NB3 will be later) Each US price is as follows;
NB2-52 : $219.00
NB3-52 : $219.00
ODW-52 : $89.00
Each is only available at 52mm. No plan for other sizes as regular round-mounted.
This is IDAS’s new filtering “system” for one-shot color cameras to maximize the nebula emission’s S/N while capturing regular RGB broadband colors without re-focusing or taking apart the optical system during imaging session.
While NB1 performs alone, NB2 and 3 requires a base filter since they don’t block NIR themselves. But don’t be disappointed. I explain why…. Following is one example.
Base filter : NGS1 is the best match with NB2 and 3. But regular UV/IR blocking filter may be used too. IDAS LPS or NGS has still good advantage if the sky is light-polluted.
For regular RGB color : ODW (as FMC full spectrum filter)
For narrow-band nabula : NB2 or NB3
And blending in post processing.
Conventional 48mm UV/IR blocking filters can be set with 52-48 stepping ring as a base filter. But be sure Hutech adapters (for M42 for APS-C or smaller and M54 for full frame cameras) are optimized for IDAS filter thickness. You need to adjust the mechanical distance when non-IDAS filters are in place.
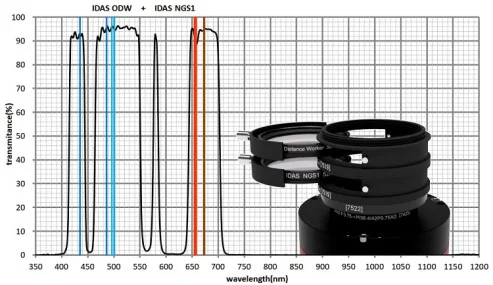
NB2 for OIII, Ha and NII
NB3 for OIII and SII
Again, as always, each emission line is intentionally set at shorter wavelength side and the transmission peak is the flat-top shape to minimizing signal loss after the spectrum shift. Very well designed as usual.
The Lyrid Meteor Shower
The annual Lyrid meteor shower, derived from particles dropped by comet C/1861 G1 (Thatcher), runs from April 16 to 25 every year. This shower can produce up to 18 meteors per hour, with occasional fireballs. Lyrids is one of the oldest known meteor showers, which could be seen without any special equipment. But if you want to catch them these days, you really need to find an area with clear skies far from the city lights.
This year, its peak is expected to be from Monday, April 22 until dawn April 23, worldwide. You can start watching as soon as it's dark. True Lyrids will appear to be travelling away from a point in space (the shower’s radiant) near the bright star Vega, which will be high in the eastern sky before dawn. Unfortunately, a bright, gibbous moon will wash out all but the brightest meteors this year.
Even when the peak number occurs before dawn, meteors will still be visible before midnight, too. Don't worry about looking directly at the radiant. Bring a blanket and a chaise to avoid neck strain. And remember that binoculars and telescopes will not help: their field of view is too narrow to see the long meteor trails. If you have friends or family along, don’t look at each other while chatting. Keep your eyes to the skies!
Text Credit:Chris Vaughan
Image Credit:Vito Technology